

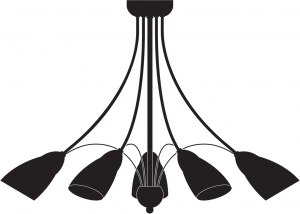
User ManualMizar5lt Semi Flush
Care and cleaningFinish – We recommend cleaning with a soft dry cloth. Do not use abrasive materials as these will damage the finish.Glass parts – Remove and wash in warm water or just use a damp cloth. Do not use abrasive materials as these will damage the finish.
Recommended bulb5 x 40WSES Golfor
5 x 5-7WSES LED Energy Efficient Golf Ball Clearor
5 x 28WSES Eco Halogen Golf Ball
When changing a bulb, always switch off at the mains and allow the bulb to cool before handling. Use a soft cloth to handle halogen bulbs, avoid directly touching the bulbs as this will shorten their life. Dispose of used bulbs carefully. Do not exceed the wattage stated or use a different shape bulb from that indicated on the fitting.
SpecificationMaximum wattage: 40WVoltage: 240V, 50HzIP Rating: 20Weight: 1.24kg ![]()
![]()
![]()
This symbol ![]() indicates that this product should not be treated as normal household waste and it should be recycled. John Lewis do not operate instore take back, but as members of the Distributor Trade Back scheme have funded the development and upgrade of recycling facilities across the UK. Please take it to your nearest collection facility or for further details contact your local council or visit www.recycle-more.co.uk.
indicates that this product should not be treated as normal household waste and it should be recycled. John Lewis do not operate instore take back, but as members of the Distributor Trade Back scheme have funded the development and upgrade of recycling facilities across the UK. Please take it to your nearest collection facility or for further details contact your local council or visit www.recycle-more.co.uk.
We have taken great care to ensure that this product reaches you in perfect condition. However, should any parts be damaged or missing please contact our Product Helpline on (01202) 690945.
John Lewis Partnership171 Victoria StreetLondon SW1E 5NNjohnlewis.com
Made in China 02/02/2021
Thank you for purchasing this Mizar light fitting. Please read the instructions carefully before use to ensure safe and satisfactory operation of this product. Please keep these instructions for future reference.
Warnings!This is a Class 1 product and must be earthed.Please read these instructions carefully before commencing any work. It is recommended that this fitting is installed by a qualified electrician.Install in accordance with the IEE Wiring regulations and the Building Regulations.To prevent electrocution switch off at mains supply before installing or maintaining this fitting.Ensure other persons cannot restore the electrical supply without your knowledge.If you are in any doubt, please consult a qualified electrician.This light fitting should be connected to a 5 amp fused circuit.If replacing an existing fitting, make a note of the connections.Always use the correct type and wattage bulb. Never exceed the wattage stated.When changing a bulb or adjusting the heads, always switch off at the mains and allow to cool down. Dispose of used bulbs carefully.This product is suitable for indoor use only.This product is suitable for installation on surfaces with normal flammability e.g. wood, plasterboard, masonry. It is not suitable for use on highly flammable surfaces (e.g. polystyrene, textiles).
Fixing InstructionsMake sure you have the following items which are required to install this light fitting:Small electrical screwdriver, cross head screwdriver & insulation tape.The installation of this fitting will be much easier with the help of an assistant.
Parts List
| Lightfitting |
|
1 |
| Screws |
|
2 |
| Glass Shades |
|
5 |
| Tool | 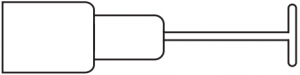 |
1 |
| Wall plugs |
|
2 |

Installation InstructionsRefer to assembly diagrams. Carefully unpack the carton, making sure all the parts are present before assembly. Fold the arms out on the light fitting.
Step 1Existing ceiling roses must be completely removed before installation of a new product. Before removing the existing fitting or ceiling rose, carefully note the position of each set of wires.
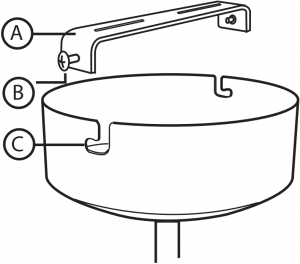
Step 2Remove the fixing bracket (A) from the ceiling cover by removing side screws (B) and attach to the ceiling using the screws provided. Ensure there is a joist at the point of fixing to support the weight of the product. Take care to avoid damaging any concealed wiring and pipes.
Step 3Having identified the household wiring from your existing light fitting, connect to the connection block inside the product in the following way:
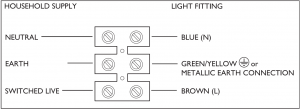 Check that…..You have correctly identified the house wires.The connections are tight.No loose strands have been left out of the connection block.
Step 4When completed, ensure that there are no bare or loose strands of wire exposed, and cover all exposed areas of the connection block with 2 layers of insulation tape.
Step 5This product has “L” shaped fixing slots to allow easy fixing to the ceiling strap. Locate the “L” slots (C) around the small screws (B) on the ceiling strap (A) (see diagram in step 2). Rotate the ceiling cover to attach the product to the strap. Tighten the screws to secure. Take care not to trap any wiring.
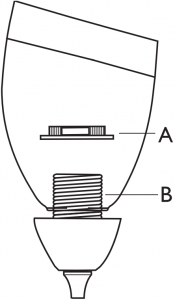
Attaching the shadesTo attach the glass shades remove shade ring (A) from threaded body (B), place glass over threaded body (B) and replace the shade ring (A), tighten with light pressure. A tool is supplied for fixing the shade ring. Please keep this for future use.
Step 6Fit the recommended bulb as per the details on the back.
Step 7Replace fuse or circuit breaker and switch on. Your light is now ready for use.
References
[xyz-ips snippet=”download-snippet”]