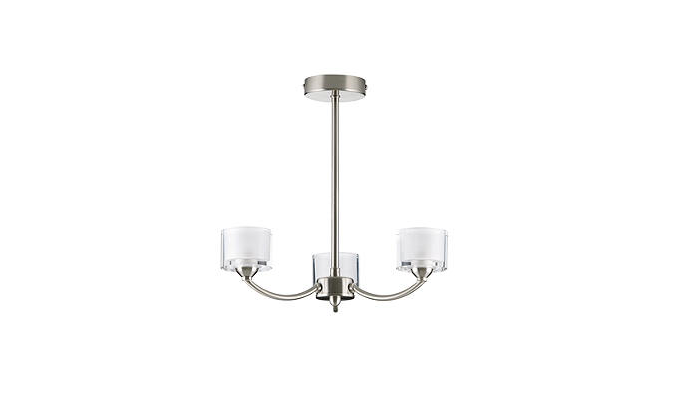
 ZOLA 3 LIGHT CEILING FITTINGThank you for buying this Zola ceiling fitting.Please read the instructions and warnings carefully before use to ensure safe and satisfactoryoperation of this product.
This product is Class I and must be earthed.
Warnings
* It is recommended that this fitting is installed by a qualified electrician.* This fitting should be fitted in accordance with IEE Wiring Regulations and the Building Regulations.* To prevent electrocution switch off at the mains supply before installing or maintaining this fitting. Ensure other persons cannot restore the electricity supply without your knowledge.* If you are in doubt please consult a qualified electrician.* To avoid damage to concealed wiring during installation, establish the direction of the supply cable before drilling fixing holes.* This fitting should be fitted to a lighting supply with a protected 5 amp fuse or equivalent circuit breaker.* ![]() Indicates that the fitting is suitable for mounting on normally flammable surfaces.* Always be sure to use the correct type and wattage of bulbs as indicated on the fitting. Never exceed the wattage stated.* When changing the bulb, always switch off at the mains and allow the old bulb to cool down before handling. Dispose of used bulbs carefully.* This fitting is designed for use with self-shielded tungsten halogen lamps only =
Indicates that the fitting is suitable for mounting on normally flammable surfaces.* Always be sure to use the correct type and wattage of bulbs as indicated on the fitting. Never exceed the wattage stated.* When changing the bulb, always switch off at the mains and allow the old bulb to cool down before handling. Dispose of used bulbs carefully.* This fitting is designed for use with self-shielded tungsten halogen lamps only = ![]()
 Instructions for use
 Instructions for use
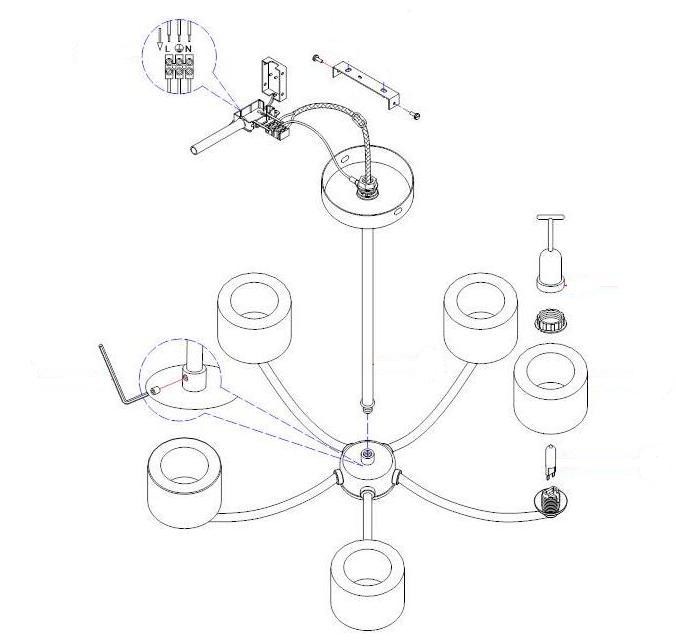
- Ensure the house electricity supply is off at the fuse board.
- If removing an existing fitting, first note down all wiring connections.
- Assemble the product by screwing the stem into the main body. Secure by tightening the grub screws located on the side of the main body.
- Remove mounting bracket from the fitting by removing the retaining screws (washers) and retain for later.
- Using the mounting bracket as a template, mark and then drill the fixing holes in the ceiling (ensure holes are drilled into a secure joist). Take care not to damage wiring.
- Attach the mounting bracket to the mounting surface using suitable fixings. Make sure no wires are trapped in the process.
- Lever open the enclosed connector block using a small flat-bladed screwdriver. Make electrical connections as follows:Connect supply live (normally brown or red) to fitting life (marked “L”) on the terminal block.Connect supply neutral (normally blue or black) to fitting neutral (marked “N”) on the terminal block.Connect supply earth (normally green/yellow or unsheathed) to earth (marked “ ”) on the terminal block. Ensure electrical connections are tight and no loose strands of wire are left out of the connector block. Ensure terminals and rubber sleeves are correctly seated then close connector block housing.
- Carefully offer fitting over mounting bracket then secure in place with the screws and any washers removed earlier.
- Fit the bulbs, type, and wattage as indicated on the fitting. The wattage indicated must not be exceeded. Do not touch halogen lamps with bare hands as this will shorten their life.
- Fit the glass. Remove the shade rings from the lamp holder and then secure the glass in place using the shade ring and tool provided.
- Switch on the electricity supply at the fuse board.
Please retain this information leaflet for future referenceGENERAL INFORMATIONThis fitting is designed for internal use onlyDo not use polishes or abrasive cleaner – just a soft dry cloth.John Lewis Partnership 171 Victoria Street London SW1E 5NNwww.johnlewis.comIssue 1 03/10
[xyz-ips snippet=”download-snippet”]