
JOHN LEWIS Mykki Floor Light User Manual

Mykki Floor Light
| Caring foryour product | We recommend cleaning with a soft dry cloth. Do not use abrasive materials as these will damage the finish. |
| Aftercare andTroubleshooting | If you experience any unresolvable technical issues with the product,contact your nearest John Lewis & Partners shop or John Lewis & PartnerTechnical Support on 03301 230106. |
| Specification | Max. power: 25W Voltage: 220–240V, 50Hz IP rating: 20Weight: 4.2kg |
| 5 year guarantee | At John Lewis & Partners we test every light to high quality standards so we are able to offer you a 5 year guarantee. |
| Recycling | |
| John Lewis Partnership171 Victoria StreetLondon SW1E 5NNjohnlewis.comMade in China | Please retain these instructions for future reference |
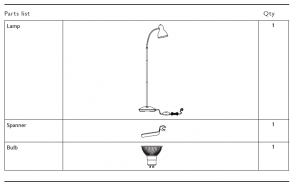
Recommended bulbProduct assemblyRecommended bulb (included)1 x 4W GU10 LEDEnergy efficient bulbWhen changing a bulb, always switch off at the mains and allow the bulb to cool before handling. Dispose of used bulbs carefully. Do not exceed the rated power stated or use a different shape bulb from that indicated on the fitting.
Product assembly

Refer to assembly drawing opposite. Carefully unpack the carton, making sure all the parts are present and all packaging has been removed before assembly.Gently pull out the protectors from the tube ends. Do not plug in or use this product until it has been fully assembled. Disconnect from mains during assembly or maintenance.Screw tube A on to the top section in a clockwise direction, followed by tubes B and C. Take care not to trap the cable or cross the thread. Locate the end of tube C on to the base. Gently pull any excess cable through from under the base and out through the side of the base. Screw the stem on to the base thread, taking care not to trap the cable or cross the threads. Once the stem has been screwed onto the base, it will be necessary to align the head with the cable coming out of the base. The central nut underneaththe base has been left slightly loose for this purpose. Rotate the head to align with the cable and fully tighten the nut. A spanner is supplied for this purpose.Do not use the lamp until the nut has been fully tightened and the stem is securely fixed.
Stand the product upright and check the tightness of the joints. Fit the bulb per the instructions overleaf.Your standard lamp is now ready to use. Switch on using the floor switch.
Read More About This Manual & Download PDF:
References
[xyz-ips snippet=”download-snippet”]