
![]() TENOR HI-FI MUSIC SYSTEMINSTRUCTION MANUAL
TENOR HI-FI MUSIC SYSTEMINSTRUCTION MANUAL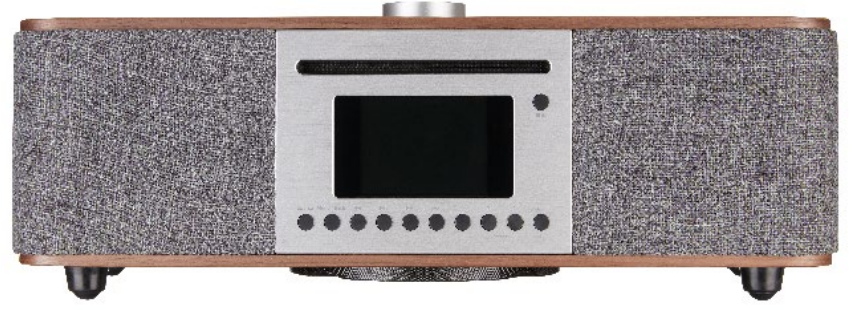
Important safety information
Thank you for purchasing this Tenor Hi-Fi music system.Hereby, John Lewis & Partners declares that the Tenor Hi-Fi Music system is in compliance with Directive 2014/53/EU. The full text of the EU declaration of conformity is available at the following internet address: https://www.johnlewis.com/content/declaration-of-conformityPlease read the instructions and warnings carefully before use, to ensure the safe and satisfactory operation of this product.It is most important this instruction leaflet be retained with the product for future reference. These warnings have been provided in the interest of safety. You MUST read them carefully before using the appliance. If you are unsure of the meanings of these warnings contact the John Lewis & Partners shop from which you purchased the appliance.– This appliance is not intended for use by persons (including children) with reduced physical, sensory or mental capabilities, or lack of experience and knowledge unless they have been given supervision or instruction concerning the use of the appliance by a person responsible for their safety.– To protect against fire, electric shock, and injury to persons, do not immerse cord, plug, or adaptor in water or other liquids.– Unplug from the mains when not in use, or before cleaning.– Do not operate any appliance with a damaged cord or plug, or after the appliance malfunctions or has been damaged in any manner. Return the appliance to your nearest John Lewis & Partners shop.– Do not let the power cord hang over the edge of the table or counter, or touch hot surfaces.– In the event of a fault, contact your nearest John Lewis & Partners shop. No repair should be attempted by the consumer.– Do not use the appliance for anything other than intended use.– For household use only.– Do not use outdoors.– Save these instructions for future reference.![]() WARNING: Polythene bags over the product or packaging may be dangerous. To avoid the danger of suffocation, keep away from babies and children.
WARNING: Polythene bags over the product or packaging may be dangerous. To avoid the danger of suffocation, keep away from babies and children.
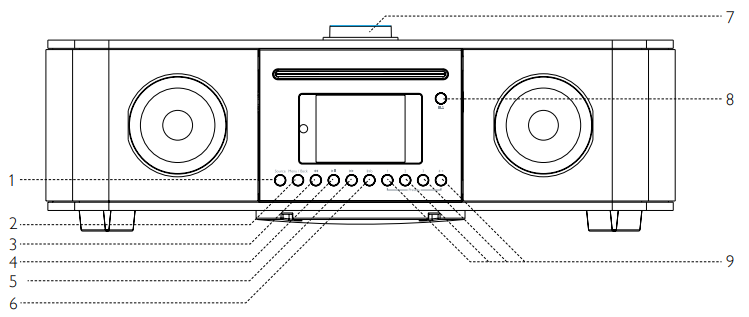
Your Tenor Hi-Fi music system
| 1. Source button2. Menu/back button3. Previous track4. Play/pause5. Next track | 6. Info button7. Multi-function navigation dial and Select button8. Stop/eject button9. Preset buttons |
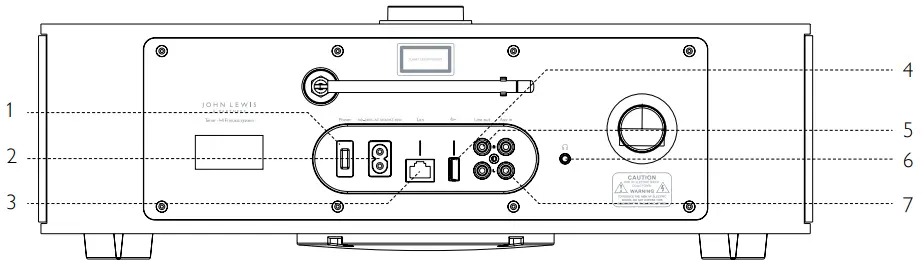
Connection panel
| 1. Power switch.2. Power input (100-240V).3. LAN sockets for a wired Ethernet connection.4. USB sockets for MP3 music playback from a USB storage device. You cannot charge a device from this socket. | 5. Line out (to connect to an external amplifier)6. Headphone socket to connect headphones.7. Aux-in socket to connect an external MP3 music player, such as an iPod, iPad, or another device. |
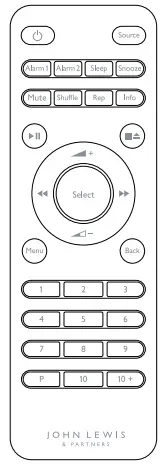
Remote control
The buttons on the remote control replicate the main controls on the Tenor music system, but also have the following additional functions.
 |
Power |
Preset numbers 1 to 10+ on the keypad.– To save a preset, tune into your preferred station on DAB, FM, or Internet Radio and long-press preset button 1, to 10– To recall a preset, short press button 1, to 10 and the stored station will play.– Use the 10+ button to access presets 11-20. Once pressed, the 10+ button makes the 1-10 keypad represent presets 11-20.The same process can then be used to save and recall a preset.
P (Preset)You can also access all presets using the ‘P’ button![]() To save a preset, tune in to your preferred station on DAB, FM, or Internet Radio and long-press the ‘P’ button, this brings up the digital preset menu. By using the NAVIGATION buttons you can navigate to any of the 1-20 presets, use the SELECT button to save the current station to your chosen preset.– To recall a preset, short press the ‘P’ button to bring up the digital preset menu, by using the NAVIGATION buttons you can navigateto any of the 1-20 presets, use the SELECT button to select and play your chosen preset.
To save a preset, tune in to your preferred station on DAB, FM, or Internet Radio and long-press the ‘P’ button, this brings up the digital preset menu. By using the NAVIGATION buttons you can navigate to any of the 1-20 presets, use the SELECT button to save the current station to your chosen preset.– To recall a preset, short press the ‘P’ button to bring up the digital preset menu, by using the NAVIGATION buttons you can navigateto any of the 1-20 presets, use the SELECT button to select and play your chosen preset.
Getting started
- Place the Tenor on a suitable shelf or table.
- Extend the telescopic aerial.
- Connect the power cord between the Tenor and the mains supply. (100-240V)
- To play internet radio you will need a wireless (Wi-Fi) network or LAN connection with the appropriate permissions, including a password if required.
- Press the NAVIGATION dial or the remote control POWER button to turn it on.
Set-up wizard
When the Tenor starts for the first time, it runs through a setup wizard to configure settings for the date, time, and Wi-Fi network, these steps are listed below. Once this has finished, the system is ready to use.
Set time display
Select Set 12/24 hour and then choose your display preference.
Auto-update
Auto-update works with data sent over DAB, FM, or the internet. The clock is only updated when in a corresponding mode, so it is best to select a mode you use regularly.Update from DAB and FM use time signals broadcast with radio transmissions. Update from Network uses a time signal sent from theinternet radio portal when connected to the internet.
Select Update from DAB | Update from FM | Update from Network | No update.
Tenor will auto-update from the selected source when time information is available.If your country uses daylight saving, the automatically updated time from the network may be wrong by one hour. You can turn on the Daylight savings option to rectify this. If you are updating the time from DAB or FM, the Daylight savings option has no effect on the clock’s time.
Set time manually
If you choose No update, the wizard prompts you to set the time and date manually. Tenor displays the date and time as dd-mm-yyyy andhh: mm AM/PM with the first value actively flashing.Adjust each value with the NAVIGATION dial and SELECT button.As you set each value, the next value becomes active and flashes.
Connect to a Wi-Fi network
Tenor is compatible with all common network protocols and encryption methods, including Wi-Fi Protected Setup (WPS). To connect Tenor to your network, you need a Wi-Fi wireless router, together with a password key if required.
Open (non-encrypted) network
Select WLAN region/country >Wi-Fi network (SSID), and then select a network from the list.The tenor will connect to the Wi-Fi network and needs no further details.
Standard encrypted network
Use the NAVIGATION dial to enter the Wi-Fi network’s password key.Highlight the next relevant character and press to select each character in turn. As you select each character, the key builds up near the top of the display.The three options – Backspace, OK, and Cancel — are included in the election cycle. These options can be accessed by using theNAVIGATION dial or by pressing the Info key, which moves the selection highlight to the Backspace option.
WPS setup
WPS encrypted networks are identified by ‘[WPS]’ at the start of the network name and have two methods of connection. Select one ofthe options and follow the prompts.Push Button >Tenor prompts you to press the connect button on your router.Press the NAVIGATION dial to continue.Pin > (code number)Tenor generates an 8-digit code number that you enter into the wireless router.Skip WPS >Enter the key as for a standard encrypted network. For more information on setting up a WPS encrypted network, see the instructions for your WPS router.On completionTenor connects to the selected network. If connecting fails, Tenor returns to a previous screen to retry. To exit the process, use the MENU/BACK button.
Modifying the Set-up Wizard
To run the setup wizard again or to change the settings, select Menu > System settings > Setup wizard Select Yes to start the setup wizard. If you choose No, the next screen asks if you would like to run the wizard next time Tenor starts. The system will then start without configuring the time, date, and Wi-Fi network settings, and display the main menu.
![]() NOTE: If power fails while the wizard is in progress, the wizard will run again the next time Tenor starts.
NOTE: If power fails while the wizard is in progress, the wizard will run again the next time Tenor starts.
Internet Radio Mode
Tenor can play thousands of radio stations and podcasts from around the world through a broadband internet connection.– To enter Internet Radio mode, press the SOURCE button and use the NAVIGATION DIAL to choose Internet Radio mode There are several ways of selecting stations.– Last listened– Browse by Country, Genre, Most popular, Newest– Search station using keywords– Presets
Last listened
When Internet Radio restarts, Tenor selects the last-listened station.To select another recently used station, select Menu > Last listened > Most recent stations appear at the top of the list.
Browse
To browse Internet broadcasts, select Menu > Station list > Stations or Podcasts > Browse through the menus to find broadcasts.
Search station using keywords
You can also search through Internet broadcasts for stations or podcasts with particular keywords in their title.
– To search, select Menu > Station list > Stations or Podcasts > Search Stations– Enter a keyword by selecting characters, then press OK. The search entry screens are similar in operation to the Wi-Fi password entry screen.– Select a broadcast from the list.– For podcasts, you may be able to select a particular episode.
Presets on Tenor
Tenor has 20 Internet Radio presetsPresets 1-3 have dedicated physical buttonsPresets 4-20 are accessed using the 4+ preset button and the digital preset menu.Using presets 1-3To save a preset, tune into your preferred station on Internet Radio and long-press preset buttons 1, 2, or 3.The number of the presets and the word ‘PRESET STORED’ will appear on the digital display.To recall a preset, short press buttons 1, 2, or 3 and the stored station will play.Using presets 4-20To save a preset, tune in to your preferred station on Internet Radio and long-press preset button 4+, this brings up the digital preset menu.By using the NAVIGATION dial you can navigate to any of the 4-20 presets, use the SELECT button to save the current station to yourchosen preset.To recall a preset, short press the preset button 4+ to bring up the digital preset menu, by using the NAVIGATION dial you can navigate to any of the 4-20 presets, use the SELECT button to select and play your chosen preset.
Presets on the remote control
Preset numbers 1 to 10+ on the keypad.To save a preset, tune into your preferred station on Internet Radio and long-press preset button 1, to 10 To recall a preset, short press button 1, to 10 and the stored station will play.Use the 10+ button to access presets 11-20. Once pressed, the 10+ button makes the 1-10 keypad represent presets 11-20. The same process can then be used to save and recall a preset.
P (Preset)You can also access all presets using the ‘P’ button![]() To save a preset, tune in to your preferred station on Internet Radio and long-press the ‘P’ button, this brings up the digital preset menu.By using the NAVIGATION buttons you can navigate to any of the 1-20 presets, use the SELECT button to save the current station to your chosen preset.To recall a preset, short press the ‘P’ button to bring up the digital preset menu, by using the NAVIGATION buttons you can navigateto any of the 1-20 presets, use the SELECT button to select and play your chosen preset.
To save a preset, tune in to your preferred station on Internet Radio and long-press the ‘P’ button, this brings up the digital preset menu.By using the NAVIGATION buttons you can navigate to any of the 1-20 presets, use the SELECT button to save the current station to your chosen preset.To recall a preset, short press the ‘P’ button to bring up the digital preset menu, by using the NAVIGATION buttons you can navigateto any of the 1-20 presets, use the SELECT button to select and play your chosen preset.
Internet radio portal registration
Tenor uses the Frontier Silicon Internet radio portal website that allows you to organize your favorite lists and also listen to Internet radio on a computer.
- To register your Tenor with the portal, switch to Internet Radio mode and then obtain your radio’s unique portal access code byselecting Menu > Station list > Help > Get access code >.
- Write down the access code.
- Visit the portal website at http://nuvola.link/sr
- If this is your first visit to the portal, register for a new accountand enter the following information.a Access codeb Your e-mail addressc A passwordd Your radio model (Tenor).
- If you already have an account and wish to add an additional radio log in to your account and select My preferences > Add another Wi-Fi radio.
Once your radio is registered with the portal, you can immediately use the Internet radio favorites and added stations features.
The portal enables you to create multiple lists of favorite stations that you can personalize. If you have several Frontier Silicon radios, you can register them all on the same account so that each radio has access to your favorite’s lists. It is possible to add favorites either directly through Tenor or through any computer with a web browser.
![]() NOTE: The displayed access code is only valid for 10 minutes. If you fail to register your radio within the time window, you will need to repeat the above step to get a new access code and try again. Do not confuse the portal access code with the Radio ID (from Menu > System settings > Info.)
NOTE: The displayed access code is only valid for 10 minutes. If you fail to register your radio within the time window, you will need to repeat the above step to get a new access code and try again. Do not confuse the portal access code with the Radio ID (from Menu > System settings > Info.)
Favorites
Favorites, stations, and podcasts can be stored on the Internet radio portal. Before you set up an account on the portal from its Web interface http://nuvola.link/sr, favorites are associated solely with the radio on which you set them.After you set up a portal account, all the favorites from your different radios merge into a combined favorites list. This combined list isavailable to all the radios on your account.
To select a Internet Radio portal favorite, select Menu > Station list > My favourites > StationTo select a Internet Radio portal podcast, select Menu > Station list > Podcasts > My favourites > Podcast
Now playing information
While the internet audio stream is playing, the screen shows its name and description. If artist and track information is available, this is alsoshown.Press the INFO button to cycle through the following on-screen display options:
– Artist and track name, where available– Description– Genre and show country– Reliability– Bit rate and Codec and Sampling– Playback buffer– Today’s Date
– Last Listened– Station List– System settings– Main Menu
Last Listened
Please see page 9
Station List
Please see page 9
System Settings
Please see page 27 for all Tenor System Settings
Main Menu
This contains all functions of Tenor
Spotify connect
 Use your phone, tablet, or computer as a remote control for Spotify.Go to spotify.com/connect to learn howThe Spotify Software is subject to a third-party license found here: http://www.spotify.com/connect/third-party-license.
DAB Radio Mode
DAB radio mode receives DAB/DAB+ digital radio and displays information about the station, program, or track as broadcast.To enter DAB mode, press the SOURCE button and use the NAVIGATION DIAL to choose the DAB radio mode
Menu options in DAB mode:– Station list– Scan– Manual tune– Prune invalid– DRC– Station order– System settings– Main menu
Station list
To select a DAB station on Tenor, press the MENU button and turn the NAVIGATION dial to view a list of stations and press the SELECT button. Once selected, the station will play and the screen will show information about the station, track or show.To select a DAB station using the Tenor Remote, select Menu > Station List and the NAVIGATION BUTTONS to view a list of stations and press SELECT.
Scan
The first time you select DAB radio, Tenor automatically performs a full scan to see what stations are available.
Manual tune
You may also want to manually scan to update the list of stations if reception was poor for the original scan and the result was an empty or an incomplete list of available stations, or you only want to list stations with good signal strength.Select Menu > Scan.Once the scan is complete, the radio shows a list of available stations.
Prune invalid
If a station is not available in your current location a ‘?’ will appear before the name of the station as shown in the ‘station list’.Prune invalid will remove these stations and only leave ones that are available at your current location.Select Menu > Prune Invalid > Yes
DRC
Some DAB broadcasts offer dynamic range compression (DRC).This feature allows radios to compress the dynamic range of the output audio stream so that quiet sounds increase and loud sounds reduce.This can be useful if you are listening to music with a high dynamic range in a noisy environment: for example, classical music while cooking.To change the DRC of the TENOR, selectMenu > DRC > DRC high | DRC low | DRC off
![]() NOTE: The TENOR’s DRC setting does not have any effect if DRC data is not included in the broadcast.
NOTE: The TENOR’s DRC setting does not have any effect if DRC data is not included in the broadcast.
Station order
You can choose the order of the DAB station list to be either Alphanumeric, Ensemble, or Valid. Ensemble lists groups of stations that are broadcast together on the same ensemble: for example, BBC or South Wales local. Valid lists valid stations first, alphanumerically, then off-air stations.
To change station order, selectMenu > Station order > Alphanumeric | Ensemble | Valid
System Settings
Please see page 27
Main Menu
This contains all functions of Tenor
DAB Presets
Tenor has 20 DAB presetsPresets 1-3 have dedicated physical buttonsPresets 4-20 are accessed using the 4+ preset button and the digital preset menu.
Using presets 1-3To save a preset, tune into your preferred station on DAB Radio and long-press preset button 1, 2, or 3.The number of the presets and the words ‘PRESET STORED’ will appear on the digital display.To recall a preset, short press buttons 1, 2, or 3 and the stored station will play.
Using presets 4-20To save a preset, tune in to your preferred station on DAB Radio and long-press preset button 4+, this brings up the digital preset menu. By using the NAVIGATION dial you can navigate to any of the 4-20 presets, use the SELECT button to save the current station to your chosen preset.To recall a preset, short press the preset button 4+ to bring up the digital preset menu, by using the NAVIGATION dial you can navigate to any of the 4-20 presets, use the SELECT button to select and play your chosen preset.While a DAB radio station is playing, the screen shows its name and the DLS (Dynamic Label Segment) information broadcast by the station about the program name, track title, and contact details. An icon at the top of the screen indicates a stereo broadcast.Press INFO to cycle through DLS text such as program type, ensemble name, frequency, signal strength, bit rate, codec, channelsand today’s date.FM radio mode receives analog radio from the FM band and displays RDS (Radio Data System) information about the station and show where broadcast.
FM Radio Mode
To enter FM mode, press the SOURCE button and use the NAVIGATION DIAL to choose FM radio mode
Selecting stations
To find a station, scan up or down by pressing and holding the Tune +/ – buttons or you can manually tune with a single press of Tune +/-
FM Presets
Tenor has 20 FM presetsPresets 1-3 have dedicated physical buttonsPresets 4-20 are accessed using the 4+ preset button and the digital preset menu.Using presets 1-3To save a preset, tune into your preferred station on FM Radio and long-press preset button 1, 2, or 3.The number of the presets and the words ‘PRESET STORED’ will appear on the digital display.To recall a preset, short press buttons 1, 2, or 3 and the stored station will play.Using presets 4-20To save a preset, tune in to your preferred station on FM Radio and long-press preset button 4+, this brings up the digital preset menu. By using the NAVIGATION dial you can navigate to any of the 4-20 presets, use the SELECT button to save the current station to your chosen preset.To recall a preset, short press the preset button 4+ to bring up the digital preset menu, by using the NAVIGATION dial you can navigate to any of the 4-20 presets, use the SELECT button to select and play your chosen preset.
Now playing information
While FM radio is playing, the screen shows its frequency or, if RDS information is available, the station name and further information. You can cycle through this information by pressing INFO.
– Scan setting– Audio setting– System settings– Main menu
Scan settings
By default, FM scans stop at any available station. This may result in a poor signal-to-noise ratio (hiss) from weak stations.To change the scan settings to stop only at stations with good signal strength, selectMenu > Scan setting > Strong stations only? > Yes.
Audio settings
By default, all stereo stations are reproduced in stereo. For weak stations, this may result in a poor signal-to-noise ratio (hiss).To play weak stations in mono, selectMenu > Audio setting > Listen in mono only? > Yes.
System Settings
Please see page 27
Main Menu
This contains all functions of Tenor
Bluetooth Mode
Prior to pairing, verify your device supports Bluetooth 4.0+EDR A2DP and your device is not connected to any other Bluetooth product.Devices may pair differently.To pair your Bluetooth device
- Press the SOURCE button and use the NAVIGATION DIAL to choose BLUETOOTH mode
- Turn the volume up by 25% on the Tenor.
- Turn up the volume on your Bluetooth source device (the device you are streaming from).
- Turn on the Bluetooth on your enabled device.
- Select Bluetooth device name ‘JL Tenor’ when it appears on your device’s screen to initiate searching.
- You can start to play your music files wirelessly. Adjust the volume level on your device.
You should not have to pair your device again.Depending on your device, you may need to make multiple attempts at pairing and/or connecting to the ‘JL Tenor’, but please give your device adequate time to pair or connect before repeating the process.
To pair a Bluetooth WI-FI-enabled iPhone, iPod touch or iPad
- Press the SOURCE button and use the NAVIGATION DIAL to choose BLUETOOTH mode
- Turn the volume up by 25% on the Tenor.
- Turn up the volume on your Bluetooth source device (the device you are streaming from).
- Select ‘Settings’, depending on the software version.
- Select ‘Bluetooth’.
- Switch Bluetooth ‘On’ to initiate searching.
- Select JL Tenor’ when it appears on the display.
- You can begin playing your music files wirelessly once the BT logo stops flashing at the bottom right of the display. Adjust the volumelevel on your device.
You should not have to pair your iPhone, iPod, or iPad again.The volume output level of music files varies. If you prefer an even higher output level, check the settings in your iPhone, iPod touch or iPad and turn the EQ off, the Sound Checkoff, and the Volume limit off. If you encounter a problem pairing, press the small arrow to the right of ‘JL Tenor’ on your iPhone, iPod touch, iPad display, and select ‘Forget this Device’. Then repeat the pairing process.
Play CDs
To play a CD
- Press the SOURCE button and use the NAVIGATION DIAL to choose CD mode
- Insert a disc with the print side facing up into the slot until it is drawn inside.
- The player will automatically load the CD and start playback.
The display will say ‘Loading’. Disc functions will not work while the disc loads. Playback will begin automatically once the player reads the table of contents.The display will show ‘No Disc’ when the unit is set to CD mode and there is no CD inside.The display shows the following information in CD mode.– CD mode– Time– Elapsed playback time in minutes– Track number
![]() To pause/resume playback of the CD.
To pause/resume playback of the CD.![]() To skip to the next track, press the button once. To fast forward through a track, press and hold.
To skip to the next track, press the button once. To fast forward through a track, press and hold.![]() To skip to the previous track, press the button once.To rewind a track, press and hold.
To skip to the previous track, press the button once.To rewind a track, press and hold.![]() To stop CD playback, press once. To eject, press again.
To stop CD playback, press once. To eject, press again.
![]() NOTE: improper operation can result in material damage.Do not insert any recording media that deviates from the standard CD format (e.g: miniDiscs) into the CD player. These may not be played and ejected correctly.Insert only one disc at a time into the CD player.
NOTE: improper operation can result in material damage.Do not insert any recording media that deviates from the standard CD format (e.g: miniDiscs) into the CD player. These may not be played and ejected correctly.Insert only one disc at a time into the CD player.
Play music from a USB device
To enter USB playback mode, press the SOURCE button and use the NAVIGATION DIAL to chooseMusic Player > USB playbackAfter you select USB playback, Tenor generates menus from the folders on the USB device. You can browse these folders with the NAVIGATION dial and BACK button. The display will show folder and file names (not necessarily track names).Once you have found a track that you want to play, press SELECT.– A short press plays the track immediately.– A long press, at any time while the track is displayed or playing, adds the track to My playlist. You can also add entire folders to My playlist.
Listen to music stored on your computer or network
Music player mode plays audio files such as MP3s, AACs, WMAs or FLACs from a computer on your local network.
In order for Tenor to play music files from a computer, the computer must be set up to share files or media.UPnP media-sharing allows devices like Tenor to play music from a shared media library and navigate through tag menus such as Artist, Album or Genre.If you are running a suitable server system, such as a PC with Windows Media Player 10 or later (WMP), and your music library is well-tagged, then it is recommended to use media sharing. Only the UPnP server needs to be set up.
![]() NOTE: iTunes does not currently work as a UPnP media server, but there are add-ons available to work with an iTunes library.
NOTE: iTunes does not currently work as a UPnP media server, but there are add-ons available to work with an iTunes library.
Setting up a music server and sharing media
The most common UPnP server is Windows Media Player (10 or later).Alternatively, other UPnP platforms and servers may be used.
Set up Windows Media Player (WMP) for media sharing
- Ensure that the PC is connected to your Wi-Fi or Ethernet network.
- Ensure that Tenor is powered on and connected to the same network.
- In WMP, add the audio files and folders you want to share with Tenor to the media library (Library > Add to Library).
- In WMP, enable media sharing (Library > Media sharing).
- Make sure that the radio has access to the shared media by selecting it and clicking Allow.
- You can also set a name for the shared media in Settings.
- Click OK to close the dialogue boxes.
![]() NOTE: Setup can differ depending on which version of WMP you have.In the media sharing dialogue box, Tenor may show up as ‘unknown device’, ‘Frontier Silicon’, or the Jupiter logo.The PC is now ready to stream the music to the radio. The WMP UPnP service runs in the background; there is no need to start WMPexplicitly.
NOTE: Setup can differ depending on which version of WMP you have.In the media sharing dialogue box, Tenor may show up as ‘unknown device’, ‘Frontier Silicon’, or the Jupiter logo.The PC is now ready to stream the music to the radio. The WMP UPnP service runs in the background; there is no need to start WMPexplicitly.
Playing your shared files
- Enter Music Player mode by pressing the SOURCE button and use the NAVIGATION DIAL to choose Music Player
- Once in Music Player mode, select > Shared media.
- You should see an entry consisting of <computer name>: <Shared media name>. If you have more than one computer sharing media, the alternatives are listed. Select the shared media you want to play.
- From this point, Tenor generates the menus from the shared media server (i.e. Windows Media Player on your computer). You can use << and >> to move through tracks. Press and hold to rewind or fast forward and press quickly to select the previous or next track.
- If you are already playing a music file, you can press BACK to quickly return to the last visited branch of the menu.
Shared media menus
The first menu shows a list of media types: for example, Music, Video, Pictures, and Playlists. Tenor can only play music and playlists. There is also a search function that finds tracks in a similar way to the internet radio search.You can select tracks by genre, artist, album, composer, or rating. Once you have found a track you want to play, press select. A short press plays the track immediately and a long press adds the track to the playlist. You can also add entire albums to the playlist.
Now playing information
While a track is playing, the screen shows its track and artist (UPnP).There is also a progress bar with figures for elapsed and total track time.At the bottom of the screen, an icon indicates UPnP.– To view further information, press Info. Each time you press the INFO button another set of information is displayed, cycling through UPnP, playback progress bar (default), album, codec/sampling rate, playback, buffer bar, and today’s date.– You can repeat tracks or play them in random order by selectingMusic Player > Menu > Repeat play orMusic Player > Menu > Shuffle play.
Playlists
Tenor holds a queue of up to 200 tracks in the playlist. Playlist tracks can be mixed from multiple UPnP servers.– To manage the playlist, select Menu > My playlist.– To view the playlist, scroll through it by turning the NAVIGATION dial. UPnP tracks show their track name.– To play the playlist from a curtain track, quickly SELECT the track.– To erase a track from the playlist, long SELECT the track, then confirm YES.If you select a track, album, or folder for instant playback (without using the playlist), the playlist is preserved. The playlist is also preserved during standby.
Wake-on-LAN
If shared media is selected, a list of available music servers will be displayed. If a question mark appears before the server name, this indicates that the server has been seen before and supports Wake-on-LAN functionality, but cannot currently be found on the network.If a server with a question mark is selected by the user, the device will try to wake the server up and connect to it. In some instances, this may not be possible as the server may not be connected to the network anymore or may be switched off.
Prune servers
From time to time, it may be necessary to remove servers displaying question marks in front of the server name from the server list: for example, if the device is moved to a new network or if a Wake-on-LAN server is removed from your current network.– To perform this function, go to Menu > Prune servers > Yes
Using the “Play To” feature in Windows 7 to stream media
Windows 7 includes a feature called “Play To” and this lets your PC, running Windows 7, control Tenor to push media and use as a universal remote control for your media collection.Tenor supports the industry-standard DLNA (Digital Living Network Alliance) 1.5 digital media renderer. This allows you to “Play To” other devices around your home and combine media streaming with controlling a connected media receiver while streaming content to itfrom another Windows 7 PC on a home network.Before you can use the “Play To” feature, you need the setup Tenor for Windows 7 streaming media.
Setting up Tenor for the “Play To” feature in Windows 7 via WindowsMedia Player 12
- Ensure that the PC is connected to the network.
- Ensure that TENOR is powered on and connected to the same network.
 NOTE: TENOR must be in an Internet radio mode to be detected
 - From the Windows 7 main screen, select Start > Devices and Printers.
- Select the Add a device tab in the top left of the Devices and Printers window and follow the instruction prompts given by the wizard.
- In the Devices and Printers window, an icon *) will appear and you are now ready to stream your Windows media music files to Tenor.
- To change the name of your device, right-click on the icon and choose properties. Then choose UPnP and click on “device webpage”.
Using “Play To” in Windows Media Player 12
Windows Media Player makes it easy to manage your media, find items that you want to play, and open “Play To”.
Selecting items that you want to play
- Click the Start button on your PC, click All Programs, and then click Windows Media Player. If the Player is currently open and you’re in Now Playing mode, click the Switch to Library button in the upper-right corner of the Player.
- If the list pane is closed or if the Burn or Sync tabs are exposed, click the Play tab.
- Find the items that you want to play in the Player Library, and then drag those items from the details pane into the list pane.
- Click the “Play to” button at the top of the list pane. Then click the device on your network that will receive the media.
- In the “Play To” dialog box, use the playback controls to play, pause, or stop the media stream, and to change to the next or previousitem in the list.
Use “Play To” elsewhere in Windows 7Outside of Windows Media Player, you can stream media to Tenor with “Play To” by right-clicking music files.Selecting music files to stream them to Tenor.
- Click the files you want to stream to Tenor.
- Right-click the selected files, point to “Play to”, and then click the device on the network that will receive the media.
- In the “Play to” dialog box, use the playback controls to play, pause, or stop the media stream, and to change to the next or previousitem in the list.
Now playing information
While a track is playing, the screen shows its track name (UPnP). There is also a progress bar with figures for elapsed and total track time. At the bottom of the screen, an icon indicates UPnP.– To view further information, press the INFO button. Each time you press INFO, another set of information is displayed, cycling through artist, album, codec/sampling rate, and playback buffer.
Plug in an external music player
Aux in mode plays audio from an external music source such as an MP3 player.
To play audio with Aux-in mode
- Connect the external audio source to the Aux In 3.5 mm stereo socket.
- Press the SOURCE button and use the NAVIGATION DIAL to choose Aux-In mode
- Adjust the volume of Tenor, and, if necessary, the audio source device, as required.
Connect your smartphone
To connect your smartphone with Tenor, you need to download the free ‘UNDOK’ app from the Apple Store or Google Play.
![]() IMPORTANT: The phone must be in the same wireless network as the music system.
IMPORTANT: The phone must be in the same wireless network as the music system.
- Download the UNDOK app and open it.
- The app automatically searches for available devices. Select ‘JL TENOR’ from the list.
- Press source to choose between different audio modes.
- Open browse to get a list of available stations.
- Select the desired station.
- Open ‘Now playing’ to get more information about the channel.
- Open the settings to adjust the equalizer, set a sleep timer, and other functions easily.
Alarms and sleep
As well as a clock and calendar, Tenor also features two versatile wakeup alarms with a snooze facility and a sleep function to turn the system off after a set period.Use the NAVIGATION dial to increase/decrease the time and SELECT to move to the next option.When using the remote control, use the NAVIGATION buttons to increase/decrease the time and the SELECT button to move to the next option.
Alarms
Each alarm can be set to start in a particular mode.To set or change an alarm, selectMenu > Main Menu > Alarms.The alarm setup will then prompt you to set the alarm parameters.– Enable – Off | Daily | Once | Weekends | Weekdays.– Time – Set the desired alarm time.– Mode – Buzzer | Internet radio | CD | DAB | FM.– Preset – Play previously saved preset as the alarm sound.– Volume – Set alarm volume from 0-32 Save.– To activate the new settings, scroll down and select Save. The screen shows active alarms with an icon at the bottom left.– At the set time, the alarm will sound. To temporarily silence it, press the SELECT button to snoozeYou can change the snooze period with the NAVIGATION dial. The radio returns to standby for the set period with the silenced alarm icon flashing.
Sleep
To set the sleep timer, selectMenu > Main menu > Sleep.Then choose from Sleep OFF | 15 MINS | 30 MINS | 45 MINS | 60 MINS.Once you select a sleep period, the system returns to the main menu.The sleep function can also be programmed using the remote control
System settings
The system settings menu :
| – Equaliser– Network– Time / Date– Backlight– Language | – Factory reset– Software update– Setup wizard– Info– Privacy policy |
Equalizer
This presents a number of preset settings, plus a My Equaliser (My EQ) option to allow you to create your own personal settings.– To choose an EQ setting, selectMenu > System settings > Equaliser.You can then choose from a variety of preset modes, such as Normal, Flat. Jazz, Rock or Movie, and My EQ.The last option ‘My EQ profile setup’ allows you to define your own settings for the ‘My EQ’ option with custom bass and treble settings, and loudness on/off.
Network
Tenor remembers the last four wireless networks it connected to, and automatically tries to connect to whichever one of them it can find. You can see the list of registered networks throughMenu > System settings > Network > Network profile >From here, you can delete unwanted networks by turning and pressing select, then confirming delete > Yes.There are also other options for viewing and manually altering network settings fromMenu > System settings > Network > (for example setting up a wired network).Users experienced with networking may find these options useful for diagnosing and fixing network problems.
Time/Date
The time and date can be updated manually or automatically. With auto-update, the time and date are automatically synchronized with national time signals broadcast over DAB and FM (when available).You can also select the display format for the time and date.The time menu contains the following options:– Set Time/Date– Auto-update– Set format– Set timezone– Daylight savings– Standby Format.
Set time/dateThis option is for manually setting the time and date displayed. The time displays as hh: mm, with the first value, hh, active (flashing). Adjust each value using the select control button and press Select to confirm. The next value then becomes active and flashes. The date values follow and are set in the same way.
![]() NOTE: The date and time are displayed as dd-mm-yyyy and hh: mm AM/PM with the first value, dd active (flashing).
NOTE: The date and time are displayed as dd-mm-yyyy and hh: mm AM/PM with the first value, dd active (flashing).
Auto-updateAuto-update works with data sent over DAB, FM, or Network. The clock is only selected when in a corresponding mode, so it is best to select a mode you use regularly.Select from the following options: Update from DAB I Update from FM I Update from Network I No UpdateSet formatTo change between 12 and 24-hour display, select Set 12/24 hour and then select your preference.Standby formatSelect either Analog or Digital clock display for when Tenor enters standby
Language
The default language is English. To change, selectMenu > System settings > Language > Select your language.
Factory reset
A factory reset resets all user settings to default values, meaning that time and date information, network configurations, and presets are lost.However, the radio’s current software version is maintained, as is registration with the Internet radio portal. Internet radio favorites, therefore, remain unless you re-register your radio with another account on the portal website.To perform a factory reset, select Menu > System settings > Factory reset proceed > Yes.
Software updates
From time to time, Tenor may make software upgrades available with bug fixes or additional features. You can either check for updates manually or set Tenor to automatically check on a periodical basis (this is the default option).If Tenor detects that newer software is available, it will ask if you want to go ahead with an update. If you agree, the new software will download and install. Your user settings will remain the same.
![]() CAUTION: before starting a software upgrade, please ensure that Tenor is plugged into a stable mains power connection. Disconnecting power during a software update may permanently damage the unit.To turn automatic checking on or off, select Menu > System settings > Software update > Auto-check setting.
CAUTION: before starting a software upgrade, please ensure that Tenor is plugged into a stable mains power connection. Disconnecting power during a software update may permanently damage the unit.To turn automatic checking on or off, select Menu > System settings > Software update > Auto-check setting.
Setup Wizard
See page 7
Backlight
Tenor has a backlight with three brightness settings, and adjustable timeout (this is the time delay, in seconds, after which the display switches to the Dim level).There are three settings:Timeout – Light On 10 I 20 I 30 I 45 I 60 I 90 I 120 I 180 I sec.On level – High I Mid I Low.Dim level – Medium I Low I Very low I Off
Disc maintenance and unit cleaning
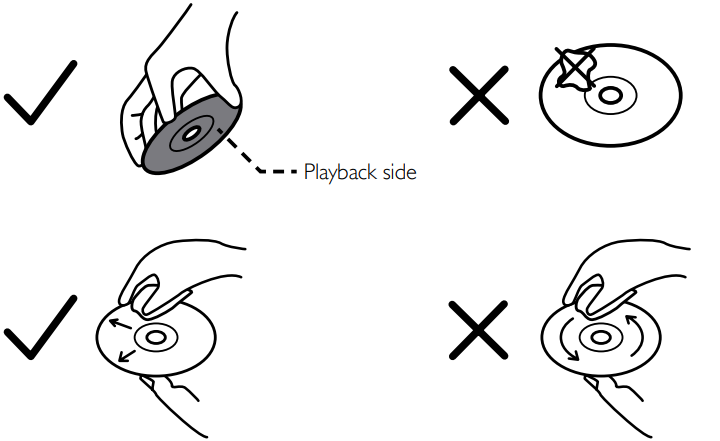
Handling discs– Do not touch the playback side of the disc.– Do not attach paper or tape to the disc.
Cleaning discs– Fingerprints and dust on the disc cause picture and sound deterioration. Wipe the disc from the center outwards with a soft cloth. Always keep the disc clean.– If you cannot wipe off the dust with a soft cloth, wipe the disc lightly with a slightly moistened soft cloth and finish with a dry cloth.– Do not use any type of solvents such as thinner, benzine, commercially available cleaners, or antistatic spray. They may damage the disc.
Storing discs– Do not store discs in places subject to direct sunlight or near heat sources.– Do not store discs in places subject to moisture and dust such as a bathroom or near a humidifier.– Storing discs vertically in a case, stacking discs or placing objects on discs outside of their cases may cause warping.
Cleaning the unit

– To clean the unit, wipe the case with a slightly moist, lint-free cloth.– Do not use any cleaning fluids containing alcohol, ammonia or abrasives.– Do not spray an aerosol at or near the unit
Class 1 Laser Product – This unit utilizes a laser. Use of controls, adjustments or performance of procedures other than those specified herein may result in hazardous radiation exposure.– Before moving the unit, ensure the disc tray is empty.– Always remove the disc when the unit is not in use. Failure to do so will risk severely damaging the disc and the unit– Do not stack devices; heat from other devices may affect the performance of the unit
Trouble-shooting
| Problem | Cause | Solutions |
| FM: hissDAB: burbling or intermittent cut-out | Low signal strength | Check or move the antenna. Move radio. Rescan local (high-strength) stations only. For DAB, check local coverage at www.ukdigitalradio.corm/coverage |
| DAB: ‘No stations available’ message | Low signal strength | As above, then rescan stations. |
| Cannot connect to the network | Network down | Check that network is working between a computer and the router. |
| Router restricts access to listed MAC addresses | Obtain the Tenor MAC address from Menu > System settings > Network > View settings and add it to the router list. Note: TENOR has separate MAC addresses for wired and wireless networks; only the current network adaptor method address is displayed, but the other address can be obtained by changing the first pair of digits between ’00’ (wireless) and ’02’ (wired). | |
| Insufficient Wi-Fi signal strength | Check the distance to the router. See if a computer can connect to the network in this location. | |
| Unknown encryption method | Change encryption method on the router. Tenor supports WEP, WPA, and WPA2. | |
| Unusual network configuration | Setup network manually through Menu > System settings > Network > Manual settings. | |
| Firewall preventing access | Check the following ports are open on the router: UDP and TCP ports 80 and 123; DNS port 53. Windows shares: ports 135 —139 and 445.Windows Media Player: varies — non-Microsoft firewalls may require configuration for UPnP |
Technical specification
Speaker: 2 x 3” full range driver, 1 x 5 1/4” wooferPower: 40W RMSPower Supply: 100-240 mains supplyDimension (mm): 458W x 153H x 227DWeight: 5.84 kgSpecifications are subject to change without notice.
Servicing and disposal
This product should only be repaired or serviced by an authorized service engineer and only genuine approved spare parts should be used.This symbol ![]() indicates that this product should not be treated as normal household waste and it should be recycled. John Lewis & Partners do not operate instore take back, but as members of the Distributor Take Back scheme have funded the development and upgrade of recycling facilities across the UK. Please take it to your nearest collection facility or for further details contact your local council or visit www.recycle-more.co.uk.
indicates that this product should not be treated as normal household waste and it should be recycled. John Lewis & Partners do not operate instore take back, but as members of the Distributor Take Back scheme have funded the development and upgrade of recycling facilities across the UK. Please take it to your nearest collection facility or for further details contact your local council or visit www.recycle-more.co.uk.
Guarantee
For 2 years in respect of defects found to be due to faulty workmanship or material. Proof of purchase is required for the validity of the guarantee.This guarantee is no longer valid if the damage has been caused by accidental damage, alteration, repair by any unauthorized persons or poor maintenance.This guarantee in no way affects your statutory rights.Retain these instructions for future reference.
 report this ad
John Lewis Partnership171 Victoria StreetLondon SW1E 5NNjohnlewis.com
References
[xyz-ips snippet=”download-snippet”]