
User Guide
![]()
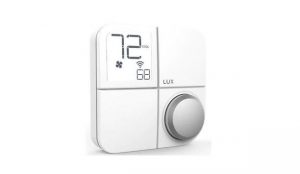
Johnson KONOse
Parts included
- One KONOse® thermostat
- One Quick Start Guide
- Wall plate
- Mounting hardware
- Wire labels
Materials and tools needed
- Phillips screwdriver
- Wire stripper
- Wire cutter
- Z-Wave® Hub or Gateway to operate with KONOse
Installing
 WARNING
Risk of Electric Shock.Disconnect all electric power sources from the old thermostat before removing the thermostat cover. Contact with internal components carrying hazardous voltage can cause electric shock and may result in severe personal injury or death.
WARNINGRisk of Electric Shock.Disconnect the power supply before making electrical connections. Contact with components carrying hazardous voltage can cause electric shock and may result in severe personal injury or death.
Replacing an existing thermostat
- Turn off the power to the heating and cooling systems at the circuit breaker.
- Remove the front of your existing thermostat from its base.
- Take a photo of the existing wiring for reference.
- Release the wires and mounting screws.
- Remove the base of the existing thermostat from the wall.
Mounting your KONOse thermostat
- Separate the KONOse from its base.
- Pull the wires from the wall through the hole in the center of the KONOse base.
- Use the included mounting hardware to secure the base to the wall.
Connecting to a power source
Connect the KONOse to a C-terminal, or use the KONOse with batteries.
Connecting to a C-terminal
About this task:Important: Make all wiring connections in accordance with local, national, and regional regulations. Do not exceed the electrical ratings of the KONOse.
- Turn off the power to the heating and cooling systems at the circuit breaker.
- Use the photo of your existing thermostat’s wiring as a guide to wire your KONOse.
- Reattach the KONOse to the base.
- Turn the power back on.
Inserting batteries
- Secure any wires that extend out of the wall so that the wires cannot make contact with the thermostat.
- Insert four batteries into the base.
- Reattach the KONOse to the base.
Setup and adjustments
Device inclusion
About this task:The thermostat prompts you to pair the device with your Smart Hub at the initial setup. You can manually pair the device at any time if you choose to skip this step at the initial setup.
To manually pair your device, complete the following steps:
- From the Home screen, press and hold the knob for 5 seconds to enter the main menu.
- Turn the knob to select the Connection icon, then press the knob to select the Inclusion menu.
Figure 1: Connection icon
![]()
3. Turn the knob to select Add, then press the knob to confirm.The device displays Scan on the screen while it prepares to add to the hub.4. At the hub portal, click Add device. The device displays Done when the device is added successfully.
If the device did not add successfully, ER:02 shows on the display. Press and hold the knob for more than 5 seconds to return to the Inclusion menu and retry to pair the device.
Result The device automatically returns to the Home screen after 5 seconds.
Device exclusionAbout this task:To remove the device from your Smart Hub, complete the following steps:
- From the Home screen, press and hold the knob for 5 seconds to enter the main menu.
- Turn the knob to select the Connection icon, then press the knob to select the Inclusion menu as shown in Figure 1.
- Turn the knob to select RST, then press the knob to confirm. The device displays Scan on the screen while it prepares to remove from the hub.
- At the hub portal, click Remove device. The device displays Done when the device is removed successfully. If the device did not remove successfully, ER:02 shows on the display. Press and hold the knob for more than 5 seconds to return to the Inclusion menu and retry to remove the device.
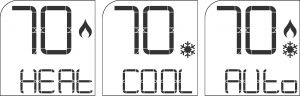
Changing the control modeAbout this task:To switch the control mode between Heat, Cool, Auto, or Off, complete the following steps:
- From the Home screen, press the knob once to turn on the backlight, then press the knob again to enter the Control Mode menu.
- In the Control Mode menu press the knob to select the preferred mode.Do not interact with the thermostat for 5 seconds for the thermostat to confirm the selection.
Figure 2: Control modes
Adjusting the temperature
- From the Home screen, turn the knob clockwise or counterclockwise to select the preferred temperature. Do not interact with the thermostat for 5 seconds for the thermostat to confirm the selection.
Accessing the installer setting menu
- From the Home screen, press and hold the knob for 5 seconds to access the main menu.
- Turn the knob to select the Settings icon, then press the knob to select the Installer Settingmenu.
Figure 3: Settings icon
![]()
3. Turn the knob clockwise to select Yes, then press the knob to confirm.4. Navigate the Installer Setting menu and select the preferred options.
ResultTo exit the Installer Setting menu, press and hold the knob for 5 seconds or do not interact with the thermostat for 60 seconds.
Disposal instructions
Johnson Controls is committed to responsible environmental stewardship. Please dispose of this product in accordance with local laws and regulations in your area. Contact your local waste disposal authorities or consult www.e-cyclingcentral.com to find an electronics recycling center near you.
Warning information
FCC Part 15CWarning: Changes or modifications to this unit not expressly approved by the party responsible for compliance could void the user’s authority to operate the equipment. NOTE:
This equipment has been tested and found to comply with the limits for a Class B digital device, pursuant to Part 15 of the FCC Rules. These limits are designed to provide reasonable protection against harmful interference in a residential installation. This equipment generates, uses and can radiate radio frequency energy and, if not installed and used in accordance with the instructions, may cause harmful interference to radio communications.
However, there is no guarantee that interference will not occur in a particular installation. If this equipment does cause harmful interference to radio or television reception, which can be determined by turning the equipment off and on, the user is encouraged to try to correct the interference by one or more of the following measures:
- Reorient or relocate the receiving antenna.
- Increase the separation between the equipment and receiver.
- Connect the equipment into an outlet on a circuit different from that to which the receiver is connected.
- Consult the dealer or an experienced radio/TV technician for help.
This device complies with Part 15 of the FCC Rules. Operation is subject to the following two conditions: (1) This device may not cause harmful interference, and (2) this device must accept any interference received, including interference that may cause undesired operation. FCC RF Radiation Exposure Statement
Caution: To maintain compliance with the FCC’s RF exposure guidelines, place the unit at least 20 cm from nearby persons.
RSS-247This device contains licence-exempt transmitter(s)/ receiver(s) that comply with Innovation, Science and Economic Development Canada’s licence-exempt RSS(s). Operation is subject to the following two conditions: (1) this device may not cause interference, and (2) this device must accept any interference, including interference that may cause undesired operation of the device.
Repair informationIf the KONOse fails to operate within its specifications, replace the unit. For a replacement thermostat controller, contact the nearest Johnson Controls® representative.
Product warranty
This product is covered by a limited warranty, details of which can be found at www.johnsoncontrols.com/buildingswarranty.
Software terms
Use of the software that is in (or constitutes) this product, or access to the cloud, or hosted services applicable to this product, if any, is subject to applicable terms set forth at www.johnsoncontrols.com/techterms. Your use of this product constitutes an agreement to such terms.
PatentsPatents: http://jcipat.com
Contact informationContact your local branch office: www.johnsoncontrols.com/locationsContact Johnson Controls: www.johnsoncontrols.com/contact-us
© 2020 Johnson Controls. All rights reserved. All specifications and other information shown were current as of document revision and are subject to change without notice.
References
[xyz-ips snippet=”download-snippet”]