
Wireless Kit
QUICK USER GUIDE
1 Statement
Thank you for purchasing our product! This quick user guide will talk about main usages of the product. More information can be found on our website and the help center. The functions, parameters, operations, etc. presented in this manual are for reference only, and Jooan may improve the content. For all specific information, please refer to the actual product.
2 Safety Caution
- Please do not put any fluid container on the product.
- Please use the product in ventilated environment and prevent blocking the vents.
- Please use included power supply with the product to prevent damage to the product.
- Please use the product under its standard working temperature and humidity.(advised in this manual or distributor’s website)
- Dust on PCB may cause short circuit. It is suggested to clean the dust on PCB timely to make the product work properly.
- Please obey the regulation and policy in your country and area during the installation of this product.
3 Unpack Audit
After receiving the product, please check all products and accessories according to the follow Packing list information. If anything is missed or damaged, please contact us.
| Packing list | ||
| S/N | Item | Quantity |
| 1 | WiFi NVR | 1pcs |
| 2 | DC 12V2A power supply (for NVR) | 1pcs |
| 3 | WIFI IP camera | 4/8pcs |
| 4 | DC 12V1A power supply (for IPC) | 4/8pcs |
| 5 | Screw bag (for IPC) | 4/8pcs |
| 6 | Antenna(for IPC) | 4/8pcs |
| 7 | User manual(Contains 4 screws for HDD) | 1pcs |
| 8 | Antenna extension | 1pcs |
| 9 | HDMI cable | 1pcs |
| 10 | Ethernet cable | 1pcs |
| 11 | Mouse | 1pcs |
| 12 | Warnning Post | 1pcs |
01
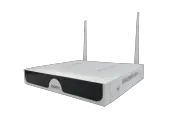
4 Product Overview
This product may require cabling, we suggest to test all products&parts before installation and cabling.
- WIFI Antenna Ports: Double antennas to WIFI range;
- AUDIO OUT: 3.5mm audio interface for external speakers;
- VGA Port: For viewing on VGA monitor;
- HD OUTPUT Port: For viewing on HDTV;
- WAN Port: Connect your NVR to the Internet;
- USB Ports: For mouse and backup
- Power Input: 12V 2A NVR power interface;

- WiFi antenna: WiFi connection with NVR;
- DC Port: Input power 12V 1A;
- Reset button: Press reset button for 10 seconds to restore factory setting and enter into matching-code mode.
- Photosensitive: Used to measure light and control the turning on of infrared light.
5 installation instructions
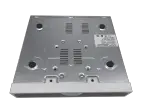
HDD installationNotes:
- To use the video recording and playback functions, HDD must be installed.
- The camera system doesn’t come with hard drive. Recommend to choose an Monitoring dedicated Hard Drive in SATA III 3.5″, 1-2TB .
 Step 1: Loose the screws which are fixing the box cover.
 Step 2: Push forward the cover to the end and remove it.
 Step 3: Connect the SATA power and data cables of the NVR to the corresponding ports of the Hard Disk Drive.(NO HDD).
 Step 4: Hold the Hard Disk Drive and the NVR together,carefully turn them over,then align the screw holes on the Hard Disk Drive with the screw holes on the NVR housing and put screw on.
 Step 5: Put the cover back to position and install the screws.
KIT installation
This system is standalone with embedded Linux Operating System in the NVR. Just like a desktop PC, need to hook a screen to the NVR to enter the OS. Any TV , monitor with VGA or HD-OUTPUT input should work for it.

USB Interface Mouse
Add the cameras to the NVRStep 1: Install antennas for cameras;Step 2: Connect a screen to the NVR via its HD-OUT port or VGA port.(The default supported screen size is 19-42″.).Step 3: Plug the NVR to power.(use bigger 12V 2A power adapter.)Step 4: Plug cameras to power.(use smaller 12V 1A power adapters.)Step 5: Within seconds, you can see camera’s images on the screen.Step 6: Plug the mouse to USB port on the back of NVR. So you can operate the system.
Default ID: admin Password: none (means leaving the password empty, just click login).Tips: To protect your privacy, please set your password at earliest convenience. Right click -> System Setup -> System Admin -> User Management to set password.
What should I do if I can’t connect to the camera? Please kindly follow below steps to add them to the NVR:Step 1: Powered on the camera. Press and hold phorosensitive to observe if the infrared light of the camera is on.Step 2: Right click -> video manage -> Delete the not working camera.Step 3: Put the camera close to the NVR and power on it.Step 4: Push the reset button of the camera 5-10 seconds or longer time to restore it to factory setting.Step 5: Use “wireless add” function to add it to the NVR, wait patiently for a while, the system will automatically search the camera and match code.

6 Warning
Notes: Device will not be in guarantee if caused by below reason
- Product failure due to accident, negligence, disaster, improper operation or misuse.
- Do not conform to the environment and conditions, such as power improper, working temperature too high or too low, lightning stroke.etc.
- Ever be maintained by other center which not belong to the real factory.
- Goods already sold more than 12 months.
Warranty Card
12-month warranty for quality-related issues For 12 month after the date of purchase, we take care of all quality-related issues with a Replacement or rull refund. (RemindenBe sure to use your product as directed.) Warranty-related shipping costs can only be covered in the country of purchase. If the product is taken outside the country of purchase,any shipping costs will be the buyer’s Responsibility. Alternatively,we can offer a 50% refund of the item’s purchase price without the need to return. If returning an item,please ship it back within 20 days after you receive approval. Further delay may void your return.
30-day money-back guarantee for any reason 1 For 30 days after the date of purchase,return your undamaged product and receive a full 1 ! refund for ANY reason.06
7 Q&A
Q1: Camera connection failed or no image. It maybe the camera did not match the code successfully,Please kindly follow page 5 to add them to the NVR.Q2: Can I add the extra new camera? The camera with the same brand is recommended when you’d like to add more cameras. To get the link of buying camera and the detailed guide for adding the camera, please contact us at Q3: NVR system can not detect the Hard Disk Drive. Attn: Install the hard drive while the system is power off,otherwise it couldn’t recognize the hard drive. The HDD recommend to choose an Monitoring dedicated Hard Drive in SATA III 3.5″, 1-2TB . Here are the steps for troubleshoot the problem.Step 1: Make sure the NVR works well.Step 2: Check the connection wires between the DVR and hard drive. Check if the cable between the DVR and the hard drive is loose.Step 3: Normally the hard drive will generate heat when start to work, please check if it generate heat.Step 4: If it doesn’t generate heat,please change a power supply for it,we suggest you to use a 12V3A power supply.Step 5: If all above methods don’t work,please connect the hard drive to your PC to format it by FAT32,then connect it to the system again.Q4: What should I do if I forget the password for logging in to the NVR? For the privacy of users, please contact us at , and the technician will help you.Q5: No display on the Monitor of the NVR system. It might be mainly caused by resolution compatibility. The default resolution of the NVR is 1280*1024, which may not be compatible with some monitors. Here are some methods for solving the issue:
Replace the display
Step 1: Connect the NVR to other monitor via the VGA output or HDMI output to s ee if you can enter the Menu bar of the NVR.Step 2: When you are able to see the Menu, please go to System Setup -> General Setup -> General Setup -> Display Resolution to adjust the appropriate resolution, then click Ok. (For larger monitors, please choose 1024*768.)Step 3: Connect the NVR to your primary screen via again to check the dispaly.
Set by IP address
Step 1: Download the EseeCloud client on your computer. (The operation is on page 14.)Step 2: Connect the NVR and your computer to the same network.Step 3: Open the EseeCloud client and search the IP address of the NVR through the LAN. Step 4: Enter the IP address of the NVR in the browser for the management interface. (Password is empty, namely enter nothing if you did not set any password. The operation details are in Chapter 8.)Step 5: Setting->Ordinary->VGA resolution->Save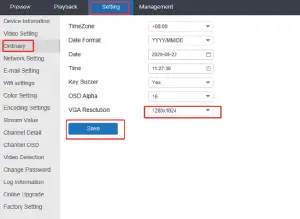 Step 6: Connect the NVR to your primary screen via again to check the dispaly.
 report this ad
Email: Skype: Tell:+1-202-945-9595 / +86-18127028076website: k.jooan.cc (download APP/ e-manual/operation video)
References
[xyz-ips snippet=”download-snippet”]