DET-3019b Infrared Forehead Thermometer
Owner’s ManualInfrared Forehead ThermometerModel DET-3019b
JOYTECH Healthcare Co., Ltd. No.365, Wuzhou Road, Yuhang Economic Development Zone, Hangzhou , Zhejiang 311100 ChinaTelephone: +86-571-81957767 Fax: +86-571-81957750Made in China
ContentsIntroduction ………………………………………………..02 Warning …………………………………………………………..03 Product Description …………………………………………. 04 LED Display Introduction ………………………………… 05 Basic Functions …………………………………………… 06 Forehead Thermometer Advantages ……………………. 07 Setting …………………………………………………………..08 Temperature Taking Hints ……………………………..09 Illustration For Use ……………………………………….11 Memory Mode ………………………………………………..16 Care And Cleaning ………………………………………..17 Battery Replacement ……………………………………..18 Specifications ……………………………………………..19 Troubleshooting ……………………………………………20 Calibration …………………………………………………..22 Symbol Explanation …………………………………….23 Service ………………………………………………………24 Warranty ………………………………………………………25 FCC Information ………………………………………………….26 Electromagnetic Compatibility Information ……………281
Document No.: JDET-1904-008 Article No.: 003 Version: Z Date of Issue: 2021-11
Introduction
Please read all instructions carefully and thoroughly before using this product.
Indication for Use: The infrared forehead thermometer is a non-contact infrared thermometer intended for the intermittent measurement of human body temperature from forehead at a distance of 1~5cm by people of all ages. This thermometer is reusable for home use and clinical use and can be reused by many people. The DET-3019b infrared forehead thermometer is specifically designed for safe use on the forehead. The Infrared Forehead Thermometer is a device capable of measuring people’s body temperature by detecting the intensity of infrared light emitted from the forehead. It converts the measured heat into a temperature reading displayed on the LED display. When properly used, it will quickly assess your temperature in an accurate manner.
This appliance conforms to the following standards:
ASTM E1965-98 Standard Specification for Infrared Thermometers
for Intermittent Determination of Patient Temperature,
ISO 80601-2-56 Medical electrical equipment –Part 2-56:
Particular requirements for basic safety and essential performance
of clinical thermometers for body temperature measurement,
IEC 60601-1-11 Medical electrical equipment –Part 1-11: General
requirements for basic safety and essential performance Collateral
Standard: Requirements for medical electrical equipment and
medical electrical systems used in the home healthcare environment
and complies with the requirements of IEC 60601-1-2(EMC) ,
AAMI ANSI ES60601-1(Safety) standards. And the manufacturer
is ISO 13485 certified.
2
Warning1. There is no gender or age limitation for using infrared forehead thermometer.2. Do not touch the temperature probe with hands. 3. Use of this Forehead thermometer is not intended as asubstitute for consultation with your physician. 4. Do not allow children to take their temperatures unsupervised,some parts are small enough to be swallowed. 5. Never immerse this device in water or other liquids(notwaterproof ). 6. Do not modify this equipment without authorization ofmanufacturer. 7. Do not expose the thermometer to temperature extremes(below -25/-13 or over 55/131) nor excessive humidity (>95%RH). 8. Keep the battery away from children. 9.Remove battery from the device when not in operation for a long time. 10.Do not put the thermometer in direct sunlight or with cotton wool, otherwise the accuracy will be affected. 11. Portable and mobile RF communications can affect the devise. The device needs special precaution regarding EMC according to the EMC information provided in the accompany documents. 12.ME equipment should not be cleaned and disinfected while in use.3LED Display Introduction
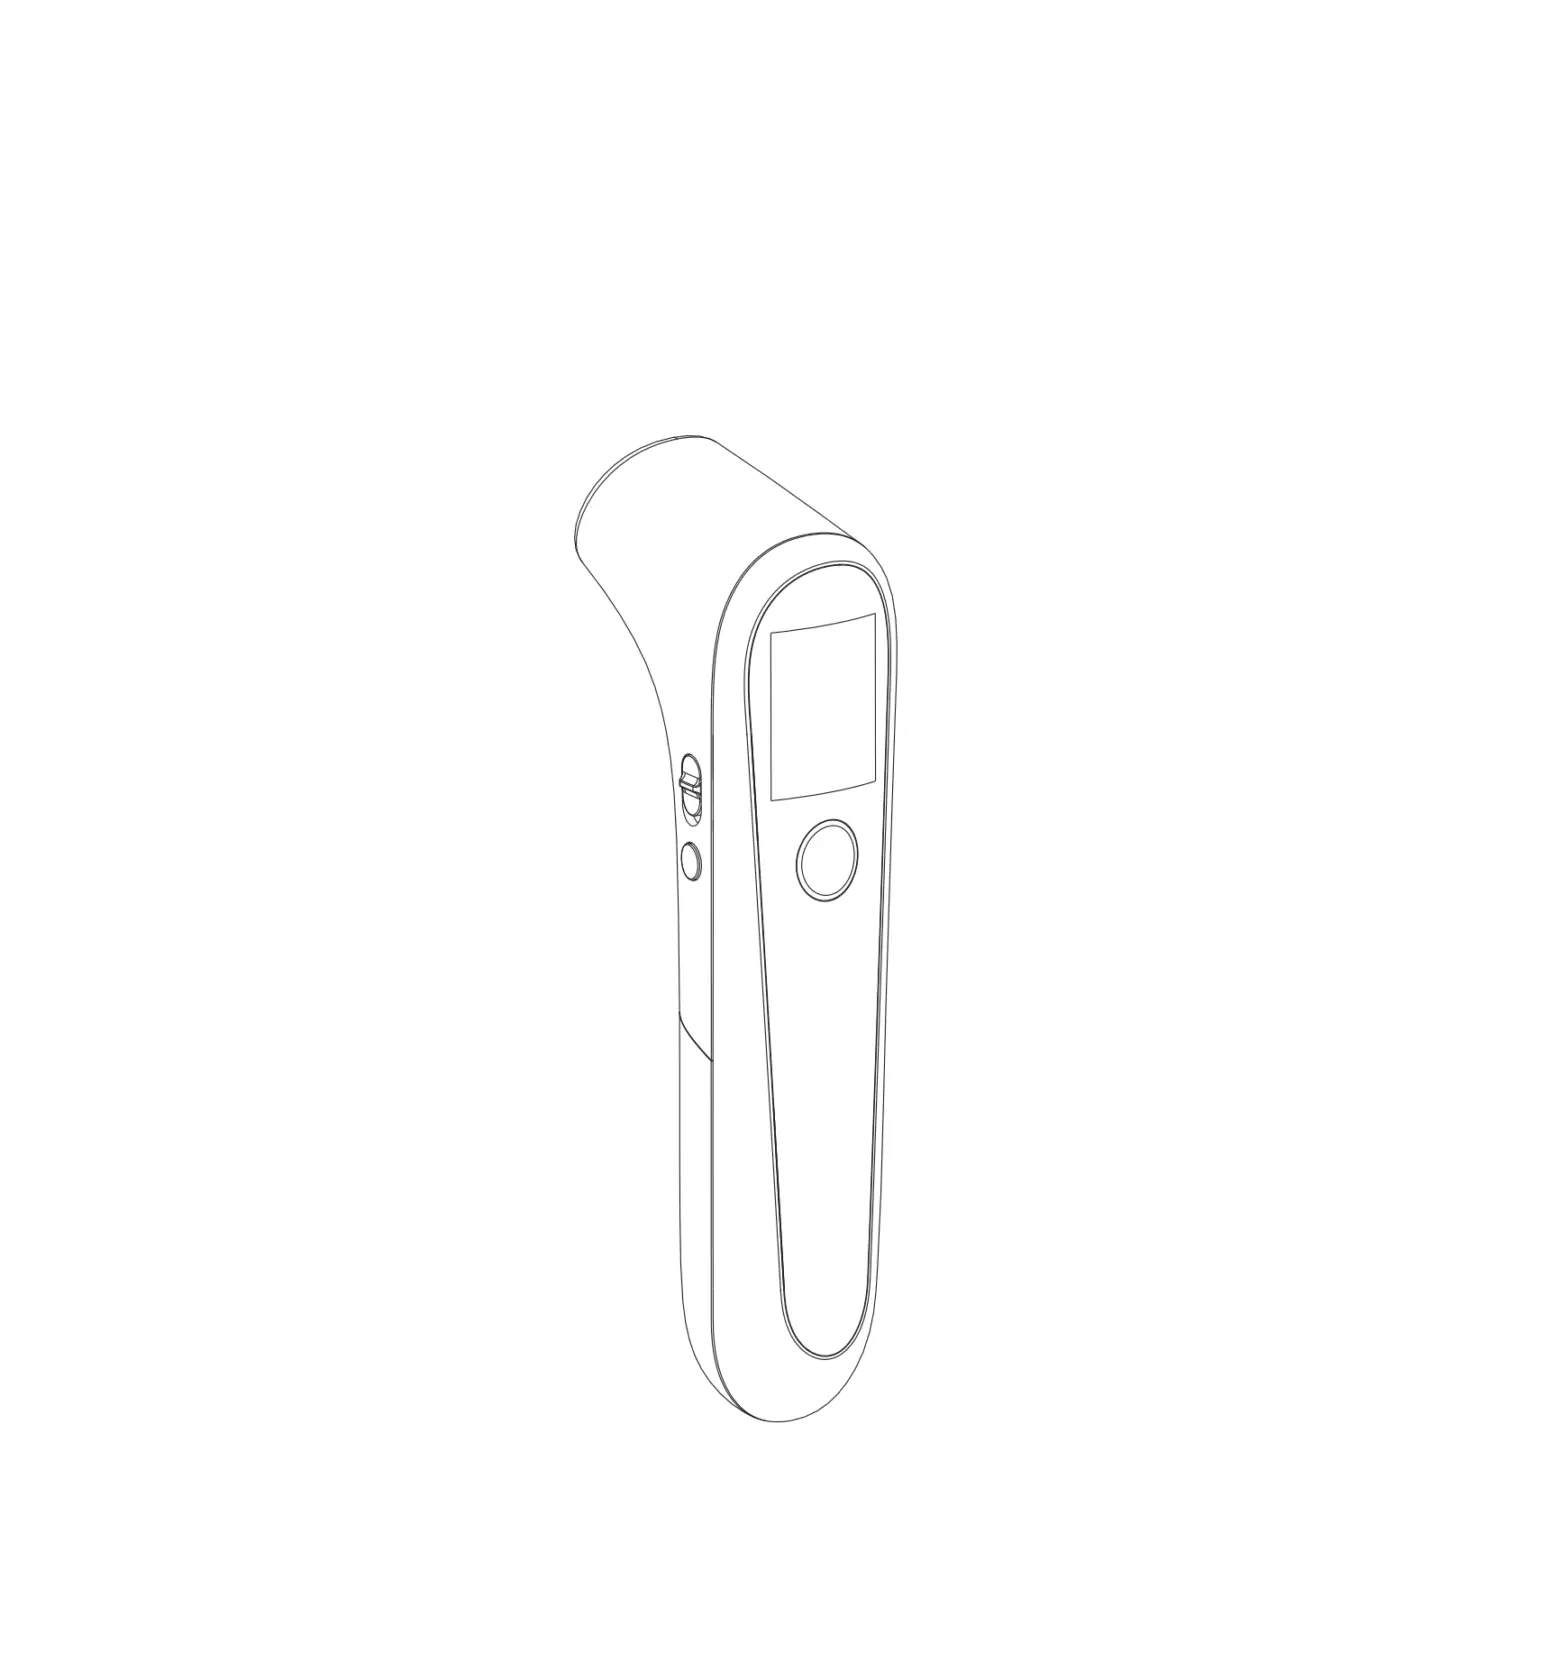
Product Description1. Probe 2. Test Button 3. Voice Switch 4. Setting Button 5. Battery Cover 6. Display1 63 24 54Basic Functions
Status indicators Forehead mode Unit sign: orObject mode
Memory mode
Low voltage sign
Bluetooth sign
Voice sign
Temperature result
Forehead ModeObject ModeMemory Mode Distance DetectionBluetooth sign / Switch Language SwitchVoice Sound Switch
The thermometer has been designed for practical use. It’s not meant to replace a visit to the doctor. Please also remember to compare the measurement result to your regular body temperature. Please see the Illustration For Use section to learn how to measure the body temperature.The object mode shows the actual, unadjusted surface temperatures, which is different from the body temperature. It can help you to monitor if the object temperature is suitable for the baby or patient, for example the baby’s milk. Please see the Illustration For Use section to learn how to measure the object temperature.There are each 30 sets memories for forehead and object measurements. Each memory also records the measurement mode icon.If the object is too far away from the probe, the temperature will not be measured until the probe is moved within the measured range. If the APP is successfully connected to the machine,the Bluetooth sign will always be on, otherwise it will keep flashing.Please see the Setting to learn how to change between Celsius and Fahrenheit. Please see the Setting to learn how to change between Chinese and English. The thermometer will broadcast the result after finishing measurement.The thermometer can turn on or off sound. Please see the Illustration For Use.
5
6
Forehead Thermometer AdvantagesInfrared Forehead Thermometer measures core body temperature, which is the temperature of a body’s vital organs. (See Figure 1) This thermometer is designed to measure the temperature of the skin surface over the temporal artery, a major artery of the head. The temporal artery is connected to the heart via the carotid artery, directly leading from the aorta, the main trunk of the arterial system. It offers constant blood flow. Therefore, body temperature changes are reflected sooner in the forehead than they are in other parts of the body such as oral, rectal and underarm.Vital Organs
Real TimSeeCttlioncgk SettingWhen installing the battery, please set the parameters of the thermometer. With the thermometer off, press and hold Setting Button to enter into setting mode.Set the unit Press TEST Button to select the unit you want. After the unit is set,press Setting Button ,language will appear .Set the language of voiceThe device can set the language of voice in either Chinese or English. Press and release TEST BUTTON to select the language. With the preferred language on the display, press Setting BUTTON to exit the setting mode.
Figure 1
7
8
Temperature Taking Hints
Temperature Taking Hints
To ensure that the reading always reflects the body temperature accurately, you need to take account of the following factors which may affect an accurate reading. 1. It is important to know each individual’s normal temperaturewhen they are well. This is the only way to accurately diagnose a fever. To determine normal temperature, take multiple readings when healthy. Re-measure with a standard digital thermometer for confirmation. 2. Users must be inside for 30 minutes before taking a measurement. Note: Users and the thermometer should be in the same ambient temperature for at least 10 minutes before taking a reading. 3. Users should not drink, eat, or be physically active such as bathing, showering, shampooing and hair drying before/while taking the measurement. Remove hat and hair and wait 10 minutes before taking a reading. 4. Oils or cosmetics on the forehead may give a lower temperature reading than the actual one. Remove dirt from the forehead before taking a measurement. Wait at least 10 minutes after washing the forehead area before taking a reading.9
5. Holding a hand on the forehead for any length of time will affect the temperature reading.6. Do not take temperature over scar tissue, open sores or abrasions. 7. Do not use the thermometer on a perspiring or sweating forehead,as this may affect the reading. 8. Don’t take a measurement while or immediately after nursing ababy. 9. Do not take temperatures with this thermometer near places thatare very hot, such as fireplaces and stoves. 10. The probe window of the thermometer is the most delicate partof the device. Do not touch the probe window. The accuracy of the reading may be affected if the probe window is damaged or dirty. 11. If the thermometer is stored in a significantly different environment than testing location, place it in the testing location for approximately 30 minutes prior to use. 12. It is not intended for use in the oxygen rich environment and presence of flammable anesthetic mixture with air, oxygen or nitrous oxide.10
Illustration For UseTo measure forehead temperature: 1. Press the Test Button, The display is activated to show allsegments. After self-checking Figure 2 appears on the display screen with voice, so you can start a new measurement. 2. Aim the thermometer at the center of the forehead with a distance less than 5cm (See figure 3) and then press the Test Button. Note: Do not remove the thermometer from the forehead before hearing voice. Note2:If the object to be tested is too far from the probe, a prompt will appear(See figure 4). 3. Read the temperature on the display. 4. Press and hold Test Button to turn off.
Illustration For UseHow to turn on or off sound: You can flip the Voice Switch to turn on or off sound.How to change the forehead mode and object mode:You can press and hold Setting Button to switch the mode between Forehead mode and Object mode.To measure object temperature: 1. Press the Test Button to turn on the thermometer, you can takethe object temperature after going into measurement mode. (see figure 5) 2. Aim the thermometer at the center of the object you want to measure with a distance less than 5cm. 3. Press the Test Button and then read the temperature on the display. 4. Press and hold Test Button to turn off.
11 Figure 2
Figure 3
Figure 4
Illustration For UseAfter measurement: 1. Power off: Device will automatically shut off if left idle formore than 30 seconds to extend battery life. 2. Clean the probe after each use to ensure an accurate reading andavoid cross contamination. (See the section of Care and Cleaning for details.)
Figure 5
12
Illustration For UseBluetooth requirementsThe thermometer requires a bluetooth device with: . Bluetooth 5.0 or later . Android 6.0 or later . IOS 10.0 or laterAnd works with: . iphone , iPod, iPad . Android Phones and TabletsUsing for the first time1. Download the “JoyHealth” App from Website or APP Store (Such as Apple Store).2.Open the App on your phone or tablet. If requested, you should enable Bluetooth on your device. You can enable Bluetooth under the Settings menu on your smart phone or tablet.3. Create a new user login, or login with your existing user name and password.4. Selection device “Thermometer”.
173
14
Illustration For UseMatch your thermometer with a Smart Device1. If this is your first time using it, bind first.Open “SETTING” menu,choose”Bind and unbind device” and select the appropriate model. The date and time on your thermometer will automatically be updated when it’s connected with your phone.2. Confirm that your thermometer is connected successfully. When your thermometer is connected successfully to your smart phone, the ” ” symbol stop flashing and keep showing.Transfer your readings1. As soon as your measurement is finished, open the app on your smart phone to transfer the readings. Note: On the matched smart phone, Bluetooth must be enabled.2. You can view your temperature readings in the app.
Memory Mode1. The Memory Mode can be accessed either in forehead mode or object mode: When the thermometer has been turned on and followed by Figure 2/5 or finished testing, press the Setting Button. The letter M will appear in the lower left corner of the display. (See Figure 6)2. The thermometer will automatically memorize the last 30 temperature readings. Each memory also records the measurement mode icon. Each time the Setting Button is pressed, the screen displays past readings that correspond with a number 1-30. The number 1 reflects the most recent reading, while the number 30 reveals the oldest reading stored in memory.(See Figure 7)3. In the memory mode, mark or mark will not change. The user can press the Test Button to take new measurements.
15
Figure 6
Figure 7
16
Care And Cleaning1. The probe window must be kept clean, dry, and undamaged at all times to ensure accurate readings. The accuracy of temperature readings can be affected by damage to the probe window, or the presence of dirt, fingerprints, earwax, dust and other soiling compounds on the probe window. Degraded sensors can degrade performance or cause other problems.2. For cleaning 1) Soak a clean soft cloth in drinking water,wring it out,and then wipe the thermometer(including probe) no less than 3 times 2) Visual or use magnifying glass to observe the thermometer have no visible dirt and stains ,then use another clean soft cloth to wipe the thermometer residue water 3) Put the thermometer in the original packaging.3.For disinfection 1) Soak a clean soft cloth in drinking water,wring it out,and then wipe the thermometer(including probe) no less than 3 times 2) Visual or use magnifying glass to observe the thermometer have no visible dirt and stains ,then use another clean soft cloth to wipe the thermometer residue water 3) Using a clean soft cloth dipped in 70% medical alcohol,wipe the probe for 3 Times,each time 1 minute. 4) Using a clean cotton swab dipped in 70% medical alcohol,wipe the sensor window 3 times 5) Wait at least 10 minutes to let the alcohol volatilization and put it in the original packaging.4. Do not put the thermometer into water directly. 5. Store the thermometer in a dry location, free from dust andcontamination and away from direct sunlight. 6. Put the thermometer back to the original packaging after using.17
Battery Replacement1. Replace battery when ” ” appears in the lower right corner of LCD display. (See Figure 8)2. Slide battery cover down as shown in Figure 9. 3. Remove battery and install 2 new AAA alkaline batteriesas shown in Figure 10 . 4. Slide battery cover back on.
Figure 8
Figure 9
Figure 10
18
Specifications
Measuring range
Forehead mode: 34.0~43.0(93.2~109.4) Object mode: 0~100(32~212)
Measuring site
Forehead(Forehead Mode)
Reference body site
Oral (This thermometer converts the forehead temperature to display its “oral equivalent.”)
Operation mode
Forehead mode(Adjust mode)
Laboratory accuracy
Forehead mode: ±0.2 (0.4) during 35.5~42.0 (95.9~107.6) at 15~35 (59.0~95.0) operating temperature range ±0.3 (0.5) for other measuring and operatingtemperature range Object mode: ±4% or ±2(4) whichever is greater
Display resolutionMeasure time Operating temperature range:
0.1 or 0.1Approximately 1 second5~40(41~104), 15%~85%RH, non-condensing Atmospheric Pressure : 700hPa ~ 1060hPa
Storage and transport temperature rangeClinical accuracyShock
-25~ 55 (-13~131), 15%~95%RH, non-condensing Atmospheric Pressure : 700hPa ~ 1060hPaClinical bias: -0.09(-0.16) Clinical repeatability: 0.13(0.23) Limits of agreement: 0.87(1.57)withstands drop of 3 feet
Dimension
155*39.2*49.4mm
Weight BatteryBattery life Expected service life
Approx.93grams(with batteries) DC3V(2×AAA battery) Approx. 1 year/3000 readings Three years
Ingress protecting rating IP22
19 Contraindication
No contraindication
Troubleshooting
Error message
Problem
Solution
The thermometer is not functioning properly.
Unload the battery, wait for 1 minute and repower it. If the message reappears, contact the retailer for service.
Place the thermometer
The ambient temperature in a room for at least 30
is not within the range minutes at room
between 5 and 40 temperature between
(41~104).
5 and 40
(41~104)
20
Troubleshooting
Error message
ProblemIn Forehead mode: Temperature taken is higher than 43.0 (109.4). In Object mode: Temperature taken is higher than 100 (212). In Forehead mode: Temperature taken is lower than 34.0 (93.2). In Object mode: Temperature taken is lower than 0 (32).
SolutionRead Temperature Taking Hints Thoroughly, then take a new temperature measurement.Read Temperature Taking Hints thoroughly , then make sure the lens filter are clean, then take a new temperature measurement.
The thermometer could not work due to low battery.
Replace two new alkaline batteries size AAA.
CalibrationThe thermometer is initially calibrated at the time of manufacture. If the thermometer is used according to the use instruction, periodic readjustment is not required. However, We recommends checking calibration every two years or whenever clinical accuracy of the thermometer is in question. Please send the complete device to the dealers or manufacturer.The above recommendations do not supersede the legal requirements. The user must always comply with legal requirements for the control of the measurement, functionality, and accuracy of the device which are required by the scope of relevant laws, directives or ordinances where the device is used.A clinical summary and procedures for checking calibration are available upon request.(Turn on the thermometer and press the setting button long time until entering into calibrate mode, software version will be displayed.)
21
22
Symbol Explanation
– 1 3 oF
1 3 1 oF
70kPa 15%
106kPa 95%
IP22
CautionDirect Current Batch Code Storage and Transportation Temperature Limit: -13~131(-25~55) TYPE BF APPLIED PART Refer to instruction manual/booklet rGeecnoevrearly/syremcbyocllafbolre Disposal of this product and used batteries should be carried out in accordance with the national regulations for the disposal of electronic products. Atmospheric pressure limitationStorage and Transportation Humidity limitation: 15%~95%RH Manufacturing DateManufacturerThe first num.2:Protected against solid foreign objects of 12,5 mm and greater. The second num.2:Protection against vertically falling water drops when ENCLOSUREtilted up to 15°.
ServiceThe thermometer has a limited one year warranty. Do not attempt to disassemble or repair the thermometer by yourself. Should service be required during or after the warranty period you must contact the manufacturer. Repackage the thermometer carefully in its original packaging or securely pack to avoid damage during shipping. Include the original sales slip indicating the date of purchase, a note describing the problem, and your return address. Send the thermometer prepaid and insured. The lay operator or lay responsible organization should contact the manufacturer or the manufacturer’s representative: for assistance, if needed, in setting up, using or maintaining the thermometer; or to report unexpected operation or events.
23
24
WarrantyThermometer is warranted by manufacture to be free from defects in material and workmanship under normal use and service for a period of one year from the date of delivery to the first user who purchases the instrument. This warranty does not cover batteries, damage to the probe window, or damage to the instrument caused by misuse, negligence or accident, and extends to only to the first purchaser of the product.
FCC InformationCaution: Changes or modifications to this unit not expressly approved by the party responsible for compliance could void the user authority to operate the equipment. *Note: This equipment has been tested and found to comply with the limits for a Class B digital device, pursuant to Part 15 of the FCC Rules. These limits are designed to provide reasonable protection against harmful interference in a residential installation. This equipment generates, uses, and can radiate radio frequency energy. If this equipment does cause harmful interference to radio or television reception, which can be determined by turning the equipment off and on, the user is encouraged to try and correct the interference by one or more of the following measures: – Reorient or relocate the receiving antenna. – Increase the distance between the equipment and the receiver. – Connect the equipment to an outlet on a circuit different from that to which the receiver is connected. – Consult the dealer or an experienced radio/TV technician for help.
25
26
FCC InformationThis device complies with part 15 of the FCC Rules. Operation is subject to the following two conditions: (1) This device may not cause harmful interference, and (2) this device must accept any interference received, including interference that may cause undesired operation. The device has been evaluated to meet general RF exposure requirement. The device can be used in portable exposure condition without restriction.
Electromagnetic Compatibility InformationThe device satisfies the EMC requirements of the international standard IEC 60601-1-2.The requirements are satisfied under the conditions described in the table below.The device is an electrical medical product and is subject to special precautionary measures with regard to EMC which must be published in the instructions for use.Portable and mobile HF communications equipment can affect the device.Use of the unit in conjunction with non-approved accessories can affect the device negatively and alter the electromagnetic compatibility.The device should not be used directly adjacent to or between other electrical equipment.
27
28
Electromagnetic Compatibility Information Electromagnetic Compatibility Information
29
30
Electromagnetic Compatibility Information Electromagnetic Compatibility InformationTable 3 continuedNOTE 1At 80 MHz and 800 MHz, the higher frequency range applies.NOTE 2 These guidelines may not apply in all situations. Electromagnetic propagation is affected by absorption and reflection from structures, objects and people.a The ISM(industrial, scientific and medical) bands between 0,15 MHz and 80 MHz are 6,765 MHzto6,795 MHz;13,553 MHz to 13,567 MHZ;26,957 MHz to 27,283 MHz; and 40,66 MHz to 40,70 MHz. The amateur radio bands between 0,15 MHz and 80 MHz are 1,8 MHz to 2,0 MHz,3,5 MHz to 4,0 MHz,5,3 MHz to 5,4 MHz,7 MHz to 7,3 MHz,10,1 MHz to 10,15 MHz,14 MHz to 14,2 MHz,18,07 MHz to 18,17 MHz,21,0MHz to 21,4MHz,24,89 MHz to 24,99 MHz,28,0 MHz to 29,7 MHz and 50,0 MHz to 54,0 MHZ.b The compliance levels in the ISM frequency bands between 150 kHz and 80 MHz and in the frequency range 80 MHz to 2,7 GHz are intended to decrease the likelihood that mobile/portable communications equipment could cause interference if it is inadvertently brought into patient areas. For this reason, an additional factor of 10/3 has been incorporated into the formulae used in calculating the recommended separation distance for transmitters in these frequency ranges.c Field strengths from fixed transmitters, such as base stations for radio(cellular/ cordless) telephones and land mobile radios, amateur radio, AM and FM radio broadcast and TV broadcast cannot be predicted theoretically with accuracy. To assess the electromagnetic environment due to fixed RF transmitters, an electromagnetic site survey should be considered. If the measured field strength in the location in which the device is used exceeds the applicable RF compliance level above, the device should be observed to verify normal operation. If abnormal performance is observed, additional measures may be necessary, such as re-orienting or relocating the device.d Over the frequency range 150 kHz to 80 MHz, field strengths should be less than 3 V/m.
31
32
Electromagnetic Compatibility Information Electromagnetic Compatibility Information
33
34
 report this ad
Electromagnetic Compatibility InformationWARNINGS! · This device should not be used in the vicinity or on the top of other electronic equipment such as cell phone, transceiver or radio control products. If you have to do so, the device should be observed to verify normal operation. · The use of accessories and power cord other than those specified, with the exception of cables sold by the manufacturer of the equipment or system as replacement parts for internal components, may result in increased emissions or decreased immunity of the equipment or system.35
[xyz-ips snippet=”download-snippet”]