
JPL Vision+ Vision & Voice Webcam 1 Home User Manual
Plug & Play 1080p HD Webcam
Ideal Work at Home solution
- Two Microphones
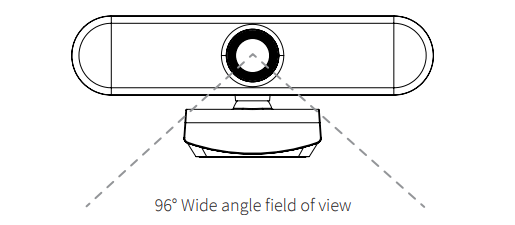
- 96° Wide Angle Field of View
- Desk / Monitor Mount
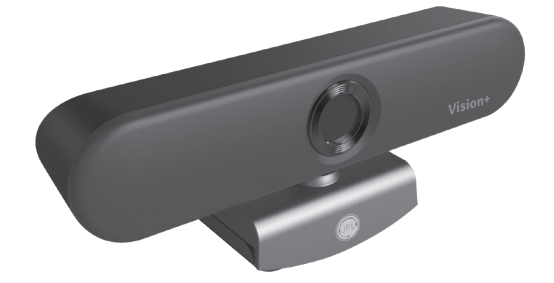
Thank you for choosing the Vision+ Webcam.
What’s in the box:
1 x Vision+ Webcam, 1 x Privacy Lens Cover, 1 x USB-A to USB-C cable
System Requirements
Windows® 2000/XP (SP3 or higher), Windows Vista® or Windows® 7/8/10 / Android 4.0 and above with UVC / MAC for HD 1080p video recording:
2.4 GHz Intel Core 2 Duo processor2 GB RAM or moreHard drive space for recorded videosUSB 2.0 port
Recommended requirements for full HD 1080p and 720p video calling:
1 Mbps upload/download for 720p2 Mbps upload/download for 1080p
Features
- Full HD 1080p 30fps CMOS video calling (up to 1920 x 1080 pixels)
- Full HD 1080p 30fps CMOS video recording (up to 1920 x 1080 pixels)
- Privacy Lens Cover
- Built-in dual stereo microphones
- Duplex Communication
- Automatic low-light correction
- 96° Wide angle field of view
- Monitor / Desk mount
- AEC – Automatic Echo Cancellation
- ANS – Automatic Noise Suppression
- Hi-speed USB 2.0 certified
- 24 Month warranty
Setting up your webcam
The Vision+ is designed to suit the way you like to make a video call, whether it’s one to one or conference, you can place the Vision+ webcam where you want it – on a computer monitor, desktop or tripod.
- Microphones
- Lens
- Mount
- USB Port

Using your webcam
Once you have connected the webcam to your computer via the USB cable you can open the visual collaboration software of your choice: Teams®, Zoom®, WebRTC, Webex, Bluejeans® and many more.
Most collaboration software packages allow you to choose your devices.
Simply select the JPL Vision+ for both microphone and camera.
Optimal Performance
- Do not sit in front of a window or other bright light source
- Having an uncluttered background will will have your viewers concentrating on you
- The mounting system allows for tilting and aiming the camera. While sitting in your normal position, your entire face should be just above the middle of the picture. Tilt and move the camera to frame up a good view.
Positioning on a monitor
Grasp the webcam in one hand and open the flexible clip base with your other hand. Mount the webcam onto the top of the monitor, making sure that the foot on the flexible clip base is flush with the back of the monitor.

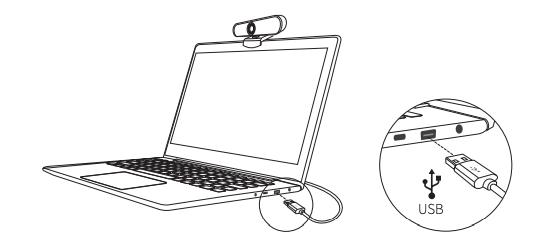
Connecting your webcam
- Plug the USB-C jack into the back of the camera
- Plug the USB-A jack into the back of your PCConnecting the USB adapter to your computer’s USB port is a simple plug & play process. No other action is required.
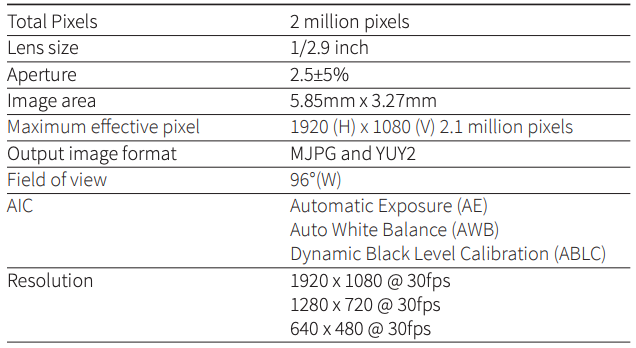
Camera parameters:
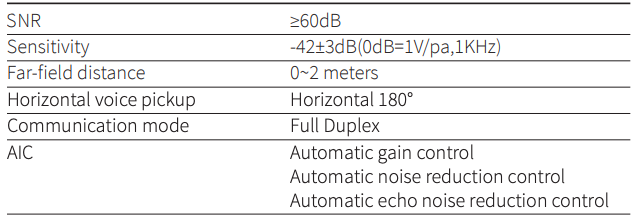
Microphone parameters:
Other parameters:

REGISTERED ADDRESS
UK Office: JPL Telecom LimitedUnits 1 & 2, Church Close Business Park, Church Close, Todber,Sturminster Newton, Dorset, DT10 1JH, England
USA Office: JPL Telecom Holdings LLC445 W Merritt Ave, Merritt Island, FL 32953, USA
Registered in England No. 5250754

References
[xyz-ips snippet=”download-snippet”]