![]()
Quick Start GuideRX4-1800Wi-Fi 6 Router
![]() Juplink
Juplink

What’s in the Box
1 x Juplink RX4-1800 Router1 x Ethernet Cable1 x AC-DC Adapter1 x Quick Start Guide
Tech Support
If you have any questions about the product, please reach out to us and we’re glad to assist you.Telt +1(833)923-2468 (Toll Free)Service Time: 09:00-17:00(EST)/ 06:00-14:00(PDT)Email [email protected]
Operating Conditions
Working Temperature: 0-45T / 32-113°FWorking Humidity: 10%-90% RH (non-condensing)Storage Temperature: -40-85°C / -40-185°FStorage Humidity. 5%-95% RH (non-condensing)
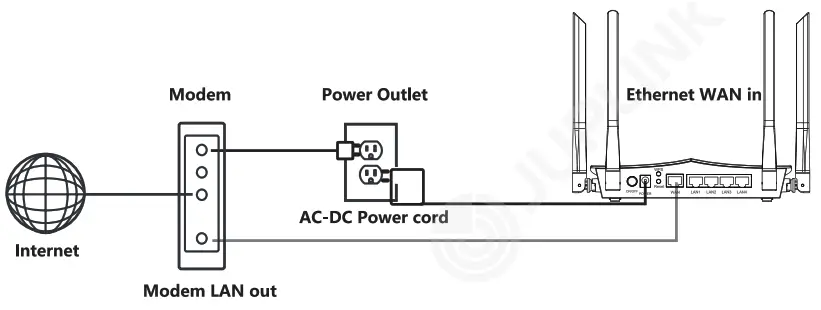
Step 1: Basic Installation
- Connect the modem to the router’s WAN port with an Ethernet cable.
- Connect the power adapter to the router and Modem’s power port and plug the other end Into a power outlet. 3. Turn on the router and modem, then wait about 2 minutes for its start.
Note: If your internet connection is through an Ethernet cable directly from the wall instead of through a DSL / Cable / Satellite modem, connect the Ethernet cable to the router’s WAN port to complete the hardware connection.
Method 1: Via wireless network
- Find the SSID (Network Name) JupUnk•RX4-1800_6G or JupUnIc-F00-1800 on phone or computer. Computer

- Click the Network Icon on your computer or go to the Wi-Fi Settings of your smartphone, and then select the SSID Juplink- X4-1800_613 or Juplink-RX4-1800 to Join the network. Recommend to disable the Mobile Data.
- Enter default WiFi password 12345678, and then click Join to get connected to the router.
- Launch a web browser on the device which has been connected to the router, and enter routerjuplInk.com to log in to the setup page.


Method 2: Via Ethernet cable
- Use an Ethernet cable to connect the computer’s network port to the router’s LAN port.

Step 3: Set up Internet Connection
Method 1: Connect to the Internet Automatically

Note:Please check with your ISP for the Internet access method before setting it.If it is PPPoE or Static, please refer to Method 2, Method 3.
Method 2: Connect to the Internet – PPPoE
- If the Internet access method provided by your ISP is PPPoE, select PPPoE here.
- Enter the Username and Password provided by your ISP.:ci

Note: If you forget your Username or Password, use an Ethernet cable to connect the WAN port of RX4-1800 to the LAN port of the old router, click Get from the old router. After obtaining this information successfully, replace the original router with RX4-1800.
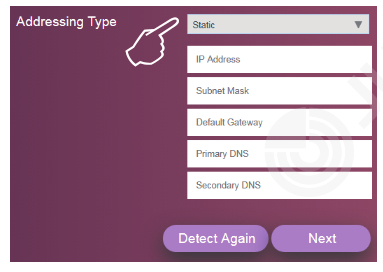
Method 3: Connect to the Internet – Static
- If the Internet access method provided by your ISP is static, select Static here.
- Enter your IP Address, Subnet Mask Default Gateway and Primary DNS, Secondary DNS provided by your ISP.
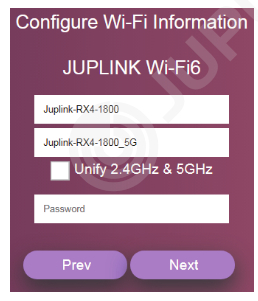
step 4: Set Your Wireless Network
- Modify your Wi-A Name ISSID! Password WIFi password.
- Select Unify 2.4C&& & Mkt (recommended) and click Nod.
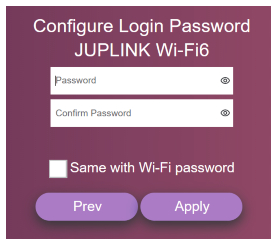
Step 5: Set Your Login Password
- Enter the new Login Password or select Same wash WWI password.
- Click Apply to finish your setting.
- Wait until the progress bar reaches 100%.
- After clicking OK, your wireless connection will be disconnected. Please connect to the new Wi-Fi network with the new Wi-Fi password after 30 seconds.


FCC Statement
This equipment has been tested and found to comply with the limits for a Class B digital device, pursuant to part 15 of the FCC Rules. These limits are designed to provide reasonable protection against harmful interference in a residential installation. This equipment generates, uses and can radiate radio frequency energy and, if not installed and used in accordance with the instructions, may cause harmful Interference to radio communications. However, there is no guarantee that interference will not occur in a particular installation. If this equipment does cause harmful interference to radio or television reception, which can be determined by turning the equipment off and on, the user is encouraged to try to correct the interference by one or more of the following measures
- Reorient or relocate the receiving antenna.
- Increase the separation between the equipment and receiver.
- Connect the equipment Into an outlet on a circuit different from that to which the receiver is connected.
- Consult the dealer or an experienced radio/TV technician for help.This device is restricted to be used indoor.
Operation is subject to the following two conditions:
- This device may not cause harmful interference.
- This device must accept any interference received, including interference that may cause undesired operation.
Radiation Exposure StatementThis device complies with FCC radiation exposure limits set forth for an uncontrolled environment and it also complies with Part 15 of the FCC RF Rules. This equipment should be installed and operated with a minimum distance 20 cm between the radiator & your body.CautionAny changes or modifications not expressly approved by the party responsible for compliance could void the user’s authority to operate this equipment. This transmitter must not be co-located or operating in conjunction with any other antenna or transmitter.Note
- The manufacturer is not responsible for any radio or TV interference caused by unauthorized modifications to this equipment.
- To avoid unnecessary radiation interference, it is recommended to use a shielded RJ45 cable.
![]() JuplinkOther Connection Mode & TroubleshootingRX4-1800 Wi-Fi 6 Router
JuplinkOther Connection Mode & TroubleshootingRX4-1800 Wi-Fi 6 Router
Tech SupportE-mail: [email protected]Tel : +1 (833) 923-2468 (toll free)Service Time: EST : 09:00-17:00/PDT: 06:00-14:00Website: www.juplink.comOperating ConditionsWorking Temperature: 0-45°C / 32-113°F Working Humidity: 10%-90% RH (non-condensing) Storage Temperature: 40-85°C / -40-185°F Storage Humidity: 5%-95% RH (non-condensing) To customize your wireless network connection and other advanced router’s settings, please go to www.juplink.com to download RX4-1800 firmware updates and User Manual for more information.
Repeater Mode
Connection

Setting
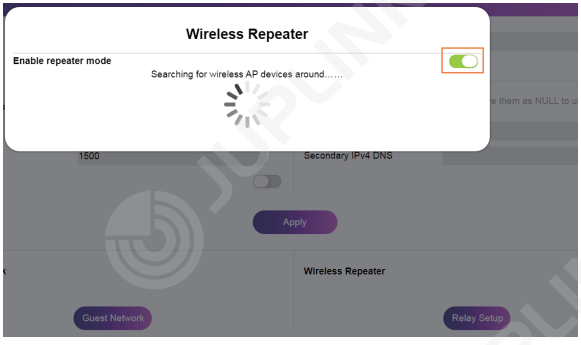
- After logging in to your router, click Basics > WAN
- Click the Relay Setup button to enable the repeater function in the pop-up window.
- Select Enable & Sync with the gateway (recommended).Note: After repeater mode is enabled, it will automatically search for surrounding Wi-Fi networks, which takes about 10 seconds. If the network you want is not found in the list, please move your device and retry the function.
- Select a Wi-Fi network in the repeater SSID list and enter the wireless password In the Key field.
- Click One Button Wireless Relay button. Your router will then reboot, and the extended new wireless network will be established in 2 minutes. After that, you can enjoy the extended Wi-Fi.
 Note: After repeater mode is enabled, it will automatically search for surrounding Wi-Fi networks, which takes about 10 seconds. If the network you want is not found in the list, please move your device and retry the function.
AP Mode (Bridge Mode)
ConnectionConnect the device as shown in the figure below.
Setting
- After logging in to your router, click Basics > WAN.
- Select Bridge from Lkik Mode drop-down list, and click Apply to finish your settings.

Note:
- Before setting, please disconnect the router’s WAN port connection
- In bridge mode, all devices connected to this router are managed by the uplink router.
- If you have multiple routers and want unified management for seamless roaming, it is recommended to select Unify 2.4G&5G and set a unified SSID.
Troubleshooting
Q1: Why cannot the maws up successfully?Al: If the router did not complete the setup, you can try the following: Press and hold the RESET button on your router with a paperclip or pin until the front indicator turns off and after about 25 seconds it turns on In red, and it finally stays in green.
Q2: Whycernot the Internet appear evaNeble?A2: The Internet appears unavailable if the Internet has difficulty communicating with your router. The problem may appear as a ‘Cannot find (Internet address(‘ message in your Web browser. If you are sure that the Internet address is correct and you’ve tried several valid Internet addresses with the same result, the message could mean that there’s a problem with your ISP or modem communicating to your router. Then, please try the following: – Make sure that the Internet Service Provider (ISP) Information is filled incorrectly. – Make sure that the Ethernet and power cables are properly connected.
Q3: Why cannot connect the routes why:* titer success connection only for a while?A3: Try the following: – Check on the settings page for restrictions and blacklist. – Reboot the router and connect again. -Reset the router and set it up again.Q4: Why do routers and mobile get a strong signal but tow speed?A4: Try the following: – Enter the router setting page and verify that your router hasn’t connected any device from unknown access.
- Check with your ISP by phone or email to confirm that the service Is normal.
- If you are connected to the 2.4G band, the problem may be caused by wireless interference. In this case, It Is recommended to switch the 2.4G channel to 1 or 11 and change the bandwidth to 20MHz.
Q5: Why cannot access the web UI of the router after entering router.JupUnk.com?A5: Try the following solutions and log in again:
- Ensure that your wireless device is connected to the router’s wireless network.
- Ensure that your wired device is connected to a LAN port (1, 2 3, or 4) of the router properly using an Ethernet cable and that the device is set to Obtain an IP address automatically and Obtain DNS server address automatically.
- Clear the cache of your web browser or try a different web browser, and try logging in again.
- Disable the firewall of your device, and try logging in again.
- If the problem persists, reset your router and follow the setting again.
Q6: An IP address conflict message appears on the computer after it is connected to the router. What should I do?A6: Try the following:
- Ensure that there is no other DHCP server in your LAN or that the other DHCP server is disabled.
- Verify that the IP address of your router Is not used by another device in your LAN. The default access address of the router is router.juptinic.com – Ensure that the static IP address assigned to the computer in your LAN is not used by another device. – Reboot your router and check again.
Q7: I forget the login password of the router. What should I do?A7: Try resetting the router and logging into the router setting page to set the password again.
Q8: Why cannot my phone or computer find the 6GHz signal? A8: Try the following:
- Only devices supporting 5GHz signal can find and connect to the 5GHz network. Some computers support connecting to 2.4G only.
- Access the router’s settings page and confirm that both wireless bands have been turned on.
- Change wireless Work Mode to 802.11 b/g/n/ac in Basics Wireless Setting page.
Q9: How to connect to Xfinity cable Modem?A9:
- Connect to the Wi-Fi network of the router and log in to the web management page at routerjuplInIccom
- Tap or click Network on the top menu.
- Tap or click WAN Setting.®
- Select PPPoE in Addressing Type.
- Enter the User Name and Password of your Internet Service Provider (ISP).
- Click Apply.
Q9: How to change the DNS servers on the router?A10:
- Log in to the web management page at router.juplink.com
- Tap or click Basics on the top menu.
- Tap or click WAN Setting.
- Select Connection Type and IP Mode, then you can set DNS manually.
- Enter Subnet Mask information.
- Enter Primary DNS and Secondary DNS.
- Click Apply.
Note: Please contact your Internet Service Provider (ISP) to obtain detail DNS information.
Q9: Why Is my Windows device not detecting my 1 lax routers wireless network?All:If your Windows device is not detecting your 11 ax router’s wireless network, you might have an earlier Intel wireless network adapter on the device (some earlier Intel adapters include Intel Dual Band Wireless AC-3160, AC-3165, AC-7260, AC-7265 and AC-8260). To check which wireless network adapter is being used on your Windows device, do as follows:
- Open the Control Panel on your Windows device.
- Enter Device Manager in the search bar at the top of the window.
- Click Device Manager.
- Click the arrow next to the network adapter to display the list of adapters.
- Your wireless network adapter is displayed in the list.
Note: If your wireless network adapter Is not made by Intel and you are still unable to connect to your router’s wireless network (SSID), try rebooting or resetting your router. If your wireless network adapter is an earlier Intel model, it might not recognize the wireless signal on your 11 ax router. In this case, connect to your router directly using a wired connection to access the internet and download the latest network adapter driver, in the following steps:
- Using an Ethernet cable, connect your Windows device to a LAN port on the rear panel of your AX router.
- Launch a web browser and visit https://downloadcenter.intel.com/product/59485/VVireless-Networking
- Download the latest wireless network adapter driver for your network adapter.
- After installing the latest driver, your device should be able to recognize your 11 ax routers’ wireless network.
 report this ad
Q12 How to establish a mesh network system on your router?Al2:
- First of all, you need to have at least 2 routers. CD Connect your router’s WAN port to the LAN port of the modem or the uplink router (main router).
- Set up the main router, and enable it to access the Internet normally. (Please note that the wireless network must be set to an encrypted mode other than Open.)
- Press the WPS button on both routers/modem for at least 5 seconds.
- After about 60 seconds, the lights on both routers/modem will stay in solid green, which indicates the setting is complete, the mesh network is set and can be used normally.
[xyz-ips snippet=”download-snippet”]