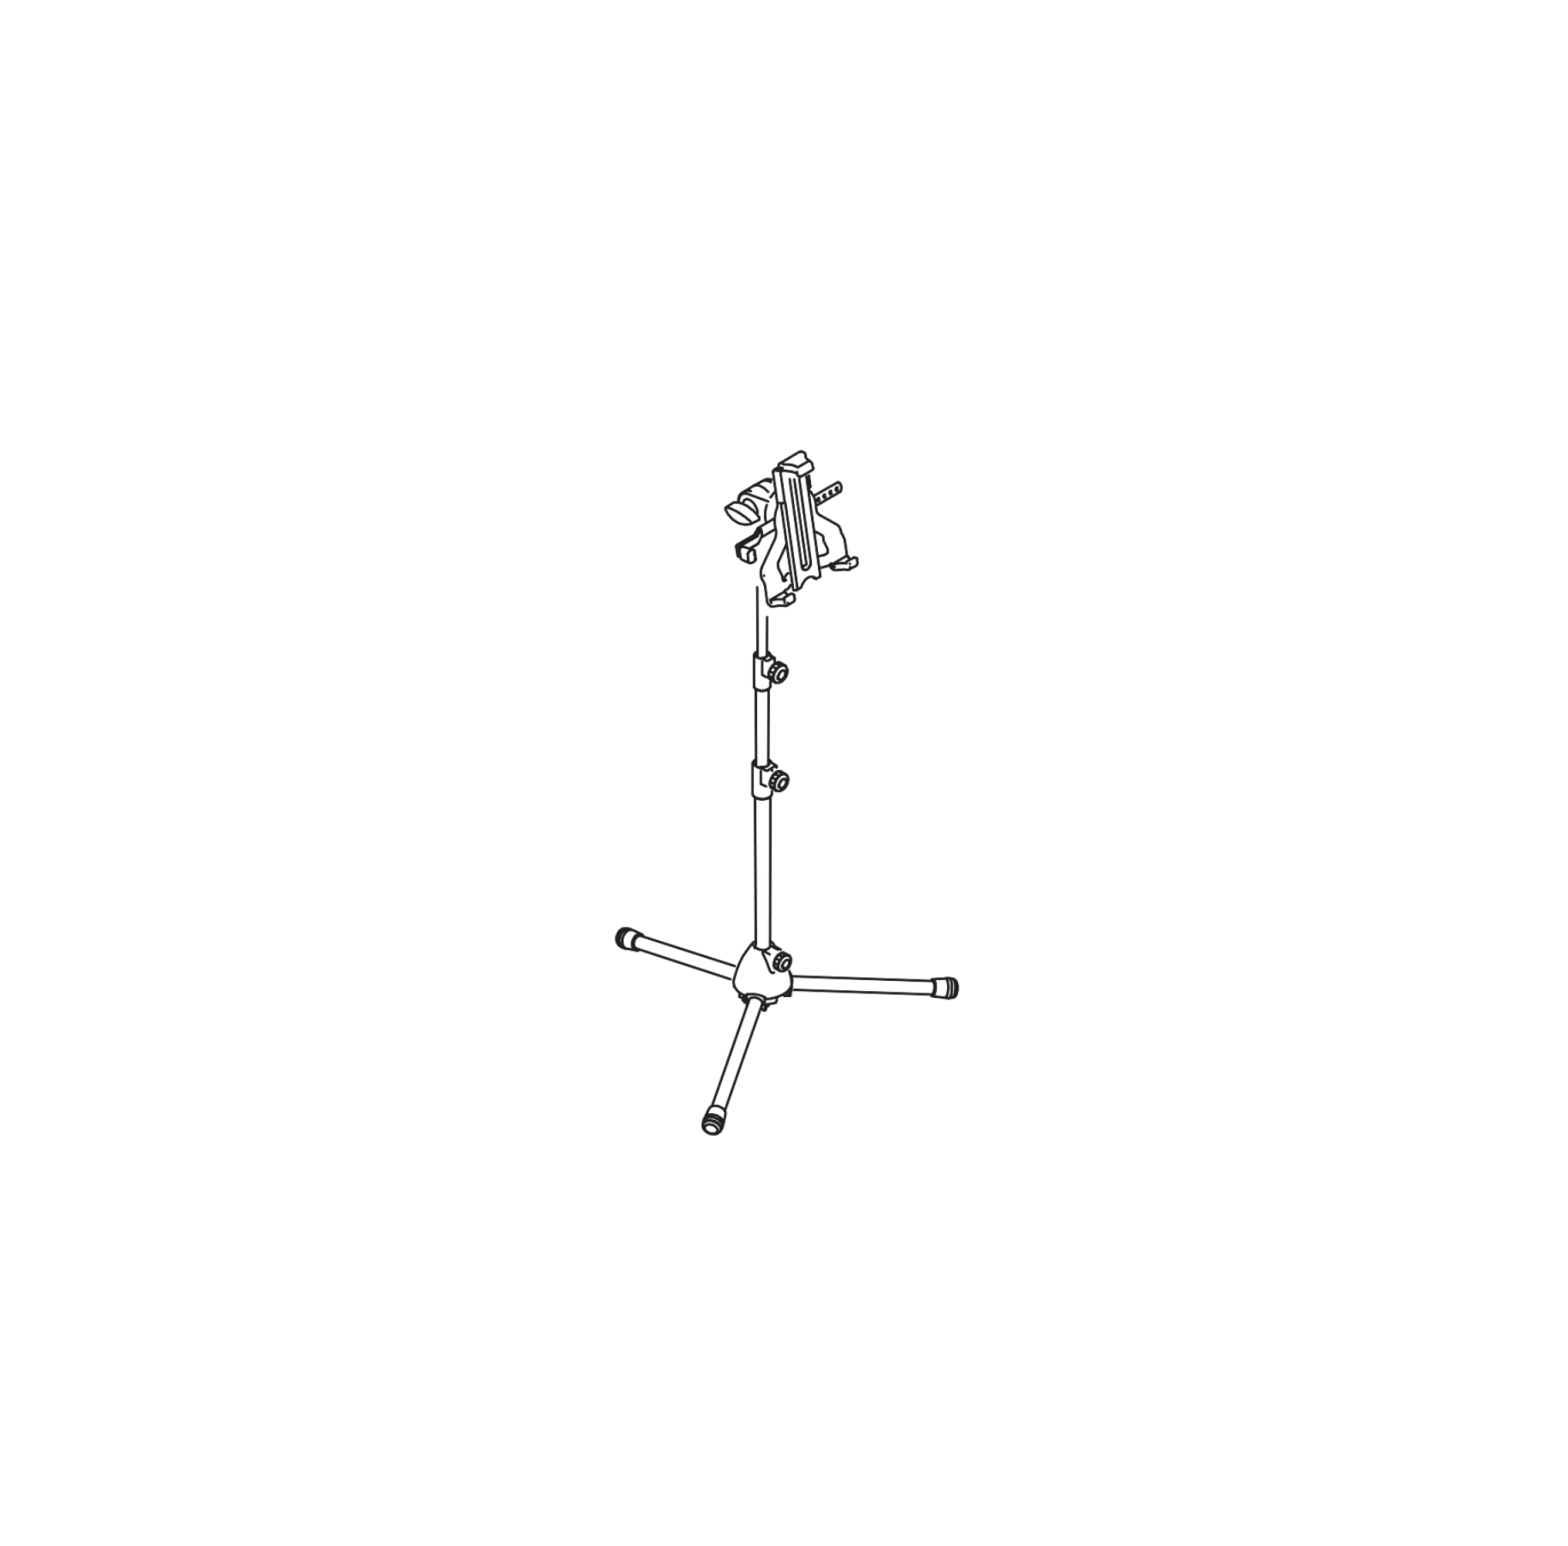
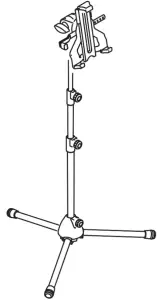
K M 19775 Tablet PC Stand
Thank you for choosing this product. Please read and follow the instructions carefully. They inform you about all the important steps concerning assembly and handling. We recommend you to keep them for future reference.
INTENDED USE
- Universal tablet holder for all tablets sized approximately 10″ to 16″.
- Particularly suited for tablets with a protective cover or casing up to 20 mm.
FEATURES & CAPABILITIES
- Flexible and stable! Your Tablet PC is an absolute eyecatcher.
- Equally suited for stage, home, rehearsal room and studio.
- The clamping mechanism (including side safety bracket) enables the simple, effective and secure mounting of your Tablet PC.
- Overlapping clamping jaws with integrated a moss rubber layer provide a secure hold, eliminate vibration noise and protect the tablet casing.
- With adjustment options that leave nothing to be desired:
- Tablet size, angle of inclination, direction, portrait/landscape: all individually adjustable
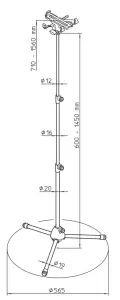
- The tablet holder is attached to a stable, height-adjustable (710-1560 mm) stand, foldable for transport and storage (packing size ø 90 x 563 mm)
SAFETY INSTRUCTIONS
a. Load capacity: – suited for Tablets from 10″ to 16″– Clip Tablet carefully into mounting plate and check for secure fit– Handle the holder with care, especially when changing the settings:– inclination, format, direction, heightb. Surface: – should be suited, i.e., a level and stable surface is a prerequisitec. Installation: – always hand-tighten the screw connections on the stand and bracket backlash freed. Various influences: – protect against wind, moisture, agitation, vibrations, etc.
INSTALLATION INSTRUCTIONS
COMPONENTS
Please visually check whether all parts are present and in good order – as far as can be seen.a. STANDa.1 3-leg with PA basea.2 3-rod combinationa.3 Connection thread – 3/8″b. TABLET CRADLEb.1 Swivel joint with 3/8″ threaded bushb.2 Cradle (base, slider, clamp)b.3 Guard arm with felt and rubber cap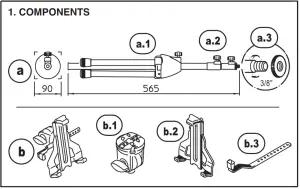
PREPARE STAND
2.1 Fold feet apart2.2 Loosen base screw and move base down as far as it will go; retighten the base screw2.3 NOTE! Stand wobblesThe base tube of the stand is not allowed to touch the ground, in fact the stand should rest securely on the three base tube parquet protectors2.4 Loosen the knurled screws, adjust the extensions to the desired height; clamp the knurled screws again

Connect the TABLET CRADLE with the STAND
3.1 Turn the knurled disc on the threaded bolt a.3 as far as it will go .3.2 Now also screw the swivel joint b.1 to the threaded bolt of the stand, but not quite up to stop (approx. 2 – 3 turns)3.3 Turn the knurled washer back again, so that it is clamped backlash-free with the swivel joint3.4 Tighten the wing nut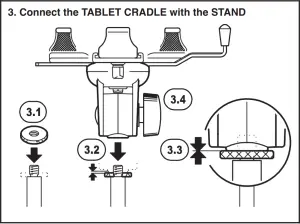
TABLET PC POSITIONING
Generally suitable for TABLET PCs from 10″ to 16″ screen size (see Chapter 7).4.1 Always position the TABLET PC in the CRADLE in a centered and balanced position4.2 NOTEOff-center positioning may be necessary due to the size of the TABLET PC. Please observe the balance of the entire installation for safety reasons4.3 The Guard arm should always rest against the TABLET PC and…4.4 …must be at the bottom – as additional safety – if the TABLET PC is set upright!
NOTE!If the Tablet PC is placed almost cantered but the guard arm does not rest 4.3 we recommend to rebuild the arm, as described in chapter 5.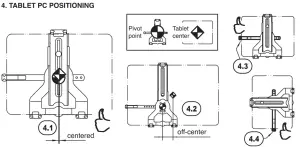
REBUILD the GUARD ARM
First remove the tablet from the holder b.2
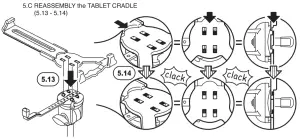
5.A DISASSEMBLING the GUARD ARM5.1 Slightly loosen the clamping nut…5.2 …and extend the slider completely5.3 Retighten the clamping nut5.4 Push the lever down and hold5.5 Shift the tablet cradle b.2 upwards as far as it will go until the connection disengages with an distinguishable click5.6 Lift tablet cradle b.25.7 Remove Guard arm b.35.8 If required, the swivel joint b.1 can be unscrewed from the stand a5.B REATTACHING the GUARD ARM5.9 Insert guard arm b.3 into the corresponding a recess of the swivel joint b.1. NOTES:5.10 Select the position of the arm b.3 so that the tablet PC sits in the centre of the holder and attaches sideways to the rubber of the bracket5.11 The guard arm should be attached to the swivel joint b.1 with at least 2 boreholes.5.12 We advise not to fit the guard arm with only one borehole, since the joint would feel loose.5.C REASSEMBLY the TABLET CRADLE5.13 Place the tablet cradle b.2 on the 4 hooks of the swivel joint b.15.14 Then push the tablet cradle b.2 down as far as it will go.Pay attention to the clicking noise.

INSERT TABLET PC
6.1 Tilt cradle b.2 backwards approx. 30°…6.2 Tighten clamp of swivel joint b.16.3 Place Tablet on lower supports…6.4 …and lean on cradle b.1NOTE:The Tablet PC should rest:a. at the BACK,b. CENTERED andc. against the GUARD ARM b.3. Depending on the size of the Tablet PC, the position of the guard arm should be corrected (see Chapter 5)6.5 Loosen the clamping of the slider…6.6 …and retract the slider until the upper attachment of the Tablet PC is securely fastened to the cradle b.2. In this process, the slightly compressed foam rubber coating clamp the tablet.6.7 Tighten the clamping again6.8 Check firm seat of the tablet and readjust, if necessary.6.9 The foam rubber pads protect the surface of the tablet and provide additional clamping.6.10 Remove the tablet in reverse order.NOTE: Please hold the tablet securely, especially when opening the clamping 6.5.
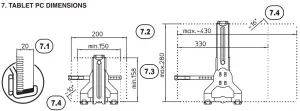
TABLET PC DIMENSIONS
The clamping range includes:7.1 – in depth up to 20 mm7.2 – in width from 150 – 430 mm7.3 – in height from 158 – 280 mm7.4 – in diagonal approx. 10″ – 16″
ADJUSTMENTS
When adjusting8. TILT9. FORMAT10. DIRECTION the TABLET PC can remain in the holder.
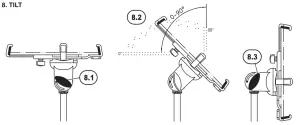
TILT
The TABLET PC can be fixed in any position between vertical and horizontal end position.8.1 Hold Tablet and loosen wing nut,8.2 tilt Tablet as desired and…8.3 …retighten wing nut
FORMAT
The Tablet PC holder has a 90° swivel function.9.1 Hold the tablet and turn it to lands cape or portrait mode – or position at an angle!Invisible stops in the swivel joint limit the rotation9.2 NOTE:Install guard arm c so that the stop is at the bottom when the tablet is aligned vertically; if necessary, the guard arm must be inserted into the swivel joint rotated by 180° (see Chapter 5)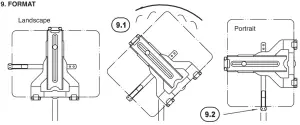
DIRECTION
10.1 Initial position:The knurled disc and the swivel joint of the cradle are clamped together10.2 First release the tension by unscrewing the knurled disc10.3 Turn the Tablet PC stand holder in the desired direction10.4 Tighten knurled disc and the swivel joint together againALTERNATIVE:10.5 Change the direction of the tablet by repositioning the complete stand (without fig.)NOTE:10.6 For safety reasons, the swivel joint must always be mounted with at least two turns on the threaded bolt of the stand.See also Chapter 2 of the instructions
SETTINGS – OVERVIEW

MAINTENANCE
- Careful handling maintains the function and safety of the installation
- Regularly check the proper condition of the components; defective parts must be – replaced or repaired
- Ensure that the screw and plug connections are firmly seated before use
- Always remove the tablet PC first when carrying out maintenance and cleaning work
- For cleaning and maintenance, use a slightly damp cloth and a non-abrasive – cleaning agent
FAULT-FINDING (F) and REPAIR (R)
F: Stand wobblesB: Check floor levelness and load capacityB: Ensure 3-leg support – base tube should not touch the surface 2.3B: Tighten the knurled screws of the clamps
F: Tablet PC sits off-centreB: Position guard arm b.3 accordingly (Chapter 4 and 5)B: Tablet PC wider than 330 mm (7.2)
F: Tablet PC wobblesB: Set slider tighter (6.6)B: Clamping too loose, tighten if necessary (6.7)B: Tablet PC is smaller than the min. dimension of 158 mm (7.3)
F: Tablet PC holder wobblesB: Swivel joint b.1 screwed too loosely to the standB: Check connection and tighten if necessary (Chapter 3 and 10)B: Not properly engaged? Place cradle b.2 and engage it correctly 5.C
F: Cradle b.2 cannot be pulled off swivel joint b.1B: First press lever, then unlock cradle b.2 and pull off 5.4 and 5.5
TECHNICAL DATA
| Material | Base, swivel joint, handles: Polyamid (PA)Tablet cradle: Bio-based plasticTubes, guard arm, screw connections: steel, brassClamps: Zinc die-castCaps, foam rubbers, rubber washers: TPE, EPDM, TPU |
| Load capacity | Tablet PCs (check dimensions) |
| Dimensions | for Tablets ~10″ – 16″width 150-330/430 mm, height 158-280 mm, depth: 20 mmStand: Height 600-1450 mm, root circle-ø 565 mmThread BSW 3/8″Installation: Height 710 – 1560 mm |
| Cardboard | 920 x 120 x 180 mm |
| Weight | net: 1.8 kg, gross: 2.1 kg |
KÖNIG & MEYER GmbH & Co. KG Kiesweg 2, 97877 Wertheim, www.k-m.de 19775-300-55 Rev.5a 03-80-503-00 4/21
 report this ad
References
[xyz-ips snippet=”download-snippet”]