
User Manual
Hand Crank Vinatge Radio Speaker

Radio Operation
- At right-side the radio, you can turn on the radio. And the frequency scale will turn to red.
- It use a special elector-acoustic design, which is tuned by a professional tuner, making this radio very good sound quality.
- ON/OFF button
- Frequency scale
- BT&Band switch
- LED indicator (For solar and hand crank charge)
- Low battery indicator(5.1. Fully charged: Light red 5.2. Low power: Flashing. 5.3. No power: Light off.)
- Flashlight Button
- Tune up
- Tune down
- Play/Pause/Function switch button
- The radio has an SOS feature for emergencies that activates a loud siren and a flashlight.
- Push the SOS switch in the bottom of right corner to activate it.
- Push to the middle of switch to turn it off.
SOS/Charging switch
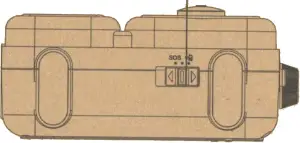
Bottom
FM/AM/WB Radio
- Push the band switch to the “FM/AM/WB”.
- Rotate the tuning knob to select a channel.
Bluetooth Speaker
- Push the band switch to “BT”.
- “Ding Dong” will be heard after 3s.
- Turn on the Bluetooth device such as a mobile phone to find the name of “MD-096” and click it to connect.
- When is connected, “Connected” will be heard and you can open the music player to listen to music.
- After disconnected the Bluetooth, “Disconnected” will be heard.
Note: To ensure the sound quality of Bluetooth, the best reception distance is within 10 meters.
TF Card Player
- Push the band switch to “BT”.
- Insert TF card to slot.
- When heard the “SD Mode”, it automatically play the music.
- If TF card installed in the machine, you can long press the button “
 “.
“. - Then you will hear “SD Mode” and it will automatically play music.
AUX Player
- Turn the power switch to “BT”.
- Long press the button “” after “AUX Mode” is heard.
- Insert the supplied AUX cable to connect your phone/MP3/iPod/PC etc.
Right-side
![]()
- Micro USB input /AUX port
- TF card insert
- Volume button
- Charging indicator
- Micro USB output /USB Flash Drive input
USB Flash Drive
- Push the band switch to “BT”.
- Insert “USB Flash Drive” to slot.
- When heard the “USB Mode”, it automatically play the music.
- If “USB Flash Drive” installed in the device, you can long press the button”“
- Then you will hear “USB Mode” and it will automatically, play music.
Note: This products have memorize playback function.
Phone charging
- Push the switch to the “” in bottom of machine.
- The standard port can be used to charge for mobile phones, digital cameras, MP3, MP4 and other emergencies.
- It has the capacity to charge 2000mAh when fully charged.
NOTE: To extend the battery life, it’s suggested to use this function only in emergencies.
Language switch
- Push the switch to the “BT”.
- Press the “” without letting go, and move the band to “AM/FM” at the same time.
- Then push the switch to the “BT” again after 2s.
Flashlight

- Flashlight
- Press on the flashlight button, it will lights up.
- Press it again to turn it off.
NOTE: Don’t irradiate to people eyes.
Time setting
- Long press the “” in “BT mode”, you heard “RTC” mode after 3s.
- Press “” when you see “CL” in the screen, press “” into time setting.
- And you can press “” and “” to change digital, press “” to enter.
- Time will continue after you turn off the device.
NOTE: Morning time won’t display “AM” in the screen, but it will display “PM” when you set afternoon time.
Alarm clock
- Long press the “” in “BT” mode, you heard “RTC mode” after 3s.
- Press “” or “” when you see “AL” in the screen, press “” to enter.
- Press “” and “” to change “ON/OFF “, select “ON” and press “” to enter time setting.
- And you can press “” and “” to change digital, press “” to enter.
- Alarm clock will be heard in your setting time and play some soft music from low volume to louder.
Power the Device
Before powering the radio, make sure you read the safety instructions.
A. USB Charging
- To charge the radio, insert the supplied USB cable into the USB power source. Plug the Micro USB connector into the input port on the side of the radio.
- When the battery is charged, the charging indicator will light red. When the battery is fully charged, the indicator will light off.
NOTE:It would be better to turn off the radio before the device is charged.
B. Hand Crank
The radio can also be charged by turning the handle at the back of the device and activating the dynamo.
- The LED indicator will light red when the handle is being turned.
- The handle can be turned either clockwise or counter-clockwise. Spin the handle for 3-5 min at the speed of 130 RPM when using the radio for the first time.
- 1 min of cranking can be used for flashlight 30 minutes or radio play (at the medium volume) about 5 minutes.
C. Solar Powered
Place the unit in clear sunlight to let it charge as efficiently as possible.
- The LED indicator will light red when the radio received sunlight to start charging up.
- The charging effect depends on the intensity of sunlight and the irradiation time of sunlight.
Kindly remind : It is mostly used for maintaining the battery or prolong the battery life through this way. With an average of sunlight, the battery fully charge need 65 ~ 70 hours.
Specifications
| Frequency range | FM:87-108 MHZAM:520-1710 MHZWB:162.400-162.550 KHZ |
| Dimensions | 128*57*98 mm |
| Weight | 395 g |
| Battery | 2000mAh Li-on battery / 3.7V |
| Speaker Unit | 8W 4Ω |
| Bluetooth | Bluetooth 5.0 |
| Max current | ≤350mA |
| Max Output Power | ≈8W |
| Working Voltage | 2.7V ~ 4.2V |
| Charging time(USB) | 3-4h |
| Bright | 120 LM |
| Bluetooth player | Max volume: 3.5h75% volume: 5h |
| After fully charged, the device supports | LED lighting: >7hBroadcast (middle volume): >20h |
Warranty
- This radio has full 12 months warranty against manufacturing defects.
- The warranty period begins from the date of purchase.
Safety Instructions
- Avoid violent shocks or falling.
- Keep out of high temperature and humidity.
- Cassettes, magnetic cards, and other magnetic recording software should be placed away from the body speakers to prevent the recorded content from being erased or noise on the cassette.
- Please do not over discharge the unit, so as not to reduce the internal battery life, or even damage the internal battery.
- Use a soft damp cloth to clean radio surface. Do not use alcohol or other liquids containing corrosive ingredients to clean this unit.
- For the first use or when the unit idles over 60 days, please placed under strong solar light (sunlight>86000LUX) for 30 minutes or hand crank for 1 minute to activate the internal battery.
- In order to protect the machine and use it normally, don’t use strong signal sources (such as walkie-talkies) to operate close to the machine, otherwise it will easily be damaged and cannot be used!
Packing list
- Radio x 1
- User Manual x 1
- Micro USB Cable x 1
- Packing box x 1
![]()


Made in China
END
[xyz-ips snippet=”download-snippet”]