User Manual
![]()
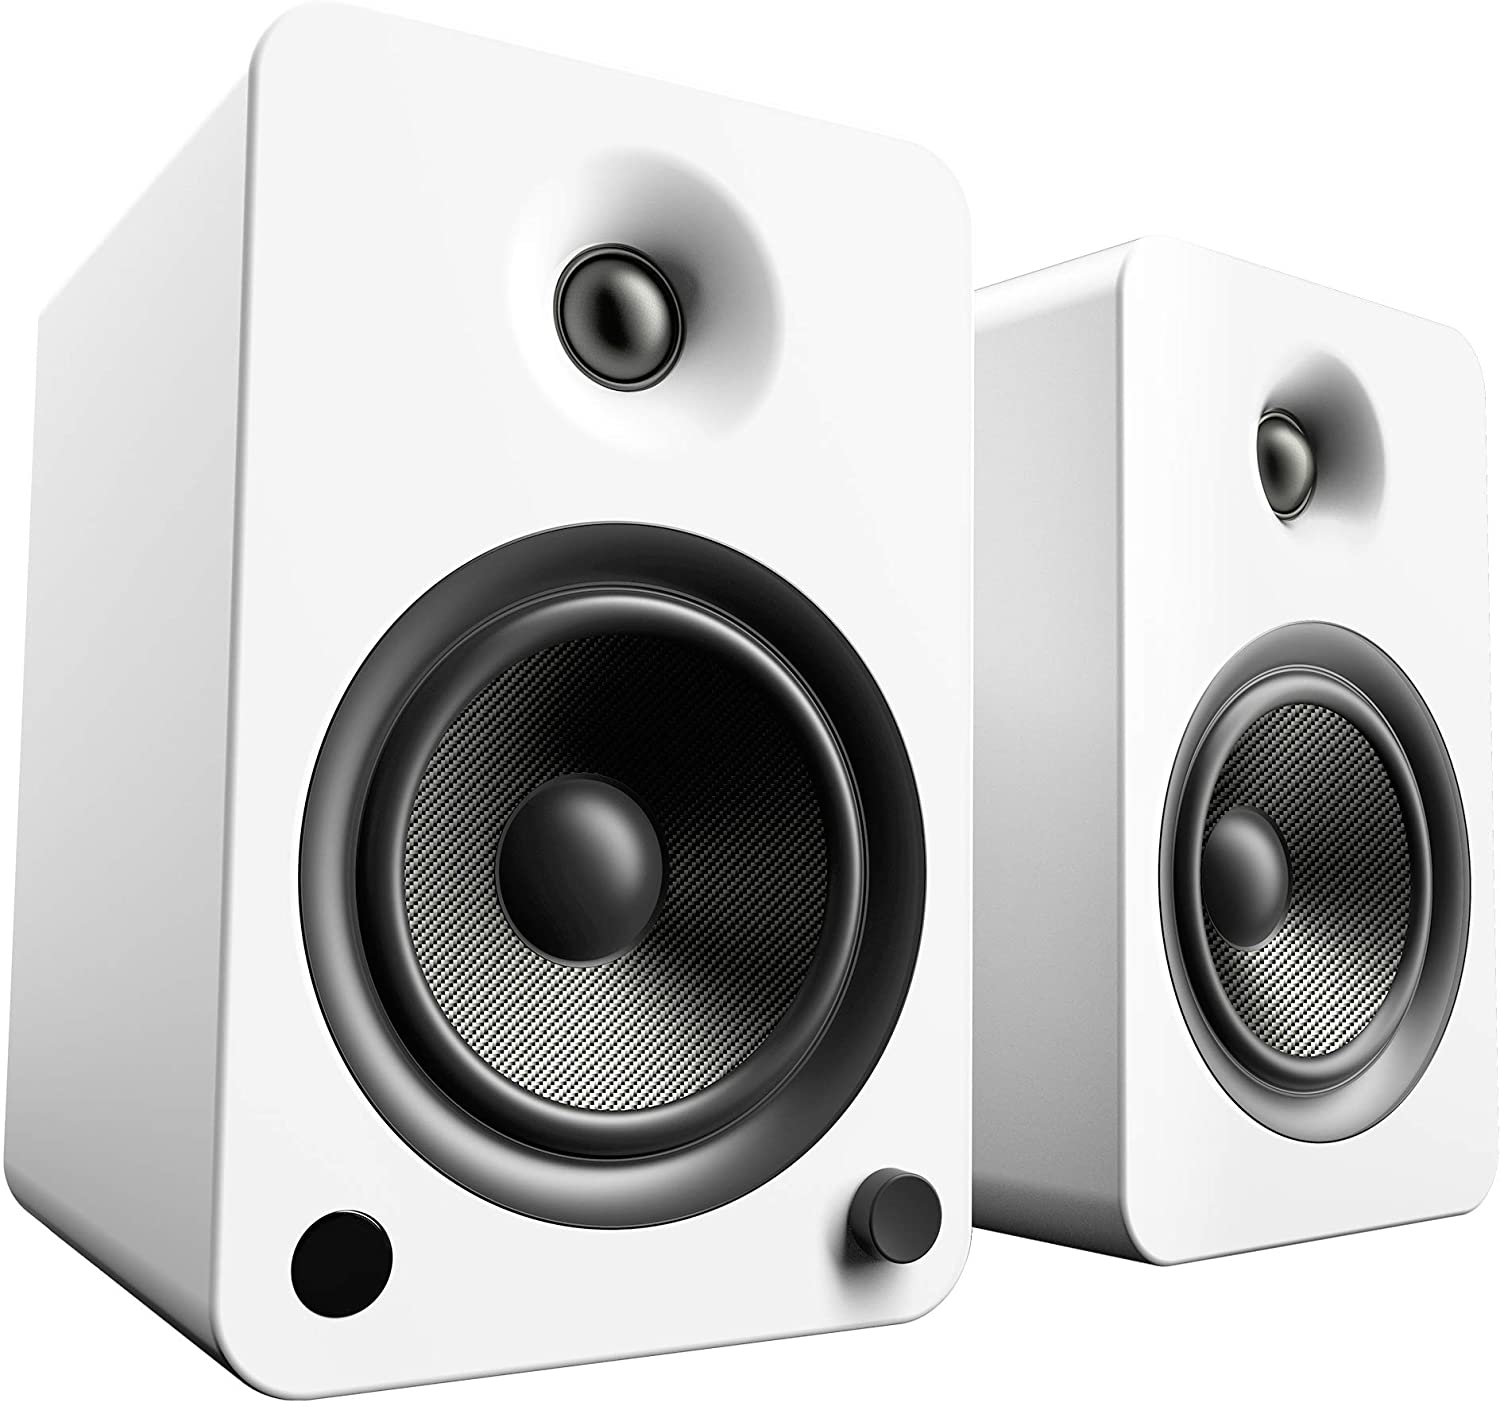
Kanto Powered Speakers
Important Safety Precautions
![]() ATTENTIONThe exclamation point within an equilateral triangle is intended to alert the user of the presence of important operating and maintenance (servicing) instructions in the literature accompanying the apparatus.
ATTENTIONThe exclamation point within an equilateral triangle is intended to alert the user of the presence of important operating and maintenance (servicing) instructions in the literature accompanying the apparatus.

CAUTION: TO REDUCE THE RISK OF ELECTRIC SHOCK, DO NOT REMOVE BACK PANEL.NO USER SERVICEABLE PARTS INSIDE. REFER SERVICING TO QUALIFIED SERVICE PERSONNEL.
 DANGEROUS VOLTAGEThe lightning flash with arrowhead, within an equilateral triangle, is intended to alert the user of the presence of non-insulated “dangerous voltage” within the product’s enclosure that may be of sufficient magnitude to constitute a risk of electric shock to persons.
- Read these instructions.
- Keep these instructions.
- Heed all warnings.
- Follow all instructions.
- Do not use this apparatus near water.
- Clean only with a dry cloth.
- Do not block any ventilation openings. Install in accordance with the manufacturer’s instructions.
- Do not install near any heat sources such as radiators, heat registers, stoves, or other apparatus (including amplifiers) that produce heat.
- Protect the power-supply cord from being walked on or pinched, particularly at plugs, convenience receptacles and the point where they exit from the apparatus.
- Only use attachments / accessories specified by the manufacturer.
- Use only with the cart, stand, tripod, bracket, or table specified by the manufacturer, or sold with the apparatus. When a cart is used, use caution when moving the cart/apparatus combination to avoid injury from tip-over.
- Unplug this apparatus during lightning storms or when unused for long periods of time.
- Refer all servicing to qualified service personnel. Servicing is required when the apparatus has been damaged in any way, such as power-supply cord or plug is damaged, liquid has been spilled or objects have fallen into the apparatus, the apparatus has been exposed to rain or moisture, the apparatus does not operate normally, or the apparatus has been dropped.
- Apparatus shall be connected to a MAINS socket outlet with a protective earthing connection.
- An appliance input coupler is used as the disconnect device – the disconnect device shall remain readily operable.
- Batteries or battery packs shall not be exposed to excessive heat such as sunshine, fire or the like.
FCC Notice:This device complies with part 15 of the FCC Rules. Operation is subject to the following two conditions: (1) this device may not cause harmful interference, and (2) this device must accept any interference received, including interference that may cause undesired operation.
NOTE 1: This equipment has been tested and found to comply with the limits for a Class B digital device, pursuant to part 15 of the FCC rules. These limits are designed to provide reasonable protection against harmful interference in a residential installation. This equipment generates, uses and can radiate radio frequency energy and, if not installed and used in accordance with the instructions, may cause harmful interference to radio communications. However there is no guarantee that interference will not occur in a particular installation. If this equipment does cause harmful interference to radio or television reception, which can be determined by turning the equipment off and on, the user is encouraged to try to correct the interference by one or more of the following measures:
- Reorient or relocate the receiving antenna
- Increase the separation between the equipment and receiver
- Connect the equipment into an outlet on a circuit different from that to which the receiver is connected
- Consult the dealer or an experienced radio/TV technician for help
NOTE 2: Any changes or modifications to this unit not expressly approved by the party responsible for compliance could void the user’s authority to operate the equipment.
Industry Canada Notice:This device complies with Industry Canada’s licence-exempt RSSs. Operation is subject to the following two conditions: (1) this device may not cause interference, and (2) this device must accept any interference, including interference that may cause undesired operation of the device.Under Industry Canada regulations, this radio transmitter may only operate using an antenna of a type and maximum (or lesser) gain approved for the transmitter by Industry Canada. To reduce potential radio interference to other users, the antenna type and its gain should be so chosen that the equivalent isotropically radiated power (e.i.r.p.) is not more than that necessary for successful communication.This device complies with Canadian ICES-003 and RSS-210
Introduction
Thank you for choosing YU4 Powered Speakers, designed by Kanto in Canada. YU4 outputs 140W Peak power into 4 Ohm speakers, for remarkably bold and clean sound. Excellent sensitivity and frequency response provide deep thumping lows and clear, scintillating highs. YU4 is an amazingly flexible speaker system that can accept five input sources and connect to a subwoofer for enhanced low frequency response. Additionally, it is equipped with the latest Bluetooth technology and a USB port for charging your devices. YU4 has a universal input power supply and can be used worldwide from 110V AC to 240V AC.
We recommend you read all instructions carefully before using the system and keep them for future reference. Kanto cannot be liable for damage or injury caused by incorrect setup or use of this product.
This powered speaker system was carefully tested and inspected during production, and before packaging and shipping. After unpacking, please check for any damage. It is rare that a unit is damaged during shipping, but if this happens contact your retailer immediately. You can also contact Kanto directly using one of the methods below.
Email: Toll Free: US & Canada: 1-888-848-2643 | UK: +44 800086999
What’s In the Box?

Front & Rear Panels
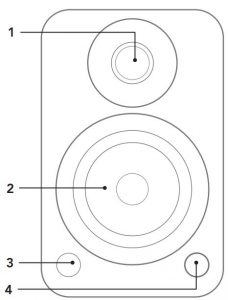
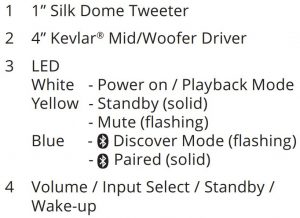
FRONT PANEL
REAR PANEL
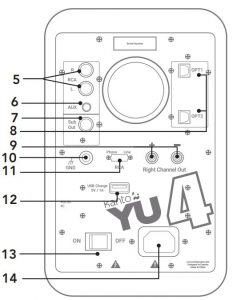
5 RCA L/R Input6 3.5 mm AUX Input7 Subwoofer Output8 Optical 1 and Optical 2 Inputs9 Right Channel Output Terminals (+ and −) for Passive Speaker Connection10 Turntable Ground Post11 RCA input Phono/Line switch12 USB Charge Port (5 V 1.0A)13 ON / OFF Switch14 AC Input Connection (100 V – 240 V)
Volume/Input Select Knob
YU4’s volume knob functions as an input select knob as well.Push the knob to select an input source– it cycles through the following inputs depending on what input source was last used.
RCA →AUX →OPT1 →OPT2 →BLUETOOTHPush and hold the knob to enter standby or wake up from standby.
Remote Control
Install two supplied AAA batteries in the back of your YU4 remote. Remote Control functions are listed below.
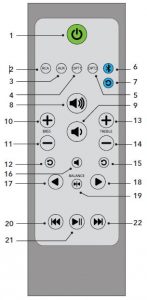
- Standby Button – press to enter Standby Mode or return to Playback Mode
- RCA Input Select
- 3.5 mm Stereo AUX Input Select
- Optical 1 Input Select
- Optical 2 Input Select
- Bluetooth® Input Select
- Bluetooth® Reset
- Increase Volume
- Decrease Volume
- Increase Bass Output
- Decrease Bass Output
- Reset Bass Output
- Increase Treble Output
- Decrease Treble Output
- Reset Treble Output
- Mute
- Balance Control Left Channel
- Balance Control Right Channel
- Reset Balance (Left and Right Channels)
- Previous Track (Bluetooth® Operation)
- Play / Pause (Bluetooth® Operation)
- Next Track (Bluetooth® Operation) Play / Pause (Bluetooth® Operation)Track (Bluetooth® Operation)
Setting Up Your Speakers
The YU4 powered speaker system is designed for either bookshelf or stand mounting. The stands should be of rigid construction, between 26” to 32” high. We re commend the Kanto SP26 speaker stands to go with your YU4.
The space between the two speakers and the distance from the listener is important. If thespeakers are positioned too close or too far apart, stereo imaging will not be fully developed.
YU4 is designed to perform optimally positioned at least 8” fro m the rear wall in an averagelistening room. However, it may not be possible to install the speakers in this position and sincerooms vary in shape, size, and furnishing, a certain amount of experimentation is necessary todetermine the most suitable position.
Moving the speakers very close to the rear wall will enhance the bass frequencies but will tend toreduce soundstage depth, while moving the speakers away from the rear wall will tend to havethe opposite effect. Avoid positioning the speakers close to or in the corners of the room, asthis will excite undesirable room coupling in the low and middle frequencies. If the width of therear wall is limited then toe-in the speakers slightly to reduc e reflections. Room characteristicsand positioning have a profound effect on the performance of the speakers, so time and effortdevoted to achieving the optimum positions will be rewarded.
Ensure that the ON/OFF Switch is in the OFF position.
Connect the two speakers together as shown below using the supplied speaker cable. Connectthe RED (+) and BLACK (−) terminals from the active speaker (le ft channel) to the corresponding terminals on the passive speaker (right channel). If you wish t o place your speakers farther apart than the supplied cable will reach, we recommend that you purchase a heavier gauge of speaker cable to minimize signal loss.
Follow the instructions on the ensuing pages to connect your audio sources to YU4.
Connect the power cord from YU4’s active speaker to the wall outlet.

![]() ATTENTIONWhen connecting audio cables the ON/OFF Switch must be turned OFF. After connecting all cables, the unit can be turned ON.
ATTENTIONWhen connecting audio cables the ON/OFF Switch must be turned OFF. After connecting all cables, the unit can be turned ON.
When the volume is high, this system can produce noise levels that could permanently damage your hearing. YU4 is a self-powered speaker system. Do not connect the speaker terminals to the speaker intputs of a stereo amplifier. Damage may occur. Use only the power cord provided with the speakers.
Connecting Audio Sources
YU4 features a high quality DAC (digital-to-analog converter) for the optical inputs that supports data streams up to 24-bit/96 kHz resolution.
YU4 supports Bluetooth 4.0 with Qualcomm® aptX™ technology.Use the appropriate audio cable to connect your audio source components to your speakers.
- 3.5 mm stereo mini-jack AUX cable
- Stereo RCA to 3.5 mm stereo mini-jack ‘Y’ cable
- Optical Toslink cable
Connecting a Turntable
YU4 features a built in Phono Pre-Amp that allows you to connect directly to a turntable.
- connect your turntable to the RCA L/R inputs on the back of the YU4
- connect your turntables grounding wire to the grounding post (not all turntables feature a ground wire)
- If your turntable does not have a built in Phono Pre-Amp, use the “Phono” setting on the Phono switch.
- If your turntable has a built in Phono Pre-Amp, use the “Line” setting on the Phono switch.
![]() ATTENTIONSome models of turntables include a built-in Phono Pre-Amp. If your turntable has a built in Phono Pre-Amp, DO NOT use the Phono setting on the RCA switch. Doing so will void your warranty and could cause severe damage to your speakers.
ATTENTIONSome models of turntables include a built-in Phono Pre-Amp. If your turntable has a built in Phono Pre-Amp, DO NOT use the Phono setting on the RCA switch. Doing so will void your warranty and could cause severe damage to your speakers.
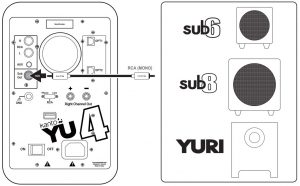
Connecting a Subwoofer
YU4 is equipped with a RCA connector to provide output signal to a powered subwoofer. Simplyconnect a single RCA cable from the SUB OUT connection on the YU4 to the AUDIO INPUT on your subwoofer. If your subwoofer has a stereo L/R RCA input, either input will work.
We recommend the Kanto sub6, sub8, or YURI powered subwoofer with crossover and volume controls. Most quality subwoofers offer these controls, which allow you to customize the amount of bass you will experience.
Look for details on the Kanto website at: www.kantoaudio.com
Auto Power-up / Auto Power-down
The YU4 is designed to save power when not in use. When no audio signal has been detected for 15 minutes, the YU4 Amp will put itself into stand-by mode. If the audio signal returns via the same input that the YU4 was playing when it entered standby, the YU4 will wake up and resume playing. It can also be woken up manually by:
- Pressing the Standby Button on the Remote
- Pressing the Control knob
If you do not find the Auto Power-up (APU) feature useful, you c an disable it by pressing the Balance Reset button on the remote and holding it for 5 seconds. The St atus LED will blink once to indicate that you have disabled the APU feature. To enable the APU if you have disabled it, simply press and hold the Balance Reset button again for 5 seconds. The Status LED wi ll blink twice to indicate that you have enabled the APU.
Note that APU is always turned on when power is applied, but will only work after automatic power down. APU will not work if unit is manually switched to standby using the remote or control knob.
Note that APU function will not work when using the Bluetooth input.
Bluetooth® Pairing


YU4 features Bluetooth 4.0 with Qualcomm® aptX™ technology and can be paired with man y devices for wireless audio playback from your phone, MP3 player or tabl et. Pairing is easy.
- Press the Bluetooth button ( ) on YU4’s remote to select it as the input source. The Bluetoo the LED (blue) will flash to indicate that YU4 is in pairing mode.
- Enable your Bluetooth device to search for a new device to pair with. Select ‘YU4 by Kanto’ from the list of Bluetooth devices available for pairing.
- If pairing is successful, the Bluetooth LED (blue) will remain solid. You will not need to pair the same Bluetooth device again – ‘YU4 by Kanto’ will remain on your device list until you remove it from the list.
- If the device does not pair with YU4, turn the speaker’s ON/OFF Switch to the OFF position, then repeat Steps 1 to 3. Alternatively, you can press the Bluetooth reset button ( ) on the remote or turn off Bluetooth on your device and turn it back on again.
Bluetooth® Operation
- We recommend keeping a maximum distance of 10 meters between th e speaker and your device. The best signal fidelity is within this range.
- You can stream audio from your device to the speaker using either the player control buttons of your device or the control buttons of the remote control (see diagram of Remote Control on page 5 of this manual – buttons #20, #21, and #22).
- Take note of the following behavior and functionality during Bluetooth operation. When you are successfully connected, the Blue LED will be lit solid, and your device will show as connected to ‘YU4 by Kanto’.• The connection between speaker and device remains active even if input source has changed.For instance, you can switch to another input source (e.g. RCA) and return to Bluetoothoperation without losing signal connection and, therefore, do not need to pair with the device again.• When the speaker is put in Standby mode or powered OFF, Bluetooth connection with the device is lost. When the speaker returns to Playback mode, the Bluetooth connection between the speaker and device is re-established. However, you may notice a choppy playback signal for approximately 30 seconds after reconnection. It will normalize.• While the speaker can be paired with more than one device, only one device can play andtransmit audio signal at a time.
- The YU4 remote control features a Bluetooth Reset button to quickly disconnect a paired device and allow a second device to pair with the speaker (button #7 on the Remote Control diagram on.• Press Bluetooth Reset button to disconnect a paired device.• Follow the pairing instructions to pair another device.• The same behavior and functionality apply to the second device.
USB Charging Operation
YU4 features one 5V 1.0 A USB charging port on the back panel. This is a convenient power source to charge your devices.
When YU4 is in Playback Mode (LED White) and Standby Mode (LED yellow), the port is active, and whatever device is connected is able to draw up to 1.0 A of power.
Audio Troubleshooting Guide
Frequently asked questions about Kanto’s YU4 speakers.
1.None of the lights on the front panel are illuminated.
- Make sure the power cable is connected to the speaker and power outlet.
- Ensure that the power outlet is providing power.
- Verify that the power switch on the rear of the speaker is in the “On” position.
2. The white light on the front panel is illuminated but there’s no audio playing.
- Make sure the correct input is selected. Click the knob on the front of the speakers to cycle through the five different inputs or use the remote to choose the correct input.
- Set the volume of the source to its highest level. Ensure audio source is playing audio.
- Check that the audio cable connected to and from the source is firmly connected. Test another audio cable if available.
- Verify that the volume of the speaker is not at its minimum level. Turn the volume up using the knob on the front or the volume controls on the remote.
3. Audio is only playing through one speaker.
- Reconnect the speaker wire between the active speaker and passive speaker and ensure the ends of the speaker wire are fastened securely through the binding posts.
- Check that the audio cable connected to and from the source is firmly seated. Try a different cable or source to isolate the issue.
- Ensure that the balance setting on the source is centered. Some sources may not have an adjustable balance setting.
- Ensure that the balance setting on the speakers is centered by using the balance reset button on the remote.
4. Your remote is not functioning correctly.
- Ensure there is a clear line of sight from the remote to the speakers. Aim the remote at the speakers.
- Check battery compartment of remote to make sure the batteries are installed and aligned correctly.
- Replace batteries.
5. Speakers are going into standby while listening to audio.
- Set the volume of the source to its highest level. Low source volume can inadvertently trigger standby mode.
6. You are experiencing poor audio quality.
- Set the volume of the source to its highest level. Low source volume can negatively affect dynamic range.
- Verify that the speaker wire is connected to the same color terminals on the active speaker and passive speaker.
- Ensure that the rear of the speaker is spaced away from the wall by at least 8 inches, allowing the rear port function to be left unimpeded.
- Set the bass and treble levels to the default setting by pressing the EQ reset button on the remote.
- Test a different song or source to isolate the issue.
7. The source will not connect to Bluetooth.
- Ensure the speakers are in Bluetooth mode by clicking the Bluetooth button on the remote or cycle through the inputs by clicking the knob on the front of the speakers until the blue light on the front panel of the speakers starts flashing.
- Make sure the blue light on the front panel of the speakers is flashing, indicating the speakers are in pairing mode. If the blue light is solidly lit, click the Bluetooth reset button on the remote to unpair a previously used device.
- On the source, turn Bluetooth off and on again.
- If the speakers cannot be found while searching for devices on the source, turn off the speakers using the power switch on the rear of the speaker. Switch them back on and try these steps again.
8. You are experiencing buzzing, hissing or distortion.
- If using the optical input, set the source’s output to stereo — not surround, Dolby, DTS, or 5.1 — and set the sample rate to 96Khz or lower.
- Verify if the noise is coming from the source by removing all sources from the speakers.
- Make sure it is not a power issue by trying a power outlet that is on a different circuit.
- Check that the audio cable connected to and from the source is firmly seated. Try a different cable or source to isolate the issue.
9. There’s no audio coming from an attached subwoofer.
- Check that the RCA cable connected to and from the subwoofer is firmly seated. Try a different cable or source to isolate the issue.
- Make sure the subwoofer is connected to a power outlet and is set to “On” or “Auto”.
- Increase the volume of the subwoofer.
Specifications
YU4 POWERED SPEAKER SYSTEM
- Tweeters: 1 inch Silk Dome
- Woofers: 4 inch Kevlar®
- Nominal Impedance: 4 Ohm
- Amplifier Type: Class D
- Power Output: 140 Watts Peak
- Input Sensitivity: 560 mV
- Total Harmonic Distortion: < 0.25%
- Crossover System: 2-way
- Crossover Frequency: 2.0 kHz
- Frequency Response: 60Hz – 20kHz
- Inputs: 1 x 3.5 mm stereo mini-jack AUX1 x RCA L/R2 x Optical (Toslink)1 x Bluetooth® 4.0 with Qualcomm aptX
- Outputs: 1 x Subwoofer1 x USB Charge Port 5 V 1.0A
- Speaker Terminals: Left and Right Binding Posts
- Input Voltage / Frequency: AC 100 V – 240 V 50/60 Hz (auto switching)
- Standby Power Consumption: < 0.5 W
- Remote: Included
- Dimensions (each speaker): W 5.5”x H 8.7” x D 7.5” (140 x 220 x 190 mm)
- Net Weight (Active): 6.9 lb (3.2 kg)
- Net Weight (Passive): 5.5 lb (2.5 kg)
- Gross Weight: 16.5 lb (7.5 kg) (boxed pair)
NOTICE: The Bluetooth® word mark and logos are registered trademarks owned by Bluetooth SIG, Inc. and any use of such marks by Kanto Distribution Inc. is under license.
NOTICE: Qualcomm aptX is a product of Qualcomm Technologies International, Ltd. Qualcomm is a trademark of Qualcomm Incorporated, registered in the United States and other countries, used with permission. aptX is a trademark of Qualcomm Technologies International, Ltd., registered in the United States and other countries, used with permission.
 NOTICE: This appliance is labeled in accordance with European Directive 2002/96/EC concerning waste electrical and electronic equipment (WEEE). This label indicatesthat this product should not be disposed of with household waste. It should be deposited at an appropriate facility to enable recovery and recycling.
- Check out our full line of bookshelf and desktop speaker systems
- Available in a stunning array of colors

To learn more about all our audio products, visit www.kantoaudio.com

Warranty
Limited Warranty to Original Purchaser
Kanto Distribution Inc. (Kanto) warrants the equipment it manufactures to be free from defects in material and workmanship for the following limited warranty period of:
24 months parts and labour
If equipment fails because of such defects and Kanto or an authorized dealer is notified within 24 months from the date of shipment with proof of original invoice, Kanto will, at its option, repair or replace the equipment, provided that the equipment has not been subjected to mechanical, electrical, or other abuse or modifications. Equipment that fails under conditions other than those covered will be repaired at the current price of parts and labor in effect at the repair. Such repairs are warranted for 90 days from the day of reshipment to the original purchaser. This warranty is in lieu of all other warranties expressed or implied, including without limitation, any implied warranty or merchantability or fitness for any particular purpose, all of which are expressly disclaimed.
Customers will be responsible for obtaining a Return Authorization as well as shipping costs to return product to a Kanto location or authorized depot listed on the website. If the equipment is covered under the warranty provisions above, Kanto will repair or replace, and be responsible for return shipping to the customer. Please keep the original packaging so products will not be damaged during shipping, and we recommend you insure your shipment. If equipment fails outside the warranty provisions, customers will be quoted repair and return shipping costs prior to work being performed.
The information in the owner’s manual has been carefully checked and is believed to be accurate. However, Kanto assumes no responsibility for any inaccuracies that may be contained in the manual. In no event will Kanto, be liable for direct, indirect, special, incidental, or consequential damages resulting from any defect or omission in this manual, even if advised of the possibility of such damages.
![]()
www.kantoaudio.comToll Free: US & Canada: 1-888-848-2643 | UK: +44 800086999
References
[xyz-ips snippet=”download-snippet”]