kanto TUK Powered Speakers User Manual

Important Safety Precautions
ATTENTIONThe exclamation point within an equilateral triangle is intended to alert the user of the presence of important operating and maintenance (servicing) instructions in the literature accompanying the apparatus.
CAUTION: Risk of Electric Shock. Do Not Open.
CAUTION: TO REDUCE THE RISK OF ELECTRIC SHOCK, DO NOT REMOVE BACK PANEL. NO USER SERVICEABLE PARTS INSIDE. REFER SERVICING TO QUALIFIED SERVICE PERSONNEL.
DANGEROUS VOLTAGEThe lightning flash with arrowhead, within an equilateral triangle, is intended to alert the user of the presence of non-insulated “dangerous voltage” within the product’s enclosure that may be of sufficient magnitude to constitute a risk of electric shock to persons.
- Read these instructions.
- Keep these instructions.
- Heed all warnings.
- Follow all instructions.
- Do not use this apparatus near water.
- Clean only with a dry cloth.
- Do not block any ventilation openings. Install in accordance with the manufacturer’s instructions.
- Do not install near any heat sources such as radiators, heat registers, stoves, or other apparatus (including amplifiers) that produce heat.
- Protect the power-supply cord from being walked on or pinched, particularly at plugs, convenience receptacles and the point where they exit from the apparatus.
- Only use attachments / accessories specified by the manufacturer.
- Use only with the cart, stand, tripod, bracket, or table specified by the manufacturer, or sold with the apparatus. When a cart is used, use caution when moving the cart / apparatus combination to avoid injury from tip-over.
- Unplug this apparatus during lightning storms or when unused for long periods of time.
- Refer all servicing to qualified service personnel. Servicing is required when the apparatus has been damaged in any way, such as power-supply cord or plug is damaged, liquid has been spilled or objects have fallen into the apparatus, the apparatus has been exposed to rain or moisture, the apparatus does not operate normally, or the apparatus has been dropped.
- Apparatus shall be connected to a MAINS socket outlet with a protective earthing connection.
- An appliance input coupler is used as the disconnect device – the disconnect device shall remain readily operable.
- Batteries or battery packs shall not be exposed to excessive heat such as sunshine, fire or the like.
FCC Notice:This device complies with part 15 of the FCC Rules. Operation is subject to the following two conditions:(1) this device may not cause harmful interference, and(2) this device must accept any interference received, including interference that may cause undesired operation.
NOTE 1:This equipment has been tested and found to comply with the limits for a Class B digital device, pursuant to part 15 of the FCC rules. These limits are designed to provide reasonable protection against harmful interference in a residential installation. This equipment generates, uses and can radiate radio frequency energy and, if not installed and used in accordance with the instructions, may cause harmful interference to radio communications. However there is no guarantee that interference will not occur in a particular installation. If this equipment does cause harmful interference to radio or television reception, which can be determined by turning the equipment off and on, the user is encouraged to try to correct the interference by one or more of the following measures:
- Reorient or relocate the receiving antenna
- Increase the separation between the equipment and receiver
- Connect the equipment into an outlet on a circuit different from that to which the receiver is connected
- Consult the dealer or an experienced radio / TV technician for help
NOTE 2:Any changes or modifications to this unit not expressly approved by the party responsible for compliance could void the user’s authority to operate the equipment.
Industry Canada Notice:This device complies with Industry Canada’s licence-exempt RSSs.Operation is subject to the following two conditions: (1) this device may not cause interference, and (2) this device must accept any interference, including interference that may cause undesired operation of the device. Under Industry Canada regulations, this radio transmitter may only operate using an antenna of a type and maximum (or lesser) gain approved for the transmitter by Industry Canada. To reduce potential radio interference to other users, the antenna type and its gain should be so chosen that the equivalent isotropically radiated power (e.i.r.p.) is not more than that necessary for successful communication.
This device complies with Canadian ICES-003 and RSS-210.
www.kantoaudio.comN.A: 1-888-848-2643U.K: +44 800086999[email protected]
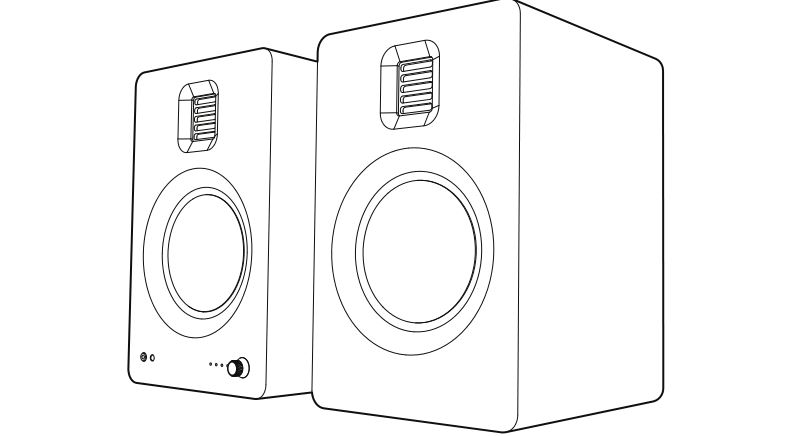
Introduction
Thank you for choosing TUK, a Canadian designed powered speaker system. TUK takes its name from Tuktoyaktuk, a remote hamlet on the shores of the Arctic Ocean. A place where the colorful dance of the Aurora Borealis offers a thrilling experience – one that we’ve sought to emulate with sound. Its wide range of connectivity makes it perfectly suited as both a near field and home audio solution.
We recommend you read all instructions carefully before using TUK and keep them for future reference. Kanto cannot be liable for damage or injury caused by incorrect setup or use of this product.
TUK was carefully tested and inspected during production, and before packaging and shipping. After unpacking, please check for any damage. It is rare that a unit is damaged during shipping, but if this happens contact your retailer immediately. You can also contact Kanto directly using one of the methods listed on page 3.
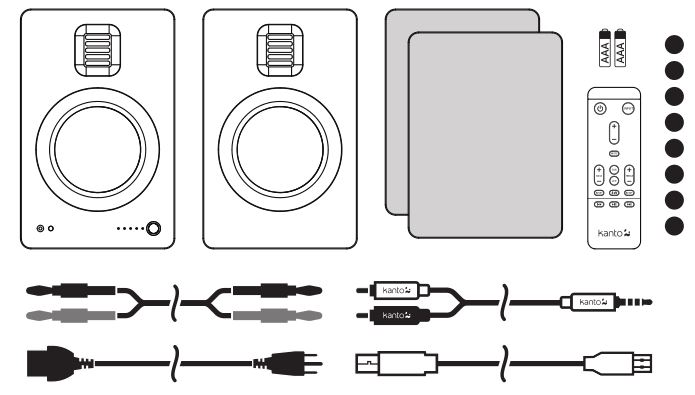
What’s in the Box?
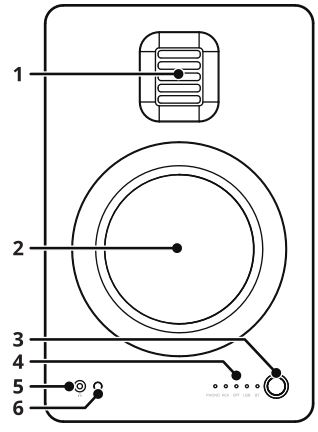
Front & Rear Panels
1 AMT Tweeter2 5″ Aluminum Driver3 Volume Adjust / Input Select / Standby4 Input LED Display5 3.5 mm Headphone Output6 Remote IR Receiver
TUK’s volume knob functions as an input select knob as well.Push the knob to select an input source – it cycles through the following inputs depending on what input source was last used.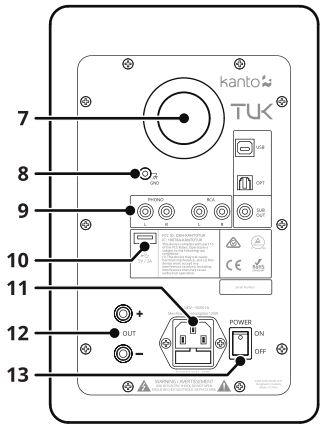 RCA→ OPT→ USB→ BLUETOOTH→ PHONOPush and hold the knob to enter standby or wake up from standby.
7 Bass Reflex Port8 Turntable Ground Post9 Input / Output Section (see Pg. 9 for more info)10 USB Charge Port (5V / 2A)11 AC Input Connection & Fuse Panel12 Output Terminals (+ and −) for Passive Speaker Connection13 Power Switch
Remote Control
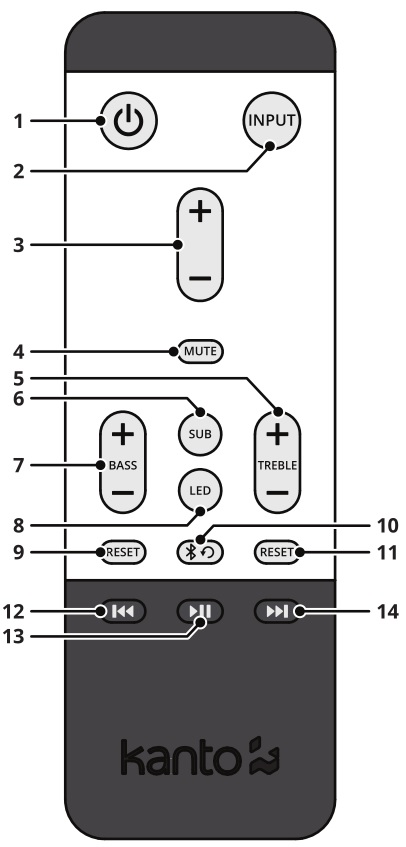 Install two supplied AAA batteries in the back of your TUK remote. Remote Control functions are listed below.
1 Standby On / Off2 Input Select3 Volume Adjust4 Mute5 Treble Adjust6 Sub Mute7 Bass Adjust8 LED Brightness Adjust9 Bass Reset10 Bluetooth Reset11 Treble Reset12 Previous Track (Bluetooth / USB)13 Play / Pause (Bluetooth / USB)14 Next Track (Bluetooth / USB)
Setting up TUK
Ensure that the Power Switch is in the OFF position.Connect the two speakers together as shown below using the supplied speaker cable.Connect the RED (+) and BLACK (−) terminals from the active speaker to the corresponding terminals on the passive speaker. If you wish to place your speakers farther apart than the supplied cable will reach, we recommend that you purchase a heavier gauge of speaker cable to minimize signal loss.Follow the instructions on the ensuing pages to connect your audio sources to TUK. The examples in the following pages are not meant to be exhaustive – just examples.Connect the AC power cord from TUK’s active speaker to your wall outlet. Turn the Power Switch to ON once all the inputs have been plugged in.TUK is designed to perform optimally when positioned at least 8” from the rear wall in an average listening room. However, it may not be possible to install the speaker in this position and since rooms vary in shape, size, and furnishing, a certain amount of experimentation is necessary to determine the most suitable position. Moving the speaker very close to the rear wall will enhance the bass frequencies but will tend to reduce soundstage depth, while moving the speaker away from the rear wall will tend to have the opposite effect. Avoid positioning the speaker close to or in the corner of a room, as this will excite undesirable room coupling in the low and middle frequencies. Room characteristics and positioning have a profound effect on the performance of the speakers, so time and effort devoted to achieving the optimum positions will be rewarded.
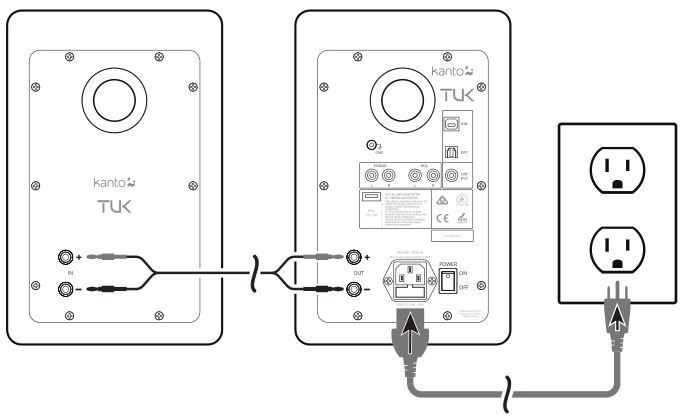
ATTENTIONWhen connecting audio cables the Power Switch must be turned OFF. After connecting all cables, the unit can be turned ON. When the volume is high, this system can produce noise levels that could permanently damage your hearing. TUK is a self-powered speaker system. Do not connect the speaker inputs to the outputs of a stereo amplifier. Damage may occur. Use only the power cord provided with TUK.
Start-up / Shut-down timeTUK can take up to 6 seconds to boot up and shut down. During this time the speaker will not respond to remote commands or adjustments to the Volume / Input knob. Do not attempt to adjust any settings while TUK is starting up as it may cause a jarring change when audio starts playing.
Channel SwapYou can swap the L / R stereo output on TUK. This can be helpful in situations where you want to place your speakers correctly, or need to reach power outlets / inputs, ensuring correct stereo image in any configuration. The active speaker is set to the left channel by default.To use the active speaker on the right, press and hold the Next Track button for 5 seconds. You will see the Input LEDs light up from left to right to confirm the output is swapped. To use the active speaker on the left, press and hold the Previous Track button for 5 seconds. You will see the Input LEDs light up from right to left to confirm the output is swapped. The L / R stereo output will be reset to default (active speaker is Left Channel) upon power-cycle.

Connecting Audio Sources
Use the appropriate audio cable to connect your audio source components to your speakers.• RCA – 3.5 mm stereo mini-jack AUX cable (included)• Stereo RCA cable• Optical Toslink cable (see Pg. 11 for TV / Home Theater setup)• USB A / B cable (commonly referred to as a “printer cable”, included)
TUK features a built in Phono Pre-Amp that allows you to connect directly to a turntable.• Please see Pg. 10 for more information about connecting turntables
TUK features a built in USB DAC that allows you to connect directly to a computer.• Please see Pg. 11 for more information about connecting via USB
TUK features Bluetooth 4.2 and supports Qualcomm® aptX™, aptX™HD and AAC codecs.• Please see Pg. 12 for more information about connecting via Bluetooth

Connecting to a Turntable
TUK features a phono input for use with turntables that do not contain built-in pre-amps.
- While the speakers are in standby or OFF, plug your turntable’s audio cables into the right and left PHONO input of TUK. If your turntable has a ground wire, connect it to the GND post of TUK.
- Turn on or wake the speakers and select the PHONO input using the TUK remote’s input button. You can also cycle through inputs by pressing the knob on the front of TUK.
After you adjust the volume on the speakers you should hear the audio from your turntable being played through the speakers. If you do not hear any audio, refer to the Audio Troubleshooting Guide.
ATTENTIONSome turntables include a built-in Phono Pre-Amp. If your turntable has a built in Phono Pre-Amp, DO NOT use the PHONO input. Doing so will void your warranty and could cause severe damage to your speakers.
Connecting to a Smart Home Device
TUK features an RCA input, optical input, and Bluetooth to cover all connection methods a smart home device may utilize. Please note the following steps are a general overview – the actual procedure will vary depending on device.
- Setup your smart home device using the manufacturer’s instructions or app. Ensure it is working correctly before trying to connect it to TUK.
- If your smart home device has an audio output, plug one end of the required cable into the device and the other into TUK. An RCA to 3.5mm cable is included but you may need an RCA cable or optical cable depending on device.
- If your smart home device only has Bluetooth, refer to the smart home device’s instructions or app to complete Bluetooth setup.
- Turn ON or wake TUK and select the input that your smart home device is connected to using the TUK remote’s Input button. You can also cycle through inputs by pressing the knob on the front of TUK.
After you adjust the volume on the speakers, you should hear the audio from your smart home device being played through the speakers. You have the option to disable the automatic power down feature on TUK to prevent the speakers from going into standby so you don’t miss any notifications or prompts (see Pg. 14).
If you’d like the speakers to automatically power down while your smart home device is not in use you may want to enable the wake up sound on your smart home device. TUK takes several seconds to wake up when it detects audio. Enabling a wake up sound will give the speakers a head start before audio begins streaming from your smart home device. Refer to your smart home device’s manual for instructions on how to enable the wake up sound.
Connecting to a Computer
TUK features a USB input for use with PCs and other audio equipment.
- While the speakers are in standby or OFF, plug the included USB cable into a USB port of the PC and the other into the USB input of TUK.
- Turn ON or wake the speakers and select the USB input using the TUK remote’s Input button. You can also cycle through inputs by pressing the knob on the front of TUK.
After your PC recognizes the speakers, it should automatically start outputting audio through the USB connection and you should hear audio from your PC being played through the speakers. If you do not hear any audio, you may have to manually change the PC’s audio output to “TUK by Kanto” in your PC’s audio settings. If you still do not hear any audio after making these changes, refer to the Audio Troubleshooting Guide.
TUK is capable of controlling your audio player (streaming service, music application, etc.) using the Play / Pause and Next Track / Previous Track buttons on the remote. Be aware that some audio players may not respond to these remote commands.
Connecting to a TV or Home Theater System
TUK features an optical (S/PDIF) input for use with TVs and other digital audio devices. Most modern TVs have an optical audio output which can carry either a stereo or surround signal. TUK requires a stereo source, and you may have to configure your TV’s audio output to stereo instead of surround. Please note the following steps are a general overview – the actual procedure will vary depending on TV brand.
- Obtain an optical cable. It is sometimes sold as a Toslink cable.
- While the speakers are in standby or OFF, plug one end of the optical cable into the TV and the other into the OPT input of TUK. Take note of the shape of the cable and port as you can only insert the cable in one orientation.
- Turn on the TV and navigate to the audio settings within the on-screen menu. Refer to your TV’s manual if you are unsure of how to find the audio settings within your TV.
- Within audio settings, change the audio output to PCM, stereo, or two channel. This option may be called “Audio Output Mode”, “Digital Audio Output Mode”, or “Digital Output Audio Format” depending on TV brand.
- Turn ON or wake the speakers and select the OPT Input using the TUK remote’s Input button. You can also cycle through inputs by pressing the knob on the front of TUK.
After you adjust the volume on the speakers, you should hear the audio from your TV being played through the speakers. If you hear noise, silence, or choppiness you may need to change the audio settings of the TV box, TV app, Blu-ray player, etc. as well. Follow a similar process to navigate to the audio settings of the device or app you are using and switch the audio mode to stereo or two channel. If you still do not hear any audio after making these changes, refer to the Audio Troubleshooting Guide. TUK supports data streams up to 24-bit / 96 kHz resolution via Optical Toslink.
Connecting Bluetooth
TUK features Bluetooth 4.2 with Qualcomm® aptX™, aptX™HD and AAC codecs and can be paired with many devices for wireless audio playback from your phone, MP3 player or tablet. Pairing is easy.
- Press the Input button on TUK’s remote to select BT as the input source. You can also cycle through inputs by pressing the knob on the front of TUK. The BT Input LED will blink slowly for 8 seconds while it attempts to pair with the last known device. If unsuccessful, TUK will enter pairing mode automatically, indicated by rapid blinking of the BT Input LED. You can also enter pairing mode manually by pressing the Bluetooth Reset button ( ) on the remote (see diagram of Remote Control on Pg. 6 – button #10).
- Enable your Bluetooth device to search for a new device to pair with. Select ‘TUK by Kanto’ from the list of Bluetooth devices available for pairing.
- If pairing is successful, the BT LED will remain solid. You will not need to pair the same Bluetooth device again – ‘TUK by Kanto’ will remain on your device list until you remove it from the list.
- If the device does not pair with TUK, press the Bluetooth Reset button ( ) on the remote or turn off Bluetooth on your device and turn it back on again, then repeat Steps 1 to 3. Alternatively, you can turn the speaker’s Power Switch to the OFF position, then back to ON.
Bluetooth Operation
- We recommend keeping a maximum distance of less than 10 meters (33 ft) between the speaker and your device. The best signal fidelity is within this range.
- You can stream audio from your device to the speaker using either the player control buttons of your device or the control buttons of the remote control (see diagram of Remote Control on Pg. 6 of this manual – buttons #12, #13, and #14).
- Take note of the following behavior and functionality during Bluetooth operation. When you are successfully connected, the BT Input LED will be lit solid, and your device will show as connected to ‘TUK by Kanto’.
- The connection between speaker and device remains active even if input source has changed. For instance, you can switch to another input source (e.g. RCA) and return to Bluetooth operation without losing signal connection and, therefore, do not need to pair with the device again.
- While the speaker can be paired with more than one device, only one device can play and transmit audio at a time.
- The TUK remote control features a Bluetooth Reset button to quickly disconnect a paired device and allow a second device to pair with the speaker. Press Bluetooth Reset button to disconnect a paired device if necessary.
- Follow the pairing instructions to pair another device.
- The same behavior and functionality apply to the second device.
USB Charging OperationTUK features one 5V / 2A USB charging port on the back panel. This is a convenient power source for mobile or smart home devices.When TUK is in Playback Mode and Standby Mode, the port is active, and whatever device is connected is able to draw up to 2 amps of power.
Connecting a Subwoofer
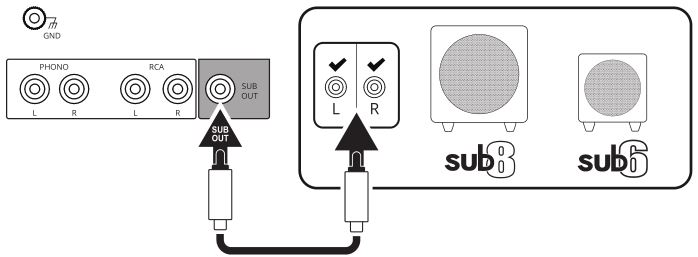
TUK is equipped with an RCA connector to provide output signal to a powered subwoofer. Simply connect a single RCA subwoofer cable from the SUB OUT connection on TUK to the AUDIO INPUT on your subwoofer. If your sub-woofer has a stereo L / R RCA input, either left or right inputs will work.
We recommend the Kanto sub6 or sub8 powered subwoofer with crossover and volume controls. Most quality subwoofers offer these controls, which allow you to customize the amount of bass you will experience.
Look for details on the Kanto website at: www.kantoaudio.com
Sub Mute You can mute the sub output on TUK. This can be helpful in situations where you want to listen to your speakers but don’t want to disturb the neighbors with sub-bass.
To mute the sub output, press the SUB button. The LED will blink to confirm the sub output is muted. To un-mute the sub output, press the SUB button again. The LED will blink to confirm that the sub output has been un-muted. The sub output will be reactivated upon waking up from standby.
Active CrossoverTUK is equipped with an active crossover filter at 80 HZ to allow for advanced setup with subwoofers. Activating the crossover will reduce the bass extension of the main speakers, allowing them to focus on the mid and high frequencies, while reducing the high frequency output of the SUB OUT port. If your Sub has an adjustable bandwidth or crossover frequency setting, it can be adjusted to the highest or most open setting.
Active Crossover is disabled by default. You can activate Active Crossover by pressing and holding the SUB button for 5 seconds. The front panel LED will blink twice to indicate that the crossover has been activated. You can deactivate the crossover by pressing and holding the SUB button for 5 seconds. The front panel LED will blink once to indicate that the crossover has been deactivated. The crossover is disabled by default or when power is removed.
Special Functions
Automatic Power Up (APU) / Automatic Power Down (APD)TUK is designed to save power when not in use. When no audio signal has been detected for 15 minutes, TUK will put itself into standby mode (APD). If the audio signal returns via the same input that TUK was playing when it entered standby, TUK will wake up and resume playing (APU). It can also be woken up manually by:
• Pressing the Standby Button on the Remote• Pressing the Control knob
 If you do not find the APU feature useful, you can disable it by pressing the Treble Reset button on the remote and holding it for 5 seconds. The Input LED will blink once to indicate that you have disabled the APU feature. To enable APU if you have disabled it, simply press and hold the Treble Reset button again for 5 seconds. The Input LED will blink twice to indicate that you have enabled APU.
If you do not find the APD feature useful, you can disable it by pressing the Bass Reset button on the remote and holding it for 5 seconds. The Input LED will blink once to indicate that you have disabled the APD feature. To enable APD if you have disabled it, simply press and hold the Bass Reset button again for 5 seconds. The Input LED will blink twice to indicate that you have enabled APD.
ATTENTIONAPU / APD is always enabled by default. APU will only activate after APD has been triggered. APU will not work if the unit is manually switched to standby using the remote or control knob.
Bass / Treble Memory (BTM) By default, TUK applies your EQ (bass & treble) settings to all inputs. If you prefer to set individual EQ settings for each input, you can activate Bass Treble Memory (BTM) by pressing and holding the Play / Pause button for 5 seconds. The Input LED will blink twice to indicate that BTM has been activated. You can deactivate BTM by pressing and holding the Play / Pause button for 5 seconds. The Input LED will blink once to indicate that BTM has been deactivated. BTM is disabled by default and by Factory Reset.
Factory ResetAll settings on TUK can be reverted to factory default by switching the Power Switch to the OFF position, waiting 5 seconds, then switching back to the ON position.
 LED BrightnessTUK’s Input LEDs on the front panel can be adjusted to 5 brightness levels including off. Cycle through the brightness settings by pressing the LED button on the TUK remote. LED brightness can also be adjusted while TUK is in standby mode.
Audio Troubleshooting Guide
Frequently asked questions about TUK by Kanto.
1. None of the lights on the front panel are illuminated.
- Make sure the power cable is connected to the speaker and power outlet.
- Ensure that the power outlet is providing power.
- Verify that the Power Switch on the rear of the speaker is in the ON position.
2. The blue Input LED on the front panel is illuminated but there’s no audio playing.
- Make sure the correct input is selected. Press the knob on the front of the speakers or use the remote to cycle through the different inputs to select the correct input.
- Set the volume of the source to its highest level. Ensure audio source is playing audio.
- Check that the audio cable connected to and from the source is firmly connected. Test another audio cable if available.
- Verify that the volume of the speaker is not at its minimum level. Turn the volume up using the knob on the front or the volume controls on the remote.
3. The remote is not functioning correctly.
- Ensure there is a clear line of sight from the remote to the speakers. Aim the remote at the IR Receiver.
- Check battery compartment of remote to make sure the batteries are installed and aligned correctly.
- Replace batteries.
4. Speakers are going into standby while listening to audio.
- Set the volume of the source to its highest level. Low source volume can inadvertently trigger standby mode.
- Disable Automatic Power Down (see Pg. 14).
5. You are experiencing poor audio quality.
- Set the volume of the source to its highest level. Low source volume can negatively affect dynamic range.
- Ensure that the rear of the speaker is spaced away from the wall by at least 8 inches, allowing the rear port function to be left unimpeded.
- Set the bass and treble levels to the default setting by pressing the EQ reset buttons on the remote.
- Test a different song or source to isolate the issue.
6. The source will not connect to Bluetooth.
- Ensure the speakers are in Bluetooth mode. Press the knob on the front of the speakers or use the remote to cycle through the different inputs to select Bluetooth.
- Make sure the blue BT Input LED on the front panel of TUK is blinking rapidly, indicating the speakers are in pairing mode. If the BT Input LED is solidly lit, press the Bluetooth reset button on the remote to unpair a previously used device and enter pairing mode.
- On the source, turn Bluetooth off and on again.
- If “TUK by Kanto” cannot be found while searching for devices on the source, power-cycle the speaker by switching the Power Switch OFF then ON and try these steps again.
7. You are experiencing buzzing, hissing or distortion.
- If using the optical input, set the source’s output to stereo — not surround, Dolby, DTS, or 5.1 — and set the sample rate to 96 kHz or lower.
- Verify if the noise is coming from the source by removing all sources from the speakers.
- Make sure it is not a power issue by trying a power outlet that is on a different circuit.
- Check that the audio cable connected to and from the source is firmly seated. Try a different cable or source to isolate the issue.
8. There’s no audio coming from an attached subwoofer.
- Check if the subwoofer is muted by pressing the SUB button (see Sub Mute on Pg. 13 for more info).
- Check that the RCA cable connected to and from the subwoofer is firmly seated. Try a different cable or source to isolate the issue.
- Make sure the subwoofer is connected to a power outlet and is ON.
- Increase the volume of the subwoofer.
- Increase the cutoff frequency of the subwoofer.
- Power-cycle the speaker by switching the Power Switch OFF then ON.
NOTICE: The Bluetooth ® word mark and logos are registered trademarks owned by Bluetooth SIG, Inc. and any use of such marks by Kanto Distribution Inc. is under license.
NOTICE: Qualcomm is a trademark of Qualcomm Incorporated, registered in the United States and other countries. aptX is a trademark of Qualcomm Technologies International, Ltd., registered in the United States and other countries.

Limited Warranty to Original Purchaser
Kanto Living Inc. (Kanto) warrants the equipment it manufactures to be free from defects in material for the limited warranty period of 2 years.
If equipment fails because of such defects and Kanto is notified within 2 years from the date of shipment with proof of original invoice from an authorized reseller, Kanto will, at its option, provide replacement parts or replace the equipment, provided that the equipment has not been subjected to mechanical, electrical, or other abuse or modifications. Any replacement parts or replacement units are warranted for 90 days from the day of reshipment to the original purchaser.
Customers will be responsible for obtaining a Return Authorization Number and paying shipping costs to return product to a Kanto location or authorized depot. If the equipment is covered under the warranty provisions above, Kanto will replace parts or provide a replacement unit, and be responsible for shipping costs to the customer. Please keep the original packaging to prevent damage to the product during shipping. Insuring your shipment is also recommended.
The information in the manual has been carefully checked and is believed to be accurate. However, Kanto assumes no responsibility for any inaccuracies that may be contained in the manual. In no event will Kanto be liable for direct, indirect, special, incidental, or consequential damages resulting from any defect in the equipment, even if advised of the possibility of such damages. This warranty is in lieu of all other warranties expressed or implied, including without limitation, any implied warranty, including any warranty of merchantability and fitness for any particular purpose, all of which are expressly disclaimed.
![]()
www.kantoaudio.com[email protected]Toll Free: US & Canada: 1-888-848-2643 | UK: +44 800086999
References
[xyz-ips snippet=”download-snippet”]