PEANUT Disinfection RobotProduct Manual
Statement
Copyright © 2020 Keenon Robotics Co., Ltd.All rights reserved.Unless otherwise permitted by Keenon Robotics Co., Ltd. in writing, no companies or individuals may copy, replicate, transcribe or translate the contents of the manual, whether in part or in whole, nor spread it in any way (electronic, photocopying, and recording, etc.) for lucrative purpose.The product specifications and information specified herein are for reference only. No prior notice will be given in case of updated its contents. Unless otherwise specified, this manual is only for instruction. The statements made hereunder shall not constitute any form of warranty.
Introduction
Dear users,Thanks for choose PEANUT Disinfection Robot. Before using your robot, please read this manual carefully and follow the instructions herein to gradually understand and use your PEANUT robot.
 http://weixin.qq.com/r/uSk-J6fEKfpWreNE93yr@ Keenon Robotics
Introduction to the Product Manual
This manual mainly describes the functional characteristics, methods of installation, and use of PEANUT Disinfection Robot, and matter that needs attention when using the robot.The manual includes the following contents:1. About Robot: Give a short description of the basic functional characteristics of the robot and show the structure of the robot in detail.2. Operating Steps: Give a description of how to make preparation when installing the robot and matters needing attention.3. Appendix: Make an explanation of common faults and detailed technical parameters of robot, and safety precautions.4. Certificate for “Three Guarantees”
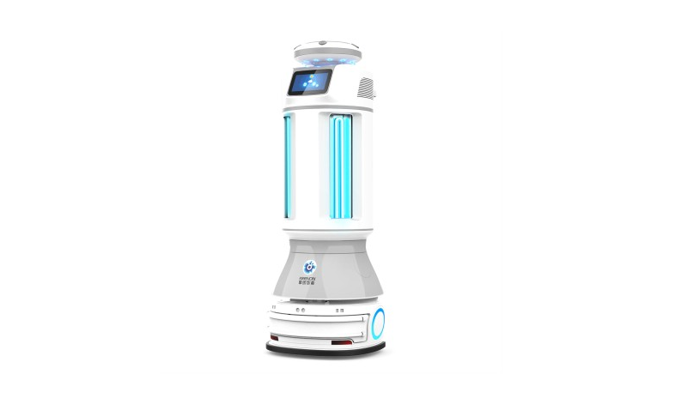
Note: The above figure is for reference only. The appearance and color of specific products shall be subject to the actual products.
About Robots (Understand Robots)
- PEANUT Disinfection Robot operates in the indoor environment and is applied in public indoor occasions such as hospitals, quarantine areas, hotels, business offices, etc.
- PEANUT Disinfection Robot realizes the core functions of full-autonomous positioning navigation and intelligent obstacle avoidance through machine vision and laser radar and can move in indoor occasions on a full-autonomous basis to provide necessary disinfection and sterilization service for various indoor places such as hospitals.
- The product described herein is Disinfection Service Robot Model No. M2.
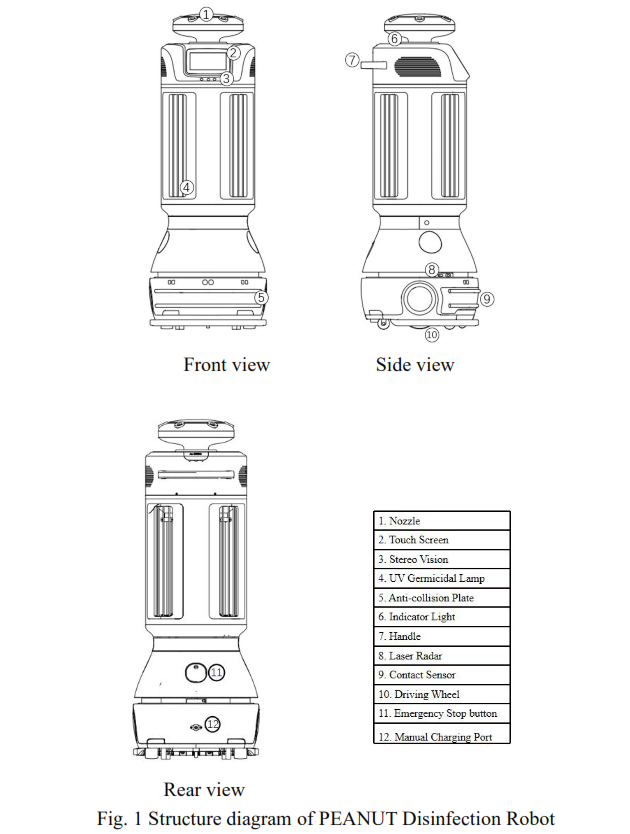
Main Structure of Robot
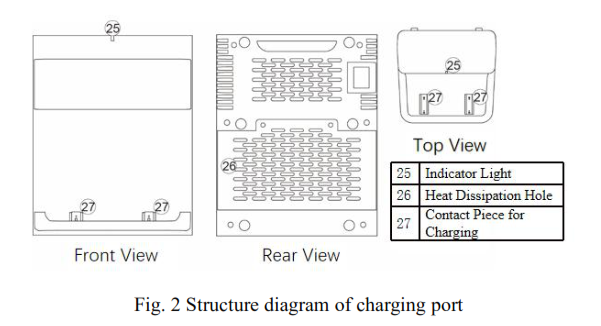
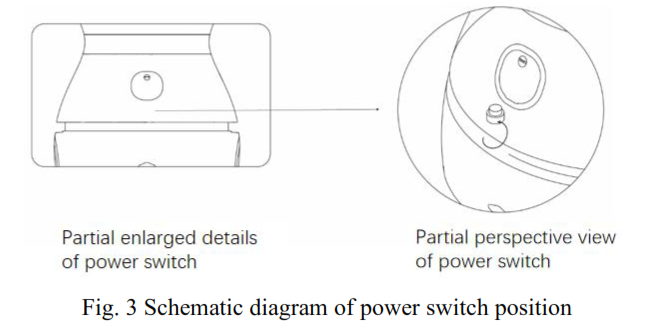
Fig. 1 shows the main structure of the PEANUT Disinfection Robot. The robot chassis has a structure of two driving wheels and four driven wheels. Autonomous positioning is made through machine vision and laser radar. Intelligent obstacle avoidance function is realized through the integrated application of different sensors such as contact sensors. Users are able to operate the robot system with the touch screen.Fig. 2 shows the structure of the charging port of the PEANUT intelligent disinfection robot. The robot has the function of intelligent autonomous recharge, through which the robot can independently find, match and contact the charging port to realize the automatic recharging function.
Operating steps (Use robot)
Please follow the following steps to operate your robot.
Installation
1. Robot mappingBefore moving, the robot needs to check the surrounding environment. It stores and identifies its operating environment in the form of a map. This step is called mapping. (Such step is completed by professional and technical personnel without user’s operation) In case of significant changes in the indoor operation environment of the robot (such as redecorating, moving the robot to a new place for operation, or rearranging indoor items), please call our Customer Service at 400-9651-808 to rebuild the map.
Power on
1. Power on/offThe power switch is located on the lower surface of the gap (near the liquid injection port) in the laser layer of the robot. You may find the power switch in the position shown in fig. 3. Start the robot by pressing the power switch upward with your finger. It will take about 40s to start the system before operation.If you want to turn off the robot, perform the same action as you start the robot. After turn off the power switch, the machine will be powered off immediately.
2. Instructions for Use of Disinfection Robot APP2.1 Introduction of functionsThe basic disinfection process is as follows: First, the user selects the disinfection mode. Second, the user selects the route to the destination or moving point. Next, the robot will go to each destination one by one after departure; Upon arrival at the destination (or route area), the robot will send a voice prompt, then turn on its disinfection equipment and conduct continuous disinfection task for a given period of time; After completion of disinfection, the robot will automatically return to the origin place.2.2 Disinfection modeThe robot has three modes of disinfection:
- On-the-way mode: open the nozzle for spraying disinfection along the route.
- Fixed-point mode: operate ultraviolet disinfection for one single room.
- Dual-mode: UV and spraying sanitization functions are activated at the same time for disinfection in a single room.
Under the on-the-way mode, the user may select one or more routes (maximum 4 routes for the current version). Please press on the power switch to start the robot; when the robot arrives at the starting point of the first route, it starts spraying disinfection and continues this operation along the way back and forth. Meanwhile, the robot will send a voice prompt every 2 minutes until the disinfection process for a pre- set number of cycles is completed. After that, the robot continues to spray on the next route or returns to the original point. Manual operation is required for this model.Under the fixed-point mode, the user may select one or more routes (maximum 4 routes for the current version). Please press on the power switch to start the robot; when reaching the destination room, the robot will send a voice prompt. Then, it operates ultraviolet disinfection while sending a voice prompt every 2 minutes until the pre-set disinfection time is over. After that, the robot continues the disinfection operation on the next point or returns to the original point.
Under the dual mode, the user may select one or more routes (maximum 4 routes for the current version). Please press on the power switch to start the robot; when reaching the destination room, the robot will send a voice prompt. Then, it operates both ultraviolet and spraying disinfection while sending a voice prompt every 2 minutes until the pre-set disinfection time is over. After that, the robot continues the disinfection operation on the next point or returns to the original point. Please keep away from the robot under the fixed-point mode and dual-mode to prevent damage caused by ultraviolet radiation.
In the disinfection process, each mode supports the functions of suspending disinfection and ending tasks, and the interface of the robot displays the remaining disinfection time or spraying disinfection mileage.
Upon completion of each disinfection task, the main interface will update to display the operation statistics this day, such as accumulative total disinfection duration, accumulative total disinfection mileage, and task load.2.3 SettingsPress the “Settings” button at the top left of the main page and enter the 4-digit password to enter the Settings page.Users can set the number of cycles for spraying disinfection, duration of stay, the intensity of spraying, sound volume, new password, motor unlock switch during the pause, working time, instant charging, and so on.Among these settings, the number of cycles for spraying disinfection: only available under on-the-way mode. It refers to the number of cycles for spraying disinfection by the robot on the given route. Users can set 1-5 times or unlimited times for the number of cycles; sThe intensity level of spraying: refers to the speed of spraying of robot when spraying operation is started under the on-the-way mode and dual-mode. The speed of spraying is divided into 5 levels. Level 1 is the slowest while Level 5 is the fastest. With the speed increase, the amount of spraying increase, the disinfection efficiency will be higher.
Duration of stay: refers to the irradiation time (15min – 90min) under the fixed-point mode and dual-mode with the ultraviolet equipment turned on. The longer the irradiation time, the better the disinfection effect will be achieved.Motor unlock switch during a pause: if this function is turned off, the user clicks on the screen, and the motor will not unlock when the robot pauses, then the user cannot push the robot to move.
Charging
1. Robot Autonomous Intelligent RechargeThe robot has the function of intelligent autonomous recharge. The robot will return to the charging port to recharge if both two conditions below are met. Please ensure that the charging port is secured in position and energized.
- The electric quantity of the robot is lower than the recharge value set by the user.
- The robot is idle and its electric quantity does not reach 100%.
2. Adapter charging (robot operation is prohibited during adapter charging)The robot can be charged through the adapter as follows:1 Power off the machine.2 Open the silicone sleeve outside the [Charging port] on the back of the robot and connect the robot with the charging plug of the adapter.3 After successful connection, the adapter indicator will turn red (if the indicator light is yellow, please press the indicator light, then the light will turn red).4 The charging is complete when the adapter indicator light turns yellow. Then, please disconnect the adapter and plug the silicone sleeve outside the charging socket of the robot.
Filling Disinfectant
The user should fill the robot with disinfectant if the robot indicates that the liquid level is too low. The filling port is located at the rear side of the machine body. Lift the silicone cover, press the blue knob, and then rotate counterclockwise to open the cover, as shown in fig. 4.
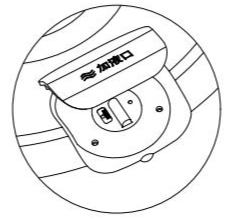
Fig. 4 Partial enlarged detail upon opening the outer silica gel cover of the liquid filling port
The description on state of indicator light
|
Indicator light state |
Meaning |
| Blue breathing light (slow blinking) | The robot is in the standby state. The spraying device and the ultraviolet lamp are not on. |
| Blue operation lamp (rotating) | The robot is in operation, with a spraying device or ultraviolet lamp on. |
| Blue Warning Light (fast blinking) | Warning, the ultraviolet lamp will be turned on soon. |
| Orange breathing light (slow blinking) | The robot lacks disinfectant. Please fill in the disinfectant or the spraying device cannot work. |
Emergency treatment
When the robot is moving, if the user needs to push and move the robot by hand, or the robot is in abnormal operation that may cause damage to the surrounding environment, another emergency event occurs, the user can stop the robot by pressing the red emergency stop button on the top of the robot. The position of the emergency stop button and how to operate the button are shown in fig. 5.

The emergency stop button is located at the back of the robot, i.e. the position indicated by reference No. 11 in the figure. For an emergency stop, you should firstly open its cover outwards. Then, break the acrylic protection plate in the middle layer. Finally, press the red emergency stop button to stop the robot urgently.* Note: The user is required to break the acrylic protection plate before pressing the emergency stop button. Therefore, please don’t use this button unless an emergency event occurs.
Handling robot
Robots are expensive equipment. Please strictly follow the instructions below when moving robots manually.As shown in fig. 6, the upper part of the robot laser layer gap (the surface indicated by the arrow) is the force-bearing part, through which you can lift the robot. Please hold the upper part of the laser layer with your hands when handling. Please keep the robot upright all the time when handling it.

Fig. 6 Schematic diagram for handling the robot
* Note:The laser layer gap is the only force-bearing part of the robot to be handled. When moving robots, you should strictly follow the instructions. It is strictly prohibited to directly pull and lift the bottom of the robot, turn over the robot, or directly lift the robot’s face and head. The damage to the robot caused by improper operation during handling shall be borne by the user.
Appendix
List of Exception and Troubleshooting
| Failure Problems | Possible Causes and Solutions to the Problems |
| Possible Causes and Solutions to the Problems | 1. The robot suffers electricity shortage; please energize the robot to charge through the adapter.2. For other causes, please contact customer service personnel. |
| Failure to charge normally. | 1. Press the yellow indicator light of the adapter, the indicator will turn red.2. For other causes, please contact customer service personnel. |
| Robots cannot move and Navigate | 1. The robot is in the blind area of the map, please turn off the robot and push it to the vicinity of the starting point to start navigation again.2. The top camera, stereo vision or laser layer gap is covered; please ensure that the above modules are not covered.3. Robot radar failure; please check the rotation of the laser radar.4. Robot collision switch failure; please check whether the collision switch is squeezed.5. For other causes, please contact customer service personnel. |
| Robots cannot send a voice | 1. The voice function of the robot is turned off or the volume is too low; please reset the voice.2. For other causes, please contact customer service personnel. |
| Abnormal robot movement | Please turn off the power supply of the machine immediately and contact the customer service personnel for disposal. |
| Robot falls | Please turn off the power supply of the machine immediately and contact the customer service personnel for disposal. |
Performance parameters of the Machine
| Model | Disinfection Robot No. M2 |
| Dimension | 500*500*1350 mm |
| Disinfectant volume | 15L |
| Spraying Parameter | Spraying output: 2-4L/h; Spray particle size <10µm. |
| Number of ultrasonic atomization sets | 6 sets of ultra-dry atomizing nozzles |
| Applicable disinfectant | Hydrogen peroxide, hypochlorous acid, and peroxyacetic acid |
| Ultraviolet radiation intensity | Each group: > 90µW/cm² |
| Number of ultraviolet lamps | Four sets of UVC ultraviolet germicidal lamps, with 360 ° coverage for irradiation |
| Disinfection method ( three methods for choice) | Ultrasonic dry spray disinfection |
| Ultraviolet irradiation disinfection | |
| Ultrasonic dry spray disinfection + Ultraviolet irradiation disinfection | |
| N.W. | 70Kg |
| Moving speed | 0-0.8m/s |
| Maximum climbing angle | Slope ≤ 3° |
| Network interface | WIFI/4G/ Bluetooth |
| Battery capacity | DC 48V 15Ah |
| Rated power | 90W |
| Standby current | Standby current is less than 0.5A |
| Endurance time | Work continuously for more than 8 hours |
| Standby time | Standby time is greater than 48 hours |
| Life span | 20,000 h |
| Temperature and humidity for
Operation |
0-45℃, RH: 5%-85%, no dust |
| Operation environment | Indoor environment, flat and smooth ground |
| Charging mode | Automatic/manual charging |
| Input voltage | Input rated voltage for charging port and adapter: 220V/50Hz |
| Storage temperature | 0℃-60℃ |
Safety instructions
Use restrictions:As a wheeled robot, the product shall only operate in indoor environment with flat ground (smooth ground; slope: < 5°; protrusion height: ≤ 1cm). Do not operate the robot in outdoor environment (such as open balcony) or rugged ground (such as stairs).Do not operate the robot in a suspended environment (e.g. duplex floor, open balcony, top of house, stairs) or environment without protective fence.Do not operate the robot in an environment where the temperature is higher than 50℃ or lower than 0℃ or there is liquid or viscous substance on the ground.Before use the robot, please remove all kinds of wires on the ground in the operating environment to avoid dragging when the robot is in operation.Before use the robot, please remove sharp objects on the ground (such as decoration waste, glass, nails, etc.) to avoid damage to the chassis of the machine.Do not place any non-transportable objects (including children and pets) on stationary or running robot.Do not push or handle the robot while the machine is moving.Do not arbitrarily move the robot.Do not clean and maintain the main machine and charging port unless the robot is shutdown or powered off.Do not use the harden objects or sharp objects to collide with the robot.Do not spill any liquid into this product.Do not push down the main machine or place it upside down.The robot is an electronic product. Please keep it away from fire.Before handling the product, please ensure that the main machine is powered off. It is recommended to use the original packaging box for packaging.Please use this product according to the instructions in the user manual or the introduction guide.Any loss or injury caused by improper use shall be borne by the user.
Battery and charging:Do not use any battery or power adapter from a third party.Do not disassemble, repair or refit batteries or charging ports without permission.Do not place the charging port near the heat source (such as a radiator, etc.).Do not wipe or clean the charging port contact piece with a wet cloth or wet hands.Please do not abandon the discarded batteries at will. It is recommended to send these batteries to a professional organization for disposal.If the robot is idle for a long time, please power off the machine upon full charge and put it in a cool and dry place. You’d better charge it at least once a month to avoid battery damage.
Certificate for “Three Guarantees”
We provide the following after-sales three guarantees services for the product in strict accordance with “The Law of the People’s Republic of China on the Protection of Consumer Rights and Interests” and “Product Quality Law of the People’s Republic of China”:Warranty period:1. Clients can request for return, replace or repair of the products with performance failure due to the reason other than the operation of the users within 7 days from the date of purchase.2. Clients can request for replace or repair of the products with performance failure due to the reason other than the operation of the users within 15 days from the date of purchase.3. We promise to provide free warranty service for our products with performance failure due to the reason other than the operation of the users within the warranty period from the date of purchase.
Warranty coverage:
| Name | Warranty period |
| Robot | 1 year |
Non-warranty terms:The warranty service is only applicable to the products under normal use. Products damaged by users and the following clauses are not covered by our warranty.
- Product damage caused by negligence, fault, and misuse of users, or disaster (e.g. food liquid stains, water seepage, external force cracking, scratches and damage of peripheral components, etc.).
- Users dismantle the machine by themselves and repair and refit it without authorization and approval of the manufacturer.
- Improper connection of accessories; product damage caused by transportation and other accidents.
- No Certificate for “Three Guarantees” (except those that can prove that the product is within the three-guarantee period); exceeding the three-guarantee period.
- The contents on the Three Guarantees are inconsistent with the real logo of the goods or have been altered.
- Damage caused by force majeure.
Product warranty card:
|
Product information |
Product model: |
SN code: |
| User information | Name: | Date of purchase: |
| Tel.: | Email: | |
| Address: | Purchase address: | |
| Sales unit information | Distributor: | |
| Stamp of distributor |
Keenon Robotics Co., Ltd.400-9651-808[email protected]11/F, Bldg 56, City of Elite, No.1000, Jinhai Rd., Pudong New Area, ShanghaiWeChat Subscription Number: KeenonWeChat Subscription Number for After-sale service: Keenon Robotics Technical Support CenterWebsite: http://www.keenon.com
References
[xyz-ips snippet=”download-snippet”]