
Kerosene Heater Owner's Manual

WARNINGS & CAUTIONS
- WARNING:FAILURE TO INSTALL, MAINTAIN, AND/OR OPERATE THIS KEROSENE HEATER ACCORDING TO MANUFACTURER’S INSTRUCTIONS MAY RESULT IN CONDITIONS WHICH CAN PRODUCE BODILY INJURY ANO/OR PROPERTY DAMAGE.NOTE: The WARNING and IMPORTANT Instructions appearing in this manual are not meant to cover all possible conditions and situations that may occur. It must be understood that common sense, caution, and carefulness are factors which cannot be built into this heater. These factors must be supplied by the person(s) installing maintaining, or operating the kerosene heater.Always contact your dealer, distributor, service agent, or the manufacturer on any problems or conditions you do not understand.
- WARNING: RISK OF EXPLOSION
- NEVER use any fuel other than clear or red dyed No. l-K kerosene. NEVER use fuel such as gasoline, benzene, paint thinners or other oil compounds in this heater.
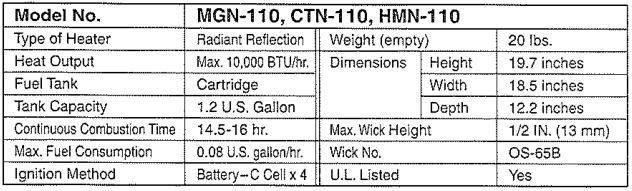
- NEVER refill heater fuel tank when heater is operating or still hot.
- NEVER use heater in areas where flammable vapors or gases may be present.
- NEVER fill heater fuel tank in living space; fill tank outdoors.
- NEVER store nor transport kerosene in other than a metal or plastic container that is (1) acceptable for kerosene, (2) non-red in color, and (3) clearly marked “Kerosene.” NEVER store kerosene in the living space; kerosene should be stored in a well ventilated place outside the living area.
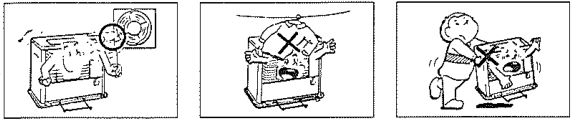
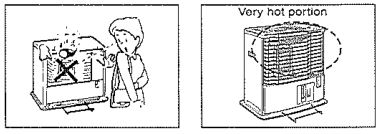
- The unit is EXTREMELY HOT while in operation. Due to high surface temperatures, keep children, clothing, furniture, and other combustible objects at least 36″ away from top and front area.
- RISK OF INDOOR AIR POLLUTION USE HEATER ONLY IN WELL VENTILATED AREAS. People with breathing problems should consult a physician before using the heater. In a house of typical construction, that ls, one that is not of unusually tight construction due to heavy insulation and tight seals against air infiltration, an adequate supply of air for combustion and ventilation is provided through infiltration; however, if the heater is used in a small room where less than 200 cubic feet (5.7 m 3 ) of air space is provided for each 1,000 BTU per hour of heater rating (considering the maximum burner adjustment), the door(s} to adjacent room(s} should be kept open or the window to the outside should be opened at least 1 inch {25.4 mm) to guard against potential buildup of indoor air pollution. Do NOT use the heater in a bathroom or any other small room with the door closed.
- NEVER use heater to heat or boil water nor use as a cooking appliance.
- WARNING: RISK OF FIRENEVER use gasoline in this heater. NEVER remove cartridge tank when heater is operating or when heater is hot. NEVER use this cartridge tank for transporting or storage of kerosene or any other flammable liquids.
- NEVER leave heater operating if you intend to leave for any period of time. Always make sure to turn heater off and inspect to insure that it is completely extinguished prior to going to bed.
- NEVER leave heater unattended. NEVER use as a source of heat for drying objects.
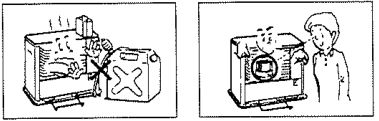
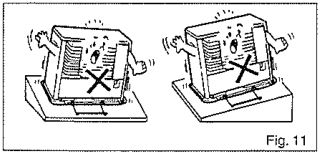
- NEVER place objects on the top plate.
- If poor quality kerosene is used, so much carbon will be accumulated on the upper part of the wick that it may not move down, a strong odor will be generated and shorter wick life will result; therefore, careful attention should be paid to the kerosene quality. When lowering the wick, make certain fire is out. (For details, see Extinguishing on page 9.)
- Adjustment of room temperature, when the room becomes too hot, should be carried out by ventilation such as opening a window, but never by means of the wick adjuster knob. If heat is reduced excessively by means of the wick adjuster knob, it will cause imperfect combustion, thereby resulting in accumulation of carbon, and odor will be generated.
- During normal operation, you will on occasion hear the sound of the fuel from the cartridge tank fill the fuel reservoir area. This sound is a normal characteristic of kerosene heaters that use a cartridge tank.
- CAUTJON: RISK OF BURNSNEVER operate the heater without the guard or grille completely attached.
SAVE THESE INSTRUCTIONS
Please read this Instruction Manual carefully. It will show you how to assemble, maintain and operate the heater safely and efficiently to obtain full benefit from its many built-in features.
FEATURES

SPECIFICATIONS
PRECAUTIONS
1 FUEL
This kerosene heater is designed to operate with No.1-K kerosene ONLY. The use of any other kerosene, liquids that are flammable or non-flammable is dangerous. Improper fuel may contaminate the unit , influence its performance and may be a RISK of explosion, fire or bodily injury.

2 PLACE FOR USE
Use a kerosene heater in a level position only.• Do not use it in a moving vehicle, a vibrating place, near a window curtain or near flammable objects.• Do not use it under mantelpiece or any high raised area.• Do not use it in a passage place such as entrance, exit or windy place.• Do not use it in a room where the temperature is more than 86°F (30°C)

3 REFUELING
- Refuel after the kerosene heater is extinguished and cool to touch.
- It is dangerous to refuel white the heater is in operation or still hot.
- In case of spillage, wipe up immediately. Be sure to close the tank cap tightly. Ignite the wick about 60 minutes after fueling when using it for the first time. After “Carbon Removal”(Refer to Page1 0), let wick absorb kerosene for 60 minutes before reigniting.
4 USAGE
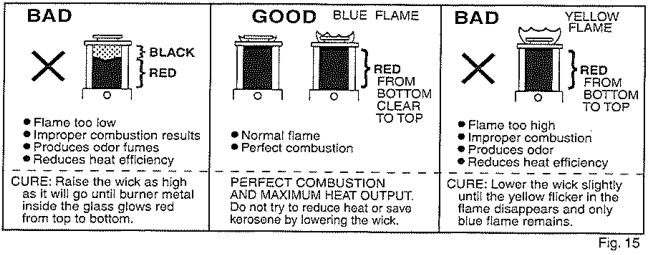
Wick does not have low or medium flame but burns in one position with blue flame about 1/2 inch high. (Refer to Fig. 15, Page 9)
- Ignite the wick in correct order, and confirm the wick ls burning normally. Raising the wick too high or lifting the burner causes abnormal burning and can be dangerous. Adjust the flame about 15 minutes after ignition in order to acquire correct combustion.
- Keep the room well ventilated. Do not use the kerosene heater in a place where flammable gases are generated or stored. Shortage of oxygen could cause improper combustion and generate carbon monoxide.
- Do not use the kerosene heater for drying clothes or other flammable objects.
- Do not carry the kerosene heater while the wick is burning – it may cause an accident.
- If the kerosene heater is burning abnormally, push the shut off button. If the flame does not go out, use a fire extinguisher.
- Before you go to bed or leave the room, extinguish the heater, then lift the burner and look at the wick to be sure fire is completely out.
- Do not hit and/or turn over the kerosene heater when you extinguish the fire.
- Never touch any portion of top plate during combustion, because it is very hot.
- Never put a pan, a kettle or any other objects on the heater.
- Never sprinkle the glass cylinder with water.
5 DAILY CHECKS AND MAINTENANCE
Perform complete check and maintenance. (Details are described on page 9) Remedy any problem immediately even if it is a minor one. It is dangerous to operate the kerosene heater when a problem exists.
USAGE
1 PREPARATIONS
 (A) Unpacking
- Remove the heater from the cardboard box. Remove all protections and packing materials. Remove the sticky tape from the protection grid and open it as described below:1. Push the front guard upwards.2. Pull the bottom of the front guard facing you.3. Pull the front guard downwards. Reverse the process to install the grid. Remove the packing material from the combustion cylinder. Open the lid of the fuel tank compartment and remove the packing materials.
- Make sure the wall guard is in the down position.
(B) Setting burner
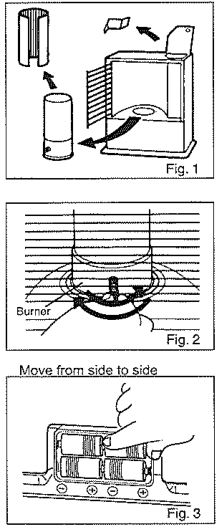
Place the chimney assembly on the round wick guide. Turn the burner knob to the left and then half way to the right until the chimney assembly is correctly positioned on the round wick guide.
(C) Installing batteries ( LR14 or Type C)
Place 4 batteries in the battery case at the rear of the heater. Make sure that you respect the polarities +/- as indicated in the drawing.
IMPORTANT: DANGER:– Never remove the batteries while the heater is operating.
2 REFUELING
(A) Fuel to use 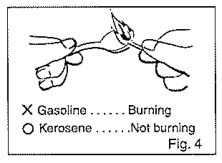
- Use only clear or red colored No. 1~K kerosene for fuel. Do not use GASOLINE or LIGHT OIL or any other fuel except No. 1-K kerosene. Specific gravity of kerosene is about 0.8, and its ignition point is more than 104°F (40°G). To distinguish kerosene from others, take half a teaspoon of fuel and bring it close to a lit match. If the fuel has a low ignition point (such as gasoline or thinner), it will bum, but if it is pure kerosene (No. 1-K kerosene), lt will not. (Fig. 4)Kerosene in the USA is sometimes dyed red due to tax laws and the red dyed kerosene should be translucent (able to be seen through) and not cloudy.
- If improper kerosene or deteriorated or impure kerosene is employed, within 3 to 20 hours the wick will be covered with excessive carbon. The following will take place and impair the kerosene heater:
- The burner will not get completely red, letting off the strong odor of incomplete combustion.
- It will become hard to ignite the wick and, even if it is ignited, the flame will die out soon.
- The upper and lower parts of wick will become stiffened so that the flame will not extinguish despite pushing the shut off button.
- Improper kerosene
- Deteriorated kerosene may be caused by the following:
- Kerosene kept over from the preceding season.
- Kerosene stored for a long period of time in a sunlit place.
- Kerosene stored for a long period of time in a place of high temperature.
- Kerosene mixed with other fuel oils such as diesel fuel, heating fuel oil or bad kerosene. In any of those cases, kerosene will easily deteriorate.

- Impure kerosene
- Kerosene mixed with other kinds of oil such as cooking oil, machine oil, diesel fuel or other foreign fuels.
- Kerosene mixed with water or dirt.
- Kerosene mixed with anything else not recommended by manufacturer.
- Never use a container that has been used to store gasoline.
- Make sure the inside of can is free of rust.
- Deteriorated kerosene may be caused by the following:
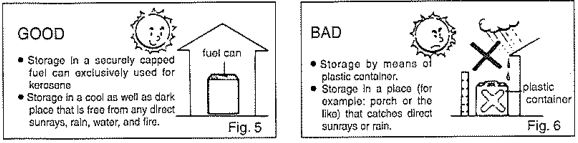
- It is quite difficult to separate proper kerosene from deteriorated or impure kerosene, therefore care should be taken to distinguish good quality from BAD. Kerosene should not be kept over from the preceding season. Avoid using kerosene that is unreasonably low in price.
(B) Procedures and cautions for refueling
- Be sure to extinguish the kerosene heater and let it become cool to the touch before refueling.
- Do not remove the cartridge tank while heater is burning or it is still hot. (Fig. 7)
- Use the enclosed siphon for refueling. Procedures for using the siphon. (Fig. 8)
- Refuel outdoor.
- Tighten the air-tight cap located on the top of siphon.
- Insert the straight hose into the kerosene container.
- Insert the flexible hose through the opening of cartridge tank.
- Squeezing the bulb repeatedly, refuel by watching the fuel gauge.
- When the fuel level rises up to the center of fuel gauge, loosen the air-tight cap. (Fig. 9)Allow siphon to drain before removing from tank and container.
- Fasten the tank cap to the cartridge tank securely.
- Wipe up any spilled kerosene thoroughly.
- Please check that push pin (Refer to Page 14) is seated properly before replacing tank.
- Set the tank into the kerosene heater properly. (If the cartridge tank is set improperly, the cover on cartridge tank will no shut.) Do not drop the tank into the heater. When tank is replaced a gurgling sound will be heard signifying that fuel is being released into reservoir.

NOTE• Extinguish the kerosene heater and refill the tank before the fuel reaches the bottom of the cartridge tank. (Fig. 10)

3 PREPARATION PRIOR TO IGNITION
The kerosene heater should be used in a level position or improper combustion may result. When using it on a slanted floor or in an unstable position the automatic safety shut-off device may be activated.
4 IGNITION
Do not carry the heater while wick is burning. Wait for 60 minutes the first time the tank is filled to allow the wick to become saturated with kerosene before igniting the wick. If the wick is used before fully saturated with kerosene, the wick will be damaged permanently.
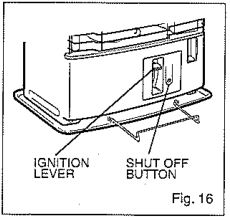
(A) Strongly and fully press down the IGNITION LEVER to the end.(B) After confirming ignition, release the ignition lever. For confirmation of ignition, look in through the glass diagonally above the combustion cylinder.

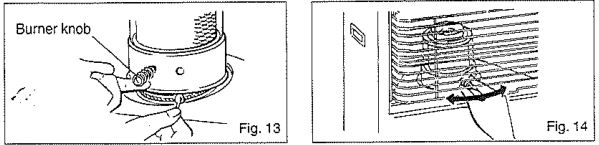
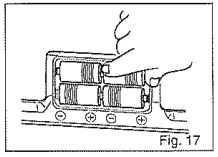
(C) Ignition by a match• A broken igniter wire or dead batteries should be replaced with new ones. When using matches, open the front guard and light as illustrated. (Fig. 13)• Never leave a burnt match on the wick adjuster or horizontal reflector. Incomplete burning or fire may occur.
(D) After igniting the wick rotate the burner knob (spring) left and right a few times to ensure that the burner rests properly on the round wick guide. (Fig. 14)
NOTE• During initial use, a slight odor may be noticed. This is caused by evaporation of anticorrosion oil and therefore not abnormal. This odor disappears after new burner has been used 3 to 4 hours.• Wait 5 minutes before reigniting the heater if the automatic safety shut-off device was activated. Reigniting immediately after extinguishing will cause non-ignition, white smoke or strong odor. (Caution: the burner may still be hot.)
5 FLAME ADJUSTMENT
Combustion can be optimized within a range of 10’% by adjusting the height of the flame. To adjust the flame, adjust the ignition lever up which will lower the wick and in turn lower the flame.
If the ignition lever has been adjusted all the way up (wick height at minimum height) and the flame is still too high according to Fig. 15, shut off the heater and contact us at an- Get HEAT (877-438-4328), or e-mail: [email protected]. If you continue to use your heater with bad combustion, soot and/or Carbon Monoxide (CO) emissions will result.
If the flame on the burner is un-even, adjust the burner back and forth as described in IGNITION Section 4 (D), Page 8 of these instructions to even-out the flame.
Using fan or humidifier while operating your heater may cause the flame to become slightly pink. This is normal.
Never use the automatic ignition device when the heater is in use. When you lower the ignition lever to use the ignition device, you may be increasing the wick height and you may burn-out the wick.
WARNING: RISK OF INDOOR AIR POLUTION AND FIREDo not operate your heater at a wick setting lower than the minimum wick-stop setting. If the heater 1s used at !ewer than the low wick stop, it may cause the generation of odor or Carbon Monoxide.
6 EXTINGUISHING THE HEATER
To extinguish press the SHUT OFF BUTTON. The wick will descend for extinguishment and the IGNITION LEVER will move up to the “OFF” position (in the control panel).
NOTE• It ls possible that an excess accumulation of carbon and other deposits on the wick will prevent proper operation of the automatic shut-off device. Always make sure to visually check that the automatic shut-off device has operated properly.• The automatic shut-off device may function If heater is given a shock by hitting or shaking.• Never disassemble or adjust the automatic shut-off device Otherwise it may not operate correctly in case of emergency.
DAILY CHECKS AND MAINTENANCE
Always keep kerosene heater clean. The reflector should be free of dust, film, grease, oil, etc. Using dirty kerosene heater 1s dangerous and also shortens the life of the kerosene heater.
NEVER TRY TO REPAJR THE FOLLOWING PARTS MENTIONED BELOW AT HOME.
- Fuel gauge . . .. Do not unfasten the screws to disassemble the fuel gauge from the tank.
- Tip-over device.. . . . Do .not disassemble the shock sensitive section of the tip-over extinguishing device, and do not allow kerosene to spill on this device.
- Inspection of cartridge tankIs there kerosene in base plate while using the kerosene heater?Is there rust or foreign matter in the tank?Are there any dents or cracks In the tank?If so, replace the tank with a new one.
- Inspection of the wickInspect as often as possible to see if carbon has accumulated. When the carbon has accumulated remove it by (-)screw driver after fully lowering the wick (Refer to “Wick Maintenance” on Page 10)
- Checking batteriesln the event of low battery voltage (when the Ignition plug is normal), the Ignition plug will not spark enough. In this case, replace batteries.
- Check condition of wick (and how to replace, see Page 11.) Check the wick height – 1/2 inch (13mm) (see Step 19 of “Wick Replacement” and uniformity of the height). Also check if carbon accumulates on the wick. If carbon accumulates, perform “Carbon Removal” as mentioned below.
IMPORTANT
- WICK MAINTENANCEThe top of a fiberglass wick accumulates carbon in the process of burning kerosene. This must be removed to maintain efficiency ln burning and prevent sooting. It is very important that you feel for carbon hardness after second or third tankful of fuel. A wick in good condition will feel soft while one that is carbonized will feel like a bristle brush or, in late stages, top could be coated with hard black carbon.Check for resistance when moving the wick adjuster; check if burner assembly is fully red: check if it is difficult to ignite. Any of these troubles result from carbon on the upper part of the wick. To get rid of carbon. perform the “Carbon Removal” procedure described below.
- CARBON REMOVAL I DRY BURNTo perform the “Carbon Removal” take the unit outdoors, on a porch or the like because a strong odor is produced.
- (a) With the cartridge tank having only a small amount of kerosene, keep the wick burning without refilling kerosene even when the tank becomes empty. When flame starts to burn out, raise wick fully and leave it there until it burns out. Wait approximately 60 minutes, then relight wick (with match if necessary) and allow it to burn out again. When unit cools down remove any remaining ashes with an old toothbrush.
- (b) The upper part of the wick will be cleared of carbon and softened with this operation. However, if any parts are still left stiff, pinch them by means of small pliers to fracture carbon into pieces, supply a small amount of kerosene to tank and once again perform the “Carbon Removal”. After carbon has been removed, refill the tank and wait 60 minutes before igniting the wick.
- (c) In addition, perform the “Carbon Removal” within 5 to 7 days after the first use of the kerosene heater, and carbon accumulation to the wick will be reduced. Thereafter perform the “Carbon Removal” every 5 or 6 tank fulls of kerosene. !f any water gets into the cartridge tank or when the season for kerosene heaters comes to an end, completely remove all kerosene from the cartridge tank and sump the tank.
NOTE“CARBON REMOVAL” SHOULD BE DONE WEEKLY DURING THE HEATING SEASON UNLESS NEEDED MORE FREQUENTLY. CHECK TO BE SURE.
REPLACEMENT OF PARTS
1 WICK REPLACEMENT
Wick replacement should be performed on a completely cooled heater after the cartridge tank has been removed and the remainder of the kerosene in the heater has been burned off.

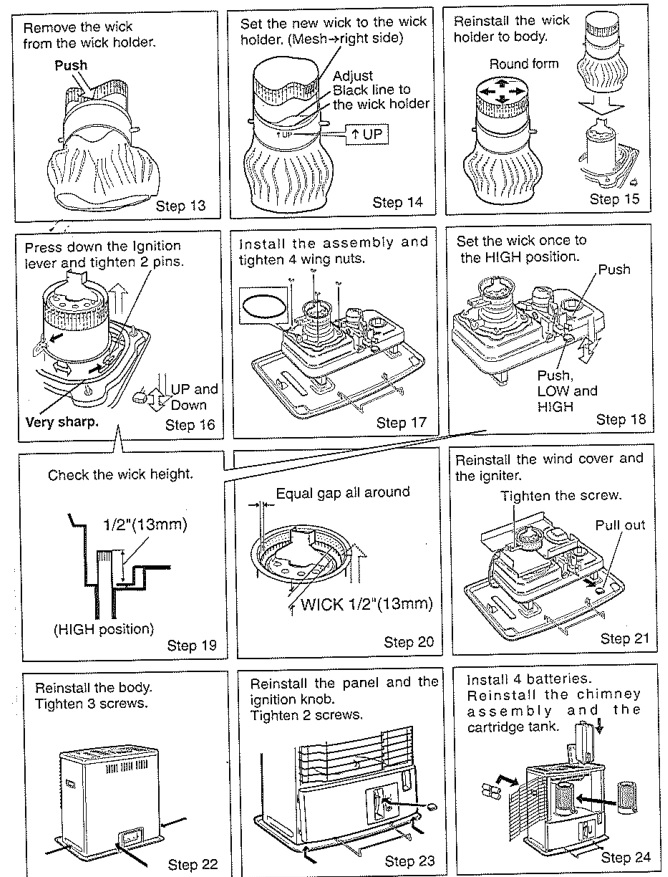
Fill the cartridge tank with clean, pure 1·K kerosene. Place the cartridge tank in the heater and wait at least 60 minutes for kerosene to fully saturate the new wick.IMPORTANT! !f this ls not done air bubbles may form in the wick reducing its ability to draw up kerosene. Remember to “dry burn” (Refer to Page 10) the new wick after each 5 or 6 tankfulls of kerosene are consumed.
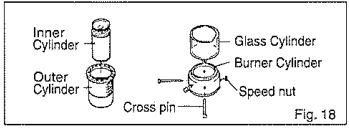
2 GLASS CYLINDER REPLACEMENT
Remove speed nuts holding cross pins. Then pull out cross pins. Replace glass cylinder. While reassembling, make sure that inner and outer cylinders are set in their proper places.
STORAGE OF KEROSENE HEATER
Store the kerosene heater carefully using the following procedure so it will operate safely next season.
- Agitate and rinse inner part of the tank with a little of remaining kerosene, then pour out entirely. Water rarely mixes with kerosene, and it would cause rust inside the tank. Remove kerosene and dry the inside of tank well.
- With no kerosene left in the kerosene heater, ignite and keep the wick burning. When the red heat of the outer cylinder becomes faint, keep the wick fully turned up until it burns out (about an hour).
- After removing the burner and batteries, remove the wick holder assembly from the fuel reservoir, dry the inside of the fuel reservoir thoroughly. Remove the carbon accumulated on the wick holder assembly and/or the soot adhering to the burner with a brush or screw driver.
- After cleaning, reassemble the heater. Remember to reassemble the wick holder assembly so as to keep the gap between the wick holder assembly and the round wick guide equal all the way around. (Refer to page 12 “Wick Replacement”, Step 20)
- The batteries should be taken out from the battery case because they may leak and corrode the kerosene heater. (Fig. 19)
- Store the kerosene heater with the the automatic safety shut*off device deactivated and the wick lowered down.
- Put the kerosene heater in the original box with original packing and keep it in a well-ventilated place. Always keep the “Owner’s Manual” with the heater! (Fig. 20)

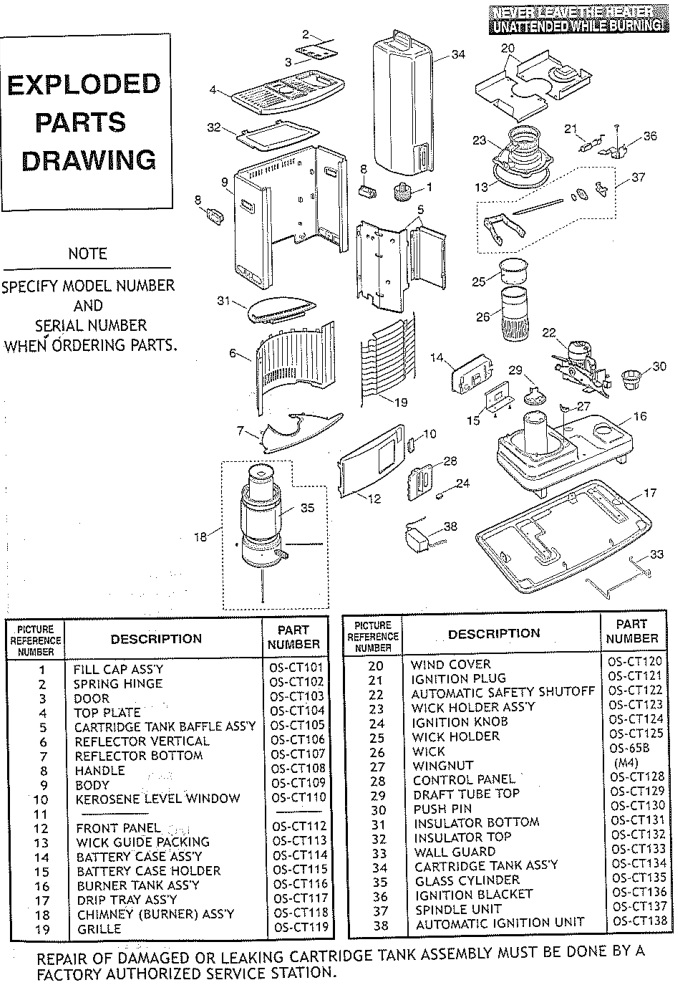
EXPLODED PARTS DRAWING
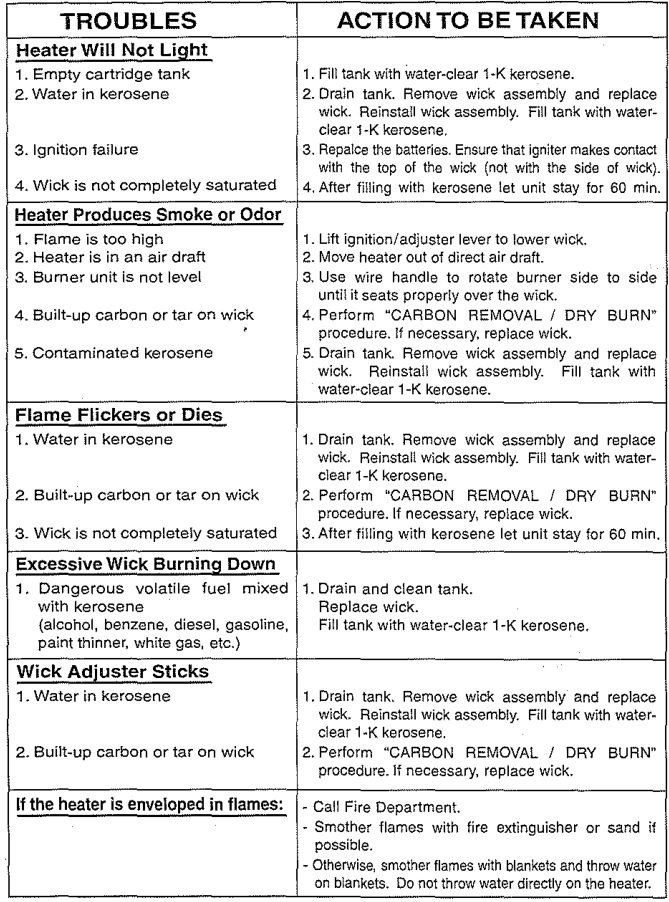
TROUBLE SHOOTING GUIDE
Kerosene Heater Owner’s Manual – Kerosene Heater Owner’s Manual –
[xyz-ips snippet=”download-snippet”]