![]()
UST – 1UTS – 1 THINUTS – 1DAISY CHAIN
User InstructionsandInstallations Guide

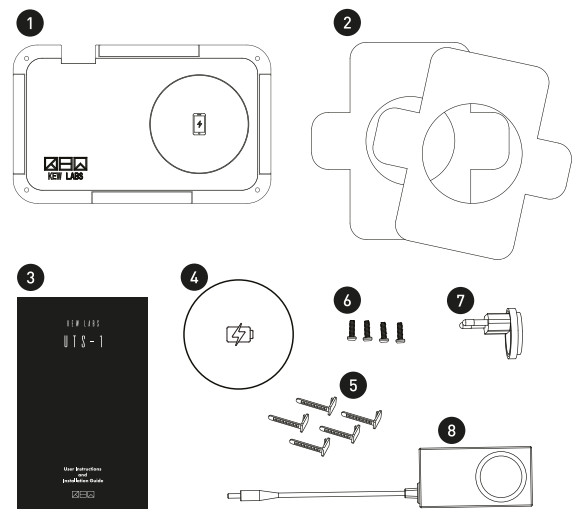
IN THE BOX
- UTS -1 charger – (two for daisy chain model)
- Apple & Samsung phone calibration template
- User instructions
- 9cm + 8cm stickers
- Cable management clips
- Screws
- Country plug adaptor
- Power adaptor
CHECK BEFORE INSTALLATION
- If you have a phone case please ensure it is flat and does not contain any metal, center magnets, cardholders, pop sockets or kickstands.
- Ensure the surface under your table is flat.
- Prepare a pencil and screwdriver if needed.
- Check installation area is within 1.5m (4′ 11″) of your PowerPoint.
- Not recommended to install in areas with low air circulation i.e. small drawers.
- iPhone 12 Users:– Table thickness should be a maximum 20mm or 0.80″.– Height setting should always be Low (L).– Calibrate without MagSafe cases if applicable.
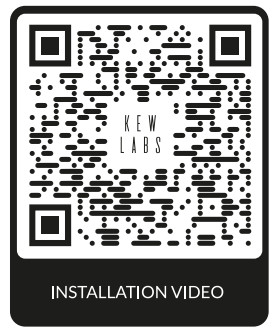
INSTALLATION VIDEO GUIDE
To watch the installation guide, please scan the QR code below or visitwww.kewlabstech.com/iuts-iinstall.
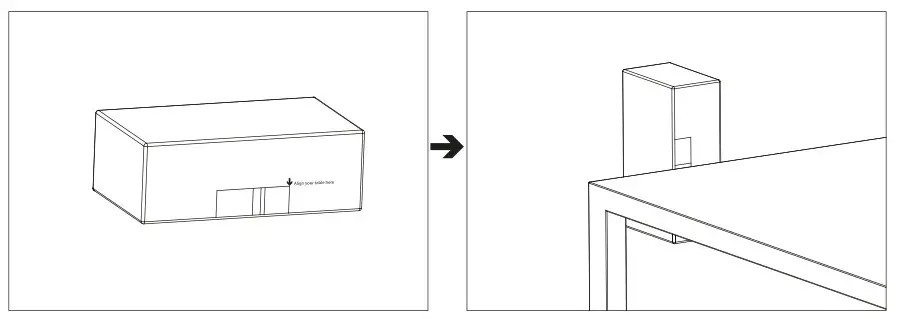
STAGE 1- CHARGER INSTALLATION
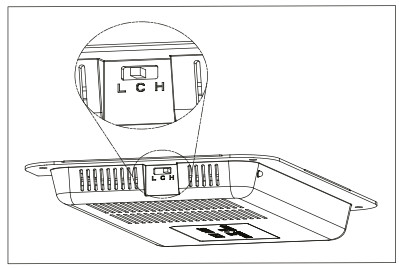
- Use the desk sizing tool on the box to measure your table’s compatibility. If you are not within the colored area, you should not install the charger. Please note the H (high) and L (low) setting indicators for later.

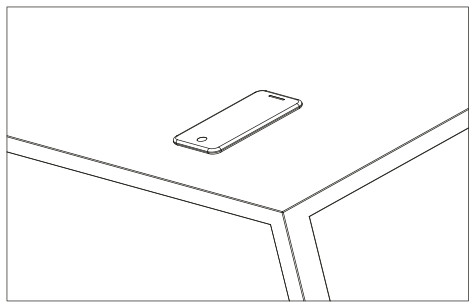
- Place your mobile phone where you want to charge it.
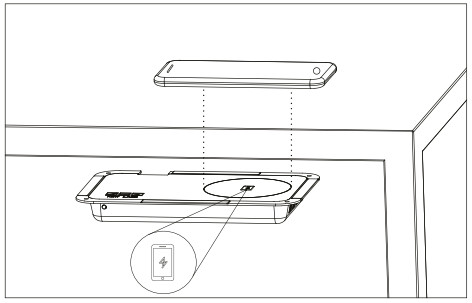
- Align the center of your phone to the icon in the charging area.
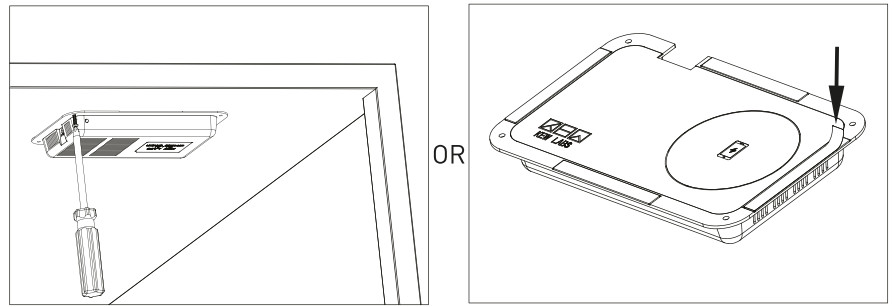
- Choose between screw or tape installation. Tape or screw the charger into position making sure the charger still reaches the power point (screws may be easier to remove).
- Use the cable clips to attach the power cable to your table. Plug the power cable into either port.
- Connect up to two UTS-1 with daisy chain power adaptor applicable.* ‘Please ensure units are spaced at least 15cm (6.0″) apart and always use two units connected together.


STAGE 2 – PHONE CALIBRATION
Phone calibration – making sure your phone is positioned correctly and charging.
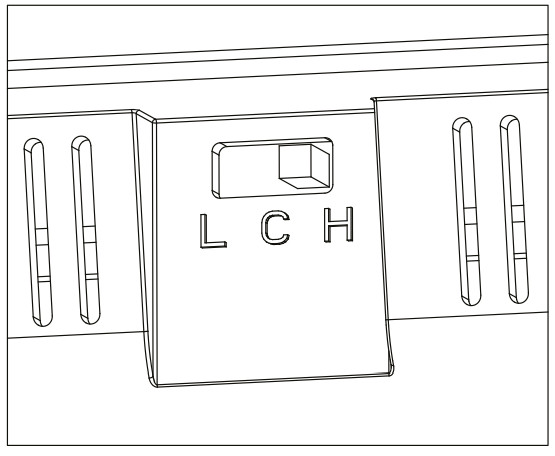
- Switch the toggle to the “C” position.
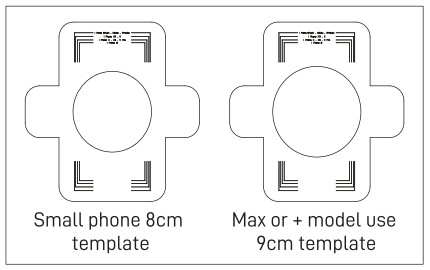
- Select a sticker template guide according to personal preference. See suggested sizing below.
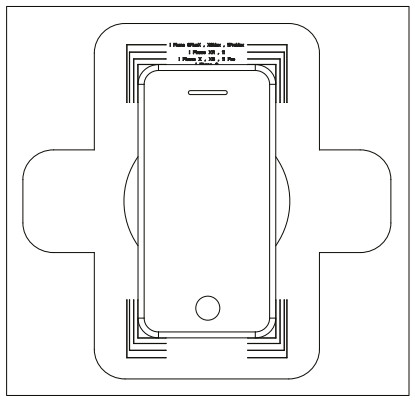
- Apple/Samsung users Align your phone to fit your phone model.Other brand mobiles Align your phone to the best fit model.
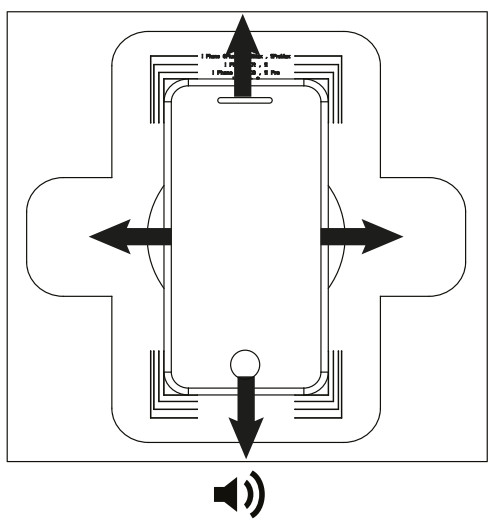
- Move the template and phone together gently holding the side handles to slowly move your device closer to the charging area and listen for the increasing speed of the audio beeps.– Please allow up to 1 second before moving your device to re-position.– As the audio beeps get faster, you are getting closer to the centered charging position.– When the sound changes to a solid signal you have reached your perfect charging area.
- Remove your phone whilst keeping your template card in position and carefully place the charging sticker in the circular gap in the template.If selecting the smallest sticker please ensure you place it in the center.
- Switch the toggle position of the charger to the correct thickness setting for your surface. Use desk sizer on box side to measure.Height Settings.Standard Version
L 18mm – 21mm (0.71″-0.83″) H 22mm – 25.4mm (0.87″-1.0″) iPhone 12 users use L with 0.8″ max distanceThin Version
L 10mm -13mm (0.39″-0.51″) H 14mm -17mm (0.55″-0.69″) Add 2mm extra for phone cases (-0.01″)
- Audio Confirmation Beep Configuration. Switch your height toggle switch to calibration mode and switch back to your original height position and listen for the number of audio beeps.
 Other brand mobiles Align your phone to the best fit model.
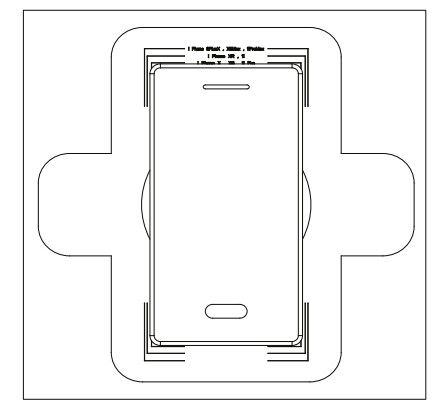
 – Please allow up to 1 second before moving your device to re-position.– As the audio beeps get faster, you are getting closer to the centered charging position.
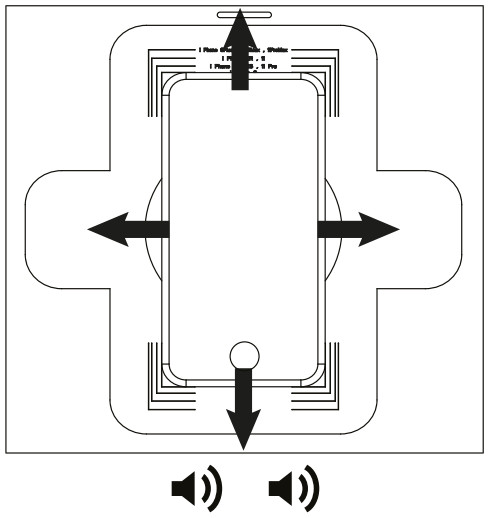 – When the sound changes to a solid signal you have reached your perfect charging area.
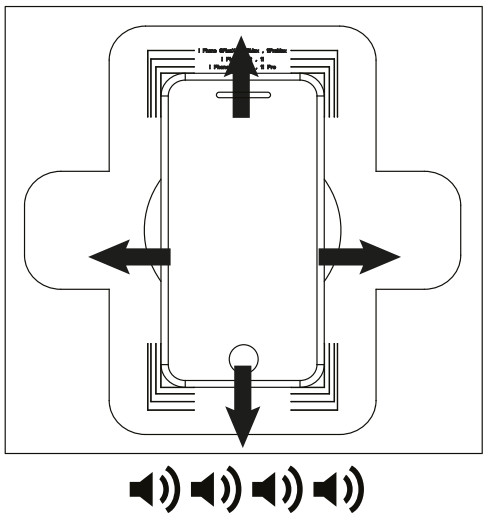
 Height Settings.Standard Version
| 1 beep | Disabled audio confirmation buzzer |
| 2 beeps | Enabled audio confirmation buzzer |
To disable or enable buzzerRepeat the above step to disable or enable the buzzer depending on preference. Kew Labs advises using the audio confirmation system to start with to determine optimal phone placement accuracy.Note: The recalibration process or multiple calibration attempts will toggle the audio confirmation on/off. Please adjust the buzzer configuration accordingly after each calibration to your desired functionality.Please turn over
GENERAL USE INSTRUCTIONS
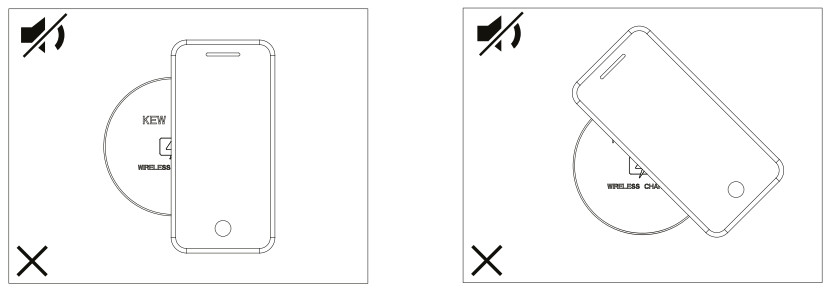
- Place your phone face up aligning the center of your phone to the center of the sticker.
- The UTS-1 will make an audio confirmation beep to indicate the accuracy of your phone positioning.
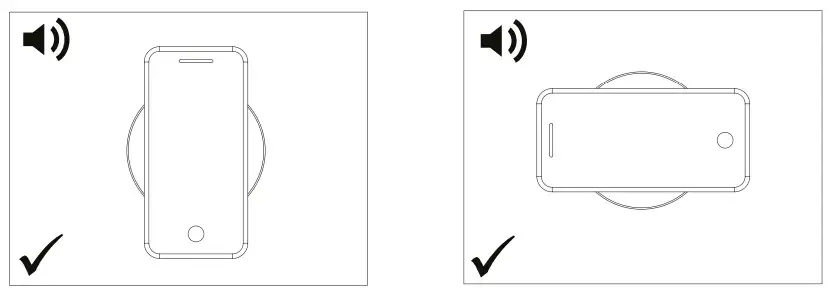
A beep is a confirmation that your phone has been placed in an optimal position for charging and fast charging. If you do not hear the beep but your phone indicates charging, you may be experiencing regular or slower charging speeds. For better performance please reposition your device more accurately to receive the beep confirmation.For better results, please remove the phone from the charging spot and wait 2-3 seconds before repositioning
Note: If you still do not hear the confirmation beep please check if the buzzer has been disabled in stage 2 – step 7.
TROUBLESHOOTING AND FADS
Please email supportfakewlabstech.com for all other questions and queries or find us on our Facebook messaging page.
Why is my phone not charging?Please ensure:
- If you have a phone case, it is flat and does not contain any metal, centrally located magnets, cardholders, pop sockets or kickstands.
- Ensure your phone is aligned as centrally as possible.
- Check if your phone is Qi wirelessly charging enabled.
- Check your sticker position through recalibration.
- Check your table or surface thickness is within the stated performance range.
Why do the audio confirmation beeps take different amounts of time?The time taken to beep is determined by how accurately you have positioned your device. A center position will beep faster than a misaligned placement or at greater distances, i.e., 25mm (1.0″). Thicker cases can also cause longer recognition time and therefore longer time to beep. Recalibrate if necessary to improve sticker position or center your device on the sticker more accurately to get a better alignment.Why has my phone stopped charging?The UTS-1 is designed to recognize and react to temperature changes within your phone which can occur after extra long charging periods of 3 hours or more. In these instances, the charger may enter a standby mode to allow your device to cool if required by your phone until the device requests more power. This feature ensures better battery health and longevity for your phone.
Can I switch the audio confirmation off?Yes— if you would prefer or need to use the charger without the audio confirmation buzzer system, you are able to turn it off. However, without the audio confirmation, your phone is not necessarily charging just through the charging indication on your screen. If you choose to use the device without the buzzer, please ensure your alignment and setup is correct and accurate.Why does my phone feel hot?Increased phone temperatures during wireless charging are normal, especially during longer charging sessions. Our IPCIN technology is designed to minimize phone heating however if your phone is hotter than usual, please ensure you have aligned it correctly and try again.Why do the charging speeds vary?Different phone models have different battery sizes and charging profiles therefore take different amounts of time to charge, with large batteries especially taking longer. Charging speeds may also slow at 80% in IOS models due to Apple software requirements designed to limit battery deterioration during wireless charging. The UTS-1 recognizes IOS charging signals and corresponds by adapting charging speeds until your device requests more power. Please try turning OFF ‘Optimised Battery Charging’ in your ‘Settings’. 0 Charging speeds will also vary depending on the surface thickness. Thicker surfaces will reduce charging efficiency due to the greater distance the charging signal needs to travelWhat does the flashing LED indicator on the charger mean?A flashing LED light is an electrical system fault error (see in LED indication section (page 12) below for more detail).
SPECIFICATIONS
| Fast Charging Speeds | Qi enabled Apple 7.5W / Samsung 9W Fast Charge. |
| Charging Distance |
|
| Normal Charging Speed | Qi enabled Google, Huawei, Sony, Nokia, LG, Xiaomi 5W Charge. |
| Charges Through | All non-metallic surfaces are wood, plastic, granite, quartz, marble glass. |
| Product Dimensions | 182mm x 112mm x 20mm (7.17 x 4.41x 0.79′). |
| Power cable length | 1.5m (01″). |
LED INDICATION
| Status | LED |
| Power Off | Off |
| Power On | On |
| System Fault (OTP, OCP, UVP, OVP, Phone Protect Mode) | Blink |
SYSTEM FAULT
Under Voltage Protect (INK Over Voltage Protect (OVN, OverCurrent Protect lOCP1: Proper power is not reaching the charger. Can be caused by incorrect adaptor usage, overloaded multi-plug adaptor set up, improper table thickness setting, metal objects placed very near to the installation of the charger.Over-Temp Protect (OTP): The charger is installed at the low air circulation area.Phone Protect Mode: Action when the phone is positioned closer than the Charging distance (under 18mm).* System Fault can be used again after removing the cause of the occurrence, turning the power off and on.
BUZZER INDICATION
| Status | Buzzer |
| Power Transfer Start | Beep |
| Calibration Mode | Beeps occur at regular intervals.If the phone is near the center, theThe beep sound interval is short. |
| Change Dip Switch20/25mm | Beep: Buzzer OffBeep-Beep: Buzzer On(at Power Transfer Start) |
WARRANTY
Kew Labs warrants to the purchaser that your product shall be free from defects in material and workmanship for the length of time, identified on your product package and/or at www.kewlabstech.com under the warranty specification for your product, from the date of purchase. This warranty is non-transferable and is limited to the original purchaser and the country it was purchased in.This warranty does not cover problems or damage resulting from
- accident, abuse, misapplication, or any unauthorized repair, modification or disassembly;
- improper operation or maintenance, usage not in accordance with product instructions or connection to improper voltage supply;
- use of non-Kew Labs consumables, such as replacement batteries,
- lost parts that were originally supplied with by Kew Labs;
- normal wear and tear. This limited warranty does not, under any circumstances, cover the replacement of or reimbursement for any electronic device or personal property that is not a Kew Labs product.
CUSTOMER SERVICE
Please don’t hesitate to contact us at suppornakewlabstech.com for any technical assistance, warranty claim or feedback you may have relating to this product. Otherwise please visit our website www.kew-tabstech.com for more detailed FAQs and more product news.
SAFETY INSTRUCTIONS
- DO NOT PLACE PHONE DIRECTLY ON CHARGER
- Avoid contact with water and do not submerge.
- Avoid extreme temperatures.
- Avoid dropping.
- Use original or certified cables.
- Do not clean with corrosive substances or oils.
- Do not disassemble.
- This product is in compliance with the radio interference. requirements of the European Community.
- Electronic adapters are recyclable waste and must not be disposed of in the household waste.
- Dispose of this equipment using a designated collection point for the recycling of electrical and electronic equipment.
FCC STATEMENTS
This device complies with Part 15 of the FCC Rules. Operation is subject to the following two conditions:
- This device may not cause harmful interference.
- This device must accept any interference received, including interference that may cause undesired operation.
Changes or modifications not expressly approved by the party responsible for compliance could void the user’s authority to operate the equipment.Note: This equipment has been tested and found to comply with the limits for a Class B digital device, pursuant to Part 15 of the FCC Rules. These limits are designed to provide reasonable protection against harmful interference in a residential installation.Continued
This equipment generates uses and can radiate radio frequency energy and, if not installed and used in accordance with the instructions, may cause harmful interference to radio communications. However, there is no guarantee that interference will not occur in a particular installation. If this equipment does cause harmful interference to radio or television reception, which can be determined by turning the equipment off and on, the user is encouraged to try to correct the interference by one or more of the following measures: (1) Reorient or relocate the receiving antenna. (2) Increase the separation between the equipment and receiver. (3) Connect the equipment into an outlet on a circuit different from that to which the receiver is connected. (4) Consult the dealer or an experienced radio/TV technician for help.
RF warning statement: The device has been evaluated to meet general RF exposure requirements. The device can be used in portable exposure conditions without restriction.
[xyz-ips snippet=”download-snippet”]