
KMC5Media CenterKMC5
![]() Owner’s ManualKMC5 Multi-Media Receiver
Owner’s ManualKMC5 Multi-Media Receiver
FCC Statement
This equipment has been tested and found to comply with the limits for a Class B digital device, pursuant to part 15 of the FCC Rules. These limits are designed to provide reasonable protection against harmful interference in a residential installation. This equipment generates, uses, and can radiate radio frequency energy and, if not installed and used in accordance with the instructions, may cause harmful interference to radio communications. However, there is no guarantee that interference will not occur in a particular installation. If this equipment does cause harmful interference to radio or television reception, which can be determined by turning the equipment off and on, the user is encouraged to try to correct the interference by one or more of the following measures:
- Reorient or relocate the receiving antenna
- Increase the separation between the equipment and receiver.
- Connect the equipment into an outlet on a circuit different from that to which the receiver is connected.
- Consult the dealer or an experienced radio/TV technician for help.
FCC Statement
This device complies with FCC radiation exposure limits set forth for an uncontrolled environment. This device complies with Part 15 of the FCC Rules. Operation is subject to the following two conditions: (1) this device may not cause harmful interference, and (2) this device must accept any interference received, including interference that may cause undesired operation.The Load Equivalency Number (LEN) indicates the amount of current a device draws from the NMEA 2000 network. Each device should have a LEN specified on the product or in the product documentation. KMC5 NMEA 2000 Load Equivalency Number (LEN): 1 (50mA)SiriusXM and all related marks and logos are trademarks of Sirius XM Radio. Inc. All rights reserved.Caution! Any changes or modifications not expressly approved by the party responsible for compliance could void the user’s authority to operate the equipment.IC Notice – CAN ICES-3 (B) – This device complies with Industry Canada’s license-exempt RSS.Operation is subject to the following two conditions: (1) This device may not cause interference; and (2) This device must accept any interference, including interference that may cause undesired operation of the device.The device meets the exemption from the routine evaluation limits in section 2.5 of RSS 102 and compliance with RSS-102 RF exposure, users can obtain Canadian information on RF exposure and compliance.FCC ID: 2ADQMKMC1001IC ID: 11078A-KMC5mounting hole cutout template: 3 inches, 76.2 mm
![]() mounting hole cutout template: 3 inches, 76.2 mm
mounting hole cutout template: 3 inches, 76.2 mm

SPECIFICATIONS
| Model | KMC5 |
| Power Output @ 14.4V, 2Ω stereo, <10% THD+N | 40W x 6 |
| Power Output @ 14.4V, 4Ω stereo, <10% THD+N | 25W x 6 |
| Frequency Response [Hz] | 20 – 20k |
| Signal-to-Noise Ratio [dB] | 100 |
| Pre-Amp Outputs | Front, Rear, Sub, Zone2 |
| Input Sensitivity | Adjustable 500mV–1.5V |
| USB Playback | MP3/WMA/FLAC/WAV |
| USB Charging | DC 5V, 1A |
| USB Compatible File System | FAT32 |
| IP Rating | IP66 |
| Line-Out Level [V] | 4 |
| Outer Trim Dimensions[in, cm] | 3.5 x 5.5, 8.89 x 13.97 |
| Protrusion From Mounting Surface [in, cm] | 1-5/16, 3.33 |
| Total Mounting Depth [in, cm] | 5, 12.7 |
| Mounting Hole Diameter [in, cm] | 3, 7.62 |
Authorized KICKER Dealer:Purchase Date:Serial Number:Be careful not to drill into wiring or vehicle mechanisms. You are solely responsible for securely mounting the KMC5 Media Center. See page 23 for mounting hole cutout template.Before installation, you may wish to plan your placement of the USB and Auxiliary inputs, and the optional KRC12 and KRC15 remotes (sold separately), for both convenience and looks!With a KICKER KXM amplifier, a pair of KICKER KM speakers, and a few KICKER cables, you’re looking at a full system upgrade that will dominate! KICKER amplifiers and accessories make upgrading a snap. Ask your dealer about KICKER amplifiers and speaker upgrades to complete your system!All specifications and performance figures are subject to change. Please visit www.kicker.com for the most current information.WARNING: KICKER products are capable of producing sound levels that can permanently damage your hearing! Turning up a system to a level that has audible distortion is more damaging to your ears than listening to an undistorted system at the same volume level. The threshold of pain is always an indicator that the sound level is too loud and may permanently damage your hearing. Please use common sense when controlling volume.
OVERVIEW
If the battery voltage is low (<+10.5V), an on-screen warning will appear. Recharge the battery and avoid becoming stuck or marooned.
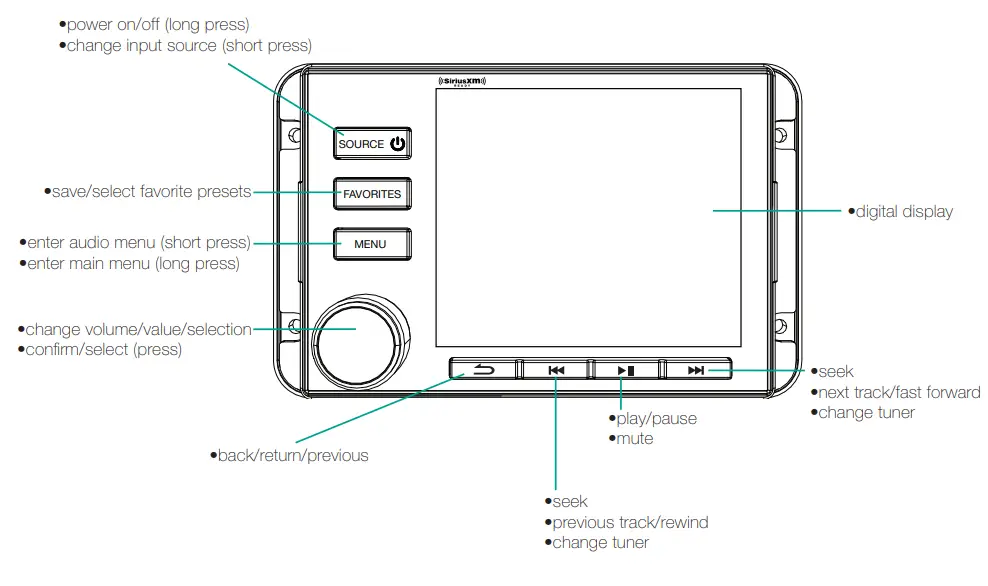
NOTE: Use short and long presses to operate. Some input sources do not support all functions.
INSTALLATION
Remember to cap unused wires and avoid electrical shorts!
 |
 |
- Remove adhesive from the rear gasket and apply to the back of the KMC5.
- Securely fasten the KMC5 to the mounting surface using the including screws.
- Attach the snap-on trim ring to the front of the KMC5.
OPERATION
PlaybackUse the SOURCE button to enter the source menu. Use the knob to choose the input source for the KMC5: Bluetooth, USB, AUX, AM, FM, WX, and SiriusXM (Requires SiriusXM Connect Tuner and Subscription, sold separately).AThe KMC5 will automatically enter Bluetooth pairing mode when there is no Bluetooth connection, with the display message “In Pairing Mode”. To enter pairing mode manually, choose Bluetooth input and then push the MENU button. This will enter the Bluetooth Menu. Select ENTER PAIRING MODE to begin pairing. When you begin scanning for devices on your audio device, the KMC5 will identify as “Media Center”. Bluetooth Menu options include:Select Device – view all paired devices and select one for playbackDisconnect Current Device – disconnects current device and connects to the next device on the listDelete Device – delete the paired device from listDelete All Devices – deletes all stored Bluetooth devices and enters pairing modeWhen a radio tuner input is selected, press the seek buttons to search for radio stations with adequate signal strength. To tune stations manually, press and hold the seek buttons for 2 seconds, then press them once to change frequencies. Use the MENU button while in the WX band to turn Auto-Alerts ON/OFF for Weatherband alert messages. This will interrupt playback for emergency alerts and messages.Set favorite presets for your favorite AM, FM, SiriusXM, and WX stations by selecting the station, pressing the FAVORITES button, selecting the favorite number (116) you wish to set, and pressing and holding the VOLUME KNOB for 2 seconds.The USB input source is only available when there is a USB device connected. The KMC5 will automatically switch to USB input when a USB device is connected and detected. KICKER recommends SANDISK drives for the best performance. Drives must be formatted in the FAT32 file system. USB hubs are not compatible. High-bit rate files (320kbps) may experience errors. In testing, the KMC5 has been shown to work with some HDDs and other file systems, however, this is not supported by KICKER! USB Menu options include:Browse – Browse all files and folders using the knob to scroll and select tracks.Repeat – turn Repeat ON/OFF for the current playlist or all tracksShuffle – turn Shuffle ON/OFF for the current playlist or all tracksDME – a digital music enhancer that will enhance the sound quality of compressed audio files.The camera and video input may be used to connect an external camera or video source to the KMC5. The reverse trigger wire (+12v) will automatically activate the camera when the vehicle is placed in reverse. To manually activate/deactivate the video input, press and hold the FAVORITES button.Device SettingsPress the MENU button to enter the audio settings for a selected input source. Hold the MENU button for 2 seconds to enter the device settings menu. The available device settings are Loud, Area, Beep, Zone2, Z2VOL, HPF, and Dimmer. Use the VOLUME KNOB to change the available values for each setting.Loudness – select On or Off for a low-frequency boostTuner – the select USA or EuropeBEEP – select whether the KMC5 responds with beepsZone 2 – toggles Zone 2 volume control on/offZone 2 Control – This allows you to select which connection is controlled by the Zone 2 volume:Internal Power: Zone 2 channels are controlled by Zone 2 volume. Zone 2 RCA is controlled by Zone 1 volume. Preamp: Zone 2 RCA is controlled by the Zone 2 volume. Zone 2 internal channels are controlled by Zone 1 volume. Both: Zone 2 channels and Zone 2 RCA are controlled by Zone 2 volume.Z2VOL – change the behavior of Zone 2 volume control:Relative: Zone 2 volume is locked to the main volume.Absolute: Zone 2 volume is adjusted independently of the main volumeNaming – Change the Zone 2 name: Zone 2, Tower, Transom, Cockpit, InteriorHPF – hi-pass crossover: OFF, 50Hz, 80Hz, 120HzDimmer – adjusts screen and button brightness: 012Day/Night – change the color scheme from Day Mode to Night Mode. KMC5 will switch automatically when lights are turned on (orange illumination wire must be connected).Low Battery Alert – turn the Low Battery Alert ON/OFF. When set to ON, the KMC5 will activate a visual and audio alert when the voltage drops below +10.5V, indicating the battery needs to be charged.Audio SettingsHold the MENU button for 2 seconds from a source screen to enter the audio settings menu. Press the MENU button to enter the audio settings. The available audio settings are Bass, Treble, Balance, Fader, and EQ. Use the VOLUME KNOB to change the available values for each setting.Sub – adjust the subwoofer level from 0+12 Mid – adjust the mid-level from -6+6 Balance – adjust the balance from Left 6 to Right 6Bass – Adjust the bass level from -6+6 Treble – adjust the treble level from -6+6 Fader – adjust the fader from Front 6 to Rear 6EQ – select between EQ presets: OFF, ROCK, POP, JAZZ, and CUSTOMWhen Custom EQ is selected, press the MENU button to enter custom frequency adjustments for 50Hz, 125Hz, 250Hz, 500Hz, 1kHz, 3kHz, and 8kHz. To manually adjust Bass, Mid, and Treble, EQ must be set to OFF.SiriusXMAfter installing your SiriusXM Connect Tuner and antenna, power on the KMC5 and select SiriusXM as the input source. Channel 1, the SiriusXM preview channel, should be audible. If it is not, please refer back to the installation instructions for your SiriusXM Connect Tuner. If the preview channel is working, tune to Channel 0 to find the Radio ID of your tuner, or locate the Radio ID on the bottom of the SiriusXM Connect Tuner.In the USA, you can activate your SiriusXM Tuner online or by calling SiriusXM Listener care:Visit www.siriusxm.com/activatenowCall SiriusXM Listener Care at 1-866-635-2349For Canadian Subscriptions, please contact:Visit www.siriusxm.ca/activatexmCall XM customer Care at 1-877-438-9677When the KMC5 detects that the SiriusXM Connect Tuner has received activation, it will display “Subscription Updated”. The activation process can take up to an hour to complete. The KMC5 must be powered on and receive the SiriusXM signal to receive the activation message.Press the MENU button while in SiriusXM input mode to enter the SiriusXM menu.Channel Browse – browse SiriusXM channels, Direct Tuning – manually enter SiriusXM channelCategory Browse – browse SiriusXM categories for relevant channels Parental Controls – change access to some channelsInformation – displays SiriusXM Radio IDReset – reset the KMC5’s SiriusXM settings to factory defaults.When choosing to enable Parental Controls for the first time, you will be prompted to enter a 4-digit passcode. (default is 0000)Manage Password – change/reset current passcodeDisable Parental Controls – remove all channel restrictions
TROUBLESHOOTING
SiriusXMCheck Antenna:The radio has detected a fault with the SiriusXM antenna. The antenna cable may be either disconnected or damaged.- Verify that the antenna cable is connected to the SiriusXM Connect Tuner.- Inspect the antenna cable for damage and kinks. Replace the antenna if the cable is damaged. SiriusXM products are available at your local retailer or online at www.shop.siriusxm.comCheck Tuner:The radio is having difficulty communicating with the SiriusXM Connect Tuner.- The tuner may be disconnected or damaged.- Verify that the SiriusXM Connect Tuner cable is securely connected to the radio.Subscription Updated: The radio has detected a change in your SiriusXM subscription status. Press the knob (8) to clear the message. Visit www.siriusxm.com or call 866-635-2349 if you have questions about your subscription.No Signal: The SiriusXM Connect Tuner is having difficulty receiving the SiriusXM satellite signal.- Verify that your vehicle is outdoors with a clear view of the sky.- Verify that the SiriusXM antenna is mounted on the outside of the vehicle.- Move the SiriusXM antenna away from any obstructions.- Inspect the antenna cable for damage and kinks.- Consult the SiriusXM Connect Tuner installation manual for more information on antenna installation. Replace the antenna if the cable is damaged. SiriusXM products are available at your local retailer or online at www.shop.siriusxm.comChannel Not Available: The channel you have requested is not a valid SiriusXM channel or the channel that you were listening to is no longer available.You may also see this message briefly when first connecting a new SiriusXM Connect Tuner.- Visit www.siriusxm.com for more information about the SiriusXM channel lineup.Channel Not Subscribed: The channel that you have requested is not included in your SiriusXM subscription package or the channel that you were listening to is no longer included in your SiriusXM subscription package.- Visit www.siriusxm.com or call 866-635-2349 if you have questions about your subscription package or would like to subscribe to this channel.Channel Locked: The channel that you have requested is Locked by the radio Parental Control feature. See page 10 for more information on the Parental Control feature and how to access locked channels. Default Passcode is 0000. If your KMC5 does not appear to be working, check the obvious things first such as blown fuses, poor or incorrect wiring connections, etc. If you’re using an amplifier, check for the incorrect settings of crossover switches and gain controls, etc.No Power?
- Press the SOURCE/POWER button and make sure the KMC5 is turned on.
- Check the +12V power wire, ground wire, and fuse(s) for power and proper connection.
 report this ad
No or low output?
- Check the balance/fader controls on the KMC5.
- Check the speaker output connections.
- Power cycle the KMC5.
- Check the volume of the audio source.
Reduced volume? Reverse a speaker connection from positive to negative on the stereo channel(s); if the volume improves, the speaker was out of phase.Is buttons/Device Unresponsive? Perform a Factory reset.Factory reset: Reset the KMC5 to factory default settings by pressing and holding the PLAY/PAUSE button for ten seconds.Are radio stations not being received? Check the antenna for proper connection and ensure the Tuner setting in the menu is set to the correct region. If you have more questions about the installation or operation of your new KICKER product, see the Authorized KICKER Dealer where you made your purchase.Please E-mail [email protected] or call Technical Services (405) 624-8583 for unanswered or specific questions.
©2020 Stillwater Designs
References
[xyz-ips snippet=”download-snippet”]