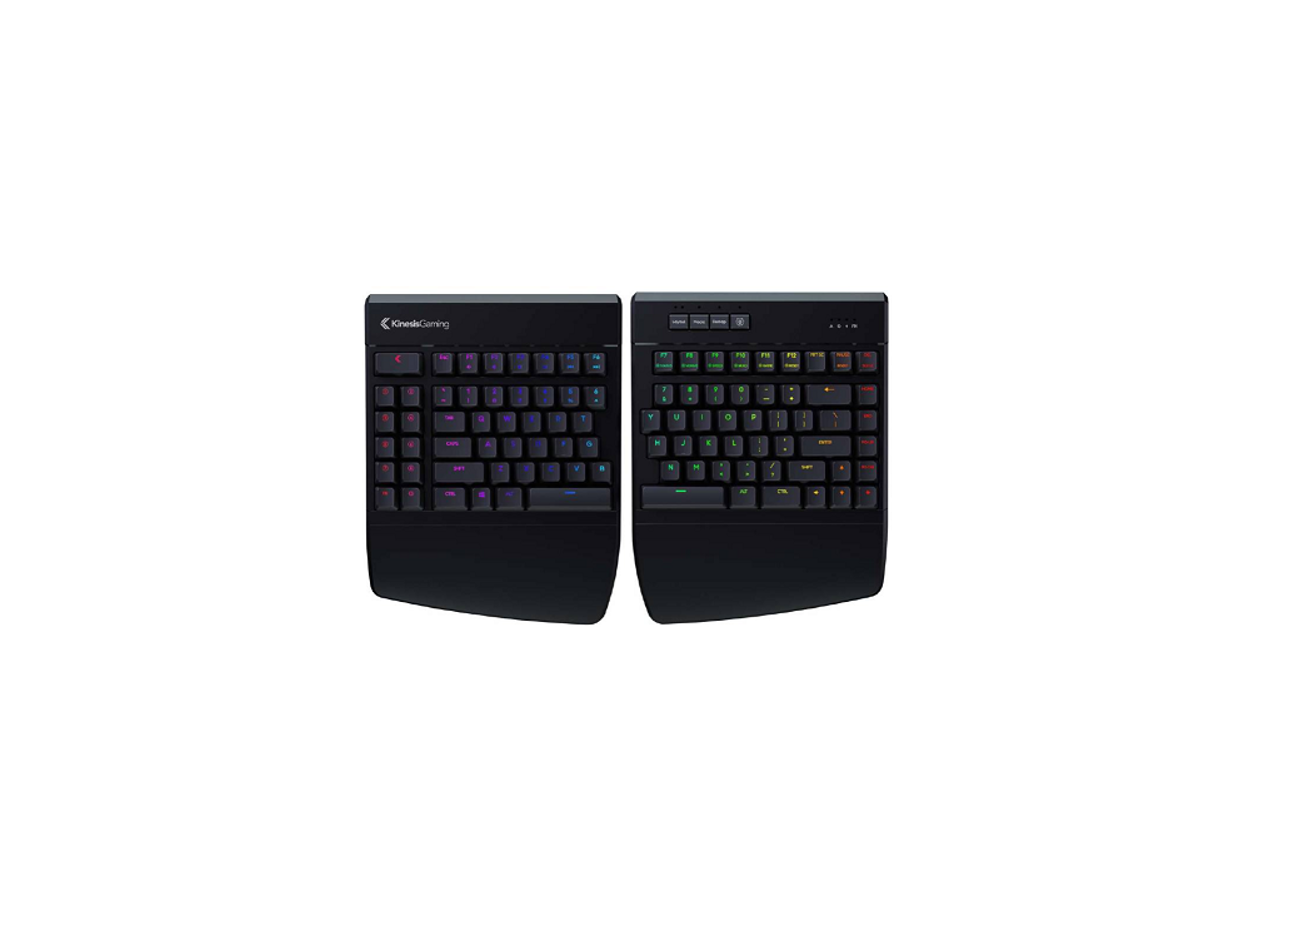
Kinesis KB975-BLU Freestyle Edge RGB Split Mechanical Gaming Keyboard User Manual
1.0 Read Me First
Health and Safety Warning
Continuous use of any keyboard may cause aches, pains or more serious cumulative trauma disorders such as tendinitis and carpal tunnel syndrome, or other repetitive strain disorders.
- Exercise good judgement in placing reasonable limits on your keyboarding time every day.
- Follow established guidelines for computer and workstation setup.
- Maintain a relaxed keying posture and use a light touch to press the keys.
Keyboard is not a medical treatment
This keyboard is not a substitute for appropriate medical treatment! If any information in this guide appears to contradict your health care professional’s advice, please follow your health care professional’s advice.
No warranty of injury prevention or cure
Kinesis bases its product designs on research, proven features and user evaluations. However, because of the complex set of factors believed to contribute to computer-related injuries, the company can make no warranty that its products will prevent or cure any physical ailment. Your particular risk of injury may be affected by workstation and chair design, posture, time worked without breaks, type of work, activities outside the workplace, and/or individual physiology.
Quick Start Guide
If you are eager to get started, please consult the included Quick Start Guide. The Quick Start Guide can also be downloaded from KinesisGaming.com/Support. Consult this full User Manual for detailed descriptions of both basic and advanced features.
Read This User’s Manual
Even if you don’t normally read manuals or you are a long-time user of Kinesis keyboards, we strongly encourage you to review this entire manual. The Freestyle Edge is a fully-programmable keyboard with powerful tools and features. If you unknowingly execute a programming shortcut or key combination, you could inadvertently alter the layout of your keyboard which might necessitate a Hard Reset of the keyboard.If you have no plans to re-program the keyboard and would like to disable all programming features see Section 4.12.
Disable All Programming
If you are a Windows user and QWERTY typist, and have no intention of custom programming the keyboard, we recommend performing the simple Program Lock command to prevent accidental reprogramming. If you change your mind down the road you can always “unlock” programming . See Section 4.10 for details.
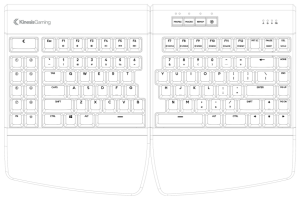
2.0 Keyboard Overview
Specifications
- Compact tenkeyless design with standard US ANSI key layout
- 6’ USB cable and 20” adjustable linking cable
- 2 year limited warranty
- Dimensions: 25” tall x 15.5” wide x 10.25” deep (Without Palm Supports: 7.25” deep)
- Weight: 8 lbs
Features
- Premium Cherry® MX mechanical switches
- 8M Color Per-Key RGB LED backlighting
- SmartSet Programming Engine with on-the-fly remaps & macros
- SmartSet App for Windows & Mac
- 9 Customizable Profiles with fully-programmable dual-layer layouts and Lighting Effects
- 4MB onboard memory (the v-Drive™)
- Multimedia actions (embedded Fn layer)
- Game Bank with 9 programmable game keys for binding macros and custom key actions
- Available Game Mode & NKRO Mode
- 1000mz polling
- 100% anti-ghosting
Package Contents
- Freestyle Edge mechanical keyboard, 20” adjustable linking cable
- Detachable Cushioned Palm Supports
- Quick Start Guide
System Requirements
- Keyboard: Windows® 7-10, MacOS® X 6+, Chrome OS® or Linux® & full-size USB Port
- Smart Set Programming App (Required for Lighting customization): Windows 7-10 or Mac OSX 10.4+, Internet Connection (download only), 25MB available hard-disk space, and 1920×1080 monitor size.
Keyboard Setup
To setup the Freestyle Edge simply plug the USB cable into a full-size USB port on your computer. The Edge does not require the installation of any special software or drivers or an internet connection. To access the SmartSet App, visit the URL below and download the SmartSet App to your Windows or Mac computer.
KinesisGaming.com/fs-edge-rgb-support/#smartset
3.0 Introduction
3.1 RGB Backlighting

The Freestyle Edge is equipped with vibrant per-key RGB backlighting. Tap the LED key to quickly toggle the backlighting On and Off. Each of the nine Profiles is pre-configured with a unique lighting effect. Additional custom effects can be assigned to any of the 9 Profiles via the SmartSet App (See Section 5.0).
| Profile 1 | Profile 2 | Profile 3 | Profile 4 | Profile 5 | Profile 6 | Profile 7 | Profile 8 | Profile 9 |
| RGB Wave (Right) | RGB Wave (Down) | RGB Spectrum | Reactive (Green) | Freestyle | Monochrome (Blue) | Monochrome (Red) | Monochrome (Green) | Monochrome (White) |
3.2 Dual Layer Layouts (Embedded Fn Layer)
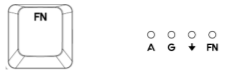
The keyboard has two separate layers so each of the 95 full-size keys can be programmed to perform two unique actions per layout– a top layer action and an “embedded” Fn layer action. Press and hold the FN key to temporarily “shift” into the Fn layer (the Fn indicator light will illuminate while the Fn layer is active).In the default layout, the Fn layer actions mirror the top layer except for 8 keys which have unique embedded actions legended on the lower half of the key: the F1-F6 keys perform multimedia actions, the PAUSE key performs INSERT, and the DEL Key performs SCROLL LOCK.
Note: The FN key can be configured to “toggle” the Fn layer on and off via the SmartSet App.
3.3 Multimedia Actions

Change your audio on the fly by using the FN key in combination with the F1-F6 keys.
Note: Multimedia actions can be assigned to any key on the keyboard in either layer using onboard programming (see Section 4.3) or the SmartSet App (see Section 5.0). Multimedia actions are disabled while the v-Drive is connected.
3.4 Programming Cluster

The four Programming Cluster keys enable quick and easy onboard reprogramming (see Section 4.0). The PROFILE key toggles between the 3 primary Profiles (1, 2, and 3), the MACRO key controls on-the-fly macro recording, and the REMAP key controls onboard remapping (aka rebinding).The 4th key with the gear icon is the SmartSet key, and it controls all onboard programming shortcuts.
Note: Hitting these keys can have unintended consequences so read through this manual before attempting to reprogram the keyboard, or disable programming (See Section 4.12).
3.5 Removable Cushioned Palm Supports
The palm supports are detachable so you can customize the keyboard based on your typing and gaming preferences. To remove the supports, flip the keyboard over and gently wiggle the palm support to lift the tabs over the bumps on the underside of the keyboard, and then pull straight out. To attach, slide the palm support into the key modules until they latch into place.
Note: If the palm support doesn’t snap into place easily you may be trying to attach it to the wrong key module, or it may be misaligned. The cushioned palm pads are attached by Velcro for small adjustments.
3.6 SmartSet Programming Engine- Onboard Shortcuts

The SmartSet key is used in conjunction with the F7-F12 keys to activate basic onboard shortcuts. Onboard shortcuts are legended with the SmartSet icon to differentiate them from embedded Fn layer actions. To trigger an onboard shortcut, hold the SmartSet key and then tap F7-F11. To prevent against accidentally resetting the keyboard, you must also hold the Shift key along with the SmartSet key before tapping F12. For a detailed explanation of these and other un-legended onboard shortcuts see Section 4.0 .
3.7 Adjustable Linking Cable
Adjusting Length: The two key modules are connected by a 20” braided linking cable that can be adjusted to suit your typing preferences and gaming style. The basic configuration allows for up to 12” of separation. If you need additional cable, simply remove the cable compartment cover on the back of the left key module and thread out more of the stored cable. Once you have achieved the desired cable length, carefully fit the excess cable into the compartment removing any kinks and slide the cable cover on until it latches.
Note: For best results rotate the left key module to remove any kinks from the cable so it lies flat.
Positioning: Position the key modules in the optimal configuration relative to your other input devices, or separate the modules to shoulder-width for maximum typing comfort. There is no wrong way to configure the Edge, experiment with different positions to find the configurations that work best for you.
KinesisGaming.com/ergonomics
3.8 Game Bank


The Game Bank comprises nine fully programmable keys (blank by default) that can be programmed to perform any custom key action, mouse-click, or macro, in either layer. The Game Bank is perfect for moving critical right-sided keys over to the left key module to enable one- handed play, storing macros, or moving the multimedia actions to the top-layer.
4.0 SmartSet Onboard Programming
The SmartSet Programming Engine allows you to custom program the keyboard without installing any software or special drivers on the computer by using a series of convenient onboard shortcuts. Remap keys, record macros, toggle Profiles, and adjust keyboard settings. Profiles and Settings are saved to the keyboard’s onboard “v-Drive” memory, not your PC, so they travel with your keyboard. To customize Lighting Effects and access other powerful programming tools, download and install the intuitive SmartSet App for Windows and Mac (See Section 5.0).
4.1 Change Profiles (Tap Profile or SmartSet + Number Row)

The Edge features 9 fully programmable Profiles which can be customized with an individualized Lighting Effect and Layout for different games or users. The LEDs above the PROFILE Key indicate the active Profile. Tap the PROFILE Key to toggle through the three primary Profiles. To jump directly to any of the nine Profiles, hold the SmartSet Key and then tap 1-9 in the number row to select the desired Profile. Left LED = Profile 1, Right LED = Profile 2, Both LEDS = Profile 3, No LEDs = Profile 4-9 (Use the Status Report to determine the Active Profile when using Profiles 4-9,See Section 4.4).
4.2 Recording Macros
A macro is string of characters or key actions that is triggered by a single key press or key combo. Macros are powerful tools that allow you to quickly produce multiple in-game actions in rapid succession. Macros are assigned to the active Profile at the time of recording but can be easily copied using the SmartSet App. To record a macro on-the-fly, tap the MACRO key to enter Macro Record Mode, choose your trigger key (s), and then type out your macro. Tap the MACRO key stop recording.
Macro Trigger Key(s): After entering Macro Record Mode, the Macro LED will flash rapidly prompting you to select a trigger key. Any full-size, non-modifier key can be used as a macro trigger. A macro can also be triggered by a two-key combination by pairing the primary trigger key with a modifier-key “co-trigger”. To assign a key combination as a macro trigger, first press and hold one of the six standard modifier keys (Ctrl, Alt or Shift) and then tap the primary trigger key.
Note: The Windows key is not recommended for use as a macro co-trigger.
Macro Contents: After a macro trigger has been selected, the Macro LED will flash slowly prompting you to record your macro (open an appropriate program during recording). Every single keystroke will be recorded so if you make a mistake, we recommend starting over, or editing your macro with the SmartSet App rather than using backspace key. To stop recording and save your macro, simply tap the MACRO key again.
Note: Macro Record Mode will end automatically when you hit the max length of 300 keystrokes.
Only Keystrokes Recorded: The speed at which you type the macro and the pauses between strokes are not recorded. The macro will playback at the Global speed setting (see Section 4.6) by default, but the playback can be customized by adding internal timing delays (1-999ms or random delays) or by setting a custom playback speed for that specific macro using the SmartSet App (see Section 5.6).Macro Playback: To play a macro, simply press the trigger key(s). Modifier co-triggers should be pressed first and held while the primary trigger key is then tapped. Macros will play back once by default, but with the SmartSet App you can enable Multiplay or Repeat playback modes (See Section 5.4)Erasing a Macro: To erase a macro without launching the SmartSet App, simply tap the Macro key, then input the trigger key(s) of the macro you wish to erase. Once the Macro LED starts flashing slow, simply tap the Macro key again to record a “blank” macro.Macro Limit: Each Profile layout can accommodate 7,200 macros characters spread across up to 100 macros. When you have reached the limit for a given layout, the keyboard lights will flash if you attempt to record another macro key to signal that you must first erase a macro before recording a new one.
4.3 Remapping Keys
With the REMAP key, you can reassign any default key action on the Freestyle Edge to any other full-size key (in either layer) to customize the layout for gaming or typing.
Note: The position/behavior of the Fn key can only be modified via the SmartSet App.
 Tap the REMAP key to enter Remap Mode. The Remap LED will flash rapidly to prompt you to first select the “Source” key action (i.e., the key action that you wish to assign). After selecting the Source key, the LED will flash slowly prompting you to select the “Destination” key position (i.e., the physical key you want to reprogram).
Remapping Tips and Tricks
- Remapping is a one-way process, it creates a duplicate key action but it does not “swap” two To “swap” two keys you must perform two separate remap programming commands.
- Remapping only operates on one layer at a time. To remap the same key in both layers you must perform two separate remap commands, one for each layer.
- While Remap Mode is active, you can hold the FN key to navigate between layers as necessary if you wish to move a key action (e.g., the media keys) from the Fn layer to the top layer, or vice
- While Remap Mode is active, the keyboard reverts back to the default layout so you can’t “lose” a
- If you assign a macro to a remapped key, macro playback will take priority over the remap action, except when macros have been temporarily disabled by setting the Global Macro Speed to 0 (See Section 6).
Special Actions: The Freestyle Edge supports a number of special actions that are not found in the default keyboard layout. These actions can be assigned using the SmartSet App (*Firmware update required).
Multimodifers* Tap-and-Hold Actions* F13-F24 Numeric Keypad Dvorak, Colemak, and Workman Fn Key (Toggle & Shift)(Hyper & Meta)
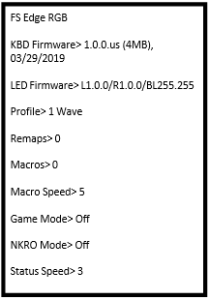
4.4 Run Status Report (SmartSet + F7)

Use the Status Report to “print-to-screen” a convenient report of the current Global Keyboard Settings. Note: Default settings shown at right. Make sure you have a text editing program (e.g., Notepad, Word) selected as the active window before running a Status Report.
- Profile> The Active Profile loaded to the keyboard (1-9) and Lighting Effect
- Remaps> Number of remapped keys in the Active Profile
- Macros> Number of macros saved to the Active Profile
- Macro Speed> “Global” macro playback speed
- Status Report Speed> Speed at which the Status Report is played back
4.5 Connect/Disconnect v-Drive (SmartSet + F8)

The Freestyle Edge features a 4MB virtual drive called the “v-Drive” which stores all keyboard configurations. During normal use the v-Drive is hidden from your computer but it can be temporarily “connected” using the onboard shortcut to run the SmartSet App (see Section 4.5) or update keyboard firmware (see Section 4.13).
Note: It is not necessary to access the v-Drive for basic keyboard use or onboard programming.
When the v-Drive is connected, your computer will now recognize the keyboard as a removable storage device called “FS EDGE RGB”. The specific appearance and location of the “FS EDGE RGB” drive on your computer will depend on your operating system:
- Windows: If a pop-up doesn’t appear, open File Explorer and look under “This PC”
- Mac: If the drive does not appear on the desktop, open Finder look under “DEVICES”
- Linux : Look in in “MY COMPUTER”
- Chrome: Look in “FILES”
Keep the v-Drive disconnected when not in use: For best results, keep the v-Drive closed when not using the SmartSet App.
Note: The keyboard’s multimedia actions, mouse clicks, and onboard programming shortcuts are disabled while the v-Drive is connected.
Always Eject v-Drive before closing: Before disconnecting the v-Drive from your computer, it is important to always Eject the “FS EDGE RGB” drive by right-clicking the drive, and selecting “Eject”. On a Windows PC, the PC will notify you when it is safe to disconnect the v-Drive via the onboard shortcut (SmartSet + F8). Ejecting the v-Drive ensures that all keyboard configuration files have been closed which will prevent data loss and/or corruption which can occur when any storage device is removed without warning.
4.6 Adjust Global Macro Speed (SmartSet + F9, then 0-9)
The Freestyle Edge can play macros at nine different playback speeds, ranging from a super-slow 4 actions- per-second (APS) up to 250 APS. The default Global speed is Speed 5, which is good for text macros but might be too slow for certain in-game macros. To adjust the Global speed, use the onboard shortcut to enter Macro Speed Mode, and then use the number row to select a speed from 1-9. If you wish to temporarily disable macro playback (without deleting any macros), chose 0 instead.
Note: You can override the Global speed setting and assign a custom, individual playback speed for each macro using the SmartSet App (See Section 5.4).
| Setting | Speed 1 | Speed 2 | Speed 3 | Speed 4 | Speed 5 | Speed 6 | Speed 7 | Speed 8 | Speed 9 |
| Actions Per Second | 4 | 8 | 12 | 22 | 35 (default) | 62 | 85 | 125 | 250 |
| Words Per Minute | 48 | 96 | 144 | 264 | 420 | 744 | 1,020 | 1,500 | 3,000 |
*Playback speeds are approximate. Exact speeds will depend on the length of the macro, your computer, and the active application.
4.7 Enable/Disable NKRO Mode (SmartSet + F10)
NKRO (“n-key rollover”) mode is a special operating mode that allows the keyboard to register all simultaneous key-presses. Most standard keyboards, and even many gaming keyboards, limit the number of keys you can press at one time to six (aka “6KRO”). If you press more than 6 keys at a time on a 6KRO keyboard, the keyboard may fail to register some of those key-presses. 6KRO is fine for basic typing and will work for most gamers a majority of the time, but hardcore gamers who are playing at lightning-fast speeds prefer NKRO keyboards for maximum performance. Use the onboard shortcut to toggle NKRO Mode on and off (the Edge will take a second to re-enumerate). NKRO mode will remain in effect until keyboard is unplugged or the v-Drive is opened. Confirm NKRO mode with the Status Report.
4.8 Enable/Disable Game Mode (SmartSet + F11)
Game Mode disables all Windows key actions to keep you from accidentally exiting your game. The Game Mode indicator LED (“G”) in the upper right corner of the keyboard will illuminate when Game Mode is on.
4.9 Soft Reset (SmartSet + Shift + F12)
Erases all custom remaps and macros in both layers of the active Profile.
Note: A Soft Reset does not modify the Lighting Effect for the active Profile.
4.10 Hard Reset (SmartSet + F12 while plugging in keyboard)
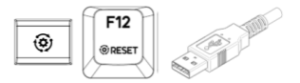
Erase the layout for all 9 Profiles and restores the Edge to its factory default settings.
Note: A Hard Reset does not reset the keyboard lighting.
4.11 App Refresh (SmartSet + PROFILE)
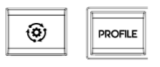
The App Refresh shortcut is a very important tool if you are programming the keyboard using the SmartSet App. The SmartSet App does not dynamically update and any changes made will not go into effect until the v- Drive is disconnected. Use this shortcut to implement your changes immediately after using the in-App save button.
4.12 Program Lock/Unlock (SmartSet + SHIFT + L)

Use the Program Lock onboard shortcut to temporarily deactivate the Programming Cluster keys and onboard shortcuts. To disable Program Lock use the same onboard shortcut.
4.13 Update Keyboard Firmware (SmartSet + SHIFT+ U)
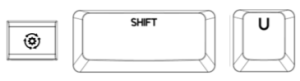
Periodically Kinesis Gaming will release new versions of firmware with new features, bug fixes lighting effects. Installing new firmware is quick and easy, just download the latest firmware files and follow the online installation instructions. There are separate files for Keyboard Firmware and Lighting Firmware and they must be installed separately.
Note: To access new firmware features, it may be necessary to download a newer version of the SmartSet App.
KinesisGaming.com/fs-edge-rgb-support/#firmware
Keyboard Firmware file should be renamed: “update.upd” and placed in the firmware subfolder before performing the above shortcut.
4.14 Update Lighting Firmware (SmartSet + SHIFT+ R)
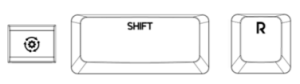
Lighting Firmware file should be renamed: “update_L.upd” and placed in the firmware subfolder before performing the above shortcut.
4.15 Adjust Status Report Speed (SmartSet + SHIFT+ F7, then 0-4)
Certain computers may not be fast enough to play the Status Report at normal speed. If you are experiencing “garbled” playback, try reducing the playback speed to level 1 or 2. Use this shortcut to enter Status Speed Mode (LEDs will flash), then tap “1-4” to select the speed (default speed is 3), or “0” to disable the Status Report all together.
4.16 Force v-Drive Connection (SmartSet + F8 while plugging in keyboard)

If you wish to have the v-Drive connect when you plug in the keyboard or are having difficulty accessing the v- Drive with the normal shortcut, simply hold down this shortcut while plugging in the keyboard to force the v- Drive to connect on startup.
5.0 SmartSet Programming App (Windows & Mac OS X)
The SmartSet App lets you design custom layouts, build powerful macros, customize the lighting for each of the 9 Profiles, and configure Global Keyboard Settings with a simple-to-use graphical interface. The App works in conjunction with onboard programming but has a number of additional “power user” tools & features.
 Note: The SmartSet App works differently than all other keyboard software so please read these instructions carefully before using.
5.1 Installation
Unlike the original Freestyle Edge, the SmartSet App must be downloaded from our website and run from your PC, not from the v-Drive. The SmartSet App can be saved to your desktop or any other folder, and doesn’t require any special installation.
Note: Do not attempt to copy the RGB SmartSet App to the v-Drive.
KinesisGaming.com/fs-edge-rgb-support/#smartset
 Updates with new features and fixes will be posted so be sure to click the “Check for Updates” button on the Introduction Menu or click the “Update” button in the top right menu.
5.2 Overview
Since the Freestyle Edge and the SmartSet App do not utilize any custom drivers, the App operates differently than other keyboard customization software. In order for the SmartSet App to communicate with the Edge it is necessary to connect the keyboard’s “v-Drive” to the PC before launching the App, using the onboard shortcut SmartSet + F8 so the App can read/write to the keyboard’s configuration files.The SmartSet App does not dynamically update the keyboard. To implement changes made in the App, you must first use the in-App “Save” buttons for Profile or Settings, and then disconnect the v-Drive (SmartSet + F8) or use the App Refresh Shortcut (SmartSet + PROFILE) to “push” the new settings to the keyboard.
Note: The SmartSet App does not need to run in the background or be installed for custom programming to function as all changes are saved directly to the keyboard’s onboard memory.
5.3 Profile Selection
The SmartSet App will automatically load the Active Profile. If you would like to customize one of the other 8 Profiles, simply use the Profile drop-down menu in the upper left.
Note: Loading a Profile to the App does not load it to the keyboard. To load a Profile to the keyboard use the onboard shortcut SmartSet + 1-9.
5.4 Layout Editor
When you launch the App, the default view is the “Layout Editor” which displays a graphical representation of the active layout for the designated Profile, showing all assigned key actions including any custom remaps and macros (shown in blue). You may assign any supported key action to any of the 95 full-size keys.
Getting Started: To begin programming, first click a key in the keyboard image or choose one of the available actions from the Actions Menu at left. The “active” key is outlined in white to designate that it is ready for programming.
Note: Some Special Actions require that an active key is selected first.
Navigating Layers: The “top-layer” action and the “Fn-layer” action can be customized separately. Use the Layer toggle-switch to move between the layers during Layout programming.
Basic Remapping: Once a key has been selected, you can use the Edge to designate a new action simply by typing the key. To store that action, select another key or click the Accept button in the Actions Menu.
Special Actions: If the action you wish to assign is not on the keyboard, use the Actions Menu at left to select one of the Special Actions (*Firmware Update to version 1.0.86 and higher required).
- NEW- Tap and Hold*: Tap and hold is a powerful tool that allows you to assign two actions to a single key, one action is sent when the key is tapped and a different action is sent if the key Note: Not all key actions are supported and the effect is not designed for use on “typing” keys because of inherent delays.
- NEW- Multimodifiers*: Assign the “Hyper” and “Meh” key modifier combinations to any key on the
- Hyper = Left Shift + Left Alt + Left Ctrl + Left Windows
- Meh = Left Shift + Left Alt + Left Ctrl
- Fn Access: Assign either the “Fn Shift” or “Fn Toggle” action to any key on the
Macro Editor: Click “Macro” in the Actions Menu to launch the Macro Editor to create new macros, edit existing macros, or copy and paste existing macros to new triggers keys or between Profiles.
Note: Keys with macros are displayed with a blue outline in the keyboard image.
Programming / Editing a Macro: First designate the primary trigger key by clicking the main keyboard image. Only non-modifier keys can be used as a primary trigger. If you would like to assign a modifier “co- trigger” to your macro, select the desired modifier using the “Co-Trigger” buttons in the Macro Editor.Then type out your macro contents (up to 300 characters). The App will record every single keystroke from the keyboard (including Backspace and Delete) but it will not record the speed or pauses (Playback speed and timing are customized separately). Store your new macro by clicking the Accept button.
Note: Alphanumeric characters are displayed in black whereas “actions” are displayed as red “tokens”.
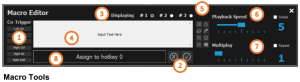
1. Co-Trigger Buttons2. Cancel / Accept3. 3 Macros Per Key4. Macro Text Box5. Macro Tools6. Speed Selector7. Multiplay Selector8. Macro Trigger
Macro Tools
- Backspace & Clear: Use these buttons to delete unwanted characters or erase your macro and start from scratch. Hitting the Backspace key on your keyboard will insert that action into your macro.
- Common Shortcuts: Use this menu to select from a list of popular pre-programmed
- Timing Delays: To perfect the playback of your macro, it may be necessary to insert brief delays in between certain keystrokes. Select a delay from 1ms to 999ms, or chose a random delay (up to 1000ms) so that playback is constantly variable.
- Mouse Clicks: Use this button to insert a mouse-click into your macro, or to create-your own double-click
- Windows Combos: Use this button to assign a macro using the Windows key without exiting the
- Copy & Paste: You can copy your favorite macros from one trigger key to another and even between different layouts using the Copy and Paste buttons.
Playback Speed Selector: To achieve optimal playback performance, program the macro to playback at a speed specifically tailored to this macro and its intended playback environment, or choose the Global Speed.Multiplay Selector: Program the macro to playback a specific number of times (1 to 9) when the trigger is pressed, or select “Repeat” to have the macro fire continuously until the trigger key is released.
Note: Most macros should be configured to Multiplay 1.
Multiple Macros per Key: Multiple macros can be assigned to the same trigger key provided you designate a unique modifier co-trigger to differentiate it. Simply select that primary trigger key as you normally would, and then click the “#2” or “#3” radio buttons to get access a fresh macro text box. To store the new macro you will need to select a unique trigger key combination using one of the six standard modifiers as a co-trigger.
5.5 Lighting Editor
To customize the lighting for a given Profile, click the “Lighting” tab to load the Lighting Editor. The Lighting Editor will display the Effect currently assigned to the Profile loaded to the App. Each Profile can be assigned one of the unique Lighting Effects using the Effect Menu at left. Each lighting effect has one or more parameters (e.g., Color, Direction, Speed) that can be customized to create a unique Lighting Effect.
Parameter Modules


Freestyle & Breathe: With the Freestyle and Breathe Effects, you can use the Color Module to assign a unique color value to each key individually. Designate the “Active Color” (large swatch) by selecting one of the pre-mixed colors, typing in an RGB or Hex value, or using the color wheel. Click the keys in the keyboard image to apply the Active Color to that key, or use the Zone buttons to quickly apply the Active Color to common key groupings.Custom Colors: To save a custom color, click-and-drag the Active Color to any of the 6 “Custom” swatches.NEW- Base Color*: Use the new Base Color to apply a secondary “base” color to Rain, Loop, Rebound, Starlight, and Reactive to make these effects two-tone.NEW- Fn Layer Color*: Use the toggle switch to navigate between the 2 layers and assign a unique lighting effect that is loaded whenever the Fn layer is accessed.*Lighting Firmware Update to Lighting Expansion Pack 1 (version 1.0.44) and higher required
NEW– Ripple and Fireball Effects*
5.6 Global Keyboard Settings Editor

Open the Global Keyboard Settings Editor to change the Active Profile loaded to the keyboard, the Global Macro Speed, the Status Report Playback Speed, and to toggle game mode. Use the “Save” button in the pop-up window to save your changes to the keyboard.
Note: These changes are saved independently of the Profile
5.7 App Tools

- Import: Import a custom Layout or Lighting file.
- Export: Export a custom Layout or Lighting file.
- Check for Updates: Check for new Keyboard Firmware, a Lighting Expansion Pack, or a new version of the SmartSet App.
- Run Diagnostics for Kinesis Gaming Tech Support: Generate a diagnostics file that can be shared with Kinesis for faster tech support.
- Help: Request tech support or to watch a tutorial video.
6.0 Maintenance
To keep your Freestyle Edge RGB performing at its peak, we recommend periodically spraying canned air between the keycaps to remove any loose debris and wiping it clean with a damp, soft cloth (no soap).
7.0 Technical Support, Repairs, and Returns
For Downloads, FAQs, troubleshooting tips, other resources please visit the link below. Kinesis offers free, lifetime technical support from trained agents Monday through Friday (excluding US Holidays) between the hours of 8:30-11:30am and 12:30-4:30pm (Pacific).
For any repair, regardless of warranty coverage, you must first contact Kinesis Technical Support to obtain a Return Merchandise Authorization (“RMA”). Visit the link below and submit a support ticket.
https://gaming.kinesis-ergo.com/support/
Repairs
This product must be repaired by authorized personnel only. Unauthorized repairs may seriously jeopardize the safety of the user (such as from fire danger) and may invalidate your warranty.
Packaging and Shipping
To ship a product back to Kinesis please use its original packaging or other suitable packaging that protects the device against impact and shock. You should insure the package with your carrier as Kinesis is not responsible for items until they are received at the Kinesis repair center. Packages sent to Kinesis without an RMA number marked on the outside of the box may be refused.
8.0 Warranty & Limitation of Liability
Visit KinesisGaming.com/Warranty for the current terms of the Kinesis Limited Warranty. Kinesis does not require any product registration to obtain warranty benefits. Proof of purchase is required for warranty repairs.
Disclaimer of Other Warranties
The warranty and remedies described in the Kinesis Limited Warranty referenced above are exclusive and in lieu of all others, whether oral or written, express or implied. Kinesis specifically disclaims any and all implied warranties, including, without limitation, warranties of merchantability and fitness for a particular purpose. No Kinesis dealer, agent, reseller, or employee is authorized to make any modification, extension, or addition to this warranty. Kinesis does not warrant that the product will meet your requirements, or that operation of the product will be uninterrupted or error-free, or that all errors will be corrected.
Limitation of Liability
 report this ad
Kinesis is not responsible for special, incidental, or consequential damages resulting from any breach of warranty, or under other legal theory, including but not limited to lost profits, downtime, goodwill, damage to or replacement of equipment and/or property nor any costs of recovering, reprogramming, or reproducing any program or data stored in or used with Kinesis products.
Read More About This Manual & Download PDF:
References
Kinesis Gaming | Official Site
Support – Kinesis Gaming
Freestyle Edge RGB Support – Kinesis Gaming
Freestyle Edge RGB Support – Kinesis Gaming
Support – Kinesis Gaming
Kinesis Gaming Store | Official
Ergonomics for Gaming | Split and 60% Keyboards
Freestyle Edge RGB Support – Kinesis Gaming
Limited Manufacturer Warranty – Kinesis Gaming
[xyz-ips snippet=”download-snippet”]