
![]()
![]()
 Kinesis Corporation22030 20th Avenue SE, Suite 102Bothell, Washington 98021 USAwww.KinesisGaming.com
Keyboard models covered by this manual:
- KBTKO-KBW
- KBTKO-KBB
- KBTKO-KBR
Version 1.0.0 (December 9 2020)
This manual covers feature included through firmware version 1.0.0 unless otherwise indicated. To download the latest firmware and to access all support resources visit the TKO Support page:
www.KinesisGaming.com/tko-support
© 2020 by Kinesis Corporation, all rights reserved. Kinesis is a registered trademark of Kinesis Corporation. TKO, Hyperspace SmartSet, and v-Drive are trademarks of Kinesis Corporation. All other trademarks are property of their respective owners.
Information in this document is subject to change without notice. No part of this document may be reproduced or transmitted in any form or by any means, electronic or mechanical, for any commercial purpose, without the express written permission of Kinesis Corporation.
FCC Radio Frequency Interference StatementThis equipment has been tested and found to comply with the limits for a Class B digital device, pursuant to Part 15 of the FCC Rules. These limits are designed to provide reasonable protection against harmful interference when the equipment is operated in a residential installation. This equipment generates, uses, and can radiate radio frequency energy and, if not installed and used in accordance with the instructions, may cause harmful interference to radio communications. However, there is no guarantee that interference will not occur in a particular installation. If this equipment does cause harmful interference to radio or television reception, which can be determined by turning the equipment off and on, the user is encouraged to try to correct the interference by one or more of the following measures:
- Reorient or relocate the receiving antenna
- Increase the separation between the equipment and receiver
- Connect the equipment into an outlet on a circuit different from that to which the receiver is connected
- Consult the dealer or an experienced radio/TV technician for help
WarningTo assure continued FCC compliance, the user must use only shielded interfacing cables when connecting to computer or peripheral. Also, any unauthorized changes or modifications to this equipment would void the user’s authority to operate.
INDUSTRY CANADA COMPLIANCE STATEMENTThis Class B digital apparatus meets all requirements of the Canadian Interface-causing Equipment Regulations.Cet Appareil numerique de la classe B respecte toutes les exiginces du Reglement sur le material broilleur du Canada.
Read Me First
Health and Safety WarningContinuous use of any keyboard may cause aches, pains or more serious cumulative trauma disorders such as tendinitis and carpal tunnel syndrome, or other repetitive strain disorders.
- Exercise good judgment in placing reasonable limits on your keyboarding time every day.
- Follow established guidelines for computer and workstation setup.
- Maintain a relaxed keying posture and use a light touch to press the keys.
The keyboard is not a medical treatmentThis keyboard is not a substitute for appropriate medical treatment! If any information in this guide appears to contradict your health care professional’s advice, please follow your health care professional’s advice.No warranty of injury prevention or cureKinesis bases its product designs on research, proven features, and user evaluations. However, because of the complex set of factors believed to contribute to computer-related injuries, the company can make no warranty that its products will prevent or cure any physical ailment. Your particular risk of injury may be affected by workstation and chair design, posture, time worked without breaks, type of work, activities outside the workplace, and/or individual physiology.Quick Start GuideIf you are eager to get started, please consult the included Quick Start Guide. The Quick Start Guide can also be downloaded from KinesisGaming.com/Support. Consult this full User Manual for detailed descriptions of both basic and advanced features.
Get to Know Your keyboard
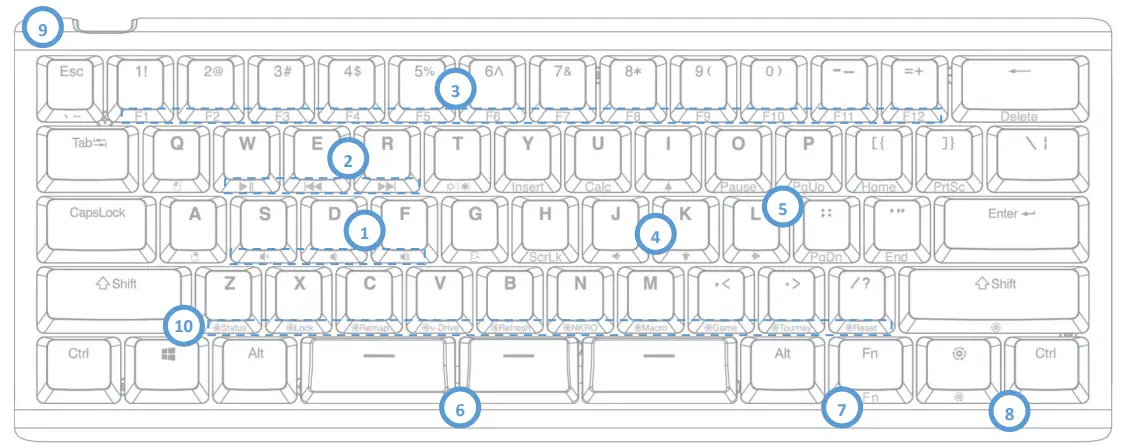
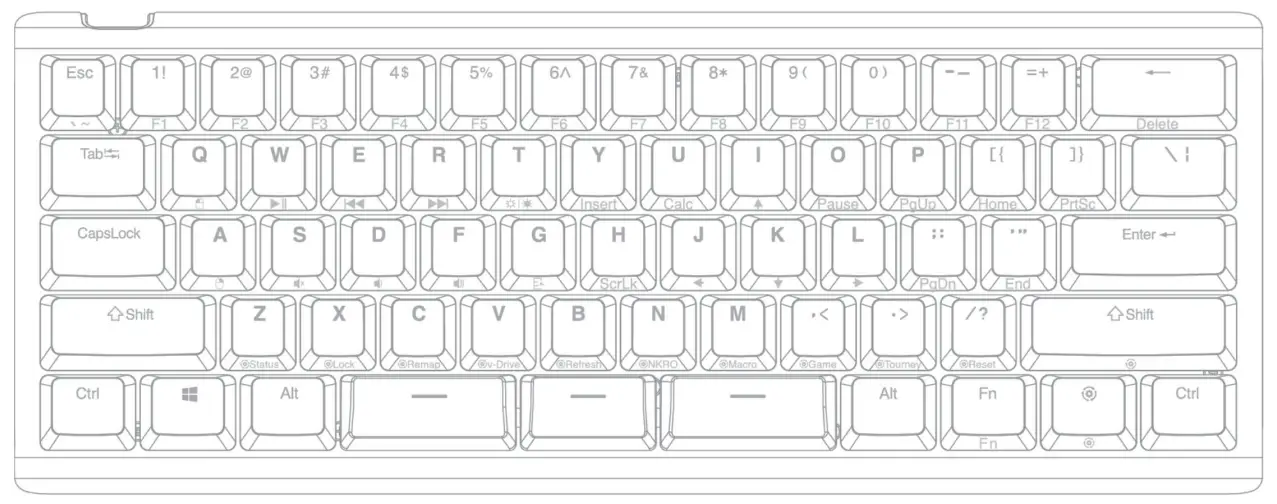
| 1. Volume Keys (Accessed via Fn) | 6. HyperSpace Modular Spacebar |
| 2. Playback Keys (Accessed via Fn) | 7. Fn Key (access the embedded layer) |
| 3. Function Keys (Accessed via Fn) | 8. SmartSet key (onboard programming) |
| 4. Arrow Cluster (Accessed via Fn) | 9. USB-C Cable Port |
| 5. Editing Keys (Accessed via Fn) | 10. Onboard Shortcuts |
Keyboard Overview
Specifications
- Programmable 60% RGB Mechanical Keyboard
- 1 year limited warranty
- Dimensions: 295mm wide x 114mm deep x 33mm tall
- Weight: 19.0oz
Features
- Anodized Aluminum Plate
- Premium PBT Double-shot Keycaps
- Premium Kailh Box mechanical switches
- 16.8M Color Dual-Zone RGB Lighting (Backlighting & Edge Lighting)
- SmartSet Programming Engine with on-the-fly remaps & macros
- SmartSet App for Windows & Mac
- 9 Customizable Profiles with fully-programmable dual-layer Layouts and dual-layer Lighting Effects
- 4MB onboard memory (the v-Drive™)
- Multimedia actions (embedded Fn layer)
- Available Game Mode, NKRO Mode, and Tourney Mode
- 2 sets of pop-out legs for optional “Tenting” and “Tilting”
- 1000mz polling and 100% anti-ghosting
Package Contents
- TKO keyboard
- Detachable 6’ USB-C cable
- Travel Case
- Dual Keycap and Switch Removal Tool
- 8 Additional Kailh Box Switches (Contrasting switch types)
- 2 HyperSpace Switch Covers
- Full-Size Spacebar keycap and Stabilizer
- Quick Start Guide
System Requirements
- Keyboard: Windows® 7-10, macOS® v10.6+, Chrome OS® or Linux® & full-size USB Port
- SmartSet Programming App (Required for Lighting customization): Windows or macOS, Internet Connection (download only), 25MB available hard-disk space, and for best results 1920×1080+ monitor resolution.
Keyboard SetupTo set up the TKO keyboard, simply connect the smaller USB-C end of the included cable to the port on the back of the keyboard. Then connect the larger USB-A end of the cable to a full-size USB port on your computer. The TKO is 100% plug-and-play and does not require the installation of any special software or special drivers or an internet connection for basic use.
The TKO is a powerful programmable keyboard. To prevent inadvertent programming of the keyboard, you can enable PROGRAM LOCK using the onboard shortcut SmartSet + Right Shift + X. Note: Profile Switching is not disabled by Program Lock. See Section 4 for details.
To customize Lighting Effects, download the Smart App for Windows or Mac at the URL below and then use the onboard shortcut to connect the “v-Drive” to your PC. See Section 5 for details.
Introduction
RGB BacklightingThe TKO keyboard is equipped with fully customizable dual-layer, dual-zone RGB lighting. Each of the nine PROFILES is pre-configured with a unique lighting effect. Profile 1 is the default, but you can load any of the other eight PROFILES with a simple onboard shortcut to obtain a different effect (see Section 4.1).Note: To disable lighting, press and hold the Fn key, and then tap the T key to access the LED On/Off action.
| Profile 1 | Profile 2 | Profile 3 | Profile 4 | Profile 5 | Profile 6 | Profile 7 | Profile 8 | Profile 9 |
| RGB | RGB | Cyan | Yellow | Purple | White | Red | Green | White |
| Wave | Spectrum | Reactive | Rain | Rebound | Ripple |
To customize the lighting, simply download and launch the SmartSet App to customize the lighting for PROFILE (see Section 5).
Dual-Layer Layouts (Embedded Fn Layer)![]() Like all compact 60% keyboards, each key on the TKO keyboard is capable of performing two distinct key actions. The TOP LAYER action is a legend on the top of the key and corresponds to a conventional keyboard Layout. The FN LAYER action is a legend on the front face of the key (Note: Front legends shown with the SmartSet “gear” icon are onboard shortcuts, not FN LAYER actions, and work differently, see Section 4). If this is your first time using a 60% you will need to get accustomed to performing certain two key combinations to access some of the default actions found on full-size keyboards.To access an “embedded” FN LAYER action, simply press-and-hold the FN key in the lower right corner of the keyboard. By default, the FN key is “momentary” which means you hold it to access the FN LAYER and release it to return to the TOP LAYER. Note: If you would prefer a toggle-style FN key, you can assign that action to any key on the keyboard using the SmartSet App, see Section 5.Since the TKO is a fully programmable keyboard, every key but the dedicated SMARTSET key can be “remapped” to perform a different action in either layer (see Section 4 and Section 5). Note: For your convenience, the default lighting effect changes subtly for each of the 9 PROFILES to indicate when you have shifted layers.
Like all compact 60% keyboards, each key on the TKO keyboard is capable of performing two distinct key actions. The TOP LAYER action is a legend on the top of the key and corresponds to a conventional keyboard Layout. The FN LAYER action is a legend on the front face of the key (Note: Front legends shown with the SmartSet “gear” icon are onboard shortcuts, not FN LAYER actions, and work differently, see Section 4). If this is your first time using a 60% you will need to get accustomed to performing certain two key combinations to access some of the default actions found on full-size keyboards.To access an “embedded” FN LAYER action, simply press-and-hold the FN key in the lower right corner of the keyboard. By default, the FN key is “momentary” which means you hold it to access the FN LAYER and release it to return to the TOP LAYER. Note: If you would prefer a toggle-style FN key, you can assign that action to any key on the keyboard using the SmartSet App, see Section 5.Since the TKO is a fully programmable keyboard, every key but the dedicated SMARTSET key can be “remapped” to perform a different action in either layer (see Section 4 and Section 5). Note: For your convenience, the default lighting effect changes subtly for each of the 9 PROFILES to indicate when you have shifted layers.
HyperSpace Triple Space Bar![]() One of the most useful and novel features of the TKO keyboard is the HYPERSPACE triple space bar. Whether you are typing or gaming, the triple space configuration gives you the ability to assign to additional key actions to your powerful thumbs. Out of the box, all 3 keys perform the standard space action but can be customized as you see fit.Use HYPERSPACE to more easily access the embedded layer for typing, or assign an important hotkey within easy reach for gaming. The opportunities are endless, but to give you some ideas you can choose from a variety of pre-configured HYPERSPACE keys using the SmartSet App. Experiment with the different configurations to find the one(s) that suit you best, or come up with your own HYPERSPACE configuration.Note: If you prefer the conventional space bar, skip to Section 3.7 for instructions on how to remove the two extra key switches and install the full-size stabilizer and keycap, and the two dust covers.
One of the most useful and novel features of the TKO keyboard is the HYPERSPACE triple space bar. Whether you are typing or gaming, the triple space configuration gives you the ability to assign to additional key actions to your powerful thumbs. Out of the box, all 3 keys perform the standard space action but can be customized as you see fit.Use HYPERSPACE to more easily access the embedded layer for typing, or assign an important hotkey within easy reach for gaming. The opportunities are endless, but to give you some ideas you can choose from a variety of pre-configured HYPERSPACE keys using the SmartSet App. Experiment with the different configurations to find the one(s) that suit you best, or come up with your own HYPERSPACE configuration.Note: If you prefer the conventional space bar, skip to Section 3.7 for instructions on how to remove the two extra key switches and install the full-size stabilizer and keycap, and the two dust covers.
Multimedia ActionsThe six standard multimedia actions are located in the embedded FN LAYER. Change your audio on the fly by pressing and holding the FN key, and then tapping S/D/F for volume control or W/E/R for playback control.Note: Multimedia actions are disabled while the v-Drive is connected.
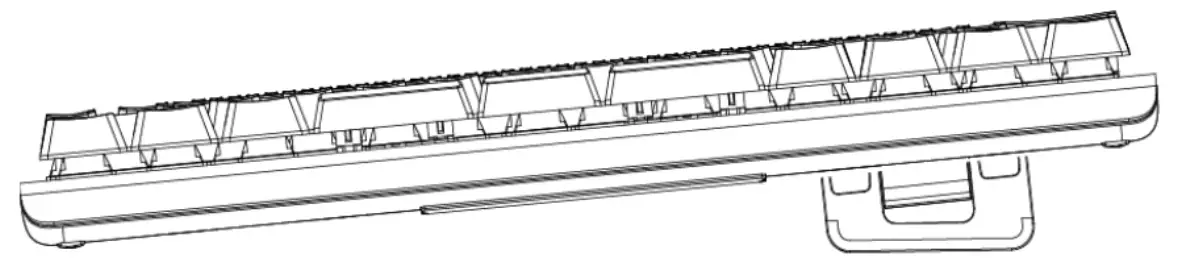
Adjustable Front-Back Tilting with the Small Legs (Typing or Gaming)Zero Slope: The TKO is designed with a zero-degree front-to-back slope for maximum ergonomics. The zero-degree slope reduces wrist extension caused by conventional keyboards. Wrist extension reduces circulation to your fingers causing pain and numbness during both typing and gaming.Positive Tilt: If you prefer a more conventional (but un-ergonomic) feel, simply flip up the two SMALL LEGS on the back edge of the keyboard to achieve a standard 5 degrees of positive tilt. Note: Kinesis does not recommend this typing position. While it is possible to flip up either the front or back pair of BIG LEGS to achieve 10 degrees of positive, that position is very harmful and should never be used.
![]()
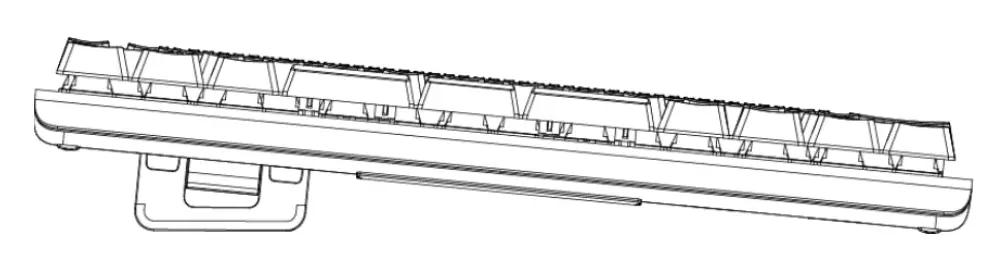
Negative Tilt: Some users, especially those dealing with repetitive strain injury symptoms, may actually prefer to use the keyboard with a negative slope. Simply flip up the two SMALL LEGS on the front edge of the keyboard to achieve 5 degrees of negative tilt. Note: For best results, use a height-adjustable keyboard tray or padded palm support. For users looking for even more negative tilt, the front pair of BIG LEGS may be deployed to achieve 10 degrees of negative tilt but that posture is only recommended if you have padded palm support or keyboard tray.
![]()
Adjustable Left-Right Tenting with Big Legs (GAMING ONLY)Conventional flat keyboards force you to type with your palms facing the desk which causes harmful forearm pronation. Typing in this posture reduces circulation which can lead to repetitive strain injuries. The TKO is the first non-split keyboard to offer an ergonomic tenting solution that reduces forearm tension during onehanded gameplay by elevating the thumb-side of your keyboard hand to reduce static muscle tension.
Left Hand Keyboard / Right Hand Mouse: Flip up the two BIG LEGS on the right edge of the keyboard to achieve 5 degrees of tenting for your left hand while your right hand is on the mouse.
Right Hand Keyboard / Left Hand Mouse: Flip up the two BIG LEGS on the left edge of the keyboard to achieve 5 degrees of tenting for your right hand while your left hand is on the mouse.
Note: Do not tent the keyboard if you plan to have both hands on the keyboard. If you would like to type in a tented configuration, Kinesis recommends our Freestyle Edge RGB split keyboard and Lift Kit accessory which supports up to 20 inches of separation between the modules and 3 adjustable tent settings. Learn More: KinesisGaming.com/ergonomics
Hotswappable Key Switches
The TKO keyboard uses hot-swappable switches which allow you to install any conventional full-travel, plate or PCB mounted mechanical “MX-style” switch in the keyboard. Swap out all 63 switches for a complete makeover, or install different switches selectively in the keyboard for a truly customized typing or gaming experience.
WARNING: IMPROPERLY REMOVING OR INSTALLING SWITCHES CAN DAMAGE THE KEYBOARD, AND VOID YOUR WARRANTY. PLEASE READ THIS GUIDE THOROUGHLY AND THEN PROCEED WITH CAUTION.
Note: Kinesis recommends unplugging the keyboard before swapping key switches.Switch Removal: Using the included tool, gently remove the keycap by pulling straight up with the two-wire loops. Once the keycap is free, use the other end of the included tool to gently depress the two tabs on the front and back edge of the switch while pulling up (wiggling the switch slightly may help release the tabs). Note: If you apply too much pressure you will break the tabs on the switch which may impact your ability to reinstall that switch in the future.
Switch Installation: Before installing a switch, turn it over and inspect it. It should have two metal pins/prongs (and only two pins) extending straight out of the base of the switch. If these pins are bent, DO NOT INSTALL THE SWITCH. Often times the pins can be straightened using a pair of tweezers.Position the switch in the vacant square hole. Orient the switch so that two pins are at the base of the hole and aligned with the two small “receptor holes” in the printed circuit board (“PCB”). Once the switch is properly aligned, gently press straight down until it snaps securely into the metal plate. If the switch doesn’t go in without an excessive amount of force, try repositioning it. If you force the switch in you are likely to bend the pins, which will damage the switch and the keyboard.Plug the keyboard in and test the new switches for functionality. If the switch doesn’t work, follow the instructions above to remove it and reinstall it, paying careful attention to the two pins. 3.8 Installing the Full-Size Space Bar
- Using the included tool, gently remove the three HYPERSPACE keycaps.
- Then use the other end of the tool to gently remove the three HYPERSPACE key switches.
- Then remove the two small stabilizers by depressing the tabs on the back of each housing and gently prying them out of the plate from the back edge. A flathead screwdriver works well.
- Install the full-size stabilizer into the keyboard by first sliding the bar through the narrow groove, and then snapping the plastic housings securely into the top plate. Make sure the stabilizer is flush with the plate.
- Reinstall one of the key switches in the center hole.
- Install the two included “Switch Covers” in the outer holes.
- Install the full-size space bar keycap.
- Test the spacebar to ensure proper feel and functionality.
Note: When using the space bar in the single key configuration, the space bar will perform the action assigned to the middle key so you may need to remap it (See Section 3.3 for default configurations).
Indicator LightsUnlike most 60% keyboards, the TKO features two indicator lights between the Hyperspace keys. These lights are used to indicate Caps Lock, and Game Mode, as well as provide feedback for certain onboard programming shortcuts.Note: These lights may be difficult to see if you have installed the full-size spacebar.
SmartSet Onboard Programming![]()
The SmartSet Programming Engine allows you to custom program the keyboard without installing any software or special drivers on the computer by using a series of convenient onboard shortcuts. Remap keys, record macros, toggle Profiles, and adjust keyboard settings. Profiles and Settings are saved to the keyboard’s onboard “v-Drive” 4MB flash memory, not your PC, so they travel with your keyboard. To customize Lighting Effects and access other powerful programming tools, download and install the intuitive SmartSet App for Windows and Mac (See Section 5.0).
All Programming commands are executed using the dedicated SmartSet Key. Press and hold the SmartSet Key, then press and hold the Right Shift key, then press the desired shortcut key. The SmartSet key LED will flash in response to successful programming commands. Continuous flashing indicates there is programming in progress (tap the SmartSet key to exit).
Program Lock/Unlock (SmartSet + Right Shift + X)![]()
If you have no plans to customize the TKO’s layout, lighting, or settings, use the shortcut above to enable Program Lock. You can also use Program Lock after the initial configuration to prevent accidental programming
Change Profiles (SmartSet + Right Shift + 1 – 9)![]()
The TKO features 9 fully programmable PROFILES. Each PROFILE can be customized with distinct Backlighting and Edge lighting effects and a unique Layout featuring unlimited remaps and up to 100 macros.Profile 1 is the default, but you can load any of the other 8 Profiles using the shortcut above and then customize to your exact specifications. Each Profile is pre-configured with a unique lighting effect to make it easy to differentiate them and a unique set of HYPERSPACE key actions (see Section 3.1).
Recording Macros (SmartSet + Right Shift + M)![]() A macro is a string of characters or key actions that are triggered by a single keypress or key combination in either layer. Macros are powerful tools for typing, coding, and gaming that allow you to quickly produce multiple actions in rapid succession. Macros are assigned to the active Profile at the time of recording but can be easily copied using the SmartSet App. Macros will override the default keyboard action for the trigger key or key combination.To record a macro on the fly, use the shortcut above to enter Macro Record Mode, choose your trigger key(s) first, and then type out your macro (up to 300 characters). When you have finished recording your macro, tap the SmartSet key to resume normal keyboard operation.
A macro is a string of characters or key actions that are triggered by a single keypress or key combination in either layer. Macros are powerful tools for typing, coding, and gaming that allow you to quickly produce multiple actions in rapid succession. Macros are assigned to the active Profile at the time of recording but can be easily copied using the SmartSet App. Macros will override the default keyboard action for the trigger key or key combination.To record a macro on the fly, use the shortcut above to enter Macro Record Mode, choose your trigger key(s) first, and then type out your macro (up to 300 characters). When you have finished recording your macro, tap the SmartSet key to resume normal keyboard operation.
Note: Macros can be also be created (and edited) using the SmartSet App.Macro Trigger Key(s): After entering Macro Record Mode, the SmartSet LED will flash rapidly prompting you to select your trigger key(s). Any full-size, non-modifier key in either the TOP LAYER or FN LAYER can be used as a macro trigger. A macro can also be triggered by a two-key combination by pairing the primary trigger key with a modifier-key “co-trigger”. To assign a key combination as a macro trigger, first press and hold one of the six standard modifier keys (Ctrl, Alt or Shift) and then tap the primary trigger key.
Note: The Windows key is not recommended for use as a macro co-trigger on PCs.Macro Contents: After a valid macro trigger has been designated, the SmartSet LED will flash slowly prompting you to record your macro (open an appropriate program during recording). Every single keystroke will be recorded, so if you make a mistake we recommend starting over or editing your macro with the SmartSet App rather than using the backspace key. To stop recording and save your macro, simply tap the SMARTSET key.Note: Macro Record Mode will end automatically when you hit the max length of 300 keystrokes.
Only Keystrokes Recorded: The speed at which you type the macro and the pauses between strokes are not recorded. The macro will playback at the Global speed setting (see Section 4.7) by default, but the playback can be customized by adding internal timing delays (1-999ms or random delays) or by setting a custom playback speed for that specific macro using the SmartSet App (see Section 5.6).
Macro Playback: To play a macro, simply press the trigger key(s). Modifier co-triggers should be pressed first and held while the primary trigger key is then tapped. Macros will playback once by default, but with the SmartSet App you can enable Multiplay or Repeat playback modes (See Section 5.4)
Erasing a Macro: To erase a macro without launching the SmartSet App, simply input the Macro Record onboard shortcut, then input the trigger key(s) of the macro you wish to erase. Once the SmartSet LED starts flashing slow, simply tap the SmartSet key again to record a “blank” macro.
Macro Limit: Each Profile layout can accommodate 7,200 macros characters spread across up to 100 macros. When you have reached the limit for a given layout, the keyboard lights will flash if you attempt to record another macro key to signal that you must first erase a macro before recording a new one.
Remapping Keys (SmartSet + Right Shift + C)![]()
Use the onboard Remap shortcut to reassign any default key action on the keyboard (except SmartSet) to any other full-size key (in either layer) to customize the layout for gaming or typing.Note: The position/behavior of the Fn key can only be modified via the SmartSet App.To remap a key, use the shortcut above to enter Remap Mode. The SmartSet LED will flash rapidly to prompt you to first select the “Source” key action (i.e., the key activities that you wish to assign). After selecting the Source key, the SmartSet LED will flash slowly prompting you to select the “Destination” key position (i.e., the physical key you want to reprogram).
Remapping Tips and Tricks
- Remapping is a one-way process, it creates a duplicate key action but it does not “swap” two keys. To “swap” two keys you must perform two separate remaps.
- Remapping only operates on one layer at a time. To remap the same key in both layers you must perform two separate remap commands, one for each layer.
- While Remap Mode is active, you can hold the FN key to navigate between layers as necessary if you wish to move a key action between layers.
- While Remap Mode is active, the keyboard reverts back to the default layout so you can’t “lose” a key. If you assign a macro to a remapped key, macro playback will take priority over the remap action, except when macros have been temporarily disabled by setting the Global Macro Speed to 0 (See Section 4.6).
Special Actions: The TKO keyboards support a number of special actions that are not found in the default keyboard layout. These actions can be assigned using the SmartSet App.
| TKOKBD Firmware> 1.0.0.us (4MB)LED Firmware> 1.0.0/BL1.0Profile> 1 WaveRemaps> 0Macros> 0Macro Speed> 5Game Mode> OffNKRO Mode> OffStatus Speed> 3 |
Run Status Report (SmartSet + Right Shift + Z)![]() Use the Status Report to “print-to-screen” a convenient report of the current Global Keyboard Settings.Note: Make sure you have a text editing program (e.g., Notepad, Word) selected asthe active window before running a Status Report.
Use the Status Report to “print-to-screen” a convenient report of the current Global Keyboard Settings.Note: Make sure you have a text editing program (e.g., Notepad, Word) selected asthe active window before running a Status Report.
- Profile> The Active Profile loaded to the keyboard (1-9) and Lighting Effect
- Remaps> Number of remapped keys in the Active Profile
- Macros> Number of macros saved to the Active Profile
- Macro Speed> “Global” macro playback speed
- Status Report Speed> Speed at which the Status Report is played back
Connect/Disconnect v-Drive (SmartSet + Right Shift + V)![]()
The TKO keyboard features a 4MB virtual drive called the “v-Drive” which stores all keyboard configurations. During normal use, the v-Drive is hidden from your computer but it can be temporarily “connected” using the onboard shortcut to run the SmartSet App (see Section 5) or update keyboard firmware (see Section 4.13).
Note: It is not necessary to access the v-Drive for basic keyboard use or onboard programming. When the v-Drive is connected, your computer will now recognize the keyboard as a removable storage device called “TKO”. The specific appearance and location of the “TKO” drive on your computer will depend on your operating system:
- Windows: If a pop-up does not appear, open File Explorer and look under “This PC”
- Mac: If the drive does not appear on the desktop, open Finder look under “DEVICES”
- Linux: Look in in “MY COMPUTER”
- Chrome: Look in “FILES”
Keep the v-Drive disconnected when not in use: For best results, keep the v-Drive closed when not using the SmartSet App. Note: The keyboard’s multimedia actions, mouse clicks, and most onboard programming shortcuts are disabled while the v-Drive is connected.
| Always Eject v-Drive before closing: Before disconnecting the v-Drive from your computer,it is important to always Eject the “TKO” drive. Ejecting the drive prevents data loss and/orcorruption which can occur when any storage device is removed without warning. Simply right-Click the drive name and select “Eject”. |
Windows Note: The PC will notify you when it is safe to disconnect the v-Drive via the onboard shortcut.Mac Note: Despite ejecting the drive, most Mac’s will still display a notification that the drive was not ejected properly. You can safely ignore this warning.
Adjust Global Macro Speed (SmartSet + Right Shift + Right Ctrl + M, then 0-9)![]()
The TKO can play macros at nine different playback speeds, ranging from a super-slow 4 actions-per-second (APS) up to 250 APS. The default Global speed is Speed 5, which is good for text macros but might be too slow for certain in-game macros. To adjust the Global speed, use the onboard shortcut to enter Macro Speed Mode, and then use the number row to select a speed from 1-9. If you wish to temporarily disable macro playback (without deleting any macros), chose 0 instead. Note: You can override the Global speed setting and assign a custom, individual playback speed for each macro using the SmartSet App (See Section 5.4).Enable/Disable NKRO Mode (SmartSet + Right Shift + N)![]() NKRO (“n-key rollover”) mode is a special operating mode that allows the keyboard to register all simultaneous key-presses. Most standard keyboards, and even many gaming keyboards, limit the number of
NKRO (“n-key rollover”) mode is a special operating mode that allows the keyboard to register all simultaneous key-presses. Most standard keyboards, and even many gaming keyboards, limit the number of
| Seng | Speed 1 | Speed 2 | Speed 3 | Speed 4 | Speed 5 | Speed 6 | Speed 7 | Speed 8 | Speed 9 |
| Actions Per Second | 4 | 8 | 12 | 22 | 35 (default) | 62 | 85 | 125 | 250 |
| Words Per Minute | 48 | 96 | 144 | 264 | 420 | 744 | 1,020 | 1,500 | 3,000 |
*Playback speeds are approximate. Exact speeds will depend on the length of the macro, your computer, and the active application.
keys you can press at one time to six (aka “6KRO”). Use the onboard shortcut to toggle NKRO Mode on and off (the TKO will take a second to re-enumerate). NKRO mode will remain in effect until the keyboard is unplugged or the v-Drive is opened..
Enable/Disable Game Mode (SmartSet + Right Shift + ,)![]() Game Mode disables all Windows key actions to keep you from accidentally exiting your game. Confirm Game mode with the Status Report.
Game Mode disables all Windows key actions to keep you from accidentally exiting your game. Confirm Game mode with the Status Report.
Tourney Mode (SmartSet + Right Shift + .)![]() Tournament Mode is a convenient shortcut that is perfect for maximizing performance and compliance for online or LAN events. Use the above shortcut to 1) disable all macros, 2) activate NKRO mode, and 3) activate Game Mode.Note: Tournament Mode is a one-way shortcut. Use the dedicated shortcuts to modify each individual feature.
Tournament Mode is a convenient shortcut that is perfect for maximizing performance and compliance for online or LAN events. Use the above shortcut to 1) disable all macros, 2) activate NKRO mode, and 3) activate Game Mode.Note: Tournament Mode is a one-way shortcut. Use the dedicated shortcuts to modify each individual feature.
Soft Reset (SmartSet + Right Shift + /)![]() Erases all custom remaps and macros in both layers in the active Profile. Note: A Soft Reset does not modify the Lighting Effect for the active Profile.Hard Reset (SmartSet + Right Shift + /while plugging in keyboard)
Erases all custom remaps and macros in both layers in the active Profile. Note: A Soft Reset does not modify the Lighting Effect for the active Profile.Hard Reset (SmartSet + Right Shift + /while plugging in keyboard)![]() Erases all custom remaps and macros in both layers for all 9 Profiles and restores keyboard settings to their factory defaults (including re-enabling Program Lock) settings. Indicator LEDs will flash to confirm.Note: A Hard Reset does not affect keyboard lighting.
Erases all custom remaps and macros in both layers for all 9 Profiles and restores keyboard settings to their factory defaults (including re-enabling Program Lock) settings. Indicator LEDs will flash to confirm.Note: A Hard Reset does not affect keyboard lighting.
Refresh Settings (SmartSet + Right Shift + B)![]() The Refresh Settings shortcut is a very important tool if you are programming the keyboard using the SmartSet App. The SmartSet App does not dynamically update and any changes made will not go into effect until the v-Drive is disconnected. Use this shortcut to implement your saved changes immediately.Update Keyboard Firmware (SmartSet + Right Shift + U)
The Refresh Settings shortcut is a very important tool if you are programming the keyboard using the SmartSet App. The SmartSet App does not dynamically update and any changes made will not go into effect until the v-Drive is disconnected. Use this shortcut to implement your saved changes immediately.Update Keyboard Firmware (SmartSet + Right Shift + U)![]() Periodically Kinesis Gaming will release new versions of firmware with new features, bug fixes, and/or lighting effects. Installing new firmware is quick and easy, just download the latest firmware files from the TKO Support page and follow the online installation instructions. Note: To download firmware, you will need your 5 digit model number: KBTKO. There are separate files for Keyboard Firmware and Lighting Firmware and they must be installed separately.
Periodically Kinesis Gaming will release new versions of firmware with new features, bug fixes, and/or lighting effects. Installing new firmware is quick and easy, just download the latest firmware files from the TKO Support page and follow the online installation instructions. Note: To download firmware, you will need your 5 digit model number: KBTKO. There are separate files for Keyboard Firmware and Lighting Firmware and they must be installed separately.
Update Lighting Firmware (SmartSet + Right Shift + R)![]() Follow the instructions above to download a lighting firmware update and perform an update.
Follow the instructions above to download a lighting firmware update and perform an update.
Adjust Status Report Speed (SmartSet + Right Shift + Right Ctrl + Z, then 0-4)![]() Certain computers may not be fast enough to play the Status Report at normal speed. If you are experiencing “garbled” playback, try reducing the playback speed to level 1 or 2. Use this shortcut to enter Status Speed Mode (LEDs will flash), then tap “1-4” to select the speed (default speed is 3), or “0” to disable the Status Report altogether.
Certain computers may not be fast enough to play the Status Report at normal speed. If you are experiencing “garbled” playback, try reducing the playback speed to level 1 or 2. Use this shortcut to enter Status Speed Mode (LEDs will flash), then tap “1-4” to select the speed (default speed is 3), or “0” to disable the Status Report altogether.
Force v-Drive Connection (SmartSet + V while plugging in keyboard)![]() If you wish to have the v-Drive connect when you plug in the keyboard or are having difficulty accessing the drive with the normal shortcut, simply hold down this shortcut while plugging in the keyboard to force the drive to connect on startup.
If you wish to have the v-Drive connect when you plug in the keyboard or are having difficulty accessing the drive with the normal shortcut, simply hold down this shortcut while plugging in the keyboard to force the drive to connect on startup.
SmartSet Programming App (Windows & macOS)
The SmartSet App lets you design custom layouts, build powerful macros, customize the lighting for each of the 9 Profiles, and configure Global Keyboard Settings with a simple-to-use graphical interface. The App works in conjunction with onboard programming but has a number of additional “power user” tools & features.Note: The SmartSet App works differently than all other keyboard software so please read these instructions carefully before using them.

InstallationDownload the latest version of the SmartSet App from our website and save it anywhere on your PC. Unlike conventional keyboard software, the SmartSet App doesn’t require any special installation and never runs in the background. Launch it when you want to customize the keyboard, and close it when you are done. All settings are saved directly to the v-Drive so they move with the keyboard. www.KinesisGaming.com/tko-support/#smartset
Updates with new features and fixes will be posted so be sure to click the “Check for Updates” button on the Introduction Menu or click the “Update” button in the top-right menu.
OverviewSince the TKO keyboard and the SmartSet App do not utilize any custom drivers, the App operates differently than other keyboard customization software. In order for the SmartSet App to communicate with the TKO, it is necessary to connect the keyboard’s “v-Drive” to the PC so the App can read/write to the keyboard’s configuration files (see Section 4.6).When you first launch the App, select the TKO keyboard from the home screen. If the v-Drive is not connected, use the onboard shortcut (SmartSet + Right Shift + V) to connect it now and then select the “Scan for v-Drive” option in the App.The SmartSet App does not dynamically update the keyboard. To implement changes made in the App, you must first use the in-App “Save” buttons for Profile or Settings, and then either: 1) disconnect the v-Drive or 2) use the Refresh Settings Shortcut (see Section 4.11) to “push” the new settings to the keyboard.
Profile SelectionThe SmartSet App will automatically load the Active Profile. If you would like to customize one of the other 8 Profiles, simply use the Profile drop-down menu in the upper left. Note: Loading a Profile to the App does not load it to the keyboard. To load a Profile to the keyboard use the onboard shortcut (see Section 4.2).
Layout EditorWhen you launch the app, the default view is the “Layout Editor” which displays a graphical representation of the active layout for the designated Profile, showing all assigned key actions including any custom remaps and macros (shown in blue). You may assign any supported key action to any of the 95 full-size keys.Getting Started: To begin programming, first click a key in the keyboard image or choose one of the available actions from the Actions Menu at left. The “active” key is outlined in white to designate that it is ready for programming.Note: Some Special Actions require that an active key is selected first.Navigating Layers: The “top-layer” action and the “Fn-layer” action can be customized separately. Use the Layer toggle-switch to move between the layers during Layout programming.Basic Remapping: Once a key has been selected, you can use the keyboard to designate a new action simply by typing the key. To store that action, select another key or click the Accept button in the Actions Menu.Special Actions: If the action you wish to assign is not on the keyboard, use the Actions Menu at left to select one of the Special Actions (*Firmware Update to version 1.0.86 and higher required).
- Tap and Hold: Tap and hold is a powerful tool that allows you to assign two actions to a single key, one action is sent when the key is tapped and different action is sent if the key holder. Note: Not all key actions are supported and the effect is not designed for use on “typing” keys because of inherent delays. Multimodifiers: Assign the “Hyper” and “Meh” key modifier combinations to any key on the keyboard.
- Hyper = Left Shift + Left Alt + Left Ctrl + Left Windows
- Meh = Left Shift + Left Alt + Left Ctrl
- Fn Access: Assign either the “Fn Shift” or “Fn Toggle” action to any key on the keyboard.
Macro Editor: Click “Macro” in the Actions Menu to launch the Macro Editor to create new macros, edit existing macros, or copy and paste existing macros to new triggers keys or between Profiles.Note: Keys with macros are displayed with a blue outline in the keyboard image.Programming / Editing a Macro: First designate the primary trigger key by clicking the main keyboard image. Only non-modifier keys can be used as a primary trigger. If you would like to assign a modifier “trigger” to your macro, select the desired modifier using the “Co-Trigger” buttons in the Macro Editor.
Then type out your macro contents (up to 300 characters). The App will record every single keystroke from the keyboard (including Backspace and Delete) but it will not record the speed or pauses (Playback speed and timing are customized separately). Store your new macro by clicking the Accept button.Note: Alphanumeric characters are displayed in black whereas “actions” are displayed as red “tokens”. Macro Tools
- Backspace & Clear: Use these buttons to delete unwanted characters or erase your macro and start from scratch. Hitting the Backspace key on your keyboard will insert that action into your macro.
- Common Shortcuts: Use this menu to select from a list of popular pre-programmed macros.
- Timing Delays: To perfect the playback of your macro, it may be necessary to insert brief delays in between certain keystrokes. Select a delay from 1ms to 999ms, or chose a random delay (up to 1000ms) so that playback is constantly variable.
- Mouse Clicks: Insert a mouse-click into your macro or create-your-own double-click macro.
- Windows Combos: Use this button to assign a macro using the Windows key without exiting the App.
- Copy & Paste: You can copy your favorite macros from one trigger key to another and even between different layouts using the Copy and Paste buttons.
Playback Speed Selector: To achieve optimal playback performance, program the macro to playback at a speed specifically tailored to this macro and its intended playback environment, or choose the Global Speed.Multiplay Selector: Program the macro to playback a specific number of times (1 to 9) when the trigger is pressed, or select “Repeat” to have the macro fire continuously until the trigger key is released.Note: Most macros should be configured to Multiplay 1.Multiple Macros per Key: Multiple macros can be assigned to the same trigger key provided you designate a unique modifier co-trigger to differentiate it. Simply select that primary trigger key as you normally would, and then click the “#2” or “#3” radio buttons to get access a fresh macro text box. To store the new macro you will need to select a unique trigger key combination using one of the six standard modifiers as a co-trigger.
Key Lighting EditorTo customize the key “backlighting” for a given Profile, click the “Backlighting” tab. The Backlighting Editor will display the Effect currently assigned to the Profile loaded to the App.Each Profile can be assigned one of the unique Lighting Effects using the Effect Menu at left. Each effect can be customized by adjusting the applicable parameters (e.g., Color, Direction, Speed).
Parameter ModulesFreestyle & Breathe: With the Freestyle and Breathe Effects, you can use the Color Module to assign a unique color value to each key individually. Designate the “Active Color” (large swatch) by selecting one of the pre-mixed colors, typing in an RGB or Hex value, or using the color wheel. Click the keys in the keyboard image to apply the Active Color to that key, or use the Zone buttons to quickly apply the Active Color to common key groupings.Custom Colors: To save a custom color, click-and-drag the Active Color to any of the 6 “Custom” swatches.Base Color: Use the new Base Color to apply a secondary “base” color to Rain, Loop, Rebound, Starlight, and Reactive to make these effects two-tone.Fn Layer Color: Use the toggle switch to navigate between the 2 layers and assign a unique lighting effect that is loaded whenever the Fn layer is accessed.
Edge Lighting EditorEach Profile has a secondary lighting zone on the perimeter of the keyboard which can be customized in both layers. Choose from the available effects and customize the parameters to your preferences.
Global Keyboard Settings EditorOpen the Global Keyboard Settings Editor to change the Active Profile loaded to the keyboard, the Global Macro Speed, the Status Report Playback Speed, and toggle game mode. Use the “Save” button in the pop-up window to save your changes to the keyboard. Note: These changes are saved independently of the Profile.
App Tools
- Import: Import a custom Layout or Lighting file.
- Export: Export a custom Layout or Lighting file.
- Check for Updates: Check for new Keyboard Firmware, a Lighting Expansion Pack, or a new version of the SmartSet App.
- Run Diagnostics for Kinesis Gaming Tech Support: Generate a diagnostics file that can be shared with Kinesis for faster tech support.
- Help: Request tech support or watch a tutorial video.
Maintenance
To keep your keyboard performing at its peak, we recommend periodically spraying canned air between the keycaps to remove any loose debris and wiping it clean with a damp, soft cloth (no soap).
Technical Support, Repairs, and Returns
For Downloads, FAQs, troubleshooting tips, other resources please visit the link below. Kinesis offers free, lifetime technical support from trained agents Monday through Friday (excluding US Holidays) between the hours of 8:30-11:30 am and 12:30-4:30 pm (Pacific).
Return Merchandise Authorizations (“RMAs”)For any repair, regardless of warranty coverage, you must first contact Kinesis Technical Support to obtain a Return Merchandise Authorization (“RMA”). Visit www.KinesisGaming.com/support and submit a support ticket.
RepairsThis product must be repaired by authorized personnel only. Unauthorized repairs may seriously jeopardize the safety of the user (such as from fire danger) and may invalidate your warranty.
Packaging and ShippingTo ship a product back to Kinesis please use its original packaging or another suitable packaging that protects the device against impact and shock. You should ensure the package with your carrier as Kinesis is not responsible for items until they are received at the Kinesis repair center. Packages sent to Kinesis without an RMA number marked on the outside of the box may be refused.
Warranty & Limitation of LiabilityVisit KinesisGaming.com/Warranty for the current terms of the Kinesis Limited Warranty. Kinesis does not require any product registration to obtain warranty benefits. Proof of purchase is required for warranty repairs.
Disclaimer of Other WarrantiesThe warranty and remedies described in the Kinesis Limited Warranty referenced above are exclusive and in lieu of all others, whether oral or written, express or implied. Kinesis specifically disclaims any and all implied warranties, including, without limitation, warranties of merchantability and fitness for a particular purpose. No Kinesis dealer, agent, reseller, or employee is authorized to make any modification, extension, or addition to this warranty. Kinesis does not warrant that the product will meet your requirements, or that the operation of the product will be uninterrupted or error-free, or that all errors will be corrected.
Limitation of LiabilityKinesis is not responsible for special, incidental, or consequential damages resulting from any breach of warranty, or under other legal theory, including but not limited to lost profits, downtime, goodwill, damage to or replacement of equipment and/or property nor any costs of recovering, reprogramming, or reproducing any program or data stored in or used with Kinesis products.
References
[xyz-ips snippet=”download-snippet”]