
User Manual
![]()

KINGSLIM D1 Dual Dash Cam
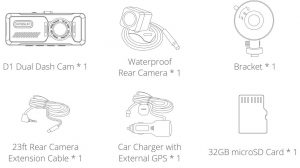
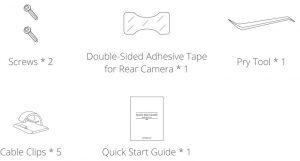
WHAT’S IN THE BOX
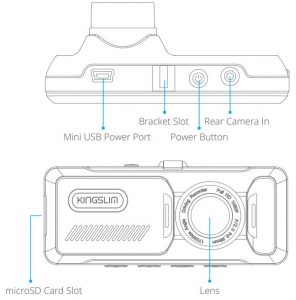
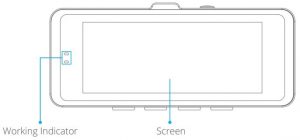
CAMERA OVERVIEW

PRODUCT OPERATION
1. Power ButtonFunction 1: Press to wake up/turn off the screen.Function 2: Long press to turn the camera on/off.
2. Menu ButtonFunction 1: Long press to enter the set-up menu.Function 2: Press to switch the shooting mode/playback mode/recording mode.Function 3: Press the menu button to lock the video during recording. Press the menu button again to unlock.Function 4: Press to exit the set-up menu.
3. OK ButtonFunction 1: Press to start/stop recording.Function 2: In the shooting mode, press the OK button to shoot a photo.Function 3: In the playback mode, press the OK button to start/stop videos.
4. Up ButtonFunction 1: In the set-up menu, press the up button to view the setting options.Function 2: In the recording mode, press the up button to view the display modes.Function 3: After pause recording, long press the up button to display the GPS information.
5. Down ButtonFunction 1: In the set-up menu, press the down button to view the setting options.Function 2: When recording, press the down button to turn audio on/off.
6. Working IndicatorStandby: The red and blue lights are on.Recording during charging: The red light is on and the blue light is flashing.Recording when fully charged: The blue light is flashing and the red light is off.
INSTALLATION
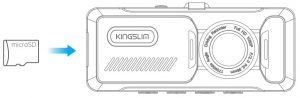
1. Insert the microSD card.Tip: A Class 10 or higher microSD card is highly recommended for the dash cam.The dash cam supports a microSD card up to 64GB. Please format your card in the camera before using it in the dash cam.
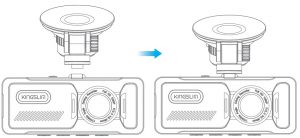
2. Insert the bracket into the bracket slot.
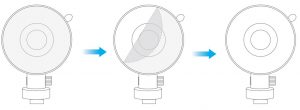
3. Install the dash cam on the windshield.First, clean the windshield with a dry cloth. Second, take the film off the suction cup and press the suction cup onto the windshield to make sure there is no air inside the suction cup, and then rotate to secure the bracket.
4. Adjust the view angle of the dash cam to ensure a good view.
5. Connect the USB power cable into the USB power port of the dash cam, then plug the car charger into the cigarette lighter socket.
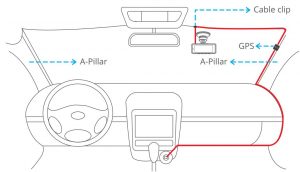
6. Connect the rear camera to the dash cam with the extension cable to check that the rear camera works well.7. Install the rear camera.Position 1: Install the rear camera on the rear windshield. This installation is easier
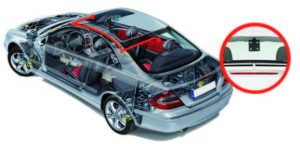
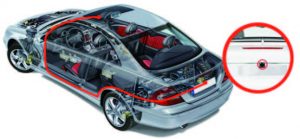
Position 2: Install the rear camera near the license plate. Position 2 is highly recommended. The rear image is crisp and clear for both rear viewing and as a back-up camera.
Note:
- Pay attention to the connector position when connecting the rear camera with the extension cable; please refer to the photo below.

- Clean the area to ensure the optimum adhesion before installing the rear camera.
- If you choose position 1, clean the rear windshield regularly to ensure the image quality.
- If you choose position 2, install the rear camera with the included adhesive stickers or screws.

8. Use the pry tool to hide the cables.
FORMATTING THE MICROSD CARD
Use a high-speed microSD card of Class10 or higher. Format your microSD card in the camera before putting it into the dash cam.
- Long press the menu button to access the set-up menu.
- Press the down button to view “format”, then press the OK button.
- Select “Confirm” and then press the OK button.
RECORDING
- After finishing formatting, connect a car charger and start the car engine. The device will automatically turn on and begin recording.
- Press the power button to turn on the device. Press the OK button to start recording.
- Every time you exit from the setting menu or playback menu, press the OK button to start recording.
ICON INTRODUCTION
The Main Interface

- Long press the menu button to enter the dash camera set-up menu.
- Press the up/down button to view the setting options. Select a setting option by using the OK button.
- Press the menu button again to exit the set-up menu.
1. ResolutionSelect “Resolution” and press the OK button to select the front camera recording resolution of “1080FHD 1920×1080” or “720P 1280×720”. The default setting is “1080FHD 1920×1080”. The rear camera recording resolution is “720P”.
2. Loop RecordingWhen the microSD card is full, the new files will cover the old one if loop recording is on. If it is off, the camera will not record anymore when the card is full. You will then need to format the microSD card or change to a new one.Options: Off/1 minute/3 minutes/5 minutesDefault Setting: 3 minutes
3. Photo ResolutionSet the photo resolution.Options: 2M 1920×1080/5M 2592×1944/8M 3264×2448/12M 4032×3024Default Setting: 2M 1920×1080
4. Video AudioSound will be recorded simultaneously with video.Options: On and OffDefault Setting: On
5. Key ToneOptions: On and OffDefault Setting: On
6. Date/TimeSet the date and time manually.
7. Date StampTurn on the date stamp; recorded videos will show the time stamp.Options: On and OffDefault Setting: On
8. Language SettingsOptions: English/繁體中文/简体中文/日本語/Français/Deutsch/Polskie/ไทย/Tiếng Việt/русский/Español/ItalianaDefault Setting: English
9. Gravity SensorWhen the mode is turned on, it will automatically start recording and save content if an impact or sudden braking is detected. The videos will be locked and will never be overwritten by new files. The higher the sensitivity level, the easier it is to trigger the emergency recording.Options: Off/Low/Medium/HighDefault Setting: Medium
10. Parking MonitoringThe camera will automatically turn on, begin the 22s recording, and lock if there is an impact to the car during parking.Options: On and OffDefault Setting: Off
11. UTCChoose the time zone manually. The device will then display the time in the selected time zone.Default Setting: UTC-5After changing the time zone, restart your dash cam and make sure the time and date are now correct.
12. Speed UnitYou can set the speed unit that you prefer.Options: KM/H and MP/HDefault Setting: KM/H
13. Motion DetectionIn standby mode, it will automatically start recording when motion is detected.Options: On and OffDefault Setting: Off
14. License Plate SettingEnter your license plate number.Options: On and OffDefault Setting: Off
15. Screen SaverThe display screen will turn off automatically after the set duration of inactivity.Options: On and OffDefault Setting: On
16. Auto Power OffThe dash cam will be turned off automatically after the time you set.Options: Off/1 minute/3 minutes/5 minutesDefault Setting: Off
17. Source FrequencyChoose the right frequency to avoid flickering. This should be based on your local AC parameters.Options: 60Hz/50HzDefault Setting: 50Hz
18. FormatFormat the microSD card.Note:
- All data will be deleted. Before formatting your microSD card, please remember to back up your important data on another device.
- Before the microSD card is inserted for the first time, please format it in the camera to ensure that the card is compatible with the camera.
19. ResetThe dash cam will be reset to factory settings.
20. Version NumberUse this to check the version of the dash camera.
DOWNLOAD THE GPS PLAYER
Download the GPS player: www.kingslim.net/player
TROUBLESHOOTING
- The dash cam is not recording.• Check whether your microSD card has enough space. Back up any important data to another device first, and then format the microSD card.• Check if the loop recording in the settings menu is set to OFF. Set “Loop Record” to 3 minutes.
- The dash cam stops during recording.During recording, a large amount of high-definition video data is processed.Please use a high-speed microSD card of Class 10 or higher.
- A “File Error” prompt appears when playing back pictures and videos.Use a genuine microSD card, and be sure to format it.
- The image is misty.Ensure there are no fingerprints or other marks on the camera lens. Use a soft, dry cloth to clean the lens. Clean the front windshield.
- CrashingIf your device crashes, use a sharp object to press the reset button to restart the device.
- No sound on the video.Ensure the audio recording mode is on.
- The camera keeps turning on and off automatically.Charge the camera with the included car charger. Do not charge the battery via the USB data cable with other adapters.
CAUTION!
- Please place your device in a secure location and protect the lens from scratches and dirt.
- Do not expose the device to rain, moisture, or water under any circumstances.
- Avoid leaving the device in direct sunlight for extended periods of time.
- Do not remove or expose the internal battery.
CONTACT US
For any inquiries with KingSlim products, please feel free to contact us, we will respond within 24 hours.Email: Tel: 888-811-1140 (US) Mon-Fri (except holidays) 9am-5pm (EST)Official website: www.kingslim.net
The microSD, microSDHC, microSDXC and SD marks and logos are trademarks of SD-3C, LLC.
References
[xyz-ips snippet=”download-snippet”]