
![]() Quick Start GuideKingSlim D1 Pro Dash CamV1.0Please read this manual before operating your car dash camera, and keep it for further reference.
Quick Start GuideKingSlim D1 Pro Dash CamV1.0Please read this manual before operating your car dash camera, and keep it for further reference.
WHAT’S IN THE BOX
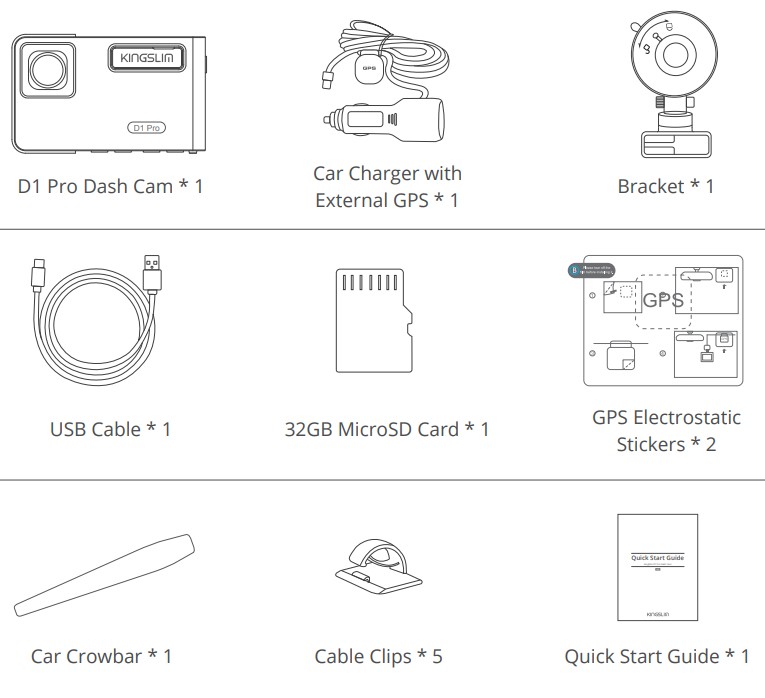
Note: The USB cable is only used to connect the computer and the dash camera to read the card.
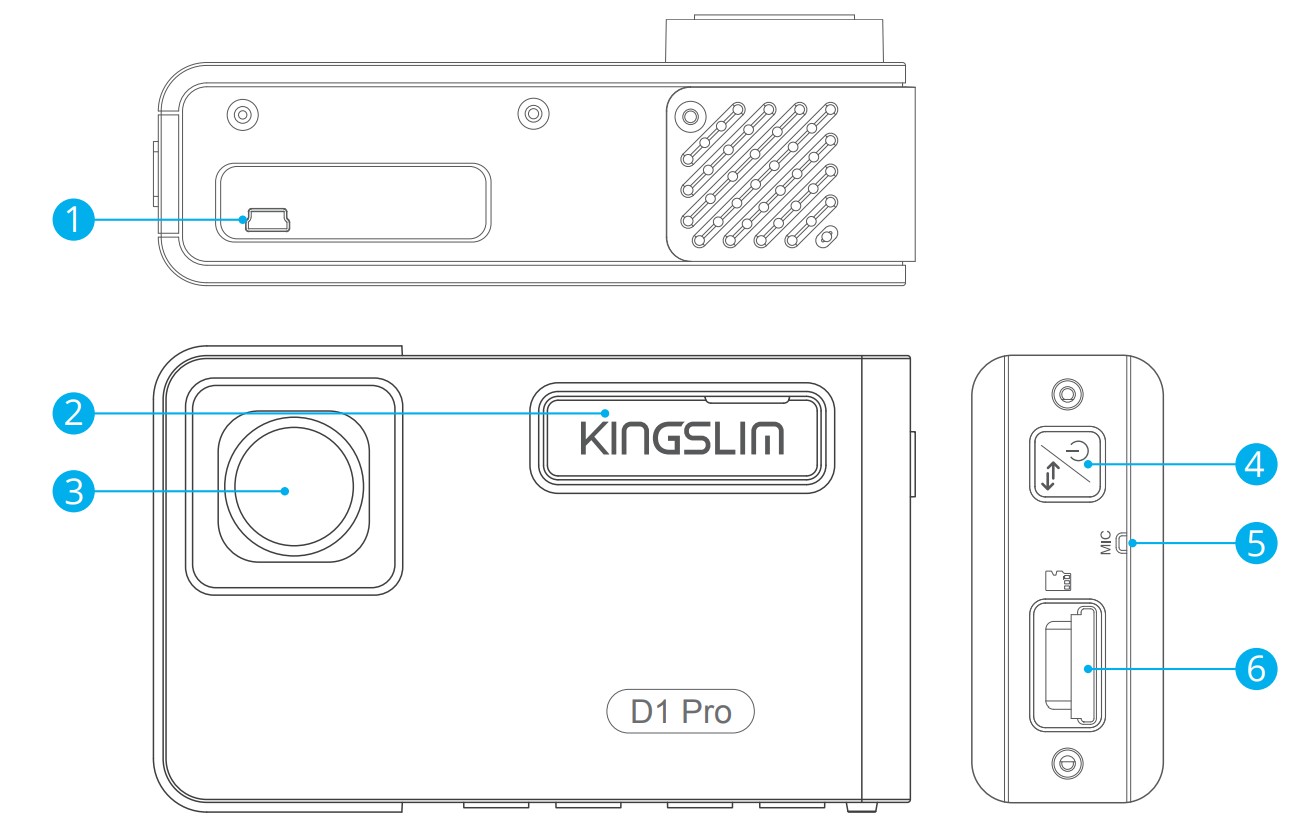
CAMERA OVERVIEW
 |
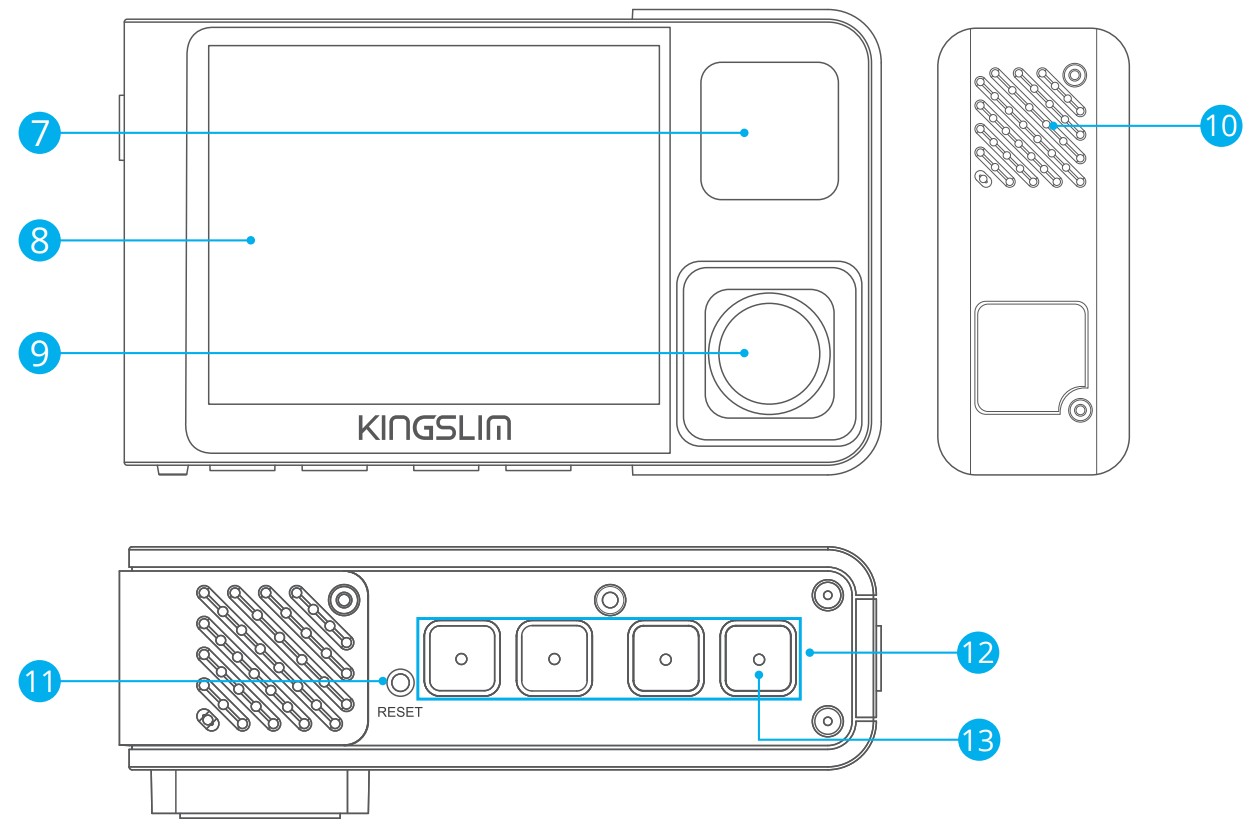 |
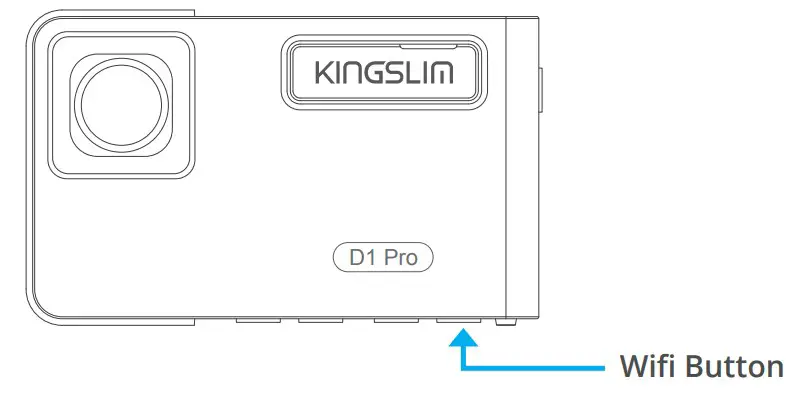
| 1 USB Power Port2 Bracket Slot3 Front Camera4 Power Button5 Microphone6 MicroSD Card Slot | 7 IR LEDs & Indicator light8 Screen9 Inside Camera10 Speaker11 Reset12 Set Buttons13 Wifi Button |
Note: Short pressing the power button also can switch images of the front or inside showed alone or front and inside displayed simultaneously on-screen.
INSTALLATION
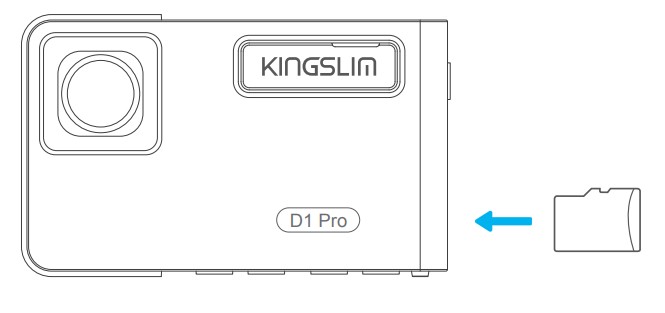
- Insert the MicroSD Card.

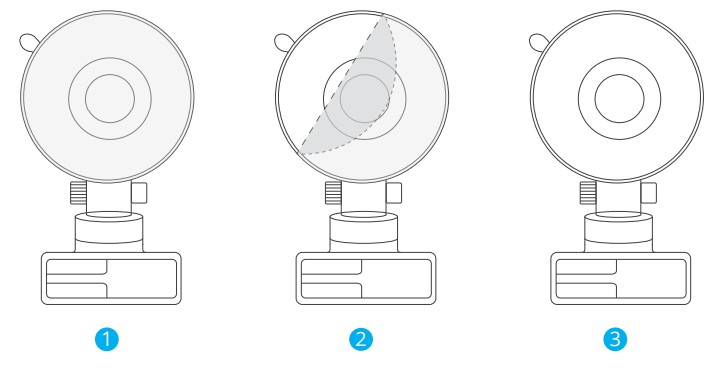
- Take the film off from the suction cup.
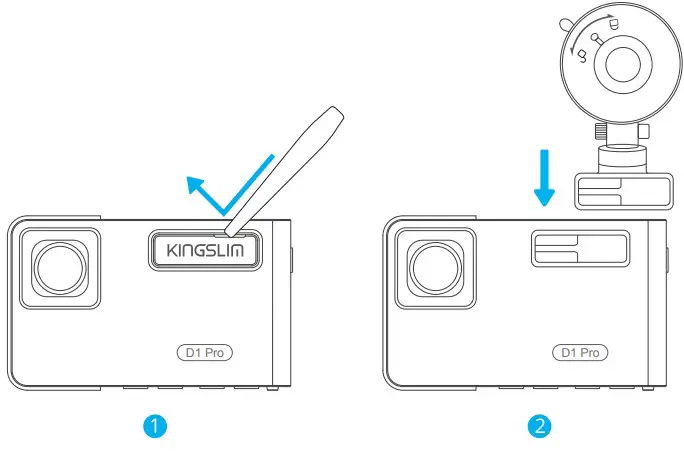
- Using the crowbar to take off the nameplate on the slot, then insert the bracket into the slot of the camera.
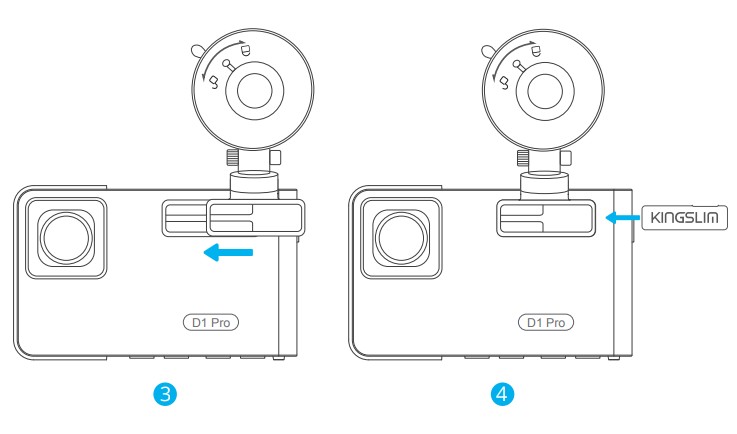
- Firstly clean the windshield with a dry cloth, secondly put and press the suction cup on the windshield to make sure there is no air inside the suction cup, last rotate to fix the bracket. (when install, please don’t let the rearview mirror block the camera’s infrared light.)
- Adjust the viewing angle of the dashcam to get a good view.
- Connect the car charger to the car cigarette lighter, then insert the USB end of the charger into the USB power port of the dash camera, please refer to the below picture.
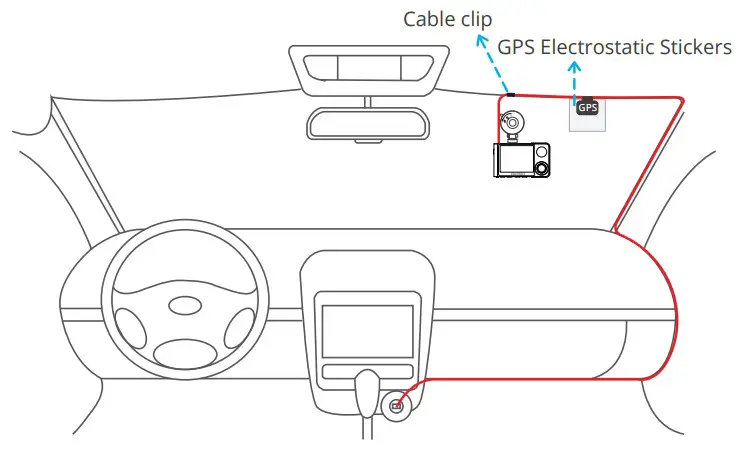
- Attach the electrostatic sticker of GPS to the top edge of the windshield, and then fix the GPS module on the electrostatic sticker, please refer to the below picture.
- Fix the cable with a cable clip at the place where the icon is (please refer to the below picture), then use the yellow crowbar to hide the cable.
Note:
- After powering on the dashcam through the car charger, the dashcam will automatically turn on and start recording (if the card has been inserted). To change settings, please firstly stop recording.
- Please charge for 30 minutes before using this dash cam powered by the built-in battery.
- The built-in battery is only used to power the “parking monitor” function. In normal use, please plug the car charger into the cigarette lighter of the car to power the dashcam. The built-in battery is not recommended as a normal power supply for the dashcam. This is to avoid parking monitoring failure caused by running out of battery while the car is parked.
- The camera can also be powered by connecting it to a power source such as your DC 5V phone adapter via the USB cable. When charging, please shut down the camera by long-pressing the power button.
- Regarding the usage of the cable clip, only one clip is needed to fix the outlet position of the USB cable which connects to the dash camera’s power port, the remaining cable must be hidden along the top edge of the windshield. Please hide the cable according to the above picture.
FORMATTING THE MICROSD CARD
The MicroSD Card is needed to format firstly on the computer and then format on the camera to make sure it can be more compatible with the camera.When using the 32GB card above, the card has to be formatted on the camera, then the camera can record normally. If not format, the camera will show “Insert SD card” on the screen.This dashcam supports a microSD card, up to 128G with class 10 & above.
- Please format the card on the computer firstly.
- After inserting the card into the camera and turning on the camera, press the button to stop recording.
- Press to enter the setting interface, press too, and press to enter Setupinterface.4. Press to choose “Format”, press to format interface, and press and choose “OK”, then press to format the card. After finishing the format, it will back to the setup interface.
 4. Press
Note:
- All data will be deleted. Before formatting your memory card, please remember to backup your important data on your other devices.
- Every time you insert a microSD card, please format it in the camera to ensure that the microSD card is compatible with the camera.
DOWNLOAD THE APP AND GPS PLAYER
Download the “RoadCam” app on the App Store or Google Play.

Download the GPS player: www.kingslim.net/playerNote: Please turn off the anti-virus software on the computer before installing the player or click “allow” when prompted.
USE THE “ROADCAM” APP
CONNECT WITH THE APP
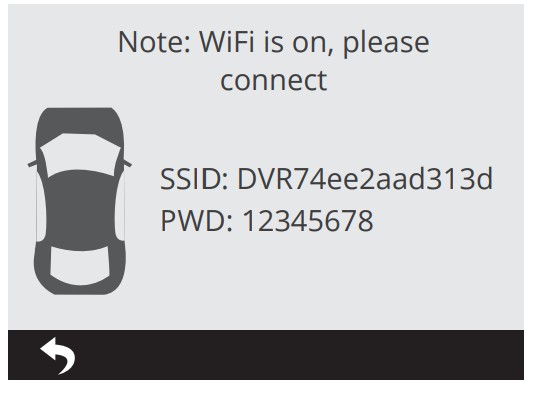
- Long press the Wifi button on the bottom of the camera to enter the Wifi settings interface.Or short press to enter the setting interface, press to, and press to enter Setup interface. Press to choose “Wifi”, press and choose “On” to enable Wifi.
- Go to your smartphone’s Wifi settings and connect to the Wifi name that’s shown on the dashcam. Enter the password and confirm the Wifi network.
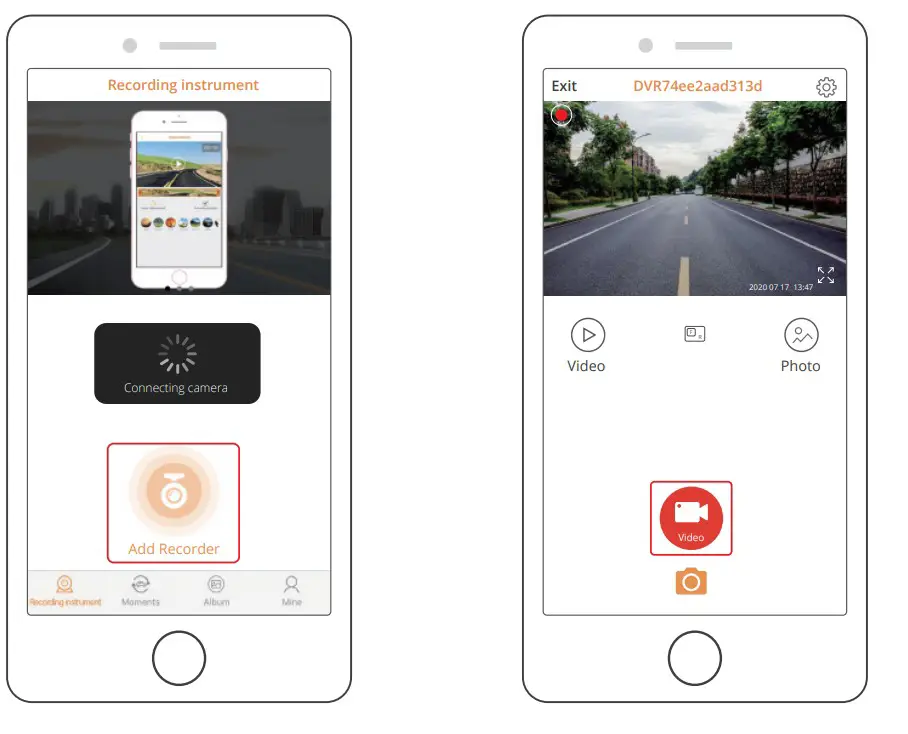
- Open the “RoadCam” app, tap “Add Recorder”, wait a few seconds to enter the preview interface.
- Tap the video or photo icon to control the dashcam, either recording videos or shooting photos.
 Or short press
DOWNLOAD OR DELETE VIDEOS AND PHOTOS
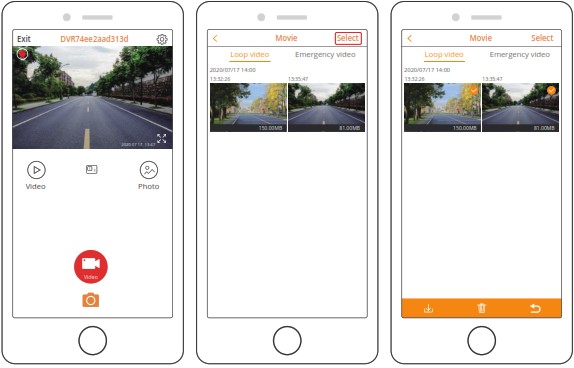
- Tap the icon to stop the recording.
- Tap the icon to check the videos or photos.
- Tap “Select” and choose videos or photos that you want.
- Tap the download or delete icon to download or delete.
Note: To exit the Wifi feature, please press the power button on the dashcam.
USER MANUAL
 report this ad
Scan the following QR code or visit the KingSlim website to download a detailed user manual.![]() www.kingslim.net/manual/d1pro.pdf
www.kingslim.net/manual/d1pro.pdf
 https://kingslim.net/manual/d1pro.pdf
CONTACT US
For any inquiries with KingSlim products, please feel free to contact us, we will respond within 24 hours.E-mail: [email protected]Tel: 888-811-1140 (US) Mon-Fri (except holiday) 9am-5pm (EST)Official website: www.kingslim.netThe microSD, microSDHC, microSDXC, and SD marks and logos are trademarks of SD-3D, LLC.App Store is a service mark of Apple Inc., registered in the U.S. and other countries.Google Play and the Google Play logo are trademarks of Google LLC.
References
[xyz-ips snippet=”download-snippet”]