
Welcome
Thank you for choosing KINGSMITH WalkingPad Treadmill, and hereinafter referred to as “Treadmill”. Theexquisite, simple and innovative design enable you to enjoy your quality and enjoyable workout at home. ThisTreadmill is designed for family use only. Please do not use it for any business, lease or public group purpose.
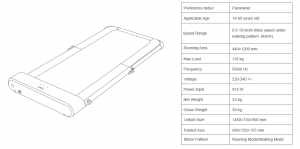
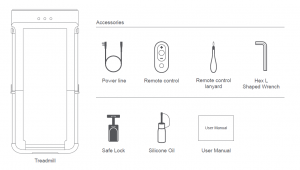
01. Product and Accessories
Please check if the items inside the packaging box are complete and intact. In case of any missing or breakage, please contact us by email
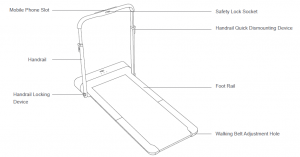
02. Function Diagram
1. Walking Mode

2.Running Mode
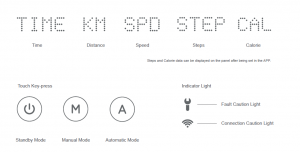
3. Display Panel Function Introduction
4. Remote Control

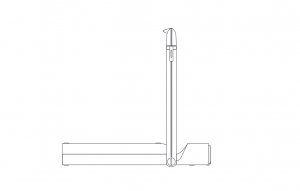
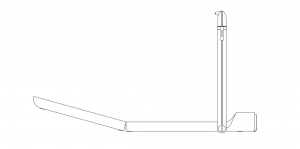
03. Initial Operating Guide
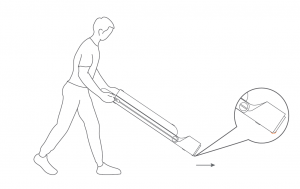
- When pushing and pulling, please ensure that the handrailhas shrunk to a minimum and fix the handrail locking andquick dismounting device. Put it on a flat floor, please don’tput it on too soft cushion or thick carpet.

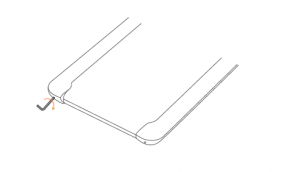
- Loose the handrail locking device, lift thehandrail to a vertical angle, and tightenthe handrail locking device.
- Unfold the treadmill, adjust the walking belt to thecenter position, slowly unfold it and assist inpressing it down to make it completely flat, orrotate the bottom foot cushion for leveling.
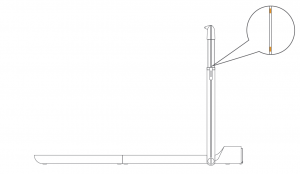
- Adjust the handrail quick mounting device to asuitable height, and then lock the device. Yellowmarks on the handrail sides indicate therecommended maximum and minimum heights.
- Install safety switch, connectpower supply and turn on.
- Download “KS Fit” APP from AppleStore or Google Play Store andcomplete installation.
- Open APP, follow the prompts to addand bind the treadmill for use.


04. Learn to Use the Treadmill
1. Mode Description
 Standby ModeThe standby mode indicator lights up, themotor and sensor stop responding.
 Manual ModeThe manual mode indicator lights up, control thespeed via remote control or APP.
 Automatic ModeThe automatic mode indicator lights up, control thespeed automatically via intelligent algorithm.
2. Standby Mode Control Description
 Standby Mode
Under standby mode, users can press the mode button on theremote control briefly to wake up the treadmill and switch to thedefault manual mode state.Users can also touch the standby icon on the display panel towake up the treadmill.When the treadmill is not running, press the mode button on theremote control or touch the standby icon on the display panel toswitch to the standby mode.
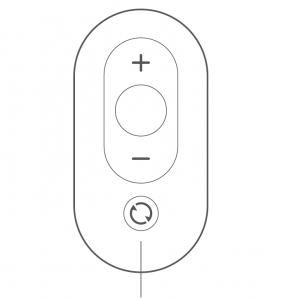
Remote Control LegendShort press: Mode switchLong press: Switch to standby mode (non-operational state )
3. Manual Mode Control Description(primary mode)
 Manual Mode
In this mode, users can use the remote control to control the treadmill. Beginners are advisedto use the manual mode first, and then use the automatic mode after being skilled in using it.
Mode ButtonShort press: Mode switchLong press: Switch to standby mode (non-operational state)
4. Automatic Control Mode Description(progressive mode)
 Automatic
This mode is an progressive mode, which is difficult to control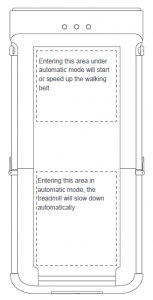 and can be used completely without the remote control. It isadvised to use the mode after proficiency.Use the remote control to start and stop, and the mode switchbutton is effective under this mode
Note: The automatic control mode can only available underwalking mode.
5. Remote Control Paring Instructions
If the remote control does not respond or you have replaced theremote control, you need to re-pair.Pairing method: Restart the machine and press the mode buttonon the remote control for 5 seconds.
6. Connection Caution Light ![]()
Not connected to APP:FlickerConnected to APP:Off
7. Fault Caution Light ![]()
E01: Software overcurrent E08: Sensor faultE02: Hardware overcurrent E09: Motor unable to startE03: IPM Module Overheating E12: Motor overcurrentE04: Low-voltage Protection protectionE05: Overvoltage Protection E13: Overloading protectionE06: Motor phase loss protection E14: Hall signal lossE07: Motor block rotation protection E15: Communication fault
05. Trademark and Legal Notice
The patents involved in Kingsmith WalkingPad Treadmillseries products are made by Beijing Kingsmith TechnologyCo., Ltd. and owned by the Company. No organization orindividual may copy, distribute all or any part of this manualwithout Kingsmith’s written permission, and may not usethese patents without authorization.When printing this manual, we have put various functionaldescriptions and instructions in it as far as possible.However, due to the continuous improvement of productfunctions and design changes, there may still be discrepancieswith the products you purchased. Due to productupdate, this manual may deviate from the actual product interms of color, appearance, etc. Please refer to the actualproduct.
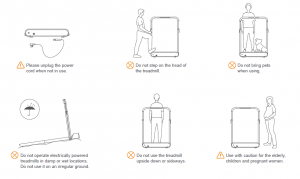
06. Safety Instruction

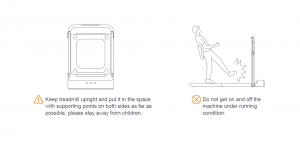
 The space distance behind the treadmillshould be kept above 2000 mm. In case ofemergency, you can hold the handrailtightly with both hands and support yourbody to jump off the treadmill.

The distance between the twosides of the treadmill shouldbe kept above 500mm.

Do not wear loose or dangling clothingwhile using the treadmill, you shouldwear sports shoes and clothes.Please exercise according to your ownsituation. If you feel uncomfortableduring the workout, please stopimmediately and consult a doctor.Otherwise, you may be at risk of injury.

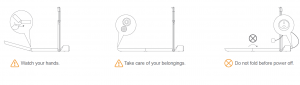
Read, understand, and test the emergency stopprocedures before use. When using, pleaseclamp the other end of the safe lock on clothes.If there is an unexpected situation, pull off thesafety lock to stop the treadmill immediately.
Start to use the treadmill.Noisy level is 65dB(A).The treadmill has an emergency stop mechanism for your safety. Before starting your training, attachthe safety key to your clothing. If the treadmill was switched off due to the safety key being pulled out,insert it again. The continuous belt does not start up again automatically.Uncontrolled use of the treadmill by a third party can be avoided by taking the safety key off andstoring it in a secure place.In an emergency, hold the handrails tightly with both hands and step off of the belt onto the sidesurfaces of the side platforms. Activate the emergency stop mechanism (safety disconnect).
06. Safety Instruction
07. Manutenzione
1. Clean the treadmill
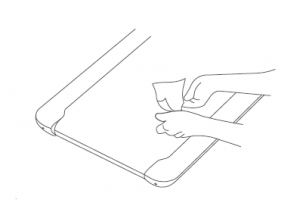
- Disconnect all power before servicing the treadmill.
- Add a little mild detergent to the 100% cotton cloth. Do not spray the detergent directlyon the walking belt or use acidic and corrosive detergent.
- Do not wipe under the walking belt
- After a period of exercise, dust and stains may appear on the rear floor. This is normaland just wipe.
2. Walking Belt Slipping and Correction
- Start the treadmill and run at a speed of 3 km/h.
- Walking belt to the left: Turn the left adjusting hole screw clockwise by 1/4 turn.
- Walking belt to the right: Turn the right adjusting hole screw clockwise by 1/4 turn.
- Walking belt slipping: Turn the left and right adjusting screws clockwise for 1/2 turnat the same time.
- After each adjustment, it needs to run for a period of time (1-2 minutes) to observethe correction. Please adjust again if necessary.
3. Walking belt lubrication

- Power off the treadmill and unplug the power cord
- Lift the edge of the walking belt and smear the inner surface with silicone oil.
- Start the treadmill to run at a speed of 3km/h for 10-20 seconds.
- 5-10ml of silicone oil is required for one lubrication. Excessive application may causeslipping and affect normal use.
- Lubricate your walking belt every three months.
Read More About This Manual & Download PDF:
WalkingPad Treadmill User Manual – WalkingPad Treadmill User Manual –