
KW17 Smart Watch User Manual
Please refer to this manual before using the productV1.0
Notes:
- The company reserves the right to modify the contents of this manual without any further notification. It is normal that some functions may vary in certain versions of software.
- Please charge this product with the configured charger for no less than 2 hours before using it.
- Please connect with the APP and set personal information to sync time before use. Please refer to the instructions of the subsequent synchronization software for details.
- Lights up when charging and phone push. Bright red during charging, green after fulling charged, and the phone pushes with flicker color.
1. Product Overview
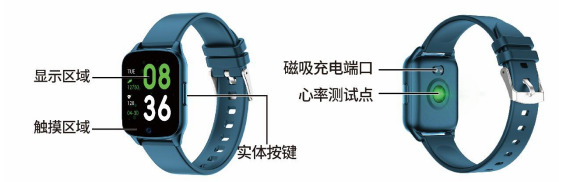
显示区域:Display zone触摸区域:Touch screen实体按键:Button磁吸充电端口:Magnet charging port心率测试点:Heart rate sensorDisplay zone
Models can be paired with:Android phones: support OS 5.0 and aboveIphones: Support OS 9.0 and above
2. APP download and connection
- Please scan the QR code below to download APPIt is recommended to use a browser to scan and download. Currently, WeChat scan download is not supported. Please give the corresponding permissions of this software in the download and installation process for BT connection.The APP name is “Da Fit”.
 ( Da Fit QR code)Notes:
- For Apple phone users: If it is in standby or hibernation state for a long time (for example, 2 hours or more) on Apple phone, (the phone has not been using, and it is in a black screen state), Da Fit will be cleaned up by IOS system, then the APP application and watch disconnect in between, the functions on APP are not available to use. Please re-open the watch and it will be automatically reconnected.
- For Android phone users: After installing the APP software on the Android phone, you need to enable the background application launch permission in the settings of your phone. Each smart phone has a difference. Take Huawei phone as an example. The steps are as follows:Settings–Application–Application Launch Management– Da Fit, find the APP application, change the automatic management to manual management, open all permissions (allow Auto-launch,Secondary launch, Run in background). This is only for the APP application to maintain the Bluetooth connection with the watch while the phone is in standby (the phone does not have a bright screen), and will not be cleaned up by the Android system. Will not use network traffic in the background, nor does it affect the power consumption of the phone.
- Connections for APP and Watch
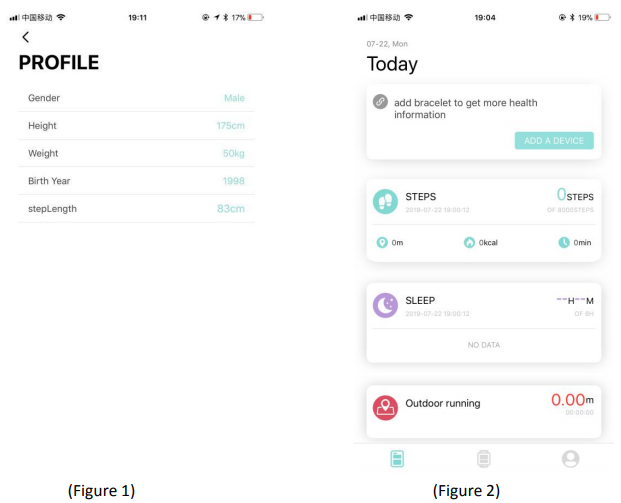
- Open the app and set your personal information, such as “Height”, “Weight”, “Birth Year”, etc..
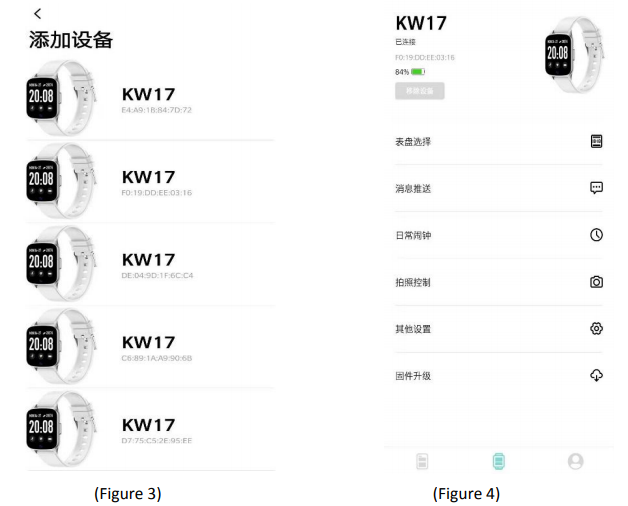
- For Android mobile phone: Switch to the home page after information setting on Android phone, click “ADD a Device” (Figure 2) to reach the “Add Device” page, click to choose the right model icon you purchased (Figure 3)
- It’s automatically back to the home page after successful connection between app and watch. Click the device icon to switch to the device page to check connection status, it will be shown the device model and picture, power, device address and other information after connected successfully. (Figure 4).
- For iPhone: Bluetooth connection of IOS phone refers to Android phone (same with point 2, 3)
- When pairing is failed by scanning QR code, you can click to see if the watch and phone has been connected with others,If yes, please ignore the device on phone before new connection.
- APP settings ( Functions are available after connected successfully )3.1 WATCH FACESClick the WATCH FACES to select a dial you prefer and click on the top left corner to return and save it.3.2 NOTIFICATIONSClick to open the notification reminder, you can select the program you want to push, you can choose the social application you want or select push all information.3.3 ALARMSClick the “ALARMS” to enter into the setting page. Three alarms period for default.Click on an alarm to enter the clock time.3.4 SHUTTERAndroid phone: Click the shutter function from APP, and the watch will show a camera icon, click it to take a photo directly, photos will be automatically saved to your album.Apple Phone: Click the “Shutter”from the iphone and your phone needs to open the camera manually(due to the IOS system) then click to take pictures on watch.3.5 OTHERS3.5.1 Find Device: Click”Find Device”, it will vibrates to remind on watch.3.5.2 Time Formats: Click to set the 12-hour Time or the 24-hour Time. It’s set after click DOWN, The watch time is synchronized with your setting time format.3.5.3 “Do not disturb”: “Closed”is the default mode. Click to enter the setting page, you can set the “do not disturb” mode according to your personal needs. Information will not be accepted again after setting.3.5.4 “Reminders to Move”: Default mode is “off”. Sedentary reminder only takes effect from 10:00- 22:00.3.5.5 Quick View: Default mode “ON”. An effective duration can be set. you can set valid period according to individual required duration.3.5.6 Weather: switch to open and close weather function, and you can manually set up the city or automatic positioning. The positioning needs to give authority, otherwise it is not available to use. Weather information update once every 2 hours, if it is in closed state, it takes 2 hours waiting before disappearing on watch.3.6 UPGRADEWhen a new version of the server is detected, a new version of the watch firmware can be upgraded3.7 REMOVEThe Pairing watch and phone app can be removed.Note: For Apple phone IOS, go to “Settings” – “Bluetooth”, to ignore current Bluetooth pairing, in order to completely unbinding.
 ( Da Fit QR code)Notes:
3. Main functions
3.1 Basics3.1.1 Power ON: When watch is power off, long press the side button for 5 seconds to power on. In the standby state, short press the side button to wake up it.3.1.2 Power OFF: When watch is power on, long press the side button for 5 seconds to power off directly.3.1.3 Check Device information: Long press the touch key to enter the Message interface. You can see the Bluetooth name, device type, device address, etc.3.2 StepsYou can view pedometer data on watch and APP. When watch is successfully paired with APP, your sport data will automatically synchronize (or manually refresh) from watch to the APP, including steps count, distance, calories and other parameters.3.3 Sleep monitorThe default sleep monitor time for the watch is from 20:00 pm to 10:00am. If you wear a watch to sleep, you can check last night’s sleep time on the watch after getting up the next morning. When watch is successfully paired with APP, the sleep data will be automatically synchronized (or manually synchronized) to the APP. The watch will automatically recognize and judge what the sleep state it comes to be . If you just get up shortly from bed, the sleep data displayed on the watch is different from the actual data because the watch is still detecting sleep. It is only when the watch completes detection that will show results of the whole night, and is consistent with the actual data. It will be acceptable to have some errors with the actual data due to different sleep states.3.4 Heart rate monitorWhen heart rate data is empty, it displays “000Bpm”. Go to the heart rate icon, long press the touch key for more than 2s to start testing. The data displays directly after testing. It is continuously measured for 30 seconds and it just keeps the last data. if it exits from the current page during measuring, the testing value is not recorded.3.5 Training3.5.1 Exercise includes: Walking,Running, Cycling, Skipping, Badminton, Basketball, Football.3.5.2 Switch the corresponding training icon: Long press to enter the corresponding exercise mode, data such as steps, distance, calories, heart rate, exercise duration will be visible. Long press on the current sport page to pause, and exit from the application. 3.5.3 Activity data can only be uploaded to APP for view. While the data after exercise can not be viewed on the watch.Note: Sport data save rules: 1.Exercise time more than 2 min or; 2. with testing heart rate data; It needs to meet any one of the two conditions that can save data, if not, it will not keep any exercise data.3.6 Blood PressureGo to the blood pressure icon and long press the touch key to measurement. You can stop it after the measured value is obtained.3.7 Blood OxygenGo to the blood oxygen icon and long press the touch key to measurement. You can stop it after the measured value is obtained.3.8 WeatherAfter the weather function is enabled on phone APP, it will be displayed on the watch. It won’t display if it’s closed on APP. The weather information will be updated once every 2 hours.3.9 MessageGo to Message interface, and long press to check the message you won’t miss. You first need to give allowance to synchronization function on APP. The information received from the phone will be synchronized to the watch. (5 messages will be kept by default. If it comes over 5 messages, it will automatically cover the earliest message. Long press the current message to clear automatically after viewing.)Messages can be synchronized from smart phone to the watch via Bluetooth. They can be easily viewed. It does not support to reply. For Voice message, it can only display incoming messages, but can not be heard on the watch.4.0 ShutterYou can take a photo with your phone camera by remotely control.For Android phone users: Click the “Shutter”, your Android phone will enter the current camera page , the camera icon will pop up on the watch, and then you can click to take photos.For Apple Phone: Click the “Shutter”, an introduction page comes to your Apple phone, your phone needs to manually enter the camera interface, and then click to take pictures on watch. You need to manually open the camera because of the Apple phone system.4.1 PlayerLong press to enter the music control interface, you can long press the middle “player”to pause or play the previous song or the next song. Short press to switch the current operation. (It is recommended that the mobile phone player is in the foreground operation, some smart phones probably will have compatibility problem if in the background )4.2 OthersLong press to enter into “Others” functions4.2.1 Back: Long press to return to the previous interface4.2.2 Stopwatch: Long press to start timing, short press to pause timing, long press to clear and exit timing.4.2.3 Mute: Long press to switch on and off 4.2.4 Brightness: Long press to enter the brightness interface, short press to set the brightness effect, long press to confirm setting.4.2.5 Reset: Long press to restore factory settings, the watch will return to the factory state4.2.6 Power off: Long press to shut down the watch, it will enter the power off state.
4. Precautions
4.1 Only one connected app can be installed on the mobile phone to ensure that the connection is normal before the data can be synchronized. If there are multiple such connected APP applications, they may affect the connection between the watch and the mobile phone.Note: Some Android phones will prompt you that you cannot install them. Please go to `setting’ of the phone and authorize the ` Unknown source’4.2 When the mobile phone prompts permission to apply, please click “Allow” to avoid the application permission of the APP application is not open, which may result in you not receiving notifications, scanning QR codes, remote cameras and other functions. This permission is a normal application and does not affect the flow of the phone or other information on the phone. It’s limited for Bluetooth connection between the APP and the watch.4.3 Some Android mobile phone may accidentally close the mobile app when cleaning the application. Please keep the mobile app running in the backstage. Android phone settings backstage running method: open the phone settings – application management – Da Fit – Rights management – Backstage management – select backstage running. (The setting method may be different due to different mobile phone versions and models)4.4 Heart rate monitoring requires the watch and arm to be tight, too tight or too loose, the test may be inaccurate, because too tight will affect the flow of blood, too loose will affect heart rate sensor monitoring.4.5 Please avoids colliding with hard objects to break the glass. 4.6 Please use 5V, 1A for the charger. This product does not support fast charging. Do not charge with water (sweat) to prevent short circuit and damage the product. 4.7 This product is an electronic monitoring product, not for medical reference, data for daily reference.
5. Troubleshooting
In case there’s a problem during the using of the smart watch, please solve it accordingly by the following ways. If the problem still exists, please contact the seller or designated maintenance personnel.5.1 The watch cannot be turned on5.1.1 Press the display touch area for over 3 seconds5.1.2 Make sure there is enough battery. Battery power may be too low, please charge it.5.1.3 If leave the watch too long and the normal charger does not respond, please try charging with an output power of 5V/1A.5.2 Shut down automatically5.2 Battery power may be too low, please charge it.5.3 Short battery life5.3.1 It may occur when the battery hasn’t been fully charged, please ensure sufficient time for the charging ( at least 2 hours is required)5.3.2 Charger or data cable may not work properly, please change a new one.5.3.3 Please check the port of the data cable and try again to ensure a proper connection.5.4 BT disconnect or unable to connect5.4.1 Please restart it5.4.2 Please turn off BT of mobile phone and open it to reconnect.5.5 Inaccurate sleep dataSleep monitor is designed to imitate the natural pattern of falling asleep and waking up, please wear the watch normally, otherwise deviation may occur if going to bed late or only wear while sleeping. There may not sleeping data generate if go to bed at day time as the defaulted sleeping time is preset to between 9:00 pm to 9:00 am.
[xyz-ips snippet=”download-snippet”]