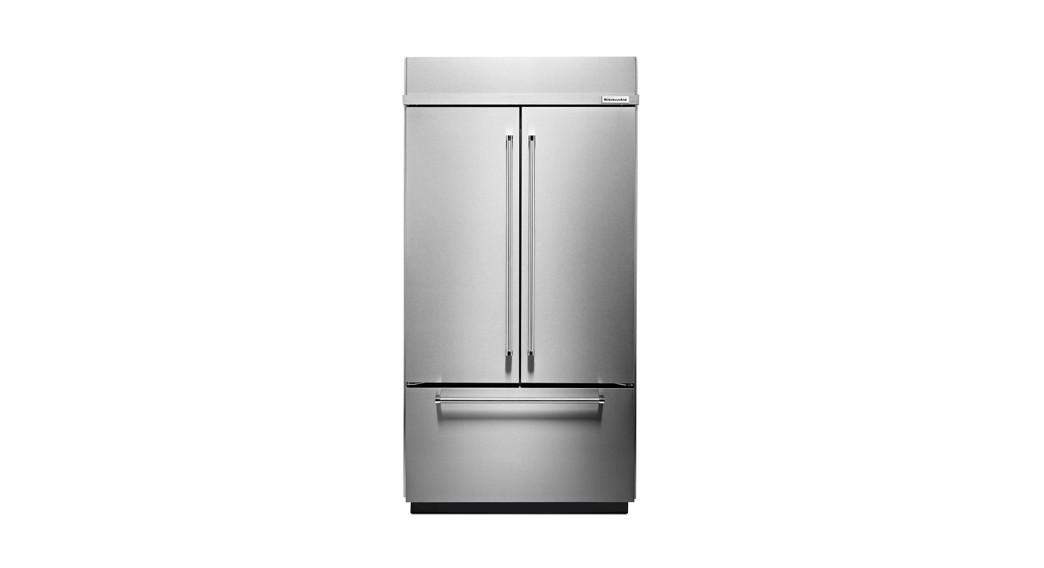
![]() French Door Bottom Mount Dispensing and Storage Guide
French Door Bottom Mount Dispensing and Storage Guide
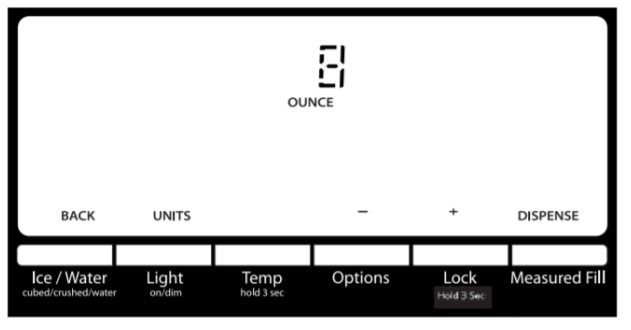
Water and Ice Dispenser Controls
Press Ice/Water to toggle through the following choices in a continuous loop:
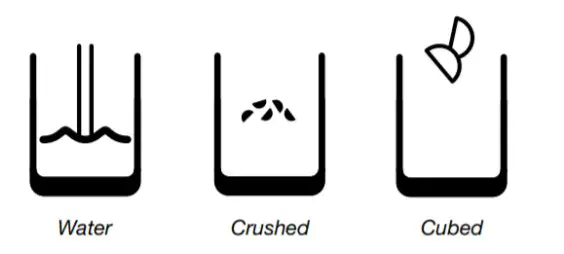
- Water (default) – Dispenses water.
- Cubed – Dispenses cubed ice.
- Crushed – Dispenses crushed ice.
TO DISPENSE WATER (STANDARD)
- Select water.
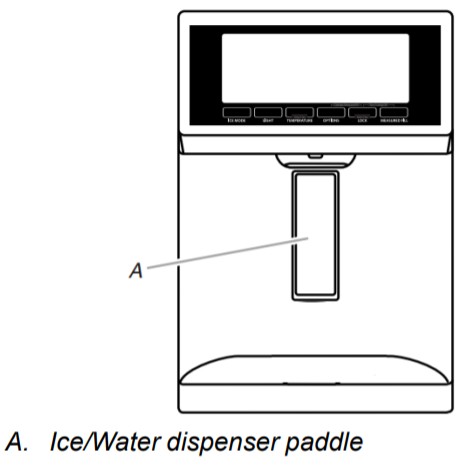
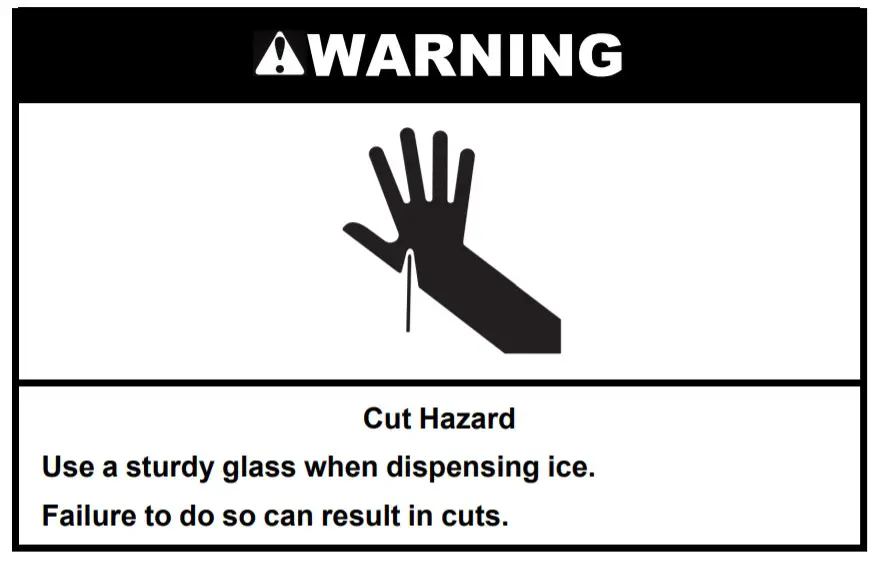
- Press a sturdy glass against the water dispenser paddle.
- Remove the glass to stop dispensing.
TO DISPENSE WATER (MEASURED FILL)Measured Fill allows you to dispense a specified amount of water with the touchpad.NOTE: The amount of water you select will be dispensed. Be sure that the container is empty and can hold the entire volume. If ice is in the container, you may need to adjust your selection.Household water pressure may affect the accuracy of the Measured Fill feature. For optimum performance of your water dispenser, you must first calibrate Measured Fill. For best results, calibration should be performed when water is not being used in the house.How to calibrate Measured Fill:IMPORTANT: Flush the water system before calibrating the Measured Fill.
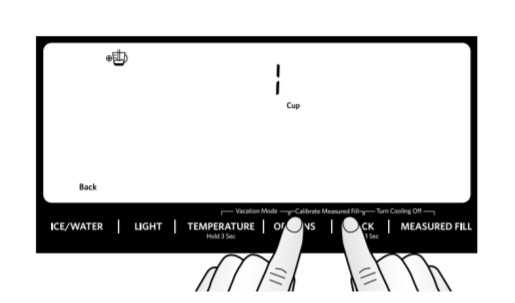
- Place a sturdy measuring cup (1-cup [237 mL] size) on the dispenser tray centered in front of the water dispenser paddle.NOTE: Depending on your model, a measuring cup may be provided.
- Press and hold the Options and Lock buttons at the same time for 3 seconds. The words “Back” and “1 Cup” will appearon the display screen. Also, the Calibrate Measured Fill icon will illuminate and remain lit while the Measured Fill feature isbeing calibrated.NOTE: You may press Ice/Water “Back” at any time to exit calibration mode. The Calibrate Measured Fill icon will disappear.

- Press and release the water dispenser paddle, as needed, to dispense water to the 1 cup fill line.NOTE: If overfilling or spilling occurs, discard the water and press “Back” to restart the calibration process.
- When 1 cup of water has been correctly dispensed into the measuring cup, press the Measured Fill button under the word “Confirm” to confirm the calibration.
When Measured Fill calibration has been confirmed, the Calibration icon will disappear and the display will return to the home screen.
- Press Measured Fill to turn the feature on. When the feature is on, the Measured Fill screen appears on the display. Press Ice/Water “Back” to manually turn off the Measured Fill feature.NOTE: The dispenser will automatically turn off Measured Fill after 1 minute of inactivity. When Measured Fill is turned off,any changes you have made will be lost and all defaults will be restored.
- You can dispense water by ounce, cup, or liter. The default unit is ounces. To switch to cups, ounces, or liters, press the Light button.Default, minimum, and maximum volumes are listed below.
Units Default Minimum Maximum Ounces 8 1 128 Cups 1 4-Jan 16 Liters 0.25 0.05 4 - Press the Lock and Options buttons to adjust the volume as desired. The Lock button increases the volume, and the Options button lowers the volume.NOTE: Most coffee cups (commonly 4 to 6 oz [118 to 177 mL] per cup) are not the same size as a measuring cup (8 oz [237mL]). You may need to adjust the volume to avoid unintentionally overfilling coffee cups.When increasing or decreasing the dispense volumes, if an adjustment button (-/+) is held for approximately 10 seconds or longer the control may stop responding. Release the button for approximately 2 seconds and then continue making the adjustment.
- Dispense water.NOTE: While dispensing water, the digital display will count down how much water remains to be dispensed, according tothe volume you selected. The flow of water will automatically stop once the desired volume has been dispensed.• Press a sturdy glass against the dispenser paddle. or•Place the glass below the water dispenser and press Measured Fill, under Dispense, for hands-free dispensing.
- To stop dispensing before the selected volume has been dispensed, remove the glass from the dispenser lever or pressthe Measured Fill button a second time.NOTE: If you stop dispensing before the desired volume has been dispensed, the digital display will continue to show howmuch water remains to be dispensed. The display will turn off after 1 minute of inactivity.
- To select a new volume or start dispensing the same volume again, you must first finish dispensing the selected volume, orturn off the Measured Fill feature (either by waiting 1 minute so it will automatically turn off or by pressing Ice/Water “Back” to manually turn it off) and then turn it back on.
 NOTE: The dispenser will automatically turn off Measured Fill after 1 minute of inactivity. When Measured Fill is turned off,any changes you have made will be lost and all defaults will be restored.
TO DISPENSE ICEIMPORTANT:•If the ice cubes are hollow or have an irregular shape, it could be because of low water pressure. See “Water Supply Requirements” in the Owner’s Manual.•Ice travels from the ice storage bin through the dispenser chute to the dispenser. To turn off the ice maker, see “Ice Maker andStorage Bin” in the Owner’s Manual.•The dispenser may continue to make noise and ice may continue to dispense for several seconds after releasing the dispenser button or paddle.The word “Ice” appears on the display screen when either crushed or cubed ice is selected.For crushed ice, cubes are crushed before being dispensed. This may cause a slight delay when dispensing crushed ice. Noise from the ice crusher is normal, and pieces of ice may vary in size.NOTE: When changing from crushed to cubed, a few ounces of crushed ice will be dispensed along with the first cubes.
- Select the desired type of ice. To switch between cubed ice and crushed ice, press Ice/Water.
- Press a sturdy glass against the dispenser paddle. Hold the glass close to the dispenser opening so ice does not fall outside of the glass.IMPORTANT: You do not need to apply a lot of pressure to the paddle to activate the ice dispenser. Pressing hard will not make the ice dispense faster or in greater quantities.
- Remove the glass to stop dispensing.NOTE: Ice may continue to dispense for several seconds after removing the glass from the dispenser paddle. The dispensermay continue to make noise for a few seconds after dispensing.
DISPENSER DRIP TRAY
There is an insert in the dispenser drip tray. The insert can be removed from the drip tray to carry to the sink to empty or clean.Push down on the rear edge of the insert to tilt up the front edge for easy removal.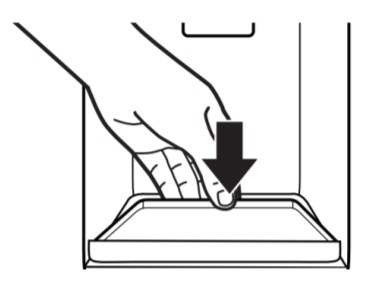 Temperature-Controlled DrawerIMPORTANT: The left-hand refrigerated drawer has its own temperature control. This control sets the temperature for this drawer only. The temperature for the right-hand drawer is set to the same temperature as the main refrigerator compartment.Temperatures have been preset for the storage of Meat/Fish, Cold Drinks, Greens/Herbs, Deli/Cheese, and Thaw/Marinate. These preset temperatures cannot be adjusted.Press Select to toggle through the temperature settings. The icon will illuminate when it is selected.
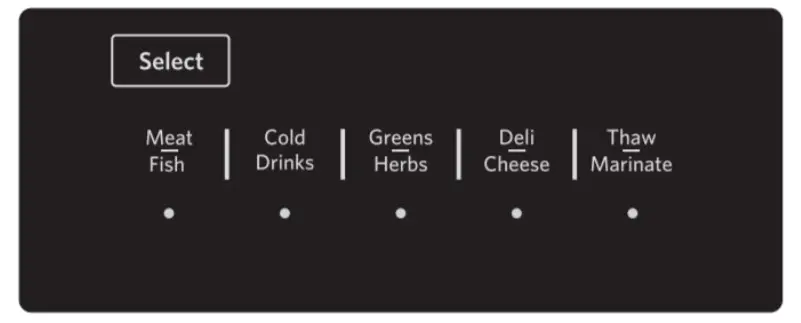
- Meat/Fish – 32°F (0°C)
- Cold Drinks – 34°F (1°C)
- Deli/Cheese – 38°F (3°C)
- Greens/Herbs – 36°F (2°C)
- Thaw/Marinate – 39°F (4°C)
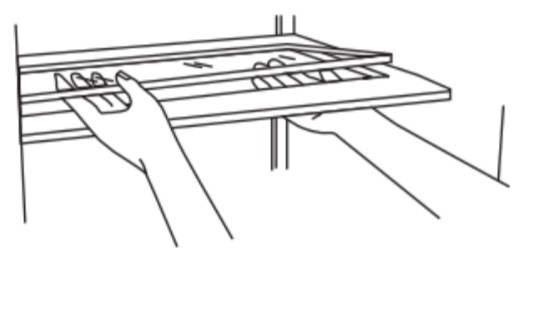
Crisper Cover, Drawers, and BinsTo remove and replace the drawers:
- Grasp the handle at the bottom of the drawer and slide the drawer straight out to the stop. Lift the drawer of the bottomguide.2. Replace the drawer by placing it on the bottom drawer guide and pushing it past the drawer stop into position.To remove the crisper(s) cover:1. Remove crisper drawers.2. Holding the glass insert firmly with one hand, press up in the center of the glass insert until it rises above the plastic frame. Gently slide the glass insert forward to remove.3. Lift the cover frame up and remove it.
To replace crisper(s) cover:
- Fit back of the cover frame into supports on sidewalls of the refrigerator and lower the front of the cover frame into place.
- Slide rear of glass insert into cover frame and lower front into place.
- Replace crisper drawers.
CRISPER EASYSLIDE BINA shallow storage compartment with glass lids that slide from side to side is located below and in front of the crisper drawers.NOTE: This compartment is not temperature or humidity-controlled, so it is not recommended for storing leafy vegetables.
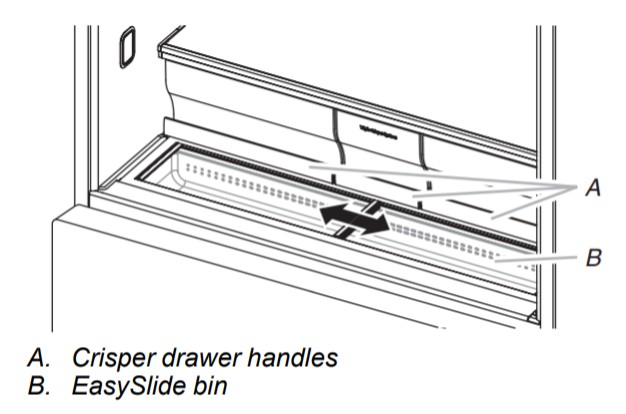
To remove the EasySlide bin:
- Remove all three crisper drawers.
- Hold the upper sliding lid near the trim and lift up to remove.Remove the lower lid.
- Grasp the front of the bin with both hands, and lift up on the front to remove.
To replace EasySlide bin:
- Slightly tilt the rear of the bin upward.
- Align the center rib and tabs on the EasySlide bin with the ribs and slots in the cabinet.
- Lower the bin into place.
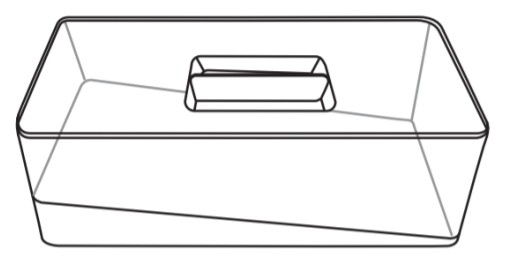
EASY SLIDE HERB BOXA box to store herbs and the water to keep them fresh is located within the Easy Slide bin. For your convenience, you can reposition the herb box anywhere along the length of the bin.
- Slide open one of the bin doors to access the herb box.
- Remove the herb box from the bin using two hands. One hand should hold the box while the other hand holds the lid.
- Grasp the handle between your fingers and lift up to remove the lid.NOTE: The bottom of the herb box is angled so that the roots of the herbs can be submerged in water while the leaves remain dry.
Refrigerator Door BinsThe bins on your refrigerator door are adjustable to meet your individual storage needs and are removable for ease of cleaning.NOTE: The smallest door bin must be installed in the lowest position on the refrigerator door.To remove and replace the interior bins:
- To remove, grasp the sides of the bin and lift up and out.
- To replace, with the rear of the bin facing the back of the refrigerator, lower the bin onto the drawer glides.
ADJUSTABLE DRAWER BIN DIVIDERSEach refrigerated drawer has an interior drawer bin with a divider that can be inserted into one of three different positions orremoved to customize the space for your food storage needs.
Additional Control Panel FeaturesPOWER OUTAGE INDICATORThe power outage indicator lets you know if the power supply to the refrigerator has been cut off and the freezer temperature hasrisen to 18°F (-8°C) or higher.The control panel temperature display will read “PO,” and an alert tone will sound three times. “Confirm” will blink until you acknowledge the power outage by pressing Measured Fill under “Confirm.”Once the power outage has been confirmed, the “PO” will disappear, and the display will return to the Home screen.DOOR AJAR ALARM
 The Door Ajar Alarm feature sounds an alarm when the refrigerator door(s), drawers, or freezer drawer is open for 5 minutes and cooling is turned on. The alarm will repeat every 2 minutes. Close all doors and drawers to turn them off.The feature then is reset and will reactivate when either door is left open again for 5 minutes.NOTE: To mute the audible alarm while keeping the doors open, such as while cleaning the inside of the refrigerator, press any button on the control panel. The alarm sound will be temporarily turned off, but the Door Ajar icon will still be displayed on thedispenser control panel.DISABLING SOUNDS
- To turn off all control and dispenser sounds, press and hold Ice/Water and Measured Fill at the same time for 3 seconds.All normal operating tones are disabled. Only alert tones will be audible.
- To turn all sounds back on, press and hold Ice/Water and Measured Fill at the same time for 3 seconds again.
SABBATH MODESabbath Mode is designed for those whose religious observances require turning off the lights and dispensers.In Sabbath Mode, the temperature set points remain unchanged, but the interior and dispenser lights turn off, and all sounds, alarms, and dispenser paddles are disabled.NOTE: If a power outage occurs while in Sabbath Mode, Power The outage will not be indicated on the display no matter how long the power was out.
- To turn on Sabbath Mode, press and hold Light and Options at the same time for 3 seconds. When the feature turns on,“Sabbath Mode” will appear on the dispenser display.
- To turn off Sabbath Mode, press and hold Light and Options at the same time for 3 seconds. The screen will display thesettings as they were before Sabbath Mode was turned on.However, the Max Cool and Max Ice features will remain off until they are selected again.NOTE: Turning “Cooling Off” will cancel Sabbath Mode.
SHOWROOM MODEThis mode is used only when the refrigerator is on display in a retail store. If you unintentionally turn on Showroom mode, the word(s) Showroom or Showroom Mode will light up on the display.Exit Showroom mode by pressing and holding Light and Lock at the same time for 3 seconds.
![]() ®/™ ©2020 KitchenAid.All rights reserved.Used under license in Canada.W11411646A
®/™ ©2020 KitchenAid.All rights reserved.Used under license in Canada.W11411646A
[xyz-ips snippet=”download-snippet”]