KitchenAid KUID508HPS 18 inch Built-In Ice Maker in PrintShield Stainless Steel
| LEARN MOREIn an effort to conserve natural resources, this ice maker includes a condensed User Guide. A complete Use and Care Guide can be downloaded at www.kitchenaid.com/manuals. The model number is located on the inside of the ice maker.In the U.S.A., register your ice maker at www.kitchenaid.com. In Canada, register your ice maker at www.kitchenaid.com |
|
Your safety and the safety of others are very important. We have provided many important safety messages in this manual and on your appliance. Always read and obey all safety messages. |
 This is the safety alert symbol.This symbol alerts you to potential hazards that can kill or hurt you and others. All safety messages will follow the safety alert symbol and either the word “DANGER” or “WARNING.”These words mean:
IMPORTANT SAFETY INSTRUCTIONS
WARNING : To reduce the risk of fire, electric shock, or injury when using your ice maker, follow these basic precautions:
- Plug into a grounded 3 prong outlet.
- Do not remove ground prong.
- Do not use an adapter.
- Do not use an extension cord.
- Disconnect power before cleaning.
- Disconnect power before servicing.
- Replace all parts and panels before operating.
- Use two or more people to move and install ice maker.
SAVE THESE INSTRUCTIONS
| State of California Proposition 65 Warnings:WARNING: This product contains one or more chemicals known to the State of California to cause cancer.WARNING: This product contains one or more chemicals known to the State of California to cause birth defects or other reproductive harm. |
OPERATING YOUR ICE MAKER
How Your Ice Maker Works
When you first start your ice maker, the water pan will fill and the system will rinse itself before starting to make ice. The rinsing process takes about 5 minutes.Under normal operating conditions, the ice maker will cycle at preset temperatures. The ice level sensor located in the ice storage bin will monitor the ice levels.IMPORTANT: If the water supply to the ice maker is turned off, be sure to set the ice maker control to OFF.
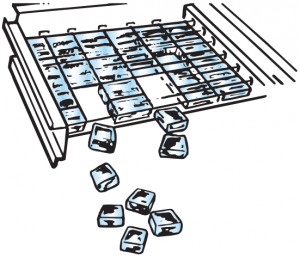
The Ice Making Process
- Water is constantly circulated over a freezing plate. As the water freezes into ice, the minerals in the water are rejected. This produces a sheet of ice with a low mineral content.

- When the desired thickness is reached, the ice sheet is released and slides onto a cutter grid. The grid divides the sheet into individual cubes.
- The water containing the rejected minerals is drained after each freezing cycle.
- Fresh water enters the machine for the next ice making cycle.
- Cubes fall into the storage bin. When the bin is full, the ice maker shuts off automatically and restarts when more ice is needed. The ice bin is not refrigerated, and some melting will occur. The amount of melting varies with room temperature.NOTE: As the room and water temperatures vary, so will the amount of ice produced and stored. This means that higher operating temperatures result in reduced ice production.
 NOTE: As the room and water temperatures vary, so will the amount of ice produced and stored. This means that higher operating temperatures result in reduced ice production.
Using the Controls
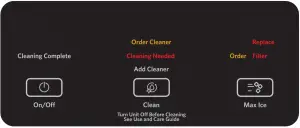
- To start ice production, press ON/OFF.
- To stop ice maker operation, press ON/OFF
NOTES:
- Pressing the ON/OFF button does not shut off power to the ice maker.
- Allow 24 hours to produce the first batch of ice. Discard the first 2 batches produced.
Max Ice Mode
Select the Max Ice feature when you have an upcoming need for a large amount of ice and the ice bin is low or empty. Max Ice mode will produce a greater quantity of ice in a 24-hour period.
- Press MAX ICE while the ice maker is on. The indicator light will illuminate.
- Press MAX ICE again to turn off the Max Ice feature. The indicator light will turn off.
- The Max Ice mode will be on when you first turn on the product.It will turn off after 24 hours. To turn Max Ice back on, press MAX ICE.
Clean
It is recommended that you clean the ice maker when the “Cleaning Needed” light is illuminated or 9 months has elapsed, or iceproduction decreases significantly. To clean your ice maker, see “Ice Maker System” in the “Cleaning” section.
Door Ajar Alarm
The Door Ajar Alarm feature sounds an alarm when the ice maker door is open for 5 minutes. The alarm will repeat every 2 minutes.Close the door to turn off. The feature then resets and will reactivate when the door is left open again for 5 minutes.
Water Filtration System
| Do not use with water that is microbiologically unsafe or of unknown quality without adequate disinfection before or after the system. Systems certified for cyst reduction may be used on disinfected waters that may contain filterable cysts. |
Installing a Water Filter
- Purchase a KitchenAid approved water filter.
- Take the water filter out of its packaging and remove the cover from the O-rings. Be sure the O-rings are still in place after the cover is removed.A. CoverB. O-ringsC. Alignment pinD. Alignment arrow
- The water filter compartment is located in the right-hand side of the ice maker controls. For 15″ (38.1 cm) models, push in on the door to release the latch, and then lower the door.
- Using the arrow pointing to the alignment pin on the side of the filter and the arrow inside the control housing, align the alignment pin with the cutout notch and insert the filter into the housing.A. Alignment pinB. Unlocked symbolC. Locked symbolD. Cutout notch inside control housingE. Arrow pointing to cutout notchF. Arrow pointing to alignment pin
- Turn the filter clockwise until it locks into the housing. Ensure that the alignment arrow on the filter head aligns with the locked symbol on the control box housing.NOTE: If the filter is not correctly locked into the housing, the ice maker will not produce ice.A. Alignment arrow aligned with locked symbol
- For 15″ (38.1 cm) models, push the control box door closed until the latch snaps closed.
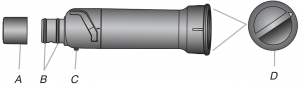 A. CoverB. O-ringsC. Alignment pinD. Alignment arrow
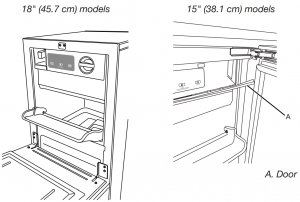
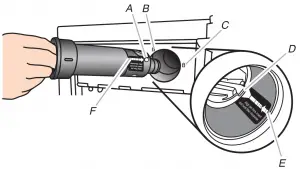 A. Alignment pinB. Unlocked symbolC. Locked symbolD. Cutout notch inside control housingE. Arrow pointing to cutout notchF. Arrow pointing to alignment pin
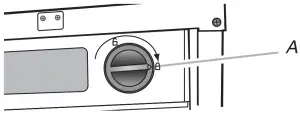 A. Alignment arrow aligned with locked symbol
The Water Filter Status LightThe water filter status lights will help you know when to change your water filter.
- The “Order Filter” status light will be illuminated when it is time to order a replacement filter.
- The “Replace Filter” status light will be illuminated when it is time to replace the filter.
- Replacing the disposable water filter with a new filter will automatically reset the filter status tracking feature. See “Using the Controls.”
Replace the Water Filter
To purchase a replacement water filter, see “Accessories.”Replace the disposable water filter when indicated on the water filter status display or at least every 9 months. If the ice making rate decreases before the Replace Filter light illuminates, then replace the filter.
- Locate the water filter compartment in the right-hand side of the control housing. See Step 3 in the “Install Water Filter” section.
- Turn the water filter counterclockwise (to the left), and pull it straight out of the compartment.NOTE: There may be some water in the filter. Some spilling may occur.
- Install the replacement water filter by following steps 2 through 5 in the “Install the Water Filter” section.
Normal Sounds
Your new ice maker may make sounds that are not familiar to you.Because the sounds are new to you, you might be concerned about them. Most of the new sounds are normal. Hard surfaces such as floors, walls and cabinets can make the sounds seem louder than they actually are. The following describes the kinds of sounds that might be new to you and what may be making them.
- You will hear a buzzing sound when the water valve opens to fill the water pan for each cycle.
- Rattling noises may come from the flow of the refrigerant or the water line. Items stored on top of the ice maker can also make noises.
- The high-efficiency compressor may make a pulsating or high pitched sound.
- Water running over the evaporator plate may make a splashing sound.
- Water running from the evaporator plate to the water pan may make a splashing sound.
- As each cycle ends, you may hear a gurgling sound due to the refrigerant flowing in your ice maker.
- You may hear air being forced over the condenser by the condenser fan.
- During the harvest cycle, you may hear a “thud” when the ice sheet slides from the evaporator onto the cutter grid.
- When you first start the ice maker, you may hear water running continuously. The ice maker is programmed to run a rinse cycle before it begins to make ice.
- If the ice maker is connected to a water supply pressure in excess of 60 psi, you may hear a loud sound during water filling associated with the flow of water through the inlet valve. Call a licensed, qualified plumber to determine the best method to reduce the supply water pressure (50 psi is recommended).
CARING FOR YOUR ICE MAKER
Cleaning
The ice making system and the air cooled condenser need to be cleaned regularly for the ice maker to operate at peak efficiency and to avoid premature failure of system components. See the “Ice Maker System” and the “Condenser” sections.
Exterior SurfacesWash the exterior enamel surfaces and gaskets with warm water and mild soap or detergent. Wipe and dry. Regular use of a good household appliance cleaner and wax will help maintain the finish. Do not use abrasive cleaners on enamel surfaces as they may scratch the finish. For products with a stainless steel exterior, use a clean sponge or soft cloth and a mild detergent in warm water. Do not use abrasive or harsh cleaners. Do not use chlorine bleach on the stainless steel surfaces.
Ice Maker System
Minerals that are removed from water during the freezing cycle will eventually form a hard scaly deposit in the water system. Cleaning the system regularly helps remove the mineral scale buildup. How often you need to clean the system depends upon how hard your water is.With hard water of 15 to 20 grains/gal. (4 to 5 grains/liter), you may need to clean the system as often as every 9 months.
NOTE: Use one 16 oz (473 mL) bottle of approved ice maker cleaner.
To order, see “Accessories.”
- Press the ON/OFF button.
- Wait 5 to 10 minutes for the ice to fall into the storage bin.Remove all ice from the storage bin.
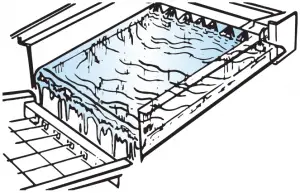
- Unscrew the drain cap from the bottom of the water pan located inside the storage bin as shown. Allow the water to drain completely.
- Replace the drain cap securely on the water pan. If the drain cap is loose, water will empty from the water pan and you will have either thin ice or no ice.
- Read and follow all handling information on the cleaner bottle before completing the steps below. Use one 16 oz (473 mL) bottle of approved ice maker cleaner.
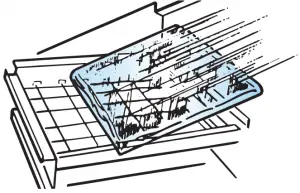
- Pour one bottle of solution into the water pan. Fill the bottle twice with tap water and pour it into the water pan.A. Water panB. Drain cap
- Press the CLEAN button. See “Using the Controls.” The Clean button will blink, indicating that the cleaning cycle is in process.When the “Cleaning Complete” light is illuminated (approximately 70 minutes), the cleaning cycle is complete. During the cleaningcycle, the system will both clean and rinse itself.
- After the cleaning cycle is complete, remove the drain cap from the water pan. Look for any cleaning solution left in the water pan.If cleaning solution drains from the water pan, you should run the clean cycle again. Be sure to refill the water pan with cleaner before starting the clean cycle again. Be sure to replace the drain cap securely on the water pan. If the drain cap is loose, water will empty from the water pan and you will have either thin ice or no ice.NOTE: Severe scale buildup may require repeated cleaning with a fresh quantity of cleaning solution.
- Press the ON/OFF button to resume ice production.
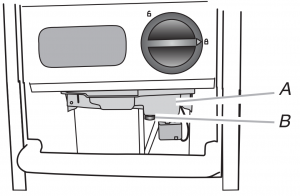 A. Water panB. Drain cap
Condenser
A Dirty or Clogged Condenser
- Obstructs proper airflow.
- Reduces ice making capacity.
- Causes higher than recommended operating temperatures which may lead to component failure.
 |
 |
|
Electrical Shock Hazard Disconnect power before cleaning. Replace all parts and panels before operating. Failure to do so can result in death or electrical shock. |
ACCESSORIES
In Canada, visit our website www.kitchenaid.ca or call 1-800-807-6777.
Water FilterOrder Part Number F2WC9I1 or ICE2
CleanerOrder Part Number 4396808
Affresh® Stainless Steel CleanerIn U.S.A., order Part Number W10355016In Canada, order Part Number W10355016B
Affresh® Stainless Steel WipesIn U.S.A., order Part Number W10355049In Canada, order Part Number W10355049B
Affresh® Kitchen & Appliance CleanerIn U.S.A., order Part Number W10355010In Canada, order Part Number W10355010B
TROUBLESHOOTING
Visit producthelp.kitchenaid.com for recommendations that may help you avoid a service call.
Ice Maker Operation
|
|
|
| Electrical Shock Hazard
Plug into a grounded 3 prong outlet.Do not remove ground prong.Do not use an adapter.Do not use an extension cord.Failure to follow these instructions can result in death, fire, or electrical shock. |
| PROBLEM | RECOMMENDED SOLUTIONS |
| Ice Maker Will Not Operate | Check that it is plugged into a grounded 3 prong outlet. Check that the control is turned on. See “Using the Controls.” Replace the fuse or reset the circuit breaker. NOTE: If problems continue, contact an electrician. Room temperature must be above 45°F (7°C). Otherwise, bin thermostat may sense cold room temperature and shut off even though the bin is not full of ice. The ice maker may not restart. Once it does shut it off. If there was a large amount of water added to the ice maker, wait a few minutes for the drain pump to clear. If there is still water in the bin, check to see whether the drain hose is kinked. For models with drain pumps, check that the drain hose is not damaged, or kinked or pinched between cabinet and ice maker. Use only Whirlpool approved drain pump kit, Part Number 1901A. |
| Ice Maker Seems Noisy | Water overflowing the reservoir is normal. This overflow helps to purge minerals that were removed from the water during the ice making process. If there a “whooshing” sound, Check the following things:
If there is ice between the evaporator plate and the cutting grid, check that the ice maker is level. If the ice maker is level, and the problem persists, run a cleaning cycle.” If the ice maker is connected to a water supply pressure in excess of 60 psi, you may hear a loud sound during which water filling associated with the flow of water through the inlet valve. Call a licensed, qualified plumber to determine the best method to reduce the supply water pressure (50 psi is recommended). |
Ice Production
|
|
|
| Electrical Shock Hazard
Disconnect power before servicing.Replace all parts and panels before operating.Failure to do so can result in death or electrical shock. |
| PROBLEM | RECOMMENDED SOLUTIONS |
| Ice Maker Runs But Produces No Ice | Check that the control is turned on. Check that the water supply is properly connected and turned on. If the drain cap is loose, water will empty from the water pan, and you will have either thin ice or no ice. Tighten the drain cap. Clean the drain tube. Check that there are no kinks in the drain line. |
| Ice Maker Runs But Produces Very Little Ice | If the accelerated ice production feature is turned on, this feature increases the ice production rate to provide you with more ice in the same amount of time. Room temperatures of more than 90°F (32°C) will normally reduce ice production. Dirt or lint may be blocking the airflow through the condenser. If there is white scale buildup in the ice maker’s water or freezing system, you should clean the ice maker. If the drain cap is loose, water will empty from the water pan, and you will have either thin ice or no ice. Tighten the drain cap. Ensure that the cutter grid is securely in place and that its harness plug is connected. Check that water filter is properly installed. |
Ice Quality
| PROBLEM | RECOMMENDED SOLUTIONS |
| Off Taste, Odor or Gray Color in the | If there is unusually high mineral content in the water supply, the water may need to be treated.If there is mineral scale buildup, clean your ice maker.Do not store any foods in the ice bin.Check that all packaging materials were removed at the time of installation. |
| Thin, Soft or Clumps of Ice | If there is unusually high mineral content in the water supply, the water may need to be treated.If there is mineral scale buildup, clean your ice maker.If there are clumps of ice in the bin and if ice is not used regularly, it will melt and form clumps. Break the clumps with the ice scoop provided. |
Plumbing Problems
|
| Excessive Weight Hazard
Use two or more people to move and install ice maker.Failure to do so can result in back or other injury. |
| PROBLEM | RECOMMENDED SOLUTIONS |
| Water Not Entering Drain Properly | If the drain hose is not aligned over the drain, move the ice maker to align the drain.NOTE: Service technicians cannot repair plumbing problems outside of the ice maker. Call a licensed, qualified plumber. |
PERFORMANCE DATA SHEET
Ice Maker Water Filtration SystemModel P6GEG2KL, P6KG2KL, P6WG2KL Capacity 2000 Gallons (7571 Liters)
 |
System tested and certified by NSF International against NSF/ANSI Standard 42 for the reduction of Chlorine Taste and Odor. |
This system has been tested according to NSF/ANSI Standards 42 for the reduction of the substances listed below. The concentration of the indicated substances in water entering the system was reduced to a concentration less than or equal to the permissible limit for water leaving the system, as specified in NSF/ANSI Standards 42.
|
Substance Reduction Aesthetic Effects |
NSF Reduction Requirements | Average Influent | Influent Challenge Concentration | Maximum Effluent | Average Effluent | Minimum % Reduction | Average % Reduction |
| Chlorine Taste/Odor | 50% reduction | 1.9727 mg/L | 2.0 mg/L ± 10% | 0.71 mg/L | 0.7788 mg/L | 70.2 |
72.8 |
Test Parameters: pH = 7.5 ± 0.5 unless otherwise noted. Flow = 0.50 gpm (1.89 Lpm). Pressure = 60 psig (413.7 kPa).Temp. = 68°F to 71.6°F (20°C to 22°C). Rated service capacity = 2000 gallons (7571 liters).
- It is essential that operational, maintenance, and filter replacement requirements be carried out for the product to perform as advertised.
- Use replacement filter P6RFWG2K, P6RFGEG2K, P6RFKG2K, Part Number ICE2.Style 1 – When the water filter status display changes from “GOOD” to “ORDER,” order a new filter. When the filter indicator reads “REPLACE,” it is recommended that you replace the filter.Style 2 – Press FILTER to check the status of your water filter.If the filter indicator light is yellow and the words “ORDER FILTER” appear on the display screen, order a new filter. If the filter indicator light is red, it is recommended that you replace the filter.
- These contaminants are not necessarily in your water supply.While testing was performed under standard laboratory conditions, actual performance may vary.
- The product is for cold water use only.
- Do not use with water that is microbiologically unsafe or of unknown quality without adequate disinfection before or after the system.
- Refer to the “Warranty” section for the Manufacturer’s name, address and telephone number.
- Refer to the “Warranty” section for the Manufacturer’s limited warranty.
Application Guidelines/Water Supply Parameters
Water Supply City or Well Water Pressure 30 – 120 psi (207 – 827 kPa) Water Temperature 33°- 100°F (0.6° – 37.8°C) Service Flow Rate 0. 50 gpm (1.89 Lpm) @ 60 psi
KITCHENAID® ICE MAKER LIMITED WARRANTY
ATTACH YOUR RECEIPT HERE. PROOF OF PURCHASE IS REQUIRED TO OBTAIN WARRANTY SERVICE.Please have the following information available when you call the Customer eXperience Center:
- Name, address, and telephone number
- Model number and serial number
- A clear, detailed description of the problem
- Proof of purchase, including dealer or retailer name and address
IF YOU NEED SERVICE:
KitchenAid Customer eXperience CenterIn the U.S.A., call 1-800-422-1230. In Canada, call 1-800-807-6777.If outside the 50 United States or Canada, contact your authorized KitchenAid dealer to determine whether another warranty applies |
FIVE YEAR LIMITED WARRANTY
|
WHAT IS COVERED |
WHAT IS NOT COVERED |
| THREE YEAR LIMITED WARRANTY (PARTS AND LABOR)
For three years from the date of purchase, when this major appliance is installed, operated, and maintained according to instructions attached to or furnished with the product, KitchenAid brand of Whirlpool Corporation or Whirlpool Canada LP (hereafter “KitchenAid”) will pay for factory specified replacement parts and repair labor to correct defects in materials or workmanship that existed when this major appliance was purchased or, at its sole discretion, replace the product. In the event of product replacement, your appliance will be warranted for the remaining term of the original unit’s warranty period. FOURTH THROUGH FIFTH YEAR LIMITED WARRANTY(SEALED REFRIGERATION SYSTEM PARTS ONLY LABOR NOT INCLUDED) In the fourth through fifth years from the date of original purchase, when this major appliance is installed, operated, and maintained according to the instructions attached to or furnished with the product, KitchenAid brand will pay for factory specified replacement parts for the following components to correct non-cosmetic defects in materials or workmanship in the sealed refrigeration system that existed when this major appliance was purchased: compressor, evaporator, condenser, dryer/strainer, and connecting tubing. This limited five year warranty is only for the sealed refrigeration system replacement parts as identified and does not include labor. YOUR SOLE AND EXCLUSIVE REMEDY UNDER THIS LIMITED WARRANTY SHALL BE PRODUCT REPAIR AS PROVIDED HEREIN. Service must be provided by a KitchenAid designated service company. This limited warranty is valid only in the United States or Canada and applies only when the major appliance is used in the country in which it was purchased. This limited warranty is effective from the date of original consumer purchase.Proof of original purchase date is required to obtain service under this limited warranty. |
The cost of repair or replacement under these excluded circumstances shall be borne by the customer. |
|
DISCLAIMER OF IMPLIED WARRANTIES IMPLIED WARRANTIES, INCLUDING ANY IMPLIED WARRANTY OF MERCHANTABILITY OR IMPLIED WARRANTY OF FITNESS FOR A PARTICULAR PURPOSE, ARE LIMITED TO FIVE YEARS OR THE SHORTEST PERIOD ALLOWED BY LAW. Some states and provinces do not allow limitations on the duration of implied warranties of merchantability or fitness, so this limitation may not apply to you. This warranty gives you specific legal rights, and you also may have other rights that vary from state to state or province to province. |
|
DISCLAIMER OF REPRESENTATIONS OUTSIDE OF WARRANTY KitchenAid makes no representations about the quality, durability, or need for service or repair of this major appliance other than the representations contained in this warranty. If you want a longer or more comprehensive warranty than the limited warranty that comes with this major appliance, you should ask KitchenAid or your retailer about buying an extended warranty. |
|
LIMITATION OF REMEDIES: EXCLUSION OF INCIDENTAL AND CONSEQUENTIAL DAMAGES YOUR SOLE AND EXCLUSIVE REMEDY UNDER THIS LIMITEDWARRANTY SHALL BE PRODUCT REPAIR AS PROVIDED HEREIN. KITCHENAID SHALL NOT BE LIABLE FOR INCIDENTAL OR CONSEQUENTIAL DAMAGES. Some states and provinces do not allow the exclusion or limitation of incidental or consequential damages, so these limitations and exclusions may not apply to you. This warranty gives you specific legal rights, and you also may have other rights that vary from state to state or province to province. |
![]()
References
Stand Mixer Attachments and Accessories | KitchenAid
Kitchen Appliance Manuals | KitchenAid Icons/facebook Icons/facebook Icons/facebook Icon/Success Avatar/Fill – Default
Kitchen Appliances to Bring Culinary Inspiration to Life | KitchenAid
Premium Major & Small Kitchen Appliances | KitchenAid
Home – Product Help | KitchenAid
[xyz-ips snippet=”download-snippet”]