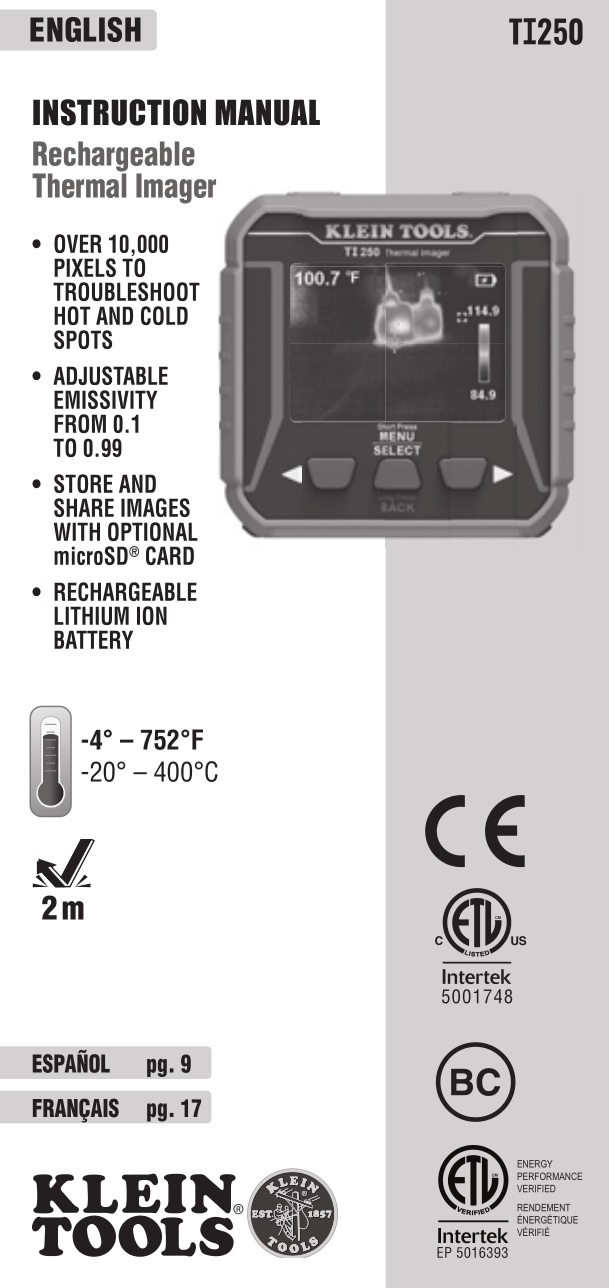
KLEIN TOOLS Rechargeable Thermal
Imager Instruction Manual
GENERAL SPECIFICATIONS
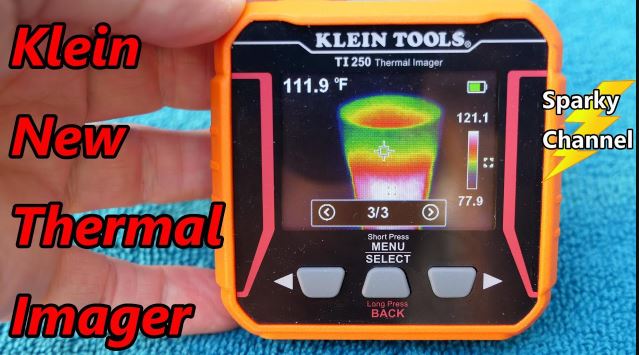
The Klein Tools TI250 is an easy-to-use, USB rechargeable Thermal Imager; power on to view unseen hot and cold spots for instant troubleshooting. The meter provides high and low temperature points, crosshairs to pinpoint specific temperatures, and options for temperature alarms. The addition of a microSD® card (optional) allows the meter to capture and store images for reporting.
- Environment: Indoor or outdoor
- Operating Altitude: 6562 ft. (2000 m)
- Relative Humidity: <90% non-condensing
- Operating Temp: 32° to 113°F (0° to 45°C)
- Storage Temp: -4° to 140°F (-20° to 60°C)
- Sensor: VOX Micro bolometer
- Sensor Resolution: 10800 pixels
- Field of View (FOV): 50 degrees
- Frame Rate: 9 Hz
- Sensitivity: <60 mk
- Temperature Range: -4° to 752° F (-20° to 400° C)
- Temperature Resolution: 0.1°F/0.1°C
- Temperature Accuracy: +/-3° or 3% (whichever greater)NOTE: Not calibrated below 14°F (-10°C)
- Temperature Display: High, Low, and Center point
- Temperature Settings: °F / C°
- Emissivity: 0.1 to 0.99 adjustable (0.95 default)
- Display Type: 2.4″ TFT LCD
- Color Pallets: Ironbow; Rainbow, Gray
- Image Format: BMP
- Image storage: microSD® Card (not included)
- Dimensions: 3.18″ × 3.11″ × 1.02″ (80.8 × 79 × 25.7 mm)
- Weight: 5.5 oz. (156 grams)
- Power: Lithium polymer battery 3.7V / 1350mAh (USB rechargeable)
- Required Charger Current / Voltage: 800mA / 5V DC
- Charging Current / Time: 450mA / 3 hours
- Auto Power Off: User-selectable for 5, 10, or 30 minutes
- Pollution degree: 2
- Drop Protection: 6.6 ft. (2m)
- Standards: Conforms to UL STD. 61010-1Certified to CSA STD. C22.2 No. 61010-1
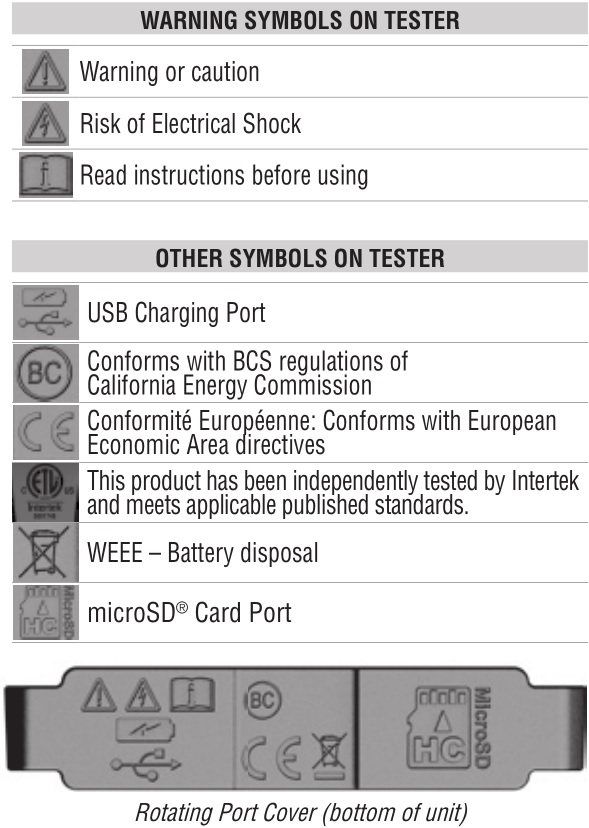
![]() 5001748
5001748
Specifications subject to change.
microSD® is a registered trademerk of SD-3C, LLC.
WARNINGS
To ensure safe operation and service of the tester, follow these instructions.
- Read the instructions to ensure safe operation.
- Always wear approved eye protection.
- Do not use if the charging port or housing is damaged in any way.
- Keep the rubber cover over the charging port when not in use.
- Do not expose to direct sunlight, open flame, heat sources, equipment that produces heat, or extremes of environmental temperature. If battery’s internal temperature gets too high, the unit will shut down until the internal temperature is lowered.
- There are no user-serviceable parts inside. DO NOT open or attempt to repair.
NOTE: Do not point the camera at the sun or any other strong energy source. This can affect the accuracy of the camera or cause damage to the sensor.
FEATURE DETAILS
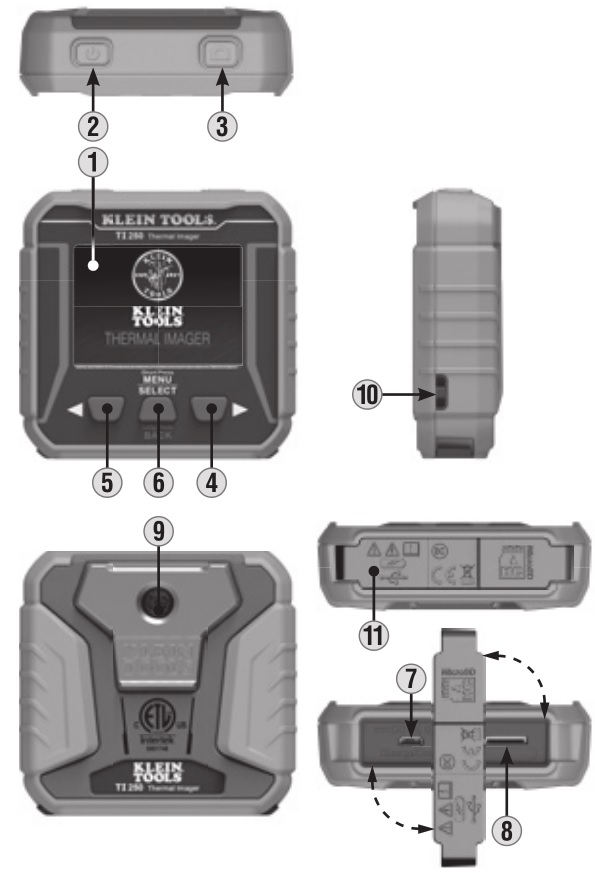
IMAGER
1. Thermal LCD Screen2. Power On / Off Button3. Camera Shutter Button4. Right-Scroll Button5. Left-Scroll Button6. Menu / Select / Back Button7. Micro-USB Charging Port8. microSD® Card Slot9. Camera10. Lanyard Hole11. Rotating Port Cover
LCD
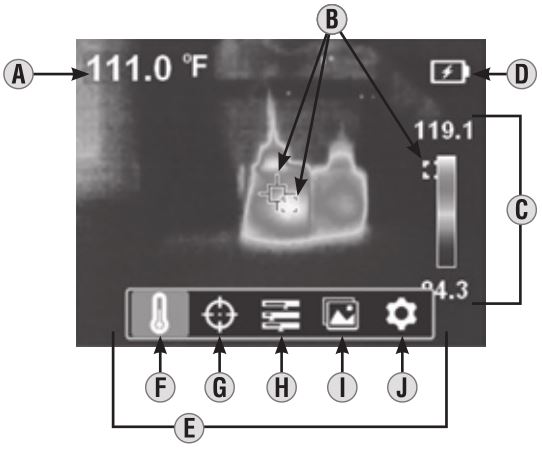
A. Center Target TemperatureB. Live Center, High and Low PointsC. Live Temperature ScaleD. Battery Level IndicatorE. Menu FunctionsF. Temperature Units (°F / °C)G. Center Target Temperature and High / Low Temperature On / OffH. Color Pallets (Ironbow, Rainbow, Gray)I. Gallery (requires microSD® card, not included)J. Settings
OPERATING INSTRUCTIONS
NOTE: Fully charge before first use.
CHARGING
Connect included Micro-USB cable to Micro-USB Charging Port 7 , and plug the other end into a computer, USB AC adapter, or other USB power supply (not included). When charging, the battery indicator will flash for 10 seconds. Normal charging time is about 3 hours.
Press Power On / Off Button 2 for 2 seconds to power the unit on or off. When powering on, the start-up screen will display for 10 seconds as the imager runs self-calibration. When complete, the display will show the thermal image with the center target temperature and high / low temperatures.
Press Menu / Select Button 6 to access Menu functions and setup. Use the Right 4 and Left 5 Scroll Buttons to make selections.
Press the Menu / Select Button 6 and the Menu and Setup functions (shown below) will appear on the LCD. Use the Right 4 and Left 5 Scroll Buttons to scroll through the functions. Press the Menu / Select Button 6 to open the function or make a selection. To exit the function, long press the Menu / Select Button 6 .
F Temperature Units: Selectable between °F and °C.
G Center Target Temperature and High / Low Temperature: Turns these icons on or off.
H Color Pallets: Selectable between Ironbow, Rainbow, and Gray.
I Gallery (requires microSD® card, not included): Scroll through and view captured photos.
J Settings:
- Temp Bar: Turns feature on or off.
- Time & Date: Sets time and date stamp for images.
- Emissivity: Adjustable from 0.1 to 0.99 (default is 0.95).
- Auto Power Off: Set to 5, 10, or 30 minutes.
- Brightness: User-selectable low, medum, or high.
- HI/LO Alert: Sets temperature alarms.
- Local Info: Provides information on firmware version, capacity, availability, code, and battery temperature.
- Default Settings Reset: Restores factory-default settings.
- Format SD: Formats microSD® card for use with TI250.
PHOTO CAPTURE
NOTE: microSD® card must be installed before powering on to use Photo Capture capabilities.
Press Camera Shutter Button 3 to take a photo.
Press the Right Scroll Button 4 to save the photo, or the Left Scroll Button 5 to discard photo.
PHOTO GALLERY
To view photos, press the Menu / Select Button 6 , then select Gallery I . Use the Right 4 and Left 5 Scroll Buttons to scroll between photos.
When within the Photo Gallery, a second press of the Menu / Select Button 6 will open additional options:
- Use the Left Scroll Button 5 to highlight the information icon, then press the Menu / Select Button 6 to display information about the photo (date, time, temperatures, emissivity, etc.) Long press the Menu / Select Button 6 to exit.
- To delete a photo, select the Trash Can icon , then press the Right Scroll Button 4 to delete. Long press the Menu / Select Button 6 to exit.
BATTERY INDICATOR (D)
- Solid Green: Battery has more than 40% charge remaining
- Partial Yellow: Battery has less than 40% charge remaining
- Partial Red: Low battery, needs recharging · Blinks Red 10 Times: No Power, Immediate Shut DownNOTE: For information on a replacement battery for this product, contact Klein Tools Customer Service.
CLEANING
Be sure unit is turned off and wipe with a clean, dry lint-free cloth. Do not use abrasive cleaners or solvents.
STORAGE
Do not expose to high temperatures or humidity. After a period of storage in extreme conditions exceeding the limits mentioned in the General Specifications section, allow unit to return to normal operating conditions before using.
WARRANTY
DISPOSAL / RECYCLE
 Do not place equipment and its accessories in the trash. Items must be properly disposed of in accordance with local regulations. Please see www.epa.gov or www.erecycle.org for additional information.
CUSTOMER SERVICE
KLEIN TOOLS, INC.450 Bond Street Lincolnshire, IL 600691-877-775-5346[email protected]www.kleintools.com
References
[xyz-ips snippet=”download-snippet”]