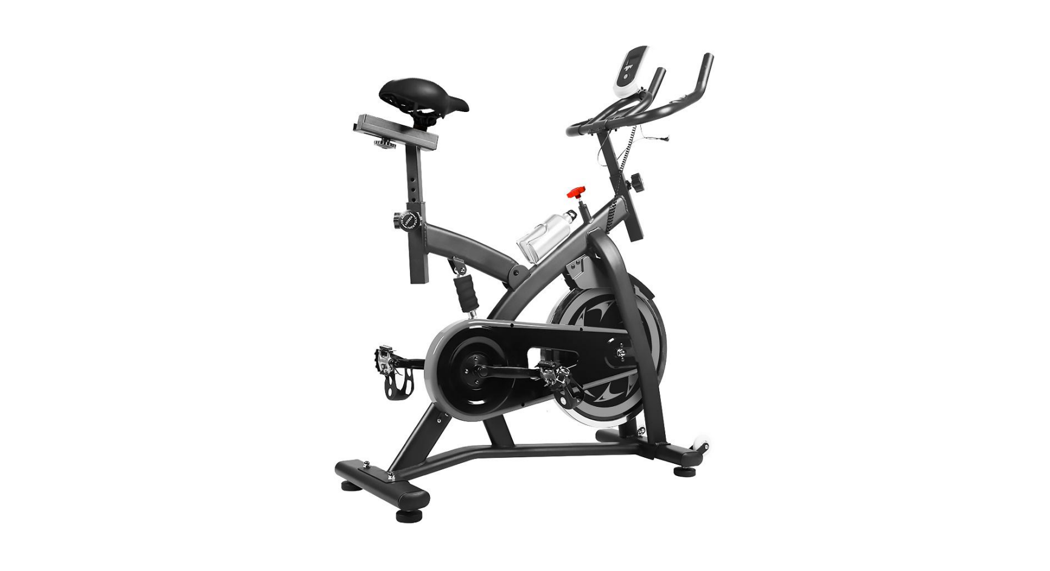
Cardio Spin BikeKey Code:42956945
WARNING! READ ALL INSTRUCTIONS CAREFULLY BEFORE USING THIS PRODUCT. FAILURE OF INCORRECT OR EXCESSIVE TRAINING MAY CAUSE INJURIES TO HEALTH.
Safety Instruction and Precaution
Please read this manual carefully before using this spin bike and make sure that you read the information supplied before commencing any exercise with this product.
- Please consult a doctor before commencing any exercise with this equipment and if you develop any uncommon symptoms during use you should seek further medical advice.
- The spin bike must be placed on a hard, flat surface, cover the floor with carpet to prevent damage to the ground. For safety, please keep the distance between the spin bike and other obstacles not less than 0.6 meters.
- Please be sure that you operate the spin bike according to the instruction manual, periodically checking all the parts for signs of wear or damage. If you find defective parts or there is noise whilst assembling the bike or during use, stop operating and make sure all operating parts are fixed prior to continued use.
- Please check the equipment carefully before use, and check the bike strictly according to installation principle every 1-2 months after use to keep the equipment running normally.
- While using, please wear suitable clothes and shoes for training to avoid anything getting caught in the bike.
- Make sure the sensor is fixed on the bracket nearby the flywheel before exercise.
- Check all parts first before doing exercises. Tighten all the bolts and nuts on a regular basis and never operate the spin bike if it is not functioning properly.
- Always climb on the spin bike from the lowest position of the foot pedal and the flywheel is not in motion.
- Keep children away from the equipment unless they are supervised by an adult.
- Create a realistic training plan before use, and use this product according to the instructions of use in this instruction manual.
- The resistance of the product can be adjusted, please select the appropriate resistance.
- Don’t touch the flywheel during use to avoid any injury.
- Attempt to use the two wheels which are located on the front base to move the spin bike around if necessary.
- The product is in compliance with EN 20957-1 & 10 CLASS HC as well as AS 4092. Suitable for domestic home use only.
Product Diagram
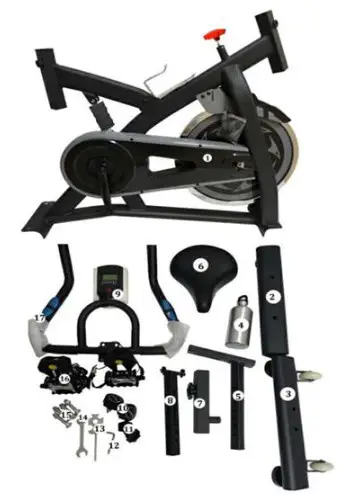
Parts List
| No. | Description | QTY | No. | Description | QTY |
| 1 | Main Frame | 1 | 10 | Ball pin | 2 |
| 2 | Rear Stabilizer | 1 | 11 | Screw knob | 2 |
| 3 | Front Stabilizer | 1 | 12 | Inner hex spanner | 1 |
| 4 | Bottle | 1 | 13 | Open spanner | 1 |
| 5 | Seat adjustable post | 1 | 14 | Wrench ( in spare ) | 1 |
| 6 | Saddle | 1 | 15 | Screw/Spacer/Cap nut(M8x35mm) | 4 |
| 7 | Seat post | 1 | 16 | Pedal(LIR) | 1 |
| 8 | Front adjustable post | 1 | 17 | Handlebar | 1 |
| 9 | Monitor | 1 |
Technical Parameters
| Overall size | 122x51x105cm | Product total surface area | 0.54m2 |
| Maximum user weight | 100kg | Product total weight | 27.9kg |
Assembly Instruction
1. Put M8x35mm bolt (Part 15) on front stabilizer(Part 3), fingers hold the bolt bottom, put the front stabilizer in the front hole at the base of mainframe (Part 1), add a spacer and M8 cap nut (Part 15) in the bolt, then tighten it with an open spanner(Part 13). Use the same way to install the rear stabilizer(Part 2)on the mainframe.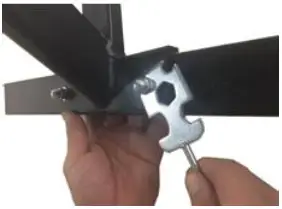
Note: the footpad on the front and rear stabilizer can be adjusted to keep the product stable on the floor after fully assembled.
2. Take out the pedal (Part 16), there is superscript “L”&“R” on the pedal, take out the “R” pedal and screw out the nut from the bolt, then screw the bolt into the nut of“R” crank on the mainframe. After tightening it in clockwise with an open spanner, screw the nut into the bolt again to ensure the pedal is assembled in the “R” crank firmly. Take out the pedal belt, buckle it up on the pedal as the picture shows. Take out the “L” pedal, use the same way to assemble it into the “L” crank, the bolt of the “L” pedal is screwed into the nut of the “L” crank should be in a counterclockwise direction.Note: “L”&“R” are marked on the crank as well. Please install the pedal accordingly, otherwise, it will damage the product. And please fasten the feet strap, or it will fall down after long usage.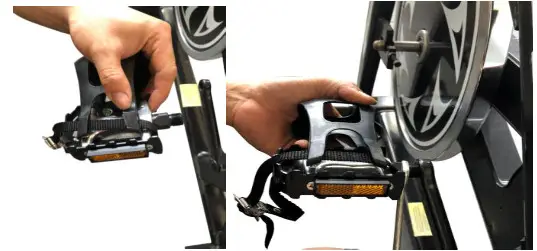
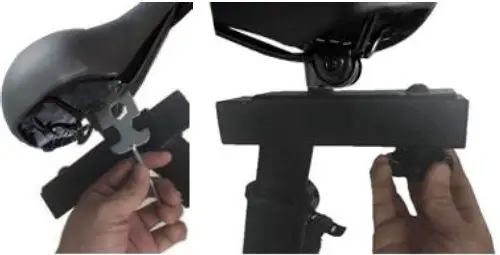
3. Take out the saddle (Part 6), connect seat post (Part 7) and seat adjustable post (Part 5) together by the plum-head bolt which screwed on the seat post, then adjust the angle of the saddle and assemble it into the seat post (Part 7) by tightening the nut on the saddle with an open spanner. Insert the post to the back tube of the mainframe, and adjust the saddle to the appropriate height, then fix the post to the tube of the mainframe with a ball pin (Part 10) and fasten it with a screw knob (Part 11).Note: The saddle can also be adjusted back and forward by the plum-head bolt.
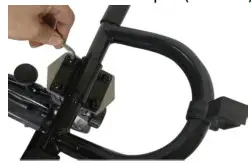
4. Take out handlebar (Part 17), connect handlebar with front adjustable post together (Part 8) with hardware M8x12mm (Assembled in the hole), and fasten by inner hex spanner (part 13). Insert the post to the front tube of the mainframe, and adjust the handlebar to the appropriate height, then fix the post to the tube of the mainframe with a ball pin (Part 10) and fasten it with a screw knob (Part 11).
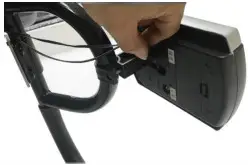
5. Take out the monitor, and slide it to the buckle on the handlebar, then connect the two cables together. Note: the cable from the handlebar should be connected to the one with PULSE of the monitor, and the cable from the flywheel should be connected with the one from the SENSOR of the monitor which is in the same color marked on cables.
6. The control knob and protective cover are pre-assembled in the equipment. Press the control knob can stop the flywheel quickly when in an emergency, please make sure they are fitted correctly (see below image).
|
Warning! Keep away from youngchildren. Injuries may occur if theSpin Bike is operated in their vicinitywithout properly fitted guards. |
Exercise Instruction
A successful exercise program consists of a warm-up, aerobic exercise, and a cool-down. Do the entire program at least two and preferably three times a week, resting for a day between workouts. After several months, you can increase your workout to four or five times per week. Warming up is an important part of your workout and should begin every session. It prepares your body for more strenuous exercise by heating up and stretching out your muscles, increasing your circulation and pulse rate, and delivering more oxygen to your muscles. At the end of your workout, repeat these exercises to reduce muscle soreness.
Monitor Instruction
1) Product specificationTIME……00:00–99:59 Minute: SecondSPD……0.0–99.9KM/HDST……0.00–99.99KMCAL……0.0–999.9KCALODO……0.0–999.9KMPULSE……40–240BPM

2) Key Functions for MODE/RESET
- MODE: Press the red button to select SCAN or lock onto a particular function.
- RESET: Press the red button for 3 seconds to remove all the records except ODO.3) Function Instruction
- SCAN: Automatic display the following functions in order, TIME-SPD-DST-CAL-ODO-PULSE.
- TIME: Press the MODE key until the pointer advances to TIME. The monitor will display the total working time from starting the exercise.
- SPEED: Press the MODE key until the pointer advances to SPD. The monitor will display the current speed.
- DISTANCE: Press the Mode key until the pointer advances to DST. The monitor will display the total trip distance from starting exercise.
- CALORIES: Press the Mode key until the pointer advances to CAL. The monitor will display total consumption calories from starting exercise.
- ODOMETER: Press the Mode key until the pointer advances to ODO. The monitor will display the total accumulated distance.
- PULSES: Press the Mode key until the pointer advances to PULSES. The monitor will display the current heart rate in beats per minute.
- AUTO ON/OFF: The system turns on when any key is pressed or when it receives any signal input from the speed sensor. The system turns off automatically when the sensor has no signal input or no any key is pressed for approximately 4 minutes.
4) Battery
- This monitor uses 2pcs AAA batteries (not included).
- If the display monitor shows improper data on the screen its advised to reinstall the batteries to have a better result.
- All data will be removed when batteries are changed.
Use Instruction
The spin bike is easy to operate. The steps outlined will enable the user to work the bike properly.Stand next to your bike seat and analyze its height. The top of the seat should be right at your hip bone.Unscrew the screw knob (Part 11) and ball pin (Part 10) below the seat and slide the seat up or down to adjust it to your hip height. Insert and screw the ball pin to fix the height, then tighten the knob again to secure it.Adjust the distance between the seat and the handlebars to match the length of your forearm. Place at the very front of the seat. Your fingertips should barely touch the front of the bike. Unscrew the knob at the back of the seat to slide it forward or back and tighten to secure it. Climb onto the seat of the bike and place your feet on the pedals in the stirrups. Reach down and pull the thin belt to tighten the stirrup around each foot. Set the handlebars at a height that is comfortable for you. You should reach forward, bending at the lower back and hips to reach them, but they should not be so far away that you are straining or feel the tension in your lower back. Unscrew the screw knob (Part 11) and ball pin (Part 10) on the tube of the mainframe, adjust up or down to a suitable height. Insert and screw the ball pin to fix the height, then tighten the knob again to secure it.WARNING! The handlebar and seat adjustment shall not exceed the mark indicating the minimum insertion depth on the post. Failure to follow the instruction may cause damage to the spin bike or lead to a personal injury. If any of the adjustment devices are left projecting, they could interfere with your movement.
The control knob is in front of you. Rotating the knob in a clockwise direction will increase the resistance of the spin bike, rotating the knob in an anticlockwise direction will decrease the resistance of the spin bike. Press down the knob when it is in an emergency, the spin bike will stop quickly. Keep your feet flat as you pedal. Keep your back flat and not hunched as you reach forward to the handlebars. Rotate the control knob to the right to increase resistance. When doing standing flats or climbs resist the urge to support all of your weight with the handlebars. Use them for balance and stability only. Put a bottle of water on the bracket, the cycling can be an intense class and you will not hop off your bike for water. To show the pulse on the monitor, you should touch both palms on the handrail sensor of the handlebars.WARNING! Please keep a safety distance of 0.6m around the equipment during exercising.WARNING! Heart rate monitoring systems may be inaccurate. Over-exercising may result in serious injury or death. If you feel faint stop exercising immediately.
 report this ad
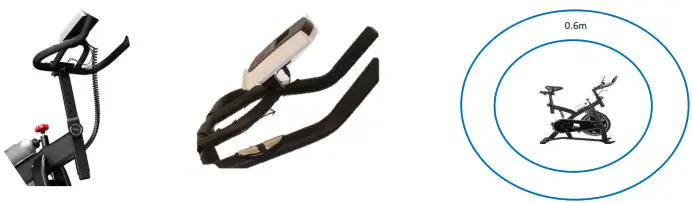
Care and maintenance
- Proper use of the equipment will increase the life span of the bike.
- Screws will get loose after exercise please check and tighten the screws properly every week so as to avoid any possible damage to the equipment or personal injury.
- Regularly check the safety device of brake ball and the guard of protective cover every week and make sure the functions are kept in good integrity.
- Special pay attention to the belt which is the most susceptible to wear.
- Wipe clean with a damp cloth. Do not use abrasive material or solvents.
- Failure to perform routine maintenance could result in personal injury and/or equipment damage.
- Keep far away from children when not in use.
- Always store in a dry and ventilated area.©KMART AUSTRALIA LIMITED KMART AUSTRALIA – 690 SPRINGVALE ROAD, MULGRAVE, VIC 3170 AUSTRALIA. KMART NEW ZEALAND – REGIONAL OFFICE C/O KMART PAPATOETOE STORE. HUNTERS PLAZA, GREAT SOUTH ROAD, PAPATOETOE, AUCKLAND, NEW ZEALAND.Made in China
[xyz-ips snippet=”download-snippet”]