
Kmart 61 Key Teaching-Type Electronic Keyboard User Manual

I. Panel Control and External Ports
- Top Panel Control
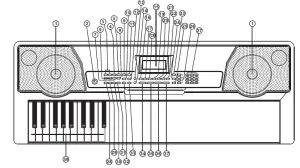
- Loudspeaker
- Power
- Previous / Next
- CD Play / Pause
- stop
- MP3 Volume Control
- Sequence/Random/ Single
- Sound Effect
- Sync
- Fill-in
- Timbre Selection
- Rhythm Selection
- Demo One
- DemoAII
- LCD Display
- Keyboard Percussion
- Recording
- Program
- Play
- Split
- Sustain
- Vibrato
- one Key
- Follow
- Ensemble
- Memory
- Numbers
- Single
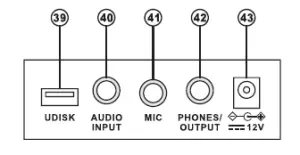
• Rear Panel Port
II. Preparations Before Playing
- Single ChordUse Power adaptor supplied. Connect the output end of the adapter to the power poert in the rear panel of the keyboard. Place other end in the power socket. (note the input voltage of the adapter shallA dedicated power adapter shall be used. Connect the output end of the adaptor to the power port on the rear panel of the keyboard , and then the other end to the power socket.(Note: the input voltage of the adaptor shall be compatible with the power supply voltage)
- •Audio output/ external headphone+ Audio output: Firstly , turn off the keyboard and the external audio devices, secondly, connect one end of the audio cable to the PHONES /OUTPUT port on the rear panel of thekeyboard , and then connect the other end to the audio input port of the audio devices.
- Headphone connection: When connecting a headphone to the PHONES /OUTPUT port on the rear panel of the keyboard , the loudspeaker will be disabled automatically . In this way,you can play the keyboard without disturbing others. * Note! When using the headphone, do not turn up and keep the volume to the maximumfor a long time, which may cause hearing loss.
- •Mic Input and Audio Input
- Mic input: Connect a microphone to the MIC port to start singing and playing.
- The Keyboard has the stereo input function. Sound signals from mobile phone, MP3 player, computer and other audio devices can be input into the keyboard system for playing Firstly, turn off the Keyboard , then , connect one end of audio cable to the output port of an audio device, and the other end to the AUD10 INPUT port on the rear panel of the Keyboard, finally, turn on the keyboard.
- Playing MP3 musicInsert a U disk into the UDISK port on the rear panel of the Keyboard for MP3 music playing Support 32G (max.)
- Press the [- …. 11111111 +] bottom to adjust the volume.
- Press [ !+II ] to go to the previous track, press [ ~] to go to the next track, [ ~I] play/pause a track, [ ■ ]stop playing track, [ C,t~I~ ] to cycle through the repeat modes forcontinuous, random, or single playback.
- Press [Effect] to adjust the effect among Common, Pop, Rock, Jazz and Classic . The keyboard is defaulted to be in common effect.
Ill. Basic Playing Method
When [Power ON/OFF] is pressed, LCD screen will turn on and show the current tone, tempo and other status. Then you may operate the Keyboard as required
- Master Volume AdjustmentPress [Master Vol +/-] to turn up or turn down the master volume. “VOLUME “and the current volume level will be shown on the display . Press [Master Vol +/-] simultaneously to reset to the default value. The master volume can also control the accompaniment volume.
- Accompaniment Volume AdjustmentPress [Aecom Vol +/- ] to turn up or turn down the master volume. “RC-VOLUME ” and the current volume level will show on the display. Press [Aecom Vol +/- ] simultaneously to reset to the default value.
- Timbre SelectionThe Keyboard provides 255 limbers, from “000” to “254”, for your selection. When turning on the keyboard , the limber selection function will be enabled automatically , and “TONE” and current tone number will show on the displays . When under other states, press [ Timbre Selection] to enable the Timbre selection function. The timbre is defaulted to be “000 “, and it can be adjusted by pressing the corresponding number buttons or pressing the”+” /”-“button.
- Playing PercussionThis Keyboard provides 61 kinds of keyboard percussions. Press [ Keyboard Percussion ] to convert the key to percussion key. Each key corresponds to one percussion instrument. Pressthis button again to disenable the keyboard percussion function.
- Playing Demonstration Songs50 demo songs have been stored in the Keyboard , from “000” to “049”, for your selection Press the [Demo one] button, the system is in the state of playing ,the present demo song repeatedly. For another one , press the button to stop the present song , and again to play the next one Press the [Demo all] button, the system is in the stage of playing all the demo songssuccessively. In the course of playing demo songs, the timbre of the songs can be changed.
IV. Auto Rhythm
• Rhythm selectionThis Keyboard provides 255 rhythms, from “000” to “254”, for your selection, and the rhythm is defaulted to be “000”. Press [ Rhythm Selection ] to enable the rhythm selection function.“RHYM ” and current rhythm number will show on the display. Then you can press the number buttons or the “+”/”-” buttons to select other rhythms.
- Rhythm Control
- Rhythm enabling♦ Press [start/stop] to start accompaniment rhythm♦ Press [Sync], “SYN” will show on the display and the four beat points will flash simultaneously, then play any key in the chord key zone (the 1st-19th key, fromleft), the accompaniment rhythm will be enable.
- InterludeAfter the accompaniment rhythm is activated , press [Fill-in] to have a temporary rhythm play during the accompaniment rhythm. If press and hold [Fill-in], the temporary rhythm will continuous.
- StophythmDuring the accompaniment rhythm , press [Start/Stop] the stop the accompaniment rhythm.
- MetronomeThe metronome contains four tempos, 1/4, 2/4, 3/4 and 4/4, espectively. Press the [Metronome] continuously to select the four tempos. Press the [Metronome] bottom again to stop the tempo.
- Tempo AdjustmentPress [Tempo+/ – ] to increase or decrease the rhythm speed. Press the two buttons simultaneously to reset to the default value.
V. Auto Bass Chord
- Single ChordUnder the state that the rhythm is enabled. Press [Single], and “SIN” will show on the display, and then you can play a single chord on the keys in the chord zone of the keyboard.
- Fingered ChordUnder the state that the rhythm is enabled. Press [Fingered], and “FIN” will show on the display, and then you can play a fingered chord on the keys in the chord zone of the keyboard.
- Chord OFFPress [Chord OFF] to disenable the single chord or the fingered chord function.
- Chord TimbreDuring single chord or fingered chord accompaniment, you can Press [Chord Timbre] to change the chord timbre and Press [Chord Timbre] again to resume the original timbre.
VI. Status Memory Function
With the status memory function, you can save the tone, rhythm, tempo and other parameters to be changed during playing, for fast shifting. This keyboard is equipped with 3 status memories, which can be flexible called at any time during playing.
Single Chord Fingering
- Storage of Status MemorySet the tone, rhythm, tempo and chord as required, and then press the [Status Memory] bottom and one of [Memory 1] to [Memory 3] to save the current status
- Calling of Status MemoryPress any one of [Memory 1] to [Memory 3] to call the setting parameters saved under thismemory to replace the current status. * No power failure protection is provided for the saved contents, and the saved contents will loss after the electronic keyboard is restarted after power cut.
VII. Effect Control
- Transposing FunctionWith the transposing function, you can play music of other tunes with C-tune fingering method. Press the [Transpose-] to decrease the tone by half-tone (minor second), and the tune in C-tune keyboard zone will change to B-tune. Press the [Transpose-] to increase the tone by half-tone (minor second), and the tune in C-tune keyboard zone will change to #C tune or bD tune. When pressing the [Transpose-] for twice, C-tune will shift to bB-tune, when pressing the [Transpose+] for five times, C-tune will shift to F-tune. Press [Transpose+] and [Transpose-] simultaneously to recover to C-tune “00”. Press [Transpose+] and [Transpose-] to adjust the level from “P-6″ to”P06”.
- Sustain FunctionPress [Sustain], “SUS” will show on the display , and the sustain effect will be activated. Press this button again to disenable the sustain effect.
- Vibrato Function Press [Vibrato], “VIB” will show on the display, and the vibrato effect will be activated . Press this button again to disenable the vibrato effect.
- Keyboard Splitting Function Press [SPLIT] to enable the keyboard splitting function, “SPLIT” will show on the display. 24 keys on the left of the keyboard will split with the1 emaining keyboard. While the left keyboard zone will increase by one octave and maintain the original tone, the right keyboard zone will decrease by one octave to maintain the same pitch with the left keyboard zone. The tone of the right keyboard zone can be set as needed so different tones can be played by the left and right keyboard zones at the same time. Press [SPLIT] again to disenable this function.
VIII. Recording and Rhythm Programming
- Top Panel ControlPress [REC] to enable the recording function, “REC” will show on the display. Under this mode all playing notes will be recorded. When the storage is full, “REC” will flash on the display, and recording will stop automatically.
- Press [PLAY] to playback the recorded notes, and “PLAY” will show on the display. On completion of playback, it will enter to the recording mode and “REC” will show on the display. You can record a new note, or you can press [PLAY] to playback the recorded note.
- Press [Start/Stop] or press [REC] again to disenable the recording function, and all recorded rhythm will be removed.
- Rhythm programmingPress [PROG] to enable the rhythm programming function, “PRG” will show on the display, and the keyboard percussion will be activated . Under this mode, you can create custom rhythms by playing the corresponding percussion key.
- 32 percussions can be recorded at maximum, after that “PRG” will flash on the display, and programming will stop automatically.
- Press [PLAY] to playback the programming rhythm. Press [PLAY] again to stop playback, “PRG” will show on the display and programming function will be enabled. You can re-program rhythms or you can press [PLAY] again to playback.
- Press [Start/Stop] or press [PROG] again to disenable the programming function, and all recorded rhythm will be removed.
IX. Three-step Intelligent Training
- Training I: One KeyPress [One Key] to enable the One Key training function, “LEARN”, “SONG” and the song number will show on the display, and then press”+”/”-” button to select the song to be learned Single Key training aims at duration learning, and there is no requirement for pitch or correctness. This mode allows mistakes when playing the keys, but the keyboards still plays correct notes.while the key zone in the display will also show the correct notes After one song is finished, repeat the currentnsong to be learned Press [Start/Stop] or press [One Key] to disenable the training function.
- Training II: Follow Press[Follow] to enable the follow function , “LEARN”, “SONG” and the song number will show on the display, and then press”+”/”-” button to select the song to be learned. With [Follow] function, you can learn by following the correctly playing notes. You can play according to the demonstration song, you can play correctly by following the guidance. You can also learn how to play by following the indicators in the key zone of the display. It will wait foryou to play the correct note before it moves to the next one * Note: Under this state, the Keyboard plays only the correct notes, and gives no response to the wrong notes. Press [Start/Stop] or press [Follow] to disenable the training function
- Training Ill EnsemblePress [Ensemble] to enable the Ensemble training function, “LEARN”, “SONG” and the song number will show on the display, and then press”+”/”-” button to select the song to be learnedThe Ensemble training aims at the correct and comprehensive learning of the song duration and notes. The keynote will be shielded for ensemble. you can perform by following the guidance of the lighted key. You need to play the correct note according to the correct duration of the song. If you fail to play within 3 seconds, the keyboard will automatically play the keynote, and the keyboard zone in the screen will display the correct note and tempo. After one song is finished, repeat the current song to be learned Press [Start/Stop] or press [Ensemble] to disenable the training function.
Appendix
Appendix
NOTICE
report this adPlease read over the NOTICE before use!
NOTICE
- Only use the adapter supplied to power the keyboard (manufacturer: SHENZHEN SHI GUANGKAIYUAN TECHNOLOGY LTD., model no. GKYZA0100120AU)
- The power adapter is removable. in the event of a fire always ensure the mains power supply is easily accessible to disconnect if required.
- The rating label is located on the bottom of the keyboard.
- Only qualified professionals should perform maintenance. In the event of abnormal performance during use, stop immediately, turn off and send keyboard for maintenance.
- When connecting the keyboard to other devices, ensure both the keyboard and the device to be connected are powered off before connection.
- Do not use excess volume for extended periods of time while performing, it may damage your hearing.
- Keep the keyboard away from heat sources.
- Keep away from liquid, dust, small particles, and other foreign matters that may enter the case of the keyboard. This may cause a short circuit.
- Remove the plug from power point before cleaning the keyboard, and always ensure your hands are dry to avoid electric shock.
- Use a soft, dry cloth to clean the keyboard. Paint, alcohol, or other chemical solvents should not be used for cleaning as this may damage the keyboard surface.
- Please remove from power source when not in use.
Read More About This Manual & Download PDF:
[xyz-ips snippet=”download-snippet”]