![]() KMOUK Soundbar KM-HSB001 User GuideP1-P19
KMOUK Soundbar KM-HSB001 User GuideP1-P19

Important Safety Instructions
- A strong impact may cause damage to the internal parts of the product. Use caution to avoid impact.
- This product contains small parts which may be a choking hazard. Not suitable for children under age 3.
- This product contains magnetic material. Consult your physician on whether this might affect your implantable medical device.
- To reduce the risk of fire or electrical shock, do not expose this product to rain, liquids, or moisture.
- Do not expose this product to dripping or splashing and do not place objects filled with liquids, such as vases, on or near the product.
- Keep the product away from fire and heat sources. Do not place naked flame sources, such as lighted candles, on or near the product.
- Do not make unauthorized alterations to this product. Only use the mounting hardware supplied with this product.
- Do not mount on surfaces that are not sturdy, or that have hazards concealed behind them, such as electrical wiring or plumbing. If you are not sure about installing the bracket, contact a qualified professional installer.
- Do not place or install the bracket or product near any heat sources, such as fireplaces, radiators, heat registers, or other apparatus that produce heat.
- Do not use chemicals or detergents to clean the product. Clean only with a dry cloth.
Unpacking
Carefully unpack the carton and confirm the following parts are included:
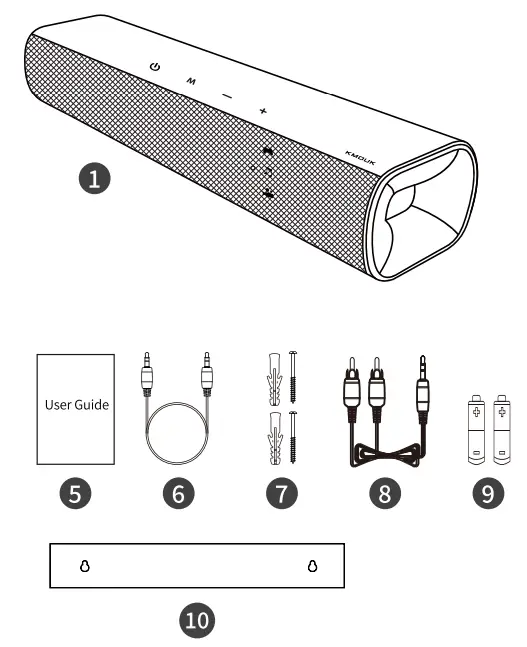
Package Contents
- KMOUK Soundbar
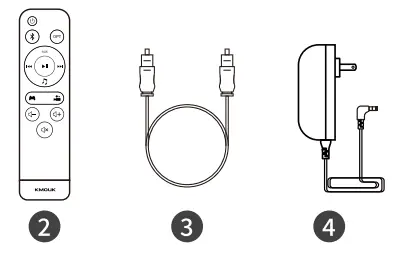
- Remote Control
- Optical Cable
- DC Adapter
- User Guide
- 5mm Audio Cable
- Wall Mount Screws (2)
- RCA to 3.5mm Audio Cable
- AM Battery (2)
- Wall-mounted Paper Guide
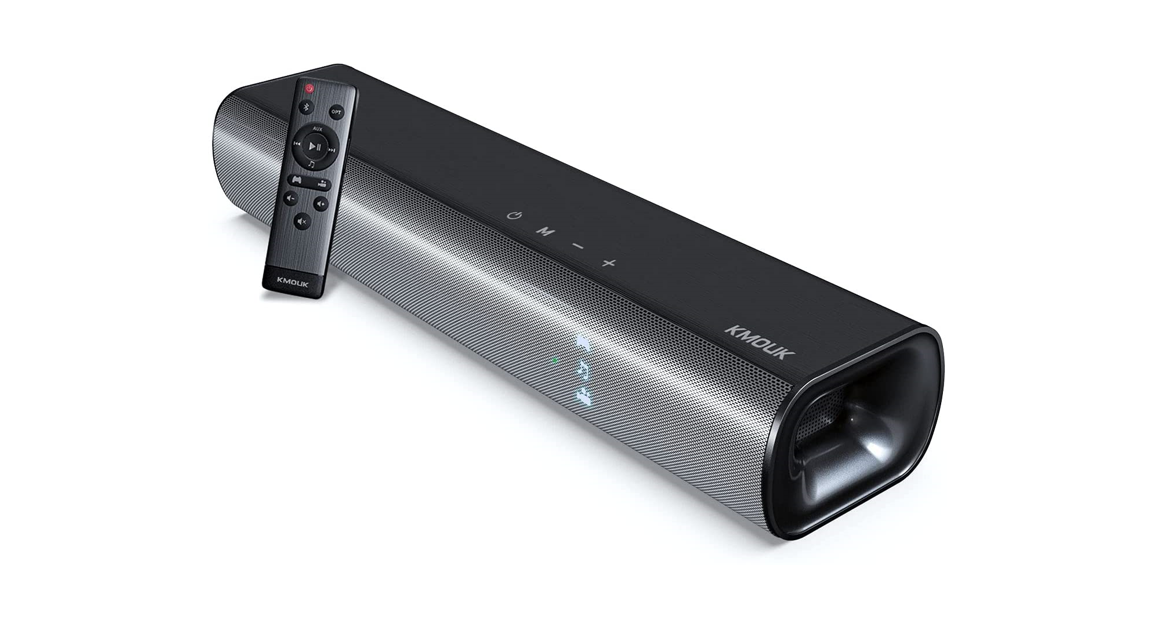
Product Overview
Front Panel

Top Panel
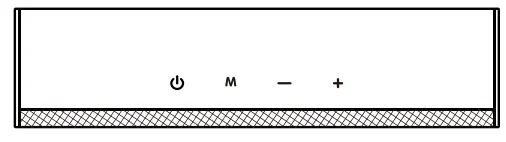
![]() Power ButtonThe soundbar will automatically power on when plugged in. Press and hold for 1.5 seconds to power off. M SourceM ButtonPress twice to adjust the audio input.
Power ButtonThe soundbar will automatically power on when plugged in. Press and hold for 1.5 seconds to power off. M SourceM ButtonPress twice to adjust the audio input.
Top Panel
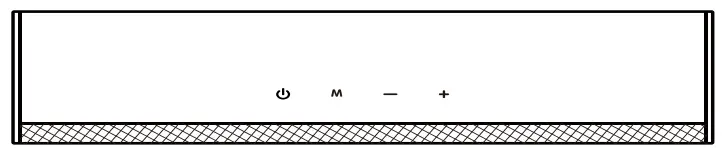 – Volume DownPress once briefly to decrease the volume by one stop, and the indicator light flashes accordingly once. At minimum volume, the indicator light flashes 3 times in rapid succession.+ Volume UpPress once briefly to increase the volume by one stop, and the indicator light flashes accordingly once. At maximum volume, the indicator light flashes 3 times in rapid succession.
Back Panel
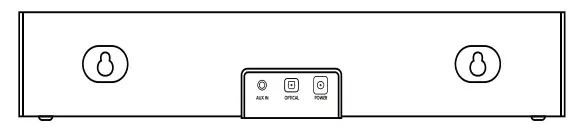
![]() Power JackOptical InputAUX InputHanging Holes
Power JackOptical InputAUX InputHanging Holes
Bottom Panel
 Silicone Feet
Attention:The film on the silicone pad must be removed at first use. Otherwise, it will affect the stability of the soundbar. Also, noise will be generated when playing music.
Remote Control
 |
|
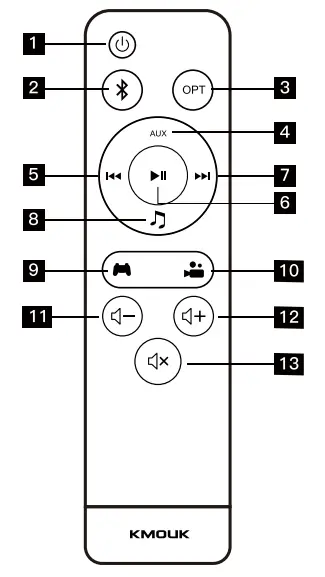
Remote Functions
| Icon | Button | Description |
| Power Button | Power on | |
| Bluetooth Mode | Input Audio Setting | |
| Optical Input | ||
| AUX Input | ||
| Previous Track | Media Playback | |
| Play / Pause | ||
| Next Track | ||
| Music Mode | Sound Mode Setting | |
| Game Mode | ||
| TV / Movie Mode | ||
| Volume – | Volume down | |
| Volume + | Volume up | |
| Mute | Turn off the Music |
Attention:
- The previous song / next song/play/pause function can only be used in the Bluetooth connection. It cannot be used in optical and AUX input.
- The LED light will turn off automatically after 1 minute.
Setup Soundbar
Connect the SoundbarBefore using the product, you need to make sure that the product is properly connected to the power supply.Step1: Plug one end of the power cord into the power connector on the back of the KMOUK Soundbar.
 Step2: Plug the other end of the power cord into the DC (mains) outlet.
Power On / Off
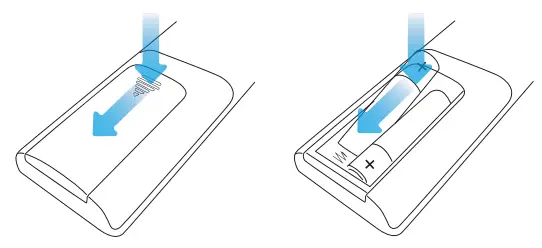
Step1: Inserting batteries before using the remote control(AAA batteries x 2).
Step2: Click the power button on the remote control or top. When you hear the tone [Hi KMOUK], the product enters the power-on state. When the power button is clicked for about 1.5 seconds in the power-on state, a [Goodbye KMOUK] tone will be heard to indicate that the power is off.
Bluetooth Connection
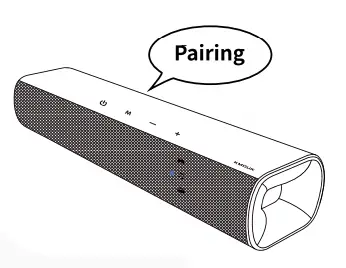
Step1: After connecting the power, double-click the Bluetooth button on the remote control. When you hear the tone [Pairing], enter Bluetooth pairing mode.
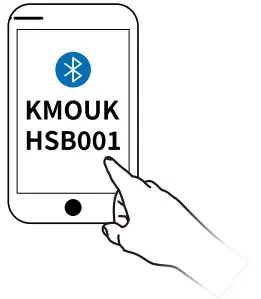
Step2: On your Bluetooth device, turn on the Bluetooth feature. The Bluetooth feature is usually found in settings.
Step3: Select the device with the name [KMOUK HSB001] from the device list. When the pairing is successful, a [Connected] tone will be heard.
Attention:
- On first use, the soundbar will automatically enter Bluetooth pairing mode after the power is connected.
- In Bluetooth mode, the soundbar will automatically connect to the most recently matched device.
- If you want to connect a new device, please disconnect from the connected device first, press the Bluetooth button on the remote control for 3 seconds(or the source button on the top panel). Then the soundbar will enter Bluetooth mode. After doing above the steps, the device still cannot be connected, please restore factory settings: Press the power button and source button at the same time, hold for 5 seconds.
Optical Connection
Step1: Remove the protective covers on both ends of the supplied optical cable.Step2: Connect the digital audio in the optical jack on the soundbar to the optical out jack of the device with a digital optical cable.Step3: Press the source button on the top panel of the soundbar or the optical button on the remote control to select the optical input.

Attention:when connecting with an optical cable, you need to set the N’s audio mode to external devices. At the same time, set the N’s audio decoding mode to PCM (Pulse-Code Modulation) mode. The TV menu may differ depending on the TV manufacturer.
AUX ConnectionStep1: Conned AUX IN(audio) on the soundbar unit to the audio out jack of the device using a 3 5mm audio cable.Step2: Press the source button on the top panel of the soundbar or the AUX button on the remote control to select the AUX input. Note3: Some devices require manual setting of the source output signal to KMOUK Soundbar.
 RCA ConnectionSteps1: Connect AUX IN (audio) on the soundbar unit to the audio out jack of the device using an RCA to 3.5mm audio cable.Step2: Insert the end of the RCA plugs into the TV.Step3: Press the source button on the top panel of the soundbar or the AUX button on the remote control to select the RCA input.

Sound Mode settingsThe KMOUK soundbar has 3 built-in equalizers. You can select your favorite sound effects by using the function keys on the remote control.We have three types of sound effects: [Music], [Games], and [Movies]. You can switch between the sound effects using the corresponding graphic buttons on the remote control. A corresponding indicator light is displayed on the front panel of the product.

OthersWhen the soundbar is turned on or turned off, it will not affect the source input, volume or mode settings.
Place the Soundbar
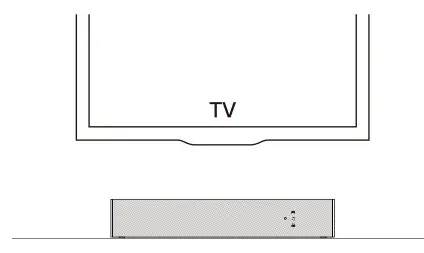
Put the Soundbar on the TableYou can use the product on the desk of your TV or computer.
Mount the Soundbar on the WallUse the wall-mounted paper guide to measure the position of the hook part on the back of the product and mark it on the wall. Screw the attachment into the wall with the help of a drill or a screwdriver and hang it on the wall.
Troubleshooting
Q: Why is the unit not turning on?A: Please check and make sure the power cord is correctly connected to a power source.
Q: Why is there no sound or the sound is distorted?A: Please go over the following:
- Check to make sure the audio cable is correctly connected.
- Turn up the volume slowly.
- Press the mute button to switch on the sound.
- Press the play/pause button.
- Set the audio output mode on your TV (if applicable) accordingly with the mode setting on the soundbar.
- Remove the clear label from the footbed.
Q: Why do the buttons on the soundbar not work?A: Switch off the Soundbar and unplug. Then connect it to a power supply and switch it on again.
Q: Why does the remote control not work?A: Please go over the following:
- Install 2 MA 1.5A batteries into the remote.
- Replace the current batteries with new ones.
- Make sure the remote control is pointed to the soundbar during use.
- Make sure the remote control is within operating range.
- Switch off the soundbar and disconnect the bower. Then reconnect and power it on, try again.
Specification
| Application | 30″ TV |
| Bluetooth | 5.0 |
| Aux in | Support |
| RCA in | Support |
| Optical Connection | Support |
| Remote Control | Support |
| Driver | 2 x 2.25″ + Passive Radiator |
| Wall-mounting | Support |
| Output Power | 12.5W X 2=25W |
| Peak Power | 50W |
| Dimension | W16.14 x D3.94 x H2.76 Inch |
Compliance
Warning: Changes or modifications to this unit not expressly approved by the party responsible for compliance could void the user’s authority to operate the equipment.Attention: This equipment has been tested and found to comply with the limits for a Class B digital device, pursuant to Part 15 of the FCC Rules. These limits are designed to provide reasonable protection against harmful interference in a residential installation. This equipment generates, uses and can radiate radio frequency energy and, if not installed and used in accordance with the instructions, may cause harmful interference to radio communications.However, there is no guarantee that interference will not occur in a particular installation. If this equipment does cause harmful interference to radio or television reception, which can be determined by turning the equipment off and on, the user is encouraged to try to correct the interference by one or more of the following measures:
- Reorient or relocate the receiving antenna.
- Increase the separation between the equipment and receiver.
- Connect the equipment into an outlet on a circuit different from that to which the receiver is
- Consult the dealer or an experienced radio/TV technician for help.
FCC Compliance: This device complies with part 15 of the FCC Rules. Operation is subject to the following two conditions: (1) this device may not cause harmful interference, and (2) this device must accept any interference received, including interference that may cause undesired operation.
RF Exposure Statement: To maintain compliance with FCC’s RF exposure guidelines, This equipment should be installed and operated with a minimum distance between 20cm of the radiator your body: Use only the supplied antenna.
Recycling: To prevent possible harm to the environment or human health from uncontrolled waste disposal, recycle it responsibly to promote the sustainable reuse of material resources. To return your used device, please use the return and collection systems or contact the retailer where the product was purchased. They can take this product for environmentally safe recycling.
Customer Service
12-month Warranty PeriodWithin one year from the date of purchase, we will repair or replace the product for free if it does not work properly due to the quality of the product itself.
Contact UsMail: [email protected]
ManufacturerName: Shenzhen YaFex E-Commerce Co., LtdAddress: 102, 23 Baili Road, Bantian Street, Longgang District, Shenzhen, China.
 report this ad
Made in China
[xyz-ips snippet=”download-snippet”]