
KODAK 10-Inch Touchscreen Digital Photo Frame
WiFi Enabled User Manual

Introduction
Thank you for purchasing the KODAK 10-Inch Touchscreen Digital Photo Frame from our company! We hope you will enjoy this method of displaying all your digital photos!
Before operating the unit, please read this manual thoroughly and retain it for future reference. This manual will help you use many of the exciting and useful features to make your KODAK 10-Inch Touchscreen Digital Photo Frame viewing more enjoyable.
This KODAK 10-Inch Touchscreen Digital Photo Frame lets you view digital photos directly from your smartphone & memory cards. You will be able to create a slideshow using multiple transition effects or display one photo at a time. No computer, digital camera, or cable connection is required.
Let’s start to keep your photos displaying every day in this KODAK 10-Inch Touchscreen Digital Photo Frame.
Important safety precautions
Always follow these basic safety precautions when using your KODAK 10-Inch Touchscreen Digital Photo Frame. This will reduce the risk of fire, electric shock, and injury.Warning: To reduce the risk of fire or shock hazards, do not expose this product to rain or moisture.Warning: To prevent risks of electric shock, do not remove the cover. There are no user-serviceable parts inside. Refer all servicing to qualified personnel.
- The KODAK 10-Inch Touchscreen Digital Photo Frame is for indoor use only.
- Unplug the KODAK 10-Inch Touchscreen Digital Photo Frame before performing care & maintenance.
- Do not block the ventilation holes on the back of the KODAK 10-Inch Touchscreen Digital Photo Frame at any time.
- Keep your KODAK 10-Inch Touchscreen Digital Photo Frame out of direct sunlight and away from heat sources.
- Protect the power cable. Route power cables so that they are not likely to be walked on or pinched by items placed on or against them. Pay particular attention to the point where the cable attaches to the KODAK 10-Inch Touchscreen Digital Photo Frame.
- Only use the supplied AC adapter with the KODAK 10-Inch Touchscreen Digital Photo Frame. Using any other adapter will invalidate your warranty.
- Unplug the power cable from the wall outlet when the unit is not in use.
Cleaning the screen.Treat the screen gently.To clean fingerprints or dust from the LCD screen, it is recommended to use a soft, non-abrasive cloth such as a camera lens cloth. If you use a commercial LCD cleaning kit, do not apply the cleaning fluid directly to the LCD screen. Clean the LCD screen with the cleaning solution applied to the cleaning cloth.
Cleaning the KODAK 10-Inch Touchscreen Digital Photo Frame Clean the outer surface of the KODAK 10-Inch Touchscreen Digital Photo Frame excluding the screen), with a soft cloth.
What’s in the box

1 x KODAK 10-Inch Touchscreen Digital Photo Frame1 x AC Adapter1 x Quick Start Guide
Features
– Easy & instant sharing photos from your smartphone to KODAK WIFI Photo Frame.– With a 10″ High-Definition (1280x 800Touchscreen, it is easy to view photos on the display.– Connects fast & easily to WIFI wireless network, small frame to see a big world.– Create your family members’ album, one WIFI Photo Frame is available for several accounts.– One app can be connected to several WiFi photos.– Auto slideshow photos in various modes with Clock, Calendar & background music.– Music playback with different kinds of playing modes.– Weather forecast & Clock, practical functions for daily life.– Light-sensor makes the panel automatically adjust its brightness to the ambient environment.– Night mode clock will be auto-activated at night after the lights are off, it’s more comfortable for your eyes to read the time in a dark environment.– Supports SD/SDHC/USB flash drive (up to 32G), easy to plug & play.– With auto-turn on/off timer, and several alarm setup options.– Built-in 4000mAh rechargeable li-battery– Free 10G cloud storage in 5 years
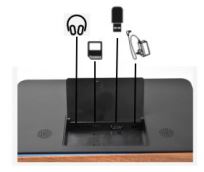
Control Illustration

Connecting Illustration
Getting Started
Step 1: Plug in the power adapter.Connect the adapter to the DC socket, the KODAK 10-Inch Touchscreen Digital Photo Frame will auto power up.
Step 2: Follow the instruction to setup KODAK WIFI Photo FrameAfter the KODAK 10-Inch Touchscreen Digital Photo Frame displays the boot animation, please follow the instructions to start the setup.
Select your language.  Select your local time zone.
 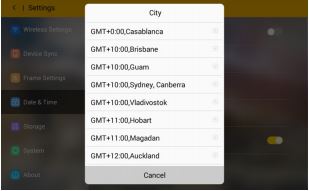 Select the available WIFI connection and enter the password.
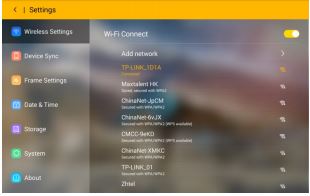
1. When the WIFI is connected, you can scan the QR code or search “Kodak WIFI Photo Frame” from the APP store or Google Play store to download the Phone Application.
2. Open the Phone Application to register a new account and connect this account with KODAK WIFI Photo Frame by scanning the device QR code or enter the device code. (You can find the device QR code from Setup>Device Sync.)
3. After successfully connecting your device, you can send photos from your mobile phone to the KODAK 10-Inch Touchscreen Digital Photo Frame. Start sharing your happiness with your family.
How to get the Phone Application
4. Download the application “KODAK Photo Frame” either scan the QR code on the frame or search from the APP store/Google Play.

Open the Application and start to sign up for a new account. If you have an account, please sign in directly.
 5. Scan the device QR code on the frame or enter the device code to connect the phone & the frame. After successfully connecting, you can send photos!
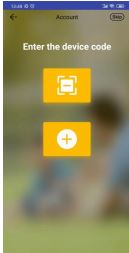
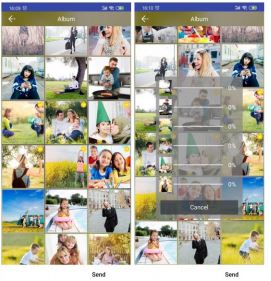
6. Press Album to choose to send photos from a local album or press Camera to take a new photo. If you want to connect another frame, press the icon on the top left. Also, you can check the sending history from the icon on the top right.
 7. You can send 6 photos at one time.
 8. If one phone is connected to several frames, you can send the same photos to those frames all at the same time.
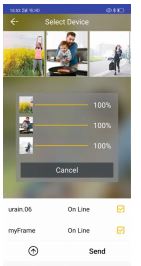 9. In the System Settings, you can access the options.
How to use the WIFI Photo Frame
The main menu is shown below, you can touch the icons on the panel to enter different functions.
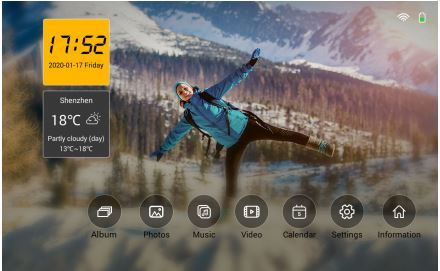
The menu consists of Album, Photos, Music, Video, Calendar, Settings, Information, Clock, and Weather.
Album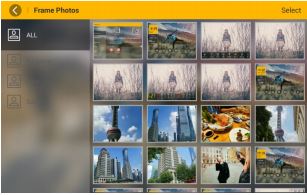 In the Album, you can find those photos sent from mobile devices or computers which are categorized by different accounts. This way, it’s easy for you to locate each family member’s photos.
Select & touch one category, you can review and start this album’s slideshow.
Photos
When you touch the Photo function, the slideshow begins automatically. Touch the panel during the slideshow, the Frame will pause and pop up a menu.Favorite – Highlight your favorite photos or set your favorite photos as wallpaper. Rotate – Adjust the photo to a suitable angle by tapping this icon.Scale – Select to display the photo in Original ratio or Auto-set full screen.Play/Pause – Play or pause the slideshow.Delete – Delete the current photo.Zoom – Zoom in the current photo.Setting – Set up the Calendar, Transition Effects, Slideshow Interval & Background Music.Info – Check the current photo information. Tapping the left arrow on the top left to exit the slideshow, and choose to display from different categories.
MusicTap the Music icon from the main menu to activate the music player, which supports playing music only from an SD card or USB Drive. Select the playlist from the left side and tap on the function icons on the bottom to switch play mode/previous song/pause/next song. Control volume by touching the soundbar on the right.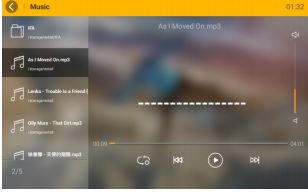 VideoTap the Video icon from the main menu to activate the video player, which supports playing video only from an SD card or USB Drive. Select the playlist from the left side and tap on the function icons on the bottom to switch video proportion/previous video/fast backward/pause/fast speed/next video. Control the volume by swiping up and down on the left side of the screen. Touch to get more functions like loop/audio/info Tapping the left arrow on the top left to exit video play and choose to display from different categories. Tapping the home icon on the right side of the arrow to back to the Main menu.
 CalendarTap the Calendar icon from the main menu to read Clock & Calendar. Taping on the right & left arrow on the top to switch months.
 ClockIn the Clock & Alarm function, you can adjust the time setting and set up different alarms.
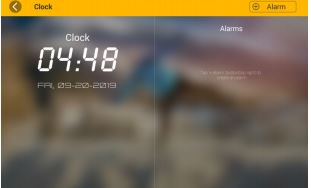 WeatherWhen you set up your location, the weather forecast will automatically show 3 days weather of in your local city. You can see different cities’ weather by adding other cities, tap on the city name to switch the city’s weather.
 SettingsIn the settings menu, you will have many options to customize the way your KODAK 10-Inch Touchscreen Digital Photo Frame operates.10. Wireless Settings
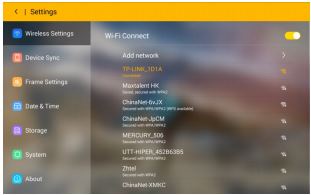 You can enable or disable the WIFI connection in this setting. When the WIFI is enabled, the frame will scan all available WIFI networks and show a list, choose your WIFI and enter the password to connect the Frame to the internet.If the WIFI is set to invisible, you can build the connection by selecting Other Network and entering the WIFI name & password.
11. Device Sync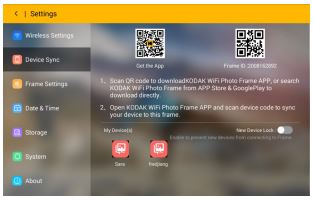
In this setting, you can find the Application download QR code and the Device QR code. Follow the instructions to sync your phone with the WIFI Photo Frame. You can manage the accounts connected to this frame.
12. Frame Settings
– Language: There are several different language options.– Sound: adjust the system volume, turn on/off the System Alert Sound and Touch Sound.– Display: adjust the brightness of the display.– Screensaver: turn on/off the screensaver and adjust the relative settings.
3. Date & Time Adjust the date & time setting for the frame.
4. Storage You can find the frame internal memory storage information here, as well as an SD card & USB drive if available. The cloud storage & service condition are available to check from here.
5. System You can update the system online or restore the system to default settings. Once you restore to factory default settings, all the data & settings will be cleared. 6. About
This option displays system information of the frame.
Specifications
Panel Size — 10″ 16:10 LCD (1280×800)Memory — 8GWIFI — 802.11 b/g/nMedia Slots — SD SDHC/ USB Drive Max 32GPhoto Formats — JPG /JPEGMusic Formats — MP3Video Formats — AVI,MP4,DGVIAdapter Power Input — AC110-240 ~ 50/60HZAdapter Power Output — DC 5V 2APower Consumption — ≅ 10W
For more information, please visit: www.maxtdigital.com/kodakframes All information contained in this document is subject to change without notice
References
[xyz-ips snippet=”download-snippet”]