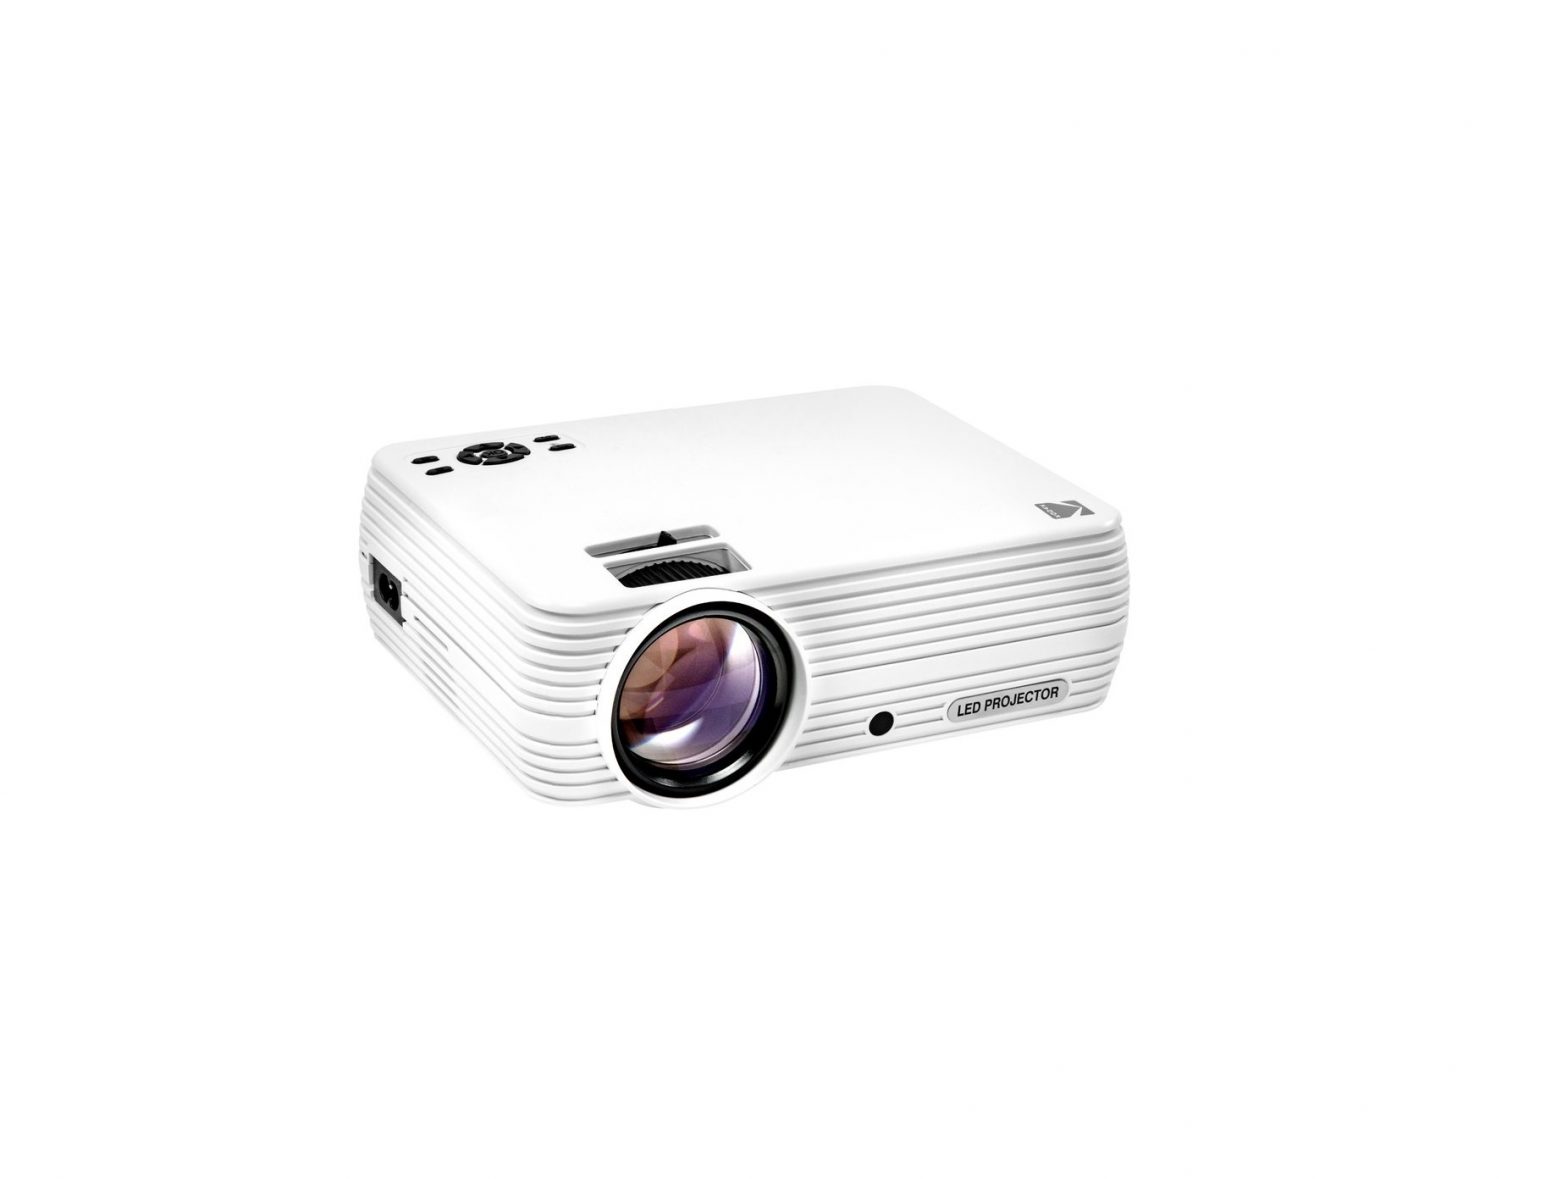
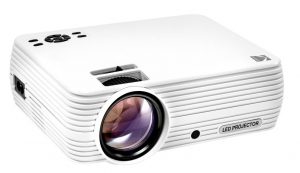
KODAK Home Projector
INTRODUCTION
Thank you for purchasing the KODAK FLIK X4 HOME PROJECTOR. This User Guide is intended to provide you with guidelines to ensure that operation of this product is safe and does not pose risk to the user. Any use that does not conform to the guidelines described in this User Guide may void the limited warranty.
Please read all directions before using the product and retain this guide for reference. This product is intended for household use only. It is not intended for commercial use.
This product is covered by a limited one-year warranty. Coverage is subject to limits and exclusions. See warranty for details.
SPECIFICATIONS
| Rated Input: | 100 V – 220 V |
| Native Resolution: | 800 x 480p |
BOX CONTENTS
- KODAK FLIK X4 HOME PROJECTOR
- Remote Control
- User Guide
- Tabletop Tripod
- Carrying Case
- Charging Cable
SAFETY PRECAUTIONS
- Do not attempt to disassemble this device for any reason.
- Do not store the projector in areas where it will be exposed to high temperatures, humidity, or direct sunlight. Exposure to any or all of these could permanently damage the projector.
- Never handle the projector with damp or wet hands. This could damage the projector or create the risk of electric shock.
- Keep the projector out of the reach of children.
- Never point the projector at someone else’s face or look directly into the projector light. The light is bright and could cause damage.
- Do not use products such as alcohol, gasoline, diluent, or any other organic solvent when cleaning or attempting to clean this product.
- Do not use this device in an environment where it will be exposed to heavy dust or humidity/moisture.
- Never drop or shake the projector, as this could cause it to malfunction or permanently damage the inside parts.
- Do not use the projector while bathing or in a shower.
- Do not place or store the projector where it can fall or be pulled into a tub or sink.
- Do not place, drop, or submerge the projector in water or any other liquid.
- If the projector somehow falls into water despite you taking all of the above precautions, please do not reach into the water to retrieve it. Unplug it immediately and then retrieve it.
- Take care that objects do not fall and liquids are not spilled onto the projector.
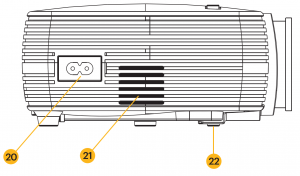
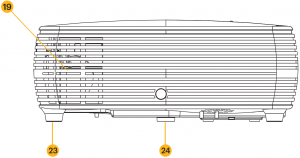
PRODUCT OVERVIEW
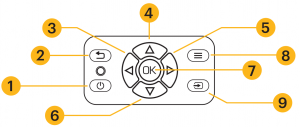
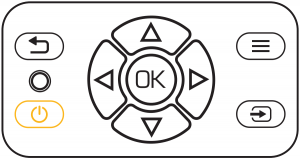
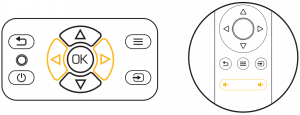
- Power
- Back
- Left
- Up
- Right
- Down
- OK
- Settings
- Input Source
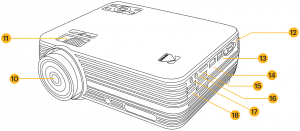
- Lens
- Focus Wheel
- VGA Input
- USB Input
- HDMI Input
- SD Card Input
- AV Input
- Audio Out Jack (3.5 mm)
- Air Outlet
- Air Intake
- Power Input
- Speaker
- Adjustable Foot
- Stationary Foot
- Tripod Dock
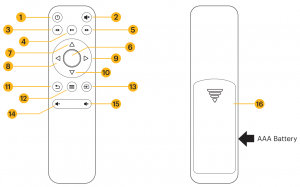
REMOTE CONTROL OVERVIEW
- Power
- Mute
- Rewind
- Play/Pause
- Fast Forward
- OK
- Up
- Left
- Right
- Down
- Back
- Settings
- Input Source
- Volume –
- Volume +
- Two (2) AAA Batteries
USING THE AUDIO OUT JACK
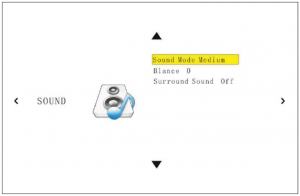
While the projector does include two (2) built-in speakers for regular use, you can also connect either headphones or a portable speaker to the 3.5 mm Audio Out Jack as shown in the image below. To adjust the volume or sound settings, navigate to the Settings menu from the home screen and press OK to open the Settings Page. (You can also hit the Settings button on top of the projector to jump straight to this page.) Use the right or left arrows to navigate to the Sounds Page, where you can adjust the treble/bass or choose from three (3) presets for varying types of audio files. You can also use the remote to raise and lower the volume.
POWERING THE PROJECTOR ON/OFF
To turn the projector on or off, press the power button on top of the projector.
USING DIFFERENT MEDIA SOURCES
You can use this projector with:
- VGA Input
- USB Input
- HDMI® Input
- SD™ Card Input
- AV Input

To switch between source types, tap the Sources button on top of the projector and use the arrows to highlight the source you want to use.
MAIN PAGE:
- The Main Page is your start page for all operations with your projector.
- When unit is powered on, the Main Page will load automatically.
- To return to the Main Page at any time, press the Back button until the Main Page loads.
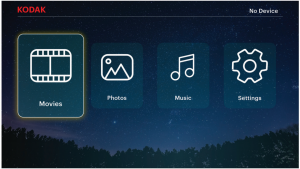
Movies ![]() : Navigate to this icon and press the OK button to select. This will access the Movies page, where your video files will be available for playback.Photos
: Navigate to this icon and press the OK button to select. This will access the Movies page, where your video files will be available for playback.Photos ![]() : Navigate to this icon and press the OK button to select. This will access the Photos page, where your photo files will be available for playback.Music
: Navigate to this icon and press the OK button to select. This will access the Photos page, where your photo files will be available for playback.Music ![]() : Navigate to this icon and press the OK button to select. This will access the Music page, where your music files will be available for playback.Settings
: Navigate to this icon and press the OK button to select. This will access the Music page, where your music files will be available for playback.Settings ![]() : Navigate to this icon and press the OK button to select. This will access the Settings page, where you can adjust the settings for your projector, such as Contrast and Brightness.
: Navigate to this icon and press the OK button to select. This will access the Settings page, where you can adjust the settings for your projector, such as Contrast and Brightness.
MOVIES PAGE
Your video files will be displayed. Navigate to the file you wish to open, and press the OK button to begin playback. During playback, navigate to the Control Bar at the bottom of the screen and press the OK button to select your desired option.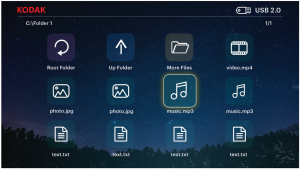
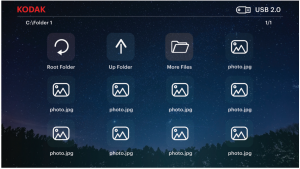
PHOTOS PAGE
Your photo files will be displayed. Navigate to the file you wish to open, and press the OK button to open the desired file. During playback, navigate to the Control Bar at the bottom of the screen and press the OK button to select your desired option.
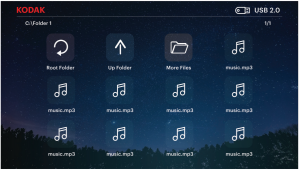
MUSIC PAGE
Your music files will be displayed. Navigate to the file you wish to open, and press the OK button to begin playback. During playback, navigate to the Control Bar at the bottom of the screen and press the OK button to select your desired option.
SETTINGS PAGE
From the settings page, you can navigate to other menus using the arrows on top of the projector or on the remote. Adjust the date/time, display size, picture mode, volume and sound settings, and more from these menus.
Access the menu by pressing the Input Source button. The menu will appear in the top right corner of the screen. Use the Up and Down buttons to navigate through the options and ensure the projector is receiving the signal from your desired source. Once you’ve navigated to your choice, press the OK button to confirm your selection.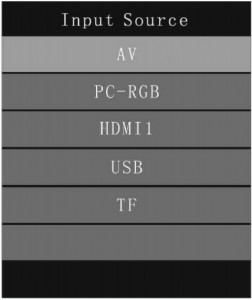
ADJUSTING FOCUS
If the image on the screen appears fuzzy or unfocused when you turn the projector on, use the focus wheel on the top to correct the image. Move the wheel left or right until the image appears sharp and clear. The dial behind the focus wheel allows you to adjust the viewing angle of the screen.
NOTE: For best performance, the projector must be located a minimum distance of 3.5 feet (1 meter) from the screen. If a specific image or video remains fuzzy after adjusting the focus wheel, try pressing the back button until you return to the Main Page. If the Main Page graphics appear clear and the image is still fuzzy, the problem may be the image or video quality.
ADJUSTING VOLUME
To adjust the device volume during playback, use the < and > buttons on the top of the projector or the volume buttons on the remote control.
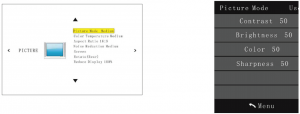
ADJUSTING PICTURE SETTINGS
From the Main Page, navigate to Settings and press the OK button to select. Once you are on the Settings Page, select the top option, “Picture Mode” and use the arrows to navigate through the preset options. The final option “User” allows you to personally customize the brightness and other picture settings.
SETTING THE SCREEN ORIENTATION
From the Main Page, navigate to Settings and press the OK button to select. Once you are on the Settings Page, select the option that says “Rotate” and press the OK button to cycle through the various options until the screen matches your projector orientation.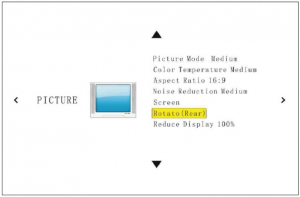
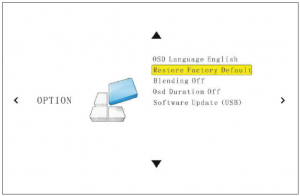
RESETTING THE PROJECTOR
From the Main Page, navigate to Settings and press the OK button to select. Once you’ve loaded the Settings Page, use the left arrow on top of the projector to open the Options Menu. From here you can adjust the software language, install firmware updates, and reset the projector.
To reset the projector, use the down arrows to highlight the second option, “Restore Factory Defaults” and press the OK button. The projector will give you a second popup window to confirm that you really want to restore the default settings, and you’ll need to select YES to proceed.
CONNECTING EXTERNAL DEVICES
A. USB Drives and SD Cards
To access photos, videos, or music stored on any USB drive or memory card, simply insert the removable storage device into the corresponding port on the side. The projector will read the files directly from the drive. You can access them from the Main Page by selecting the Music, Photos, or Movies options on the home screen. However, you’ll need to make sure you have correctly selected the input source from the source menu first: USB drives are denoted as USB, and SD™ cards are denoted as TF.
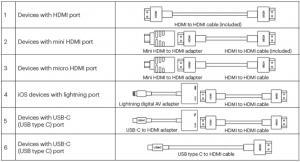
B. HDMI®/VGA Compatible Devices
If you’re using a VGA compatible device, connect the cable to the port on the side and gently screw the pins down to hold the connection in place. You should then be able to access your photos, videos, or music.
If you’re using an HDMI compatible device, such as a laptop, personal computer, smartphone, tablet, or video game console, connect an HDMI cable from the device to your projector to access photos, videos, or music.
For some devices, you will require an HDMI-to-HDMI cable and/or adapters, which you will need to purchase separately. To make things a little easier, we’ve compiled this table of devices and adapters for your convenience.
CUSTOMER SERVICE
Should you experience any problems with your product, please contact us before returning the item to the place of purchase. We’re here to help!
U.S. Support: [email protected]844-516-1539International Support: [email protected]844-516-1540
WARRANTY
LIMITED WARRANTY TO ORIGINAL CONSUMER
This KODAK FLIK X4 Projector (“Product”), including any accessories included in the original packaging,as supplied and distributed new by an authorized retailer is warranted by C&A Marketing, Inc.(the “Company”) to the original consumer purchaser only, against certain defects in material andworkmanship (“Warranty”) as follows:To receive Warranty service, the original consumer purchaser must contact the Company or itsauthorized service provider for problem determination and service procedures. Proof of purchasein the form of a bill of sale or receipted invoice, evidencing that the Product is within the applicableWarranty period(s), MUST be presented to the Company or its authorized service provider in order toobtain the requested service.Service options, parts availability, and response times may vary and may change at any time. Inaccordance with applicable law, the Company may require that you furnish additional documentsand/or comply with registration requirements before receiving warranty service. Please contact ourcustomer service for details on obtaining warranty service:USA: , 844-516-1539International: , +1-844-516-1540Shipping expenses to the Company’s Return Facility are not covered by this warranty, and must be paid by the consumer. The consumer likewise bears all risk of loss or further damage to the Product until delivery to said facility.
EXCLUSIONS AND LIMITATIONS The Company warrants the Product against defects in materials and workmanship under normal use for a period of ONE (1) YEAR from the date of retail purchase by the original end-user purchaser (“Warranty Period”). If a hardware defect arises and a valid claim is received within the Warranty Period, the Company, at its sole option and to the extent permitted by law, will either (1) repair the Product defect at no charge, using new or refurbished replacement parts, (2) exchange the Product with a Product that is new or which has been manufactured from new or serviceable used parts and is at least functionally equivalent to the original device, or (3) refund the purchase price of the Product.
A replacement Product or part thereof shall enjoy the warranty of the original Product for the remainder of the Warranty Period, or ninety (90) days from the date of replacement or repair, whichever provides you longer protection. When a Product or part is exchanged, any replacement item becomes your property, while the replaced item becomes the Company’s property. Refunds can only be given if the original Product is returned.
This Warranty does not apply to:
(a) Any non-KODAK FLIK X4 Projector product, hardware or software, even if packaged or sold with the Product;(b) Damage caused by use with non-KODAK FLIX X4 Projector products;(c) Damage caused by accident, abuse, misuse, flood, fire, earthquake, or other external causes;(d) Damage caused by operating the Product outside the permitted or intended uses described by the Company;(e) Damage caused by third party services;(f) A Product or part that has been modified to alter functionality or capability without the written permission of the Company;(g) Consumable parts, such as batteries, fuses and bulbs;(h) Cosmetic damage; or(i) If any KODAK FLIK X4 Projector serial number has been removed or defaced.
This Warranty is valid only in the country where the consumer purchased the Product, and only applies to Products purchased and serviced in that country.
The Company does not warrant that the operation of the Product will be uninterrupted or error-free.The Company is not responsible for damage arising from your failure to follow instructions relating to its use.
NOTWITHSTANDING ANYTHING TO THE CONTRARY AND TO THE MAXIMUM EXTENT PERMITTED BY APPLICABLE LAW, THE COMPANY PROVIDES THE PRODUCT “AS IS” AND “AS-AVAILABLE” FOR YOUR CONVENIENCE AND THE COMPANY AND ITS LICENSORS AND SUPPLIERS EXPRESSLY DISCLAIM ALL WARRANTIES AND CONDITIONS, WHETHER EXPRESSED, IMPLIED, OR STATUTORY, INCLUDING THE WARRANTIES OF MERCHANTABILITY, FITNESS FOR A PARTICULAR PURPOSE, TITLE, QUIET ENJOYMENT, ACCURACY, AND NON-INFRINGEMENT OF THIRD PARTY RIGHTS. THE COMPANY DOES NOT GUARANTEE ANY SPECIFIC RESULTS FROM THE USE OF THE PRODUCT, OR THAT THE COMPANY WILL CONTINUE TO OFFER OR MAKE AVAILABLE THE PRODUCT FOR ANY PARTICULAR LENGTH OF TIME. THE COMPANY FURTHER DISCLAIMS ALL WARRANTIES AFTER THE EXPRESS WARRANTY PERIOD STATED ABOVE.
YOU USE THE PRODUCT AT YOUR OWN DISCRETION AND RISK. YOU WILL BE SOLELY RESPONSIBLE FOR (AND THE COMPANY DISCLAIMS) ANY AND ALL LOSS, LIABILITY, OR DAMAGES RESULTING FROM YOUR USE OF THE PRODUCT.
NO ADVICE OR INFORMATION, WHETHER ORAL OR WRITTEN, OBTAINED BY YOU FROM THE COMPANY OR THROUGH ITS AUTHORIZED SERVICE PROVIDERS SHALL CREATE ANY WARRANTY.
IN NO EVENT WILL THE COMPANY’S TOTAL CUMULATIVE LIABILITY ARISING FROM OR RELATED TO THE PRODUCT, WHETHER IN CONTRACT OR TORT OR OTHERWISE EXCEED THE FEES ACTUALLY PAID BY YOU TO THE COMPANY OR ANY OF ITS AUTHORIZED RESELLERS FOR THE PRODUCT AT ISSUE IN THE LAST YEAR FROM YOUR PURCHASE. THIS LIMITATION IS CUMULATIVE AND WILL NOT BE INCREASED BY THE EXISTENCE OF MORE THAN ONE INCIDENT OR CLAIM. THE COMPANY DISCLAIMS
ALL LIABILITY OF ANY KIND OF ITS LICENSORS AND SUPPLIERS. IN NO EVENT WILL THE COMPANY OR ITS LICENSORS, MANUFACTURERS AND SUPPLIERS BE LIABLE FOR ANY INCIDENTAL, DIRECT, INDIRECT, SPECIAL, PUNITIVE OR CONSEQUENTIAL 29 DAMAGES (SUCH AS, BUT NOT LIMITED TO, DAMAGES FOR LOSS OF PROFITS, BUSINESS, SAVINGS, DATA OR RECORDS) CAUSED BY THE USE, MISUSE OR INABILITY TO USE THE PRODUCT.
Nothing in these terms shall attempt to exclude liability that cannot be excluded under applicable law. Some countries, states or provinces do not allow the exclusion or limitation of incidental or consequential damages or allow limitations on warranties, so certain limitations or exclusions may not apply to you. This warranty gives you specific legal rights, and you may have other rights that vary from state to state or province to province. Contact your authorized retailer to determine if another warranty applies.
Kodak does NOT manufacture this Product or provide any Warranty or support.

References
[xyz-ips snippet=”download-snippet”]