![]() KODAK PIXPRO FZ53DIGITAL CAMERACR337080299-3Quick Start Guide
KODAK PIXPRO FZ53DIGITAL CAMERACR337080299-3Quick Start Guide
The Kodak trademark, logo, and trade dress are used under license from Eastman Kodak Company.

The Camera User Manual is available online at the website below:
 https://us.kodakpixpro.com/fz53/user-manual/

https://kodakpixpro.com/Europe/support/multi-lang-downloads.php
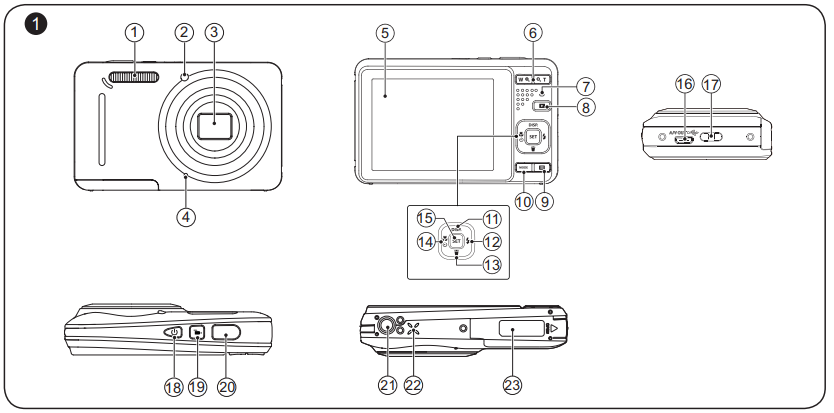
Camera Views
| 1 | Flash Lamp | 13 | Delete Button/Arrow Button (Down) |
| 2 | AF Assist Beam/Self-Timer Lamp | 14 | Macro Button/Self-Timer Button /Arrow Button (Left) |
| 3 | Lens | 15 | SET Button |
| 4 | Microphone | 16 | Micro USB Port |
| 5 | LCD | 17 | Strap Eyelet |
| 6 | Zoom Button | 18 | Power Button |
| 7 | Indicator Lamp | 19 | Fast Video Recording Button |
| 8 | Playback Button | 20 | Shutter Button |
| 9 | Menu Button | 21 | Tripod Socket |
| 10 | Mode Button | 22 | Speaker |
| 11 | Display Button/Arrow Button (Up) | 23 | Battery Cover |
| 12 | Flash Button/Arrow Button (Right) |
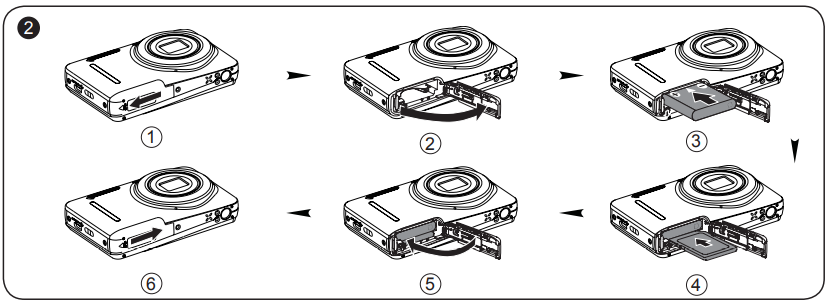
Inserting the Battery and the Memory Card
- Open the battery cover door as shown in steps ① and ②.
- Insert the battery into the battery compartment.
- Insert the memory card into the memory slot.
- Close the battery cover door as shown in steps ⑤ and ⑥.
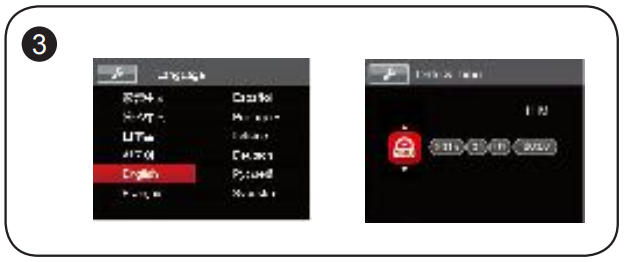
Setting the Language/Date/Time
- Press the power button to turn the camera on and the language menu will appear. Use the up/down/left/right buttons to select a language, and press the
 button to confirm the language.
 - Use the up/down/left/right buttons again to set the date and time, and press the button to confirm.
Taking a Picture
- Hold the camera securely.
- Use the zoom button to select Tele or Wide position to zoom in or out on your subject.
- Press the shutter button halfway to focus on the subject. When the focus frame turns green, press the shutter button completely down to take your photo.
This camera provides a convenient mode button that allows you to manually switch among different camera settings with ease. Available modes are listed below:
 |
Manual Mode | Movie Mode | |
| Auto Mode | Panorama Mode | ||
 |
Anti-shake | Scene Mode | |
 |
Portrait |
In shooting mode, press the  button to begin recording a video. After recording, press thebutton again to stop recording. The camera will store the video and return it to the shooting screen.
In each mode, press the![]() button to access the “Easy Menu”. Press the up/down buttons to move among options, then press the
button to access the “Easy Menu”. Press the up/down buttons to move among options, then press the![]() button to make a selection. Choosing the
button to make a selection. Choosing the![]() within this list will provide access to the “Full Menu”:
within this list will provide access to the “Full Menu”:
|
Shooting Mode |
|
 |
Shoot Settings |
 |
General Settings |
| Connection Settings | |
| File Settings |
|
Playback Mode |
|
| Playback Settings | |
|
General Settings |
| Connection Settings | |
| File Settings |
References
[xyz-ips snippet=”download-snippet”]