

KODAK PIXPRO ORBIT360 4K VR CAMERA

The Kodak trademark, logo and trade dress are used under license from Eastman Kodak Company.
Camera Views
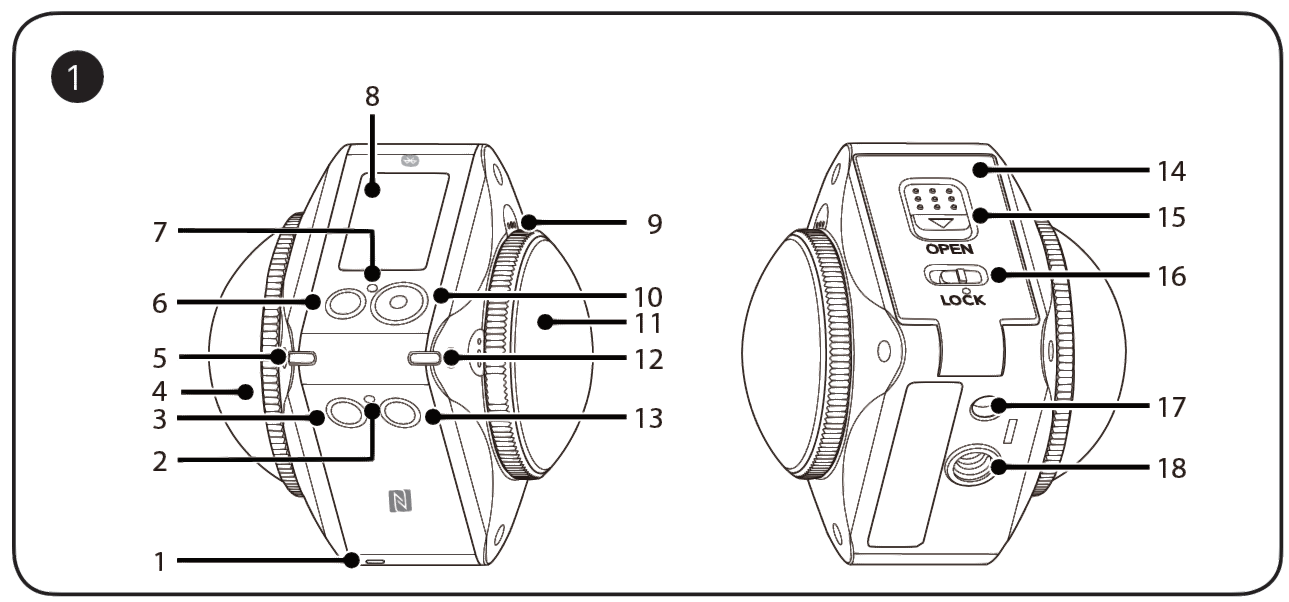
| 1 | Speaker | 10 | Video Record Button / Shooting Button / OK Button |
| 2 | Wi-Fi® Indicator | 11 | Lens A (155 Degrees) |
| 3 | Wi-Fi® Button / Direction Button (down) / Remote Control Pairing (press and hold) | 12 | Lens Status Indicator A |
| 4 | Lens B (235 Degrees) | 13 | Menu Button / Direction Button (up) / Mode Switching (press and hold) |
| 5 | Lens Status Indicator B | 14 | Battery Door Cover |
| 6 | Power Button | 15 | Battery Door Cover (open/close) |
| 7 | Status Indicator | 16 | Battery Door Cover Lock |
| 8 | LCD | 17 | Positioning Mount Receptor |
| 9 | Microphone | 18 | 1/4″ Screw Socket |
Insert the Battery and Memory Card
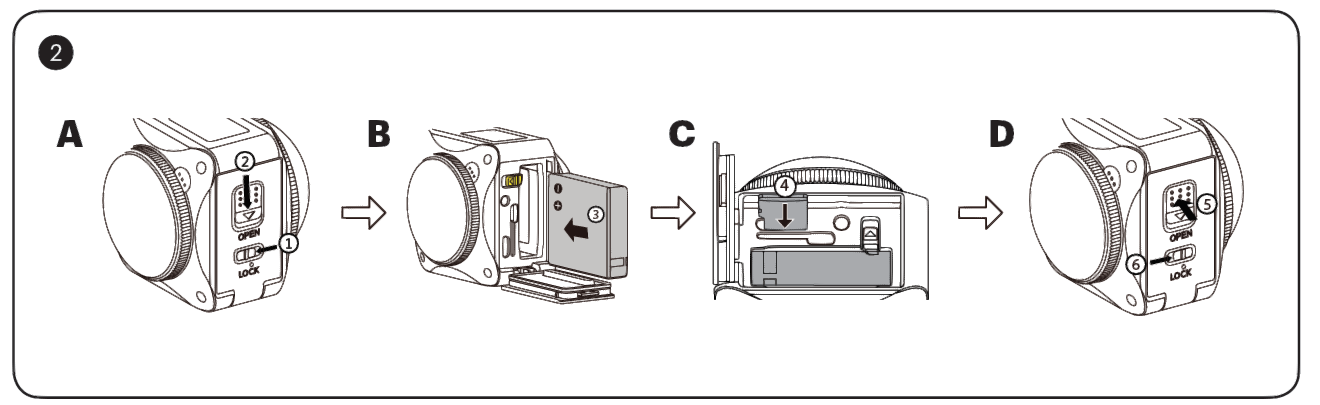
- A ① Set the battery door lock to the left then slide the open switch of the battery door downward ②.
- B Insert the Li-ion battery into the battery compartment as shown ③ (Note align the + and – symbols of the battery with the connectors in the battery compartment).
- C Next insert the memory card into the card slot ④, pushing the bottom end of the memory card fully into the slot with your fingertip.
- Please use a microSD / microSDHC / microSDXC memory card, which is Class 10 or higher and has a capacity of 8GB to 256GB.
- D Close the battery door which will “click” when tightly closed ⑤. Finally, slide the battery door lock to the right ⑥.
Setting the Date / Time

- Press the button to turn the camera on for the first time. The display will show the date and time setting interface, “Year/Month/Day/Hour: Minute : Second”.
- The field to be edited will be highlighted with a black background color, press the (up) or (down) buttons to adjust desired value. Press the button to confirm entry.
- After selecting the “Minute : Second” value, press the button to exit and enter the main interface.
Setting Camera Modes
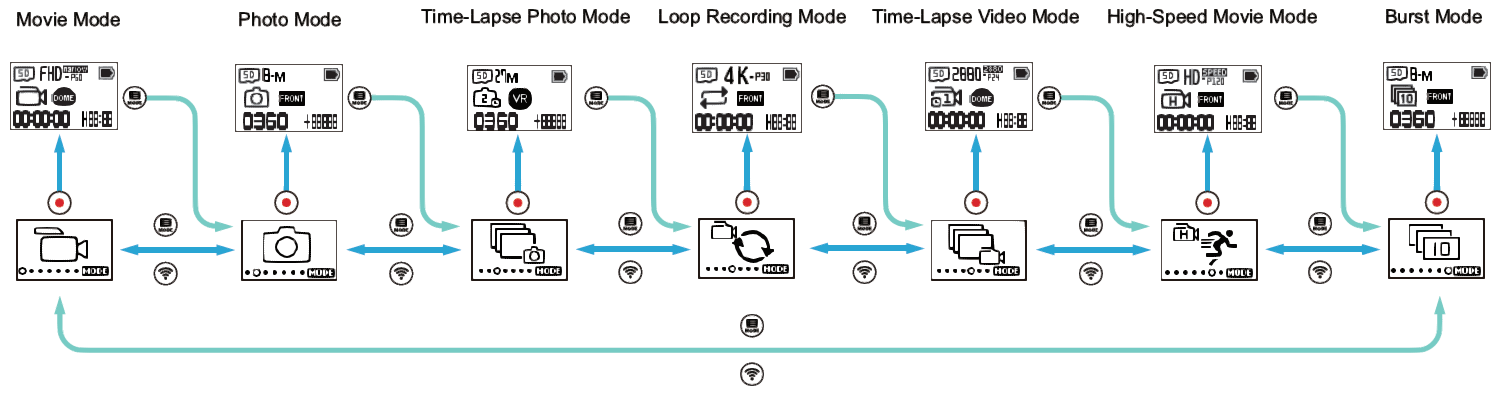
- In the Main Camera interface, press and hold the (up) button to enter the Mode selection menu.
- Press the (up) or (down) buttons to select any one mode; press the button to enter your selection of the current mode of choice.
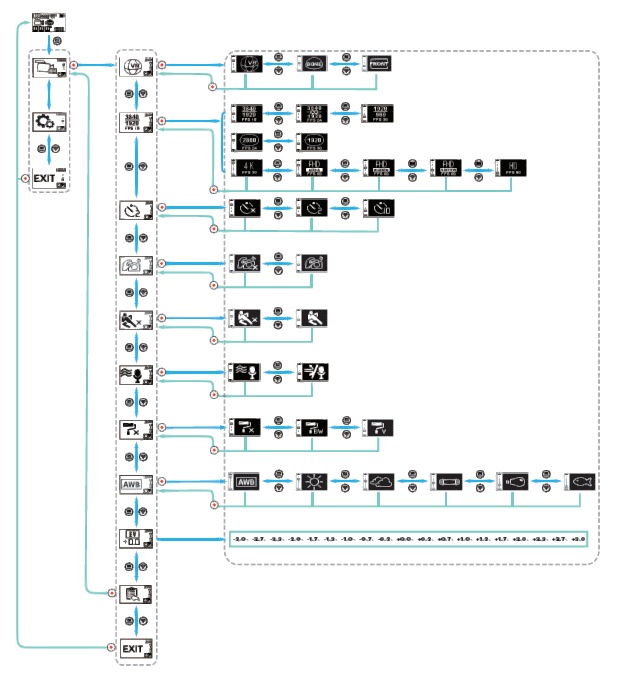
- In the Main Camera interface, press the (up) button to enter the menu selection setting for the current mode.
- Press the (up) or (down) button to select the item you want to set and press the button to enter and confirm the option selected.
- To select EXIT, , press the button to go back to the main menu interface.
- The movie setting and general setting functions are shown in diagram 5 of this Quick Start Guide to illustrate the menu interface.
Record 3600 Videos and Photographs
 report this ad
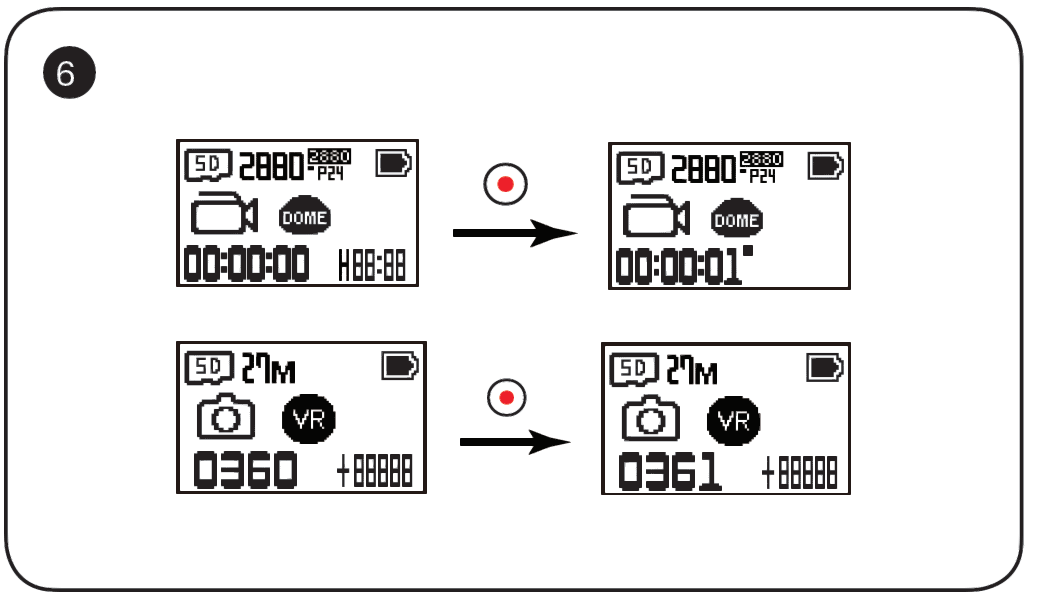
- In the recording mode, press the button to start recording and press the button again to stop recording.
- In the photo shooting mode, press the button to capture a photo.
Remote Control Options ANDR TM OID and iO TMS Systems
- Download the corresponding PIXPRO 360 VR Remote Viewer APP for your smart device
- For iOS devices, search and download the “PIXPRO 360 VR Remote Viewer” APP in the APP Store and install it following the instructions on your smart device.
- For ANDROID devices, search and download the “PIXPRO 360 VR Remote Viewer” APP in Google Play and install it following the instructions on your smart device.
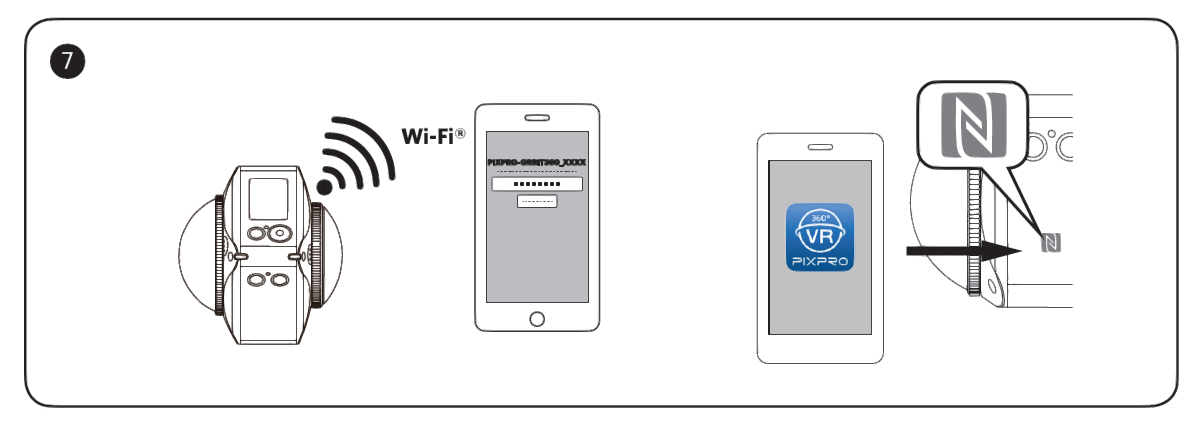
- Wi-Fi® Connection (ANDROID and iOS Systems)
- Check the SSID (PIXPRO-ORBIT360_XXXX) indicated on the label in the battery compartment of the camera and input the randomized and unique Wi-Fi® password displayed on the “Waiting Connect” screen. Press the (down) button to enter Wi-Fi® mode.
- Enter the Wi-Fi® mode on your smart device to automatically search nearby Wi-Fi® hotspots. Select the one with the same SSID (PIXPRO-ORBIT360_XXXX) and input the corresponding password. Upon verifying Wi-Fi® connection, you can tap the APP icon to start using the APP.
- Check the Eight-digit Wi-Fi® password on the camera’s “Waiting Connect” screen. The Wi-Fi®password for this ORBIT360 4K camera is unique and randomized to meet Federal and/or State compliance laws and standards.
- 3. NFC Connection (ANDROID Systems only)
- Enable the NFC mode on your smart device.
- Use your smart device to lightly touch the NFC printed letters on the camera; if the smart device has a prompt tone or vibration, it means the connection was successful.
- The APP will open automatically on your smart device.● The NFC feature will only be available when your smart device’s screen is unlocked.
Connect to a PC via Wi-Fi® (Mac and Windows Systems only)

- Download the “PIXPRO 360 VR Suite” (for MAC or Windows) installation packages from the official kodakpixpro.com website and install it on your computer by following the prompts and instructions.
- Camera: check the SSID (PIXPRO-ORBIT360_XXXX) indicated on the label in the battery compartment of the camera and input the randomized and unique Wi-Fi® password displayed on the “Waiting Connect” screen. In the camera’s main interface, press the (down) button to switch to Wi-Fi® mode.
- PC: to enable Wi-Fi® mode, your computer will automatically search any nearby Wi-Fi® hotspots. Select the one with the same SSID (PIXPRO-ORBIT360_XXXX) as the camera and input the password. Upon connecting, you can double-click the APP icon on your desktop to start using the APP.
Remote Control Pairing
- In the Main Camera interface, press and hold the (down) button for 2 seconds to enter the pairing mode.
- Press and hold the and buttons on the remote control simultaneously until pairing is successful.
More Helpful Information
- You can download user manuals and installation software and packages from the official KODAK PIXPRO website:(A) https://us.kodakpixpro.com/orbit360-4k/user-manual/(B) https://kodakpixpro.com/Europe/support/multi-lang-downloads.php
- For more information and available accessory packs, please visit our website:kodakpixpro.com
- We are committed to providing the best possible 3600 VR experience with our products, software and support. Please be sure to register your new camera for the latest updates to firmware, software and other important notices.Please refer to our official kodakpixpro.com website for more support documentation, detailed specifications and other helpful information.

References
[xyz-ips snippet=”download-snippet”]