KODAK PIXPRO WPZ2 Digital Camera User Guide
The Kodak trademark, logo and trade dress are used under license form Eastman Kodak Company.
IMPORTANT MICRO SD MEMORY CARD INFORMATION:
A microSD/micro SDHC memory card is NOT included with this camera packaging and needs to be purchased separately. This camera takes a microSD/micro SDHC memory card. We recommend using a name brand memory card that is Class 4 or higher and has a capacity of 4GB to 32GB. This camera is not compatible with standard SD cards.
The Camera User Manual and the “PIXPRO Remote Viewer” ![]() User Manual are available on the websites below:
User Manual are available on the websites below:

https://us.kodakpixpro.com/wpz2/user-manual/
https://kodakpixpro.com/Europe/support/multi-lang-downloads.php
Quick Start Guide
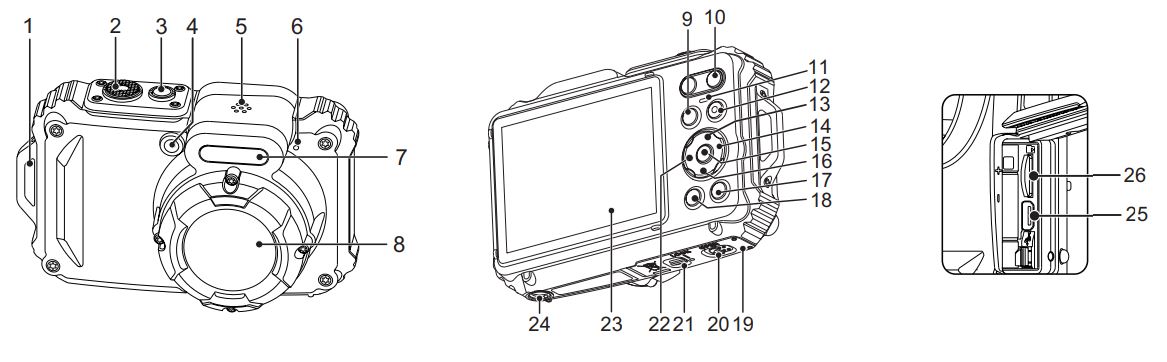
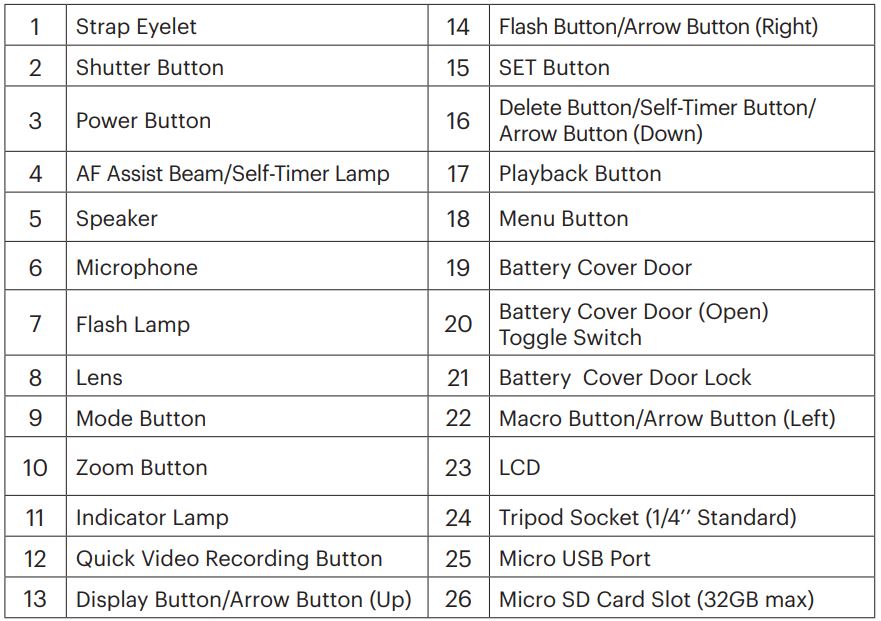
1 Camera Views
2 Inserting the Battery and Micro SD Memory Card (32GB max)
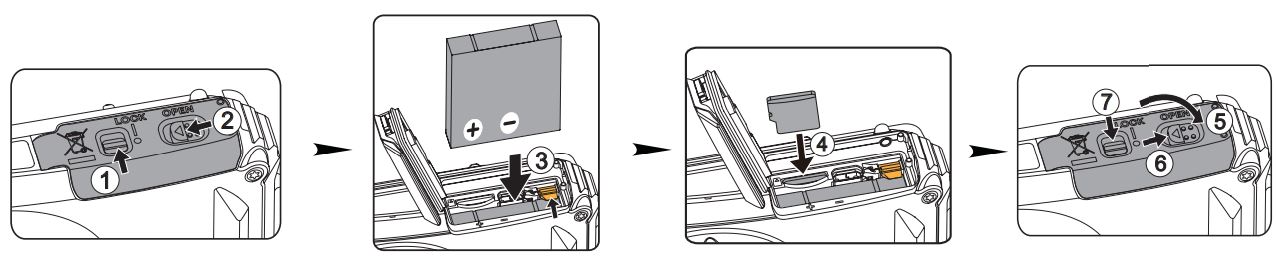
- Unlock the battery cover door lock as shown in step push the battery cover door open switch to open the battery cover door as shown in step
- Insert the battery into the battery compartment as shown in step being sure to line up metal contacts on bottom of battery with the contacts in slot
- Insert the Micro SD memory card (not to exceed 32GB) into the memory card slot as shown in step , push exposed edge of the Micro SD memory card fully into the slot with your fingertip.
- Close the battery cover door as shown in step push the battery cover door switch to close the battery cover door as shown in step and be sure to lock the battery cover door latch as shown in step .
3 Setting the Language/Date/Time
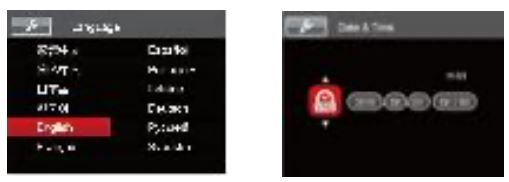
- Press the power button to turn the camera on and the language menu will appear. Use the up/down/left/right buttons to select desired language and press the (SET) button to to con rim your language.
- Use the up/down/left/right buttons again to set the date and time and press (SET) the button to con irm.
4 Taking the Best Photos
- Be sure to hold the camera securely.
- Use the zoom button to select Tele or Wide position to zoom in or out on your subject(s).
- Gently press the shutter button half-way down to focus on your subject(s). When the focus frame turns green, press the shutter button completely down to take your photo.
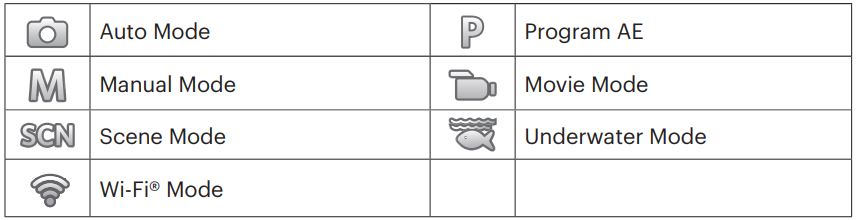
This camera provides a convenient mode button that allows you to manually switch between different camera settings with ease. Available modes are listed below:
While in shooting mode, press the ![]() button to begin recording a video. To stoprecording, press the
button to begin recording a video. To stoprecording, press the ![]() button again. The camera’s Micro SD Memory Card (max 32GB ) will store the video and return to the shooting screen.
button again. The camera’s Micro SD Memory Card (max 32GB ) will store the video and return to the shooting screen.
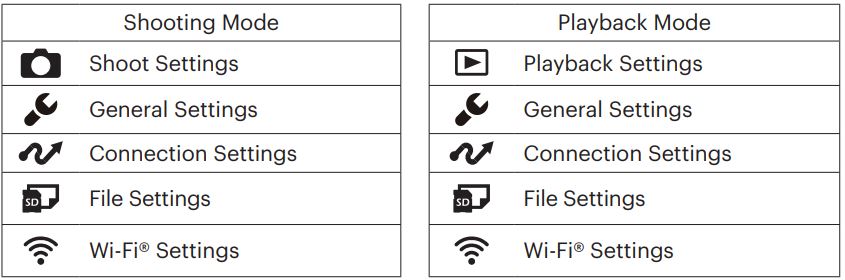
In each mode (except for the Wi-Fi® mode), press the menu ![]() button to access the “Easy Menu”. Press the up/down buttons to move between options, then press the (SET) button to make a selection. Choosing the
button to access the “Easy Menu”. Press the up/down buttons to move between options, then press the (SET) button to make a selection. Choosing the ![]() within this list will provide access to the Full Menu and Modes below:
within this list will provide access to the Full Menu and Modes below:
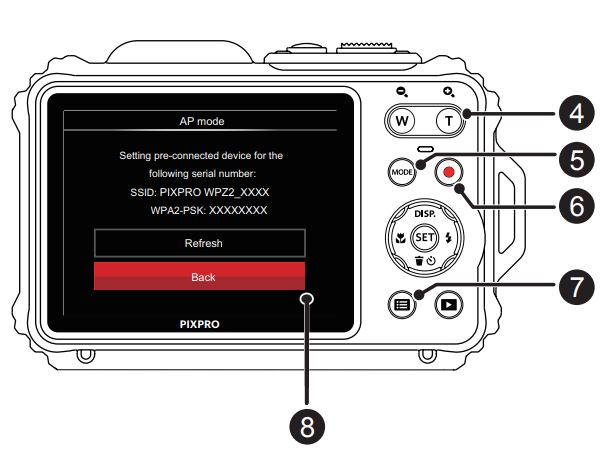
8 Wi-Fi® Connection
This camera can be connected to your smart device through the FREE “PIXPRO Remote Viewer” APP![]() . The APP is available for iOS™ and ANDROIDTM devices. Check the SSID and password on the camera’s AP mode interface. The Wi-Fi® password for this WPZ2 camera is unique and randomized to meet Federal and/or State compliance laws and standards.
. The APP is available for iOS™ and ANDROIDTM devices. Check the SSID and password on the camera’s AP mode interface. The Wi-Fi® password for this WPZ2 camera is unique and randomized to meet Federal and/or State compliance laws and standards.
References
[xyz-ips snippet=”download-snippet”]