kogan 40” FHD LED TV

COMPONENTS

A Kogan 40″ FHD LED TVB Remote controlC Stand (x2)D M4 x 14mm screw (x4)E AAA battery (x2)F Quick-start guideG Warranty card
NOT INCLUDEDPhillips head screwdriver, antenna cable, broadband internet connection.
REMOTE CONTROL OVERVIEW
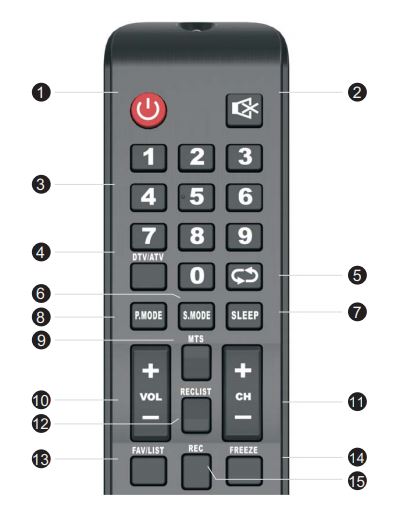
- POWER: Set your TV to power on or standby mode.
- MUTE: Toggle sound on/off
- 0-9: Press 0-9 to select a TV Channel directly while watching TV. The channel for entering the page number in Teletext mode and so on.
- DTV/ATV: Switch between Analog and Digital TV.
- : Return to the previous viewed program.
- S.MODE: Press to cycle through the
- SLEEP: Select amount of time before
- P. MODE: Press to cycle through the
- MTS: Press to search the NICAM modes.
- VOL+/VOL-: Press to increase/decrease the sound level.
- CH+/CH-: Press to scan through channels.
- RECLIST: Show the recorded list.
- FAV/LIST: Press to open the favorite list. Then you can select your favorite channel.
- FREEZE: Press to freeze the picture.
- REC: Record begins in PVR mode.
- MENU: Allow you to navigate the on-screen menus.
- SOURCE: Open the main menu, press to list the sources.
- ENTER: Allow you to navigate the on-screen menus and adjust the system settings to your preference.
- EXIT: Exit from the menu or sub-menu and cancel the function in the process (if possible).
- DISPLAY: Press to display the source and channel’s info.
- COLOUR BUTTONS: Teletex switch of the analog parts, the items selection in the menu of the digital parts, and the practice of the MHEG5 in the DVB MENU.
- GUIDE: 1. Launches the EPG(Electronic Program Guide) 2. Fast reverse in PVR or Media Player mode.
- TIME SHIFT: Function. 2. Play on PVR or Media Player mode.
- ASPECT: 1. Select picture scale. 2. Fast forward in PVR or Media Player mode.
- SUB.PG: 1. Press to access subpage. 2. Next chapter in PVR or Media Player mode.
- CANCEL 1. When a page is selected in the mode of text, it may take some time before it becomes available, pressing the CANCEL Key will return to the TV Mode. When the required page is found, the page number will appear at the top of the TV Picture, press the CANCEL key to return to the mode of text for you to browse this page. 2. Previous chapter in PVR or Media Player mode.
- INDEX: 1. Request the Index page in Teletext mode. 2. Exit the playing function in PVR or Media Player mode.
- SUBTITLE: To show and set the language of the current DTV.
- TV/RADIO: When watching the channel, allows you to switch between TV and Radio modes.
- REVEAL: Reveal or Hide the hidden words.
- HOLD: HOLD on or Off for current page display.
- SIZE: Change the size of the display in Teletext mode.
- TEXT: Switch the Teletext on and off.
 POWER: Set your TV to power on or standby mode.
 MENU: Allow you to navigate the on-screen menus.
ASSEMBLY AND INSTALLATION
BEFORE YOU GET STARTED
1. Stand assemblya. Attach stands to the base of the TV.b. Insert two 14 mm screws for each stand, and use a Phillips head screwdriver to tighten. 
2. Remote control assemblya. Open the battery compartment cover on the backside.b. Insert two 1.5V AAA size batteries, making sure to match the polarity markings (+/-) of the batteries with the diagram inside.c. replace battery compartment cover.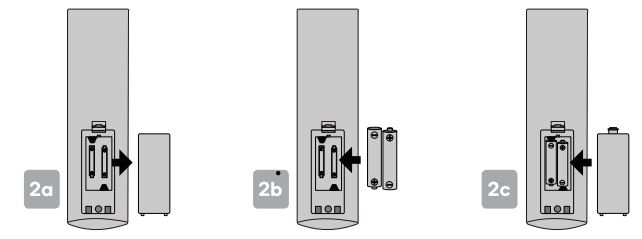
3. Connect to an antennaa. Connect an antenna cable via the ‘ANT’ input port at the back of the TV.b. Ensure the antenna cable is also connected to a working antenna, either via an antenna wall socket in your home or directly. 
4. Turning the TV onPlug the power cord into a suitable power outlet, then press the POWER button on the remote control, making sure to aim it at the sensor at the front of the TV. Alternatively, you can press the power button on the bottom of the panel on the TV.
TURNING TV OFFPress the POWER button on the remote control to enter standby mode. To power down the TV completely, unplug the power cord from the power outlet.
Do not leave your set in standby mode for long periods of time. If you will not use the TV for a long time, it is recommended to unplug the set from both the power outlet and aerial.
FIRST TIME SETUP
When turning the TV on for the first time, the Setup Wizard screen will appear. Use the ![]() and OK buttons to navigate the following options.LanguageSelect your menu language.CountrySelect your country.
and OK buttons to navigate the following options.LanguageSelect your menu language.CountrySelect your country.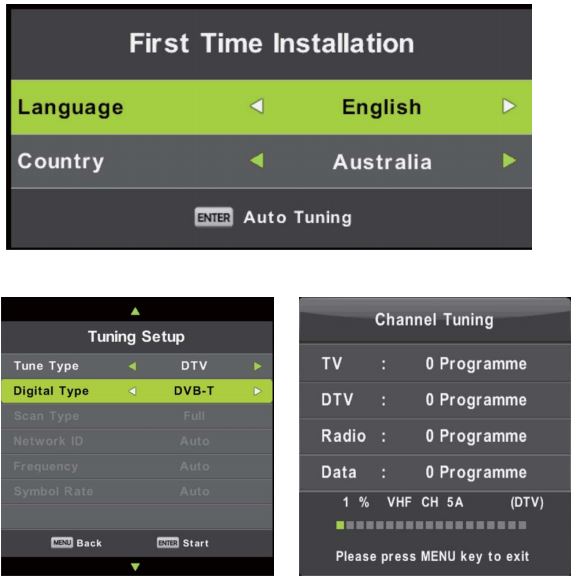
BASIC TROUBLESHOOTING
Poor picture and sound quality
- Try a different channel
- Adjust the antenna
- Check all connections
No picture or sound in TV status
- Try another channel
- Press the TV/AV button
- Make sure TV is plugged in
- Check the antenna connection
No sound or sound is too low at maximum volume
- Check the volume settings on any external speakers connected to your television
- Adjust the TV volume accordingly
- Check another channel or input
- Check that MUTE hasn’t been turned on
No color, wrong color, or tints
- Make sure the program itself is broadcast in color
- Select the picture menu, then adjust the color and tint submenus
Picture rolls vertically
- Check all connections
Blurred or snowy picture, distorted sound
- Check the direction, location, and connections to your antenna
- Issues may be caused by the use of an indoor antenna (poor signal)
Remote control malfunctions
- Replace remote control batteries
- Check battery terminals
- Remote is out of range, move closer to TV
- Remove any obstructions between the remote and IR sensor of the TV
- Make sure the power cord to your TV is plugged in and turned on
Image is not centered on the screen
- Adjust the horizontal and vertical position
“No Signal” on HDMI source
- Test the device with a different HDMI cable
- Plug the device into another HDMI port
- Try a different device connected to the same cable and port
- Perform a factory reset on your TV
For our full TV troubleshooting guide and extended User Manual for this TV, head online to help.kogan.com
Need more information?This is a Quick Start Guide, and while we hope that this has given you the assistance needed for a simple set-up, a full user guide outlining all of this product’s instructionsand features can be found online at help.kogan.com
[xyz-ips snippet=”download-snippet”]