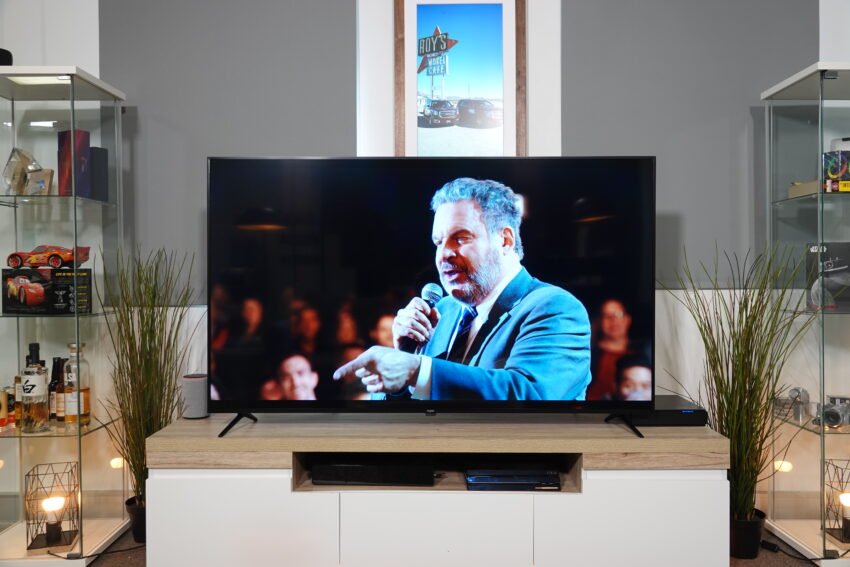
kogan 65” Smart HDR 4K LED TV
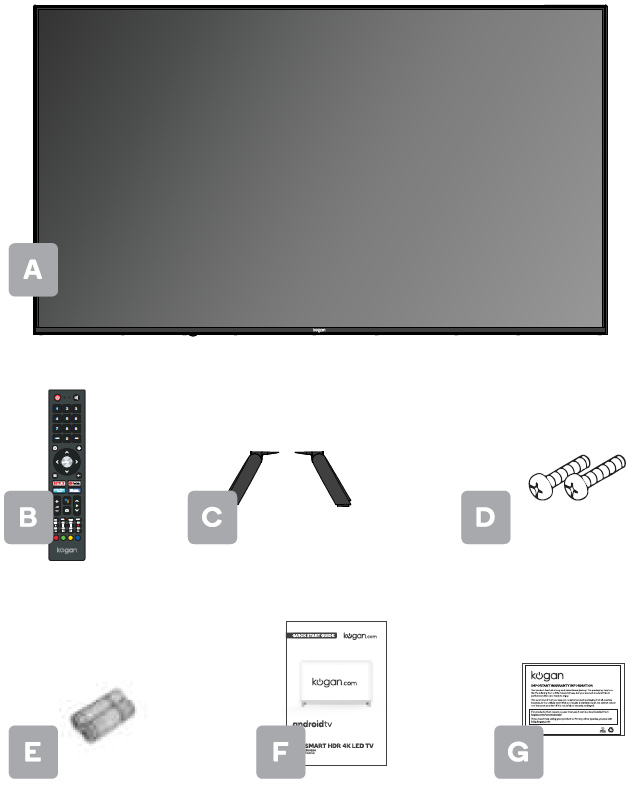
COMPONENTS
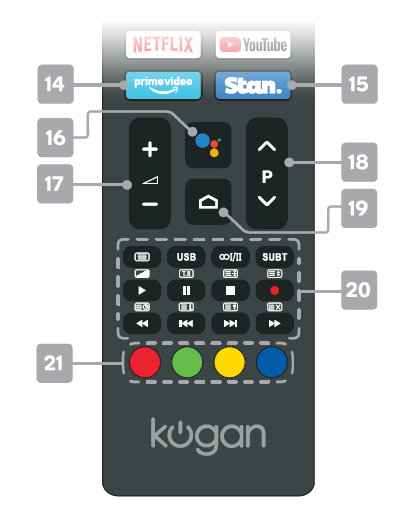
REMOTE CONTROL OVERVIEW
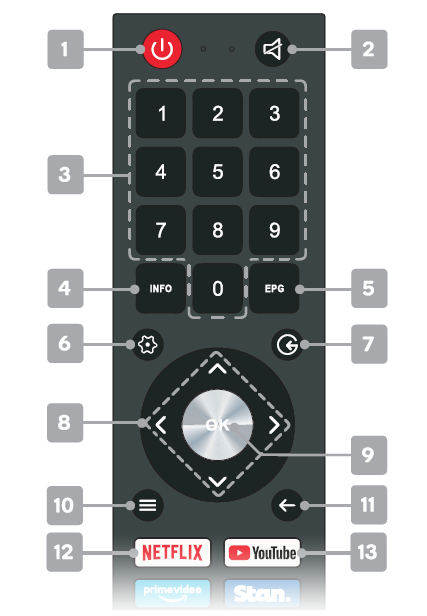
- CJ Power, press to enter or exit standby mode
- l8 Mute to toggle sound on/off
- Number buttons to select channels or input passwords
- INFO displays the current program information
- EPG Electronic Program Guide in DTVmode
- 0 Device preferences to display
- G Source displays the list of input source channels.
- •l•I◄/► Direction buttons for navigating menus and settings
- OK Enter select the current item or confirm selection, display Channel list in DTV mode
- Quick Menu to display TV options with optional, adjustable settings
- Back to the previous menu
- NETFLIXto open opp homepage
- DVouTube to open opp homepage
- price to open app homepage
- Stan. to open app homepage
- Google Assistant to launch the built-in virtual assistant for voice commands
- Volume to adjust the volume up or down
- A Tv Program to scroll channels
- Home to access the home page
- Teletext to show/hide Teletext (Teletext not available in Australia or New Zealand) use Press to switch to the USB source. <DI/II Audio to select available languages and audio channels. Subtitles to select subtitle Start playback in media mode; MIX mode in teletext II Pause in media/PVR mode; Time shift function in DTV mode Stop in media/PVR mode § Hold teletext page on display, press again to release Record in DTV mode; Change size of teletext screen. Reverse playback rapidly in media mode; Subtitle mode, or Submenu 1411 Skip to previous in media mode; llndexpage Skip to next in media mode; Reveal hidden information in some teletext pages Advance playback rapidly in media mode; Cancel teletext but not exit
- Colour buttons for navigational use within apps.
ASSEMBLY AND INSTALLATION
BEFORE YOU GET STARTED: Spread cushioning flat to lay the TV on. This will help to prevent damage.
Stand assembly
- Attach stands to base of TV, ensuring ‘L’ and ‘R’ markings on the TV and stands match.
- Insert one 20mm screw for each stand and use Phillips head screwdriver (not supplied) to tighten.Remote control assembly
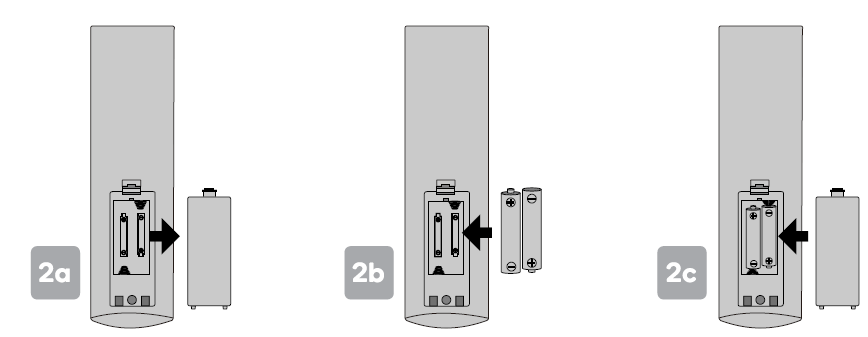
 Remote control assembly
 - Open the battery compartment cover on the back side.
- Insert two 1.5V AAA size batteries, making sure to match the polarity markings(+/-) of the batteries with the diagram inside the compartment.
- Replace battery compartment cover.Connect to antenna
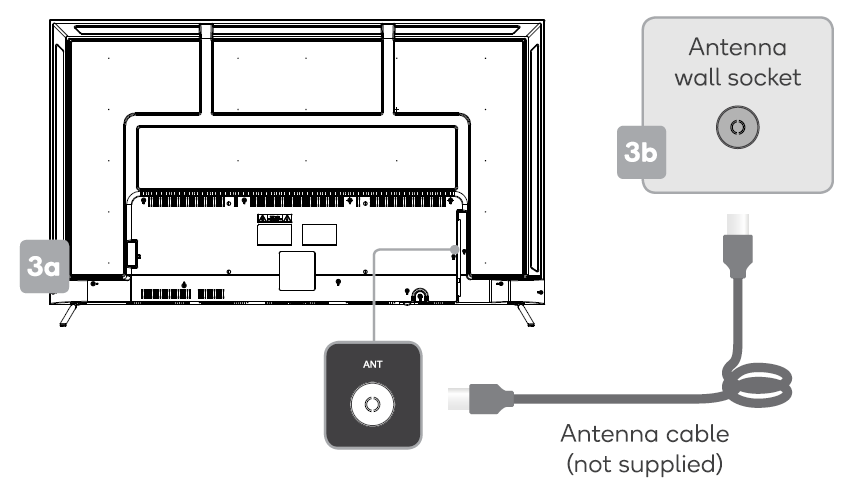
 Connect to antenna
- Connect an antenna cable (not supplied) via the ‘ANT’ input port at the back of the TV.
- Ensure the antenna cable is also connected to a working antenna, either via an antenna wall socket in your home, or directly.Turning TV on
- Plug the power cord into a suitable power outlet, then press the POWER(<!>) button on the remote control, making sure to aim it at the sensor at the front of the TV. Alternatively, you can press the power button on the lower side of the back panel on the TV.TURNING TV OFF: Press the POWER (<!,) button on the remote control to enter standby mode. To power down the TV completely, unplug the power cord from the power outlet. Do not leave your set in standby mode for long periods of time. If you will not use the TV for a long time, it is recommended to unplug the set from both the power outlet and aerial.
 Turning TV on
FIRST TIME SETUP
When turning the TV on for the first time, the Welcome screen will appear. Use the .A., T and OK buttons to navigate the following options.Bluetooth: Your Android TV remote control has bluetooth capabilities. Follow the onscreen prompts to pair the remote with the TV. This will allow you to use voice commands with your remote via the Google Assistant button.Language: Select your menu language.Quickly set up with Android phone: If you have an Android smartphone, you can easily transfer your phone’s Wi-Fi network and Google account to your TV. If not, select ‘Skip’.Select Wi-Fi network: Your Android TV will automatically scan for wireless networks nearby. Ensure the TV is within range of your wireless modem or router, and have your password handy. Follow the prompts to input your password and connect your TV to your selected network. If you’d prefer to connect an Ethernet cable to connect to the internet, simply insert the cable (not supplied) to the ‘LAN’ input port at the back of the TV (4a), and ensure that it is correctly connected to the internet. Google Account sign-in: Linking your Google Account to your Android TV will allow you to install new apps from the Play store, as well as receive recommendations, movies, and more from Google.Terms of Service: This page will allow you to read each of the Google Terms of Service, Privacy Policy, and Google Play Terms of Service in full, and to accept.Location: Grant permission for your Android TV to detect your location. You can adjust these permissions at any time from Settings.Help improve Android: Grant permission for your Android TV to detect your location to automatically send diagnostic information to Google.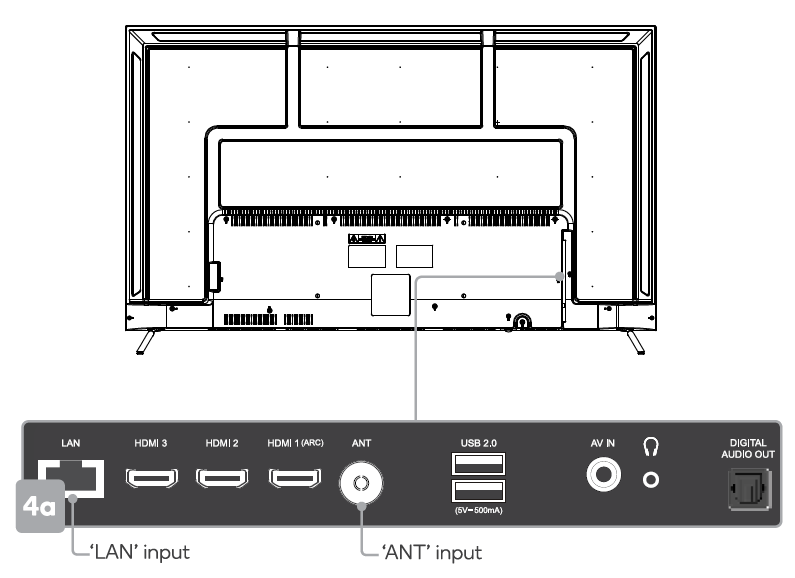 Following these options, the Auto Tuning screen will appear. Ensure you have an antenna cable connected to the ‘ANT’ input port at the back of the TV (4a).The auto tuning function will search for and save all available free-to-air TV channels. After confirming your settings (the default will be set for Australia), the process will automatically begin. The number of searched channels will be displayed on the screen. When setup is complete, you will be able to access the Home screen.
HOME SCREEN

Google Assistant: Click to launch the built-in virtual assistant, which will begin listening for voice commands. Give it a try, ask “What’s the weather today?”Text search: Enter text manually to search TV apps. System notifications: This option will only appear when notifications are present.Source: Access free-to-air channels (‘DTV’) or other input source channels.Internet connection: This will display as a Wi-Fi or LAN icon, depending on your connection. Select for connectivity options.Settings: Access the global settings menuClock: Time and date settings can be adjusted in the global settings.Apps: Access the App Centre to display all installed apps. Free-to-air channels can be accessed under the ‘Live TV’ option.Favourites list: A customizable list of apps available at a single click.Play next: Displays the program you are watching or have queued to play next. You can add to this list by long pressing the OK button, then selecting “Add to play next”. If the play next queue is empty, it will not be shown on the home page.Pinned channels: Show the program list of pinned channels. The order of this list can be adjusted by pressing ◄ from the channel icon and selecting the”<>” icon. Empty channels will not be shown on the home page.Customize channels: Add or remove pinned channels from the home page.
SETTINGS
Global settingsTo access the global settings menu (Sa), simply navigate to the ‘(I’ icon on the Home screen. Here you will find all of the adjustable options for Android TV’s interface, connectivity, and apps.In DTV mode you can also press the= Quick Menu button on your remote control and use the ◄ / ► buttons to navigate to the ‘Settings’ option. Quick menu: Options for your TV (picture, aspect ratio, speakers, etc) can be accessed by pressing the= Quick Menu button on your remote control. Use ◄ / ► buttons to navigate through the submenus, and .t. / • buttons to access Channel and Recording/Time Shift options.Device preferences: To open the device options submenu directly during live TV playback, press Device preferences button on your remote control.
BASIC TROUBLESHOOTING
Poor picture and sound quality:
• Try a different channel• Adjust the antenna• Check all connections
No picture or sound in TV status:
• Try another channel• Press the TV/AV button• Make sure TV is plugged in• Check the antenna connection
No sound or sound is too low at maximum volume:
• Check the volume settings on any external speakers connected to your television• Adjust the TV volume accordingly• Check another channel or input• Check that MUTE hasn’t been turned on
No colour, wrong colour or tints:
• Make sure the program itself is broadcast in colour• Select the picture menu, then adjust the colour and tint submenus.
Picture rolls vertically:
- Check all connections
Blurred or snowy picture, distorted sound:
• Check direction, location and connections to your antenna• Issues may be caused by the use of an indoor antenna (poor signal)
Remote control malfunctions:
- Replace remote control batteries
- Check battery terminals
- Remote is out of range, move closer to TV
- Remove any obstructions between remote and IR sensor of TV
- Make sure the power cord to your TV is plugged in and turned on
Image is not centered on the screen:
- Adjust the horizontal and vertical position
“No Signal” on HDMI source:
- Test the device with a different HDMI cable
- Plug the device into another HDMI port
- Try a different device connected to the same cable and port
- Perform a factory reset on your TV
For our full TV troubleshooting guide and extended User Manual for this TV, head online to help.kogan.com![]()
[xyz-ips snippet=”download-snippet”]