

Safety Warnings
When using an electrical appliance, basic safety precautions must always be observed.
To reduce the risk of fire, electrical shock or injury:
- Do not use outdoors or on wet surfaces
- Do not allow to be used as a toy. Close attention is required when used by or near children
- Use only as described in the manual. Do not use any attachments that have not been supplied by Kogan.com
- Do not use the vacuum if it has been dropped, damaged, left outdoors or dropped in water. Contact the Kogan.com customer support team
- Do not handle the plug or appliance with wet hands
- Do not put objects into any openings. Do not use with any of the openings blocked; keep free of dust, lint, hair and anything else that may reduce air flow
- Keep hair, loose clothing, fingers and all body parts away from openings and moving parts
- Do not pick up anything that is smoking or burning, such as cigarettes, matches or hot ashes
- Use extra care when cleaning on stairs
- Do not use to pick up or clean flammable or combustible liquids such as fuel, or use in areas where they may be present
- Look on the vacuum for warning labels and follow the instructions
- Keep the ends of the hose, wands and other attachments away from your face and body
- Do not use the vacuum cleaner without the dust cup filter in place
- Always unplug the vacuum before connecting or disconnecting the vacuum hose
- Store the vacuum indoors. After use pack the vacuum away to prevent tripping accidents
- Use of incorrect batteries can damage the motor. Please only use the supplied batteries
- Use only on dry, indoor surfaces
- Do not use for any purpose other than those described in this manual
- If the power cord is damaged, it must be replaced by a Kogan.com technician
1
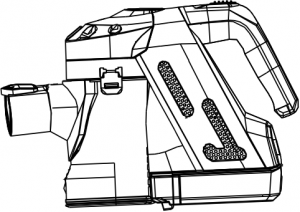
Parts

![]()
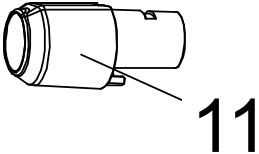
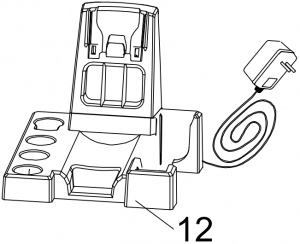
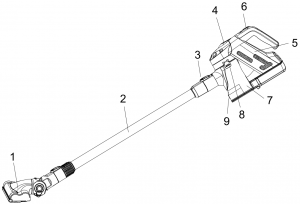
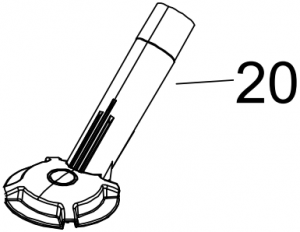
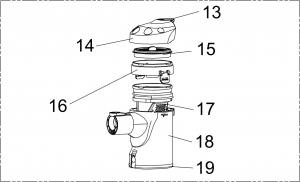
1. Electric Motorized Power Head Brush 2.Aluminum tube3. Tube release button 4.body release button5. Power switch 6. Indicator light7. Dust cup 8.Dust tank upper part release button9. Dust tank bottom release button 10.Multi crevice nozzle11. Transformation joint 12.Charging seat13. Dust cup release button 14.Dust cup cover15. Sponge, HV cotton 16.Dust cup air exhaust cover17. Plastic centering filter system 18.Dust cup19. Dust cup bottom 20.Pet brush21.Universal multi brush
2
Precautionary Measures
If the opening that sucks in air, the brush or the extension tubes are blocked, the vacuum should be turned off immediately. Clear the substance that is blocking the flow of air completely before you start the vacuum again.
Do not operate the vacuum cleaner too close to heaters, radiators, ovens etc…
Before using the vacuum cleaner, please remove any large or sharp objects from the floor in order to prevent the filter being damaged. Do not use the vacuum to clean anything that is flammable such as gas or cigarettes.

3
Assembly
| Install the main brush
If you want to use the brush, it can be easily installed as shown to the right. |
  |
|
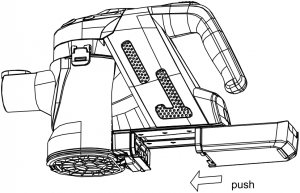
| Installing connection joint
Insert the 2-in-1 crevice/brush tool into the connecting joint. It will not click into place. Then insert the connecting joint into the main body, and it WILL click into place. To disassemble the 2-in-1 crevice/brush tool from the pole, pull the 2-in-1 tool straight out from the connecting joint. Press the red pole attachment release button, then remove the connecting joint. |
 |
|
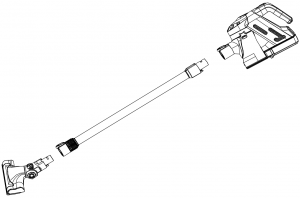
| Installing Extended Aluminium Tube
The aluminium tube can be used to extend the reach of the vacuum so it can be used as a vertical vacuum cleaner. Once installed, the main brush can then be connected to the end of the tube to clean floors/carpets. The multi-crevice nozzle can also be attached for cleaning ceilings, curtains and other difficult to clean surfaces. |
 |
|
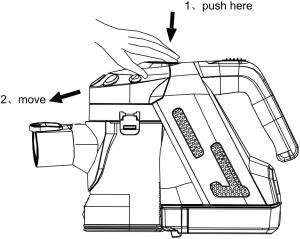
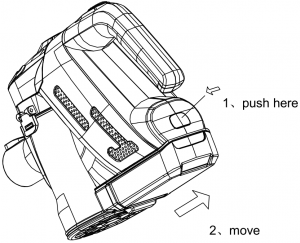
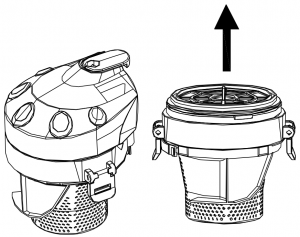
| Removing/Installing Dust Cap
a) Remove dust cap from the body: Push the release button for the dust cup, then remove the dust cup from the body. b) Install dust cap on body: first make the underside of the dust cup to connect with the body. (Please pay attention to the fitting position and direction), then push the dust cup to close with the body. The dust cup will be locked once you hear the clicking noise. |
|
|
| Installing/Removing Battery Pack
a) Removing: slide and hold the red battery release button located on the bottom of the main body. The battery will slide out. b) Installing: slide the battery along the guide until you hear it click into place. |
|
|
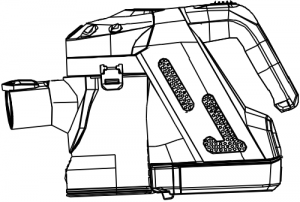
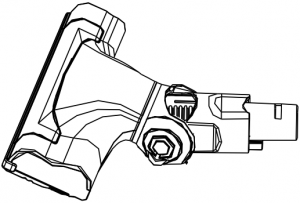
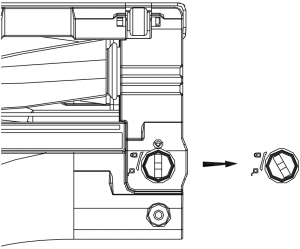
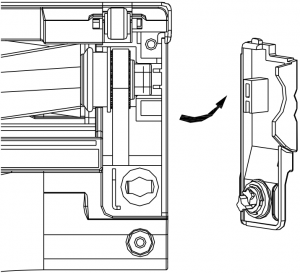
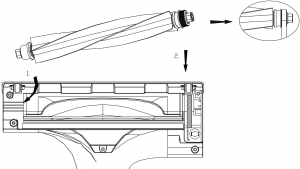
| Brush Roller Disassembly and Installation
a) Firstly, as shown in the image to the right, the roller can be unlocked by turning the lock anticlockwise to the open position, at which point you can remove the cover plate on the side. You can then remove the roller. b) As shown, when installing the brush head, insert it into place and install the cover plate (making sure that the lock is in the open position to allow for installation). Once done, turn the brush clockwise to the lock position. |
Disassembly | |
 |
 |
|
 |
||
| Installation
|
||
 |
 |

6
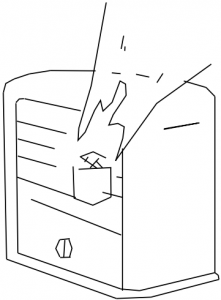
Cleaning the Dust Cup
| 1. Remove the dust cup from the body.
2. Press the dust cup bottom release button, then the dust will fall out automatically. (as shown in Fig A) 3. If you find the plastic filter system is too dirty, please press the dust cup cover (for the air exhaust) release button, remove the filter assembly cup (as shown in Fig B) and you can then clean them with a soft brush or clean them with water. They should then be dried thoroughly before use again. |

|
|

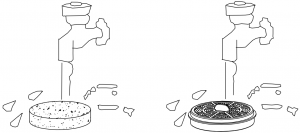
Changing or Cleaning Sponge and HV Cotton Filter
| 1. Remove the dust cup from the body.
2. Rotate the dust cup cover anticlockwise from “close” to “open”, then remove the dust cup cover. Lift the HV cotton filter out (as shown in Fig A). 3. Pull the knob of the filter frame up, then pull out the sponge filter and the HV cotton filter from the case box. Clean the sponge and HV cotton filter with a soft brush, or rinse it in lukewarm water (as shown in Fig B), then allow it to dry thoroughly before use. All filters are washable. (it is recommended that you clean the filters when you find that the suction is becoming weak). 4. Ensure that you place the filters back into position BEFORE using the vacuum again. Using the unit without the filters in position can damage the vacuum. |
|
|
|
7
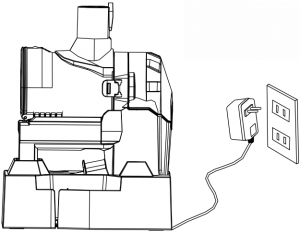
Charging the Vacuum
| When charging the vacuum, please place the vacuum into the charger cradle, then plug the cradle into a wall outlet.
Please position the unit somewhere safe where the cord won’t be tripped over or pulled on by small children or animals. |
 |
 |
Troubleshooting
| Problem | Possible Cause | Possible Solution |
| Vacuum isn’t working. | Battery may be flat. | Charge the battery. |
| Machine can’t suck up dust/suction is weak | Dust cup may be full. | Empty dust cup. |
| Battery may be flat. | Charge the battery. | |
| Dust is escaping from the vacuum during use | Dust cup is full. | Empty dust cup. |
| Dust filter, dust cup or cup bottom may not be assembled correctly. | Check to ensure that all parts are in position and locked correctly. | |
| Vacuum brushes aren’t picking-up dust | Dust cup is full. | Empty and clean the dust cup. |
If you have any further questions or concerns regarding the use of this product, please contact the Kogan.com customer support team.
8
[xyz-ips snippet=”download-snippet”]