![]() 28L Stainless SteelConvection Microwave Oven with GrillKAMWO32CSSA
28L Stainless SteelConvection Microwave Oven with GrillKAMWO32CSSA
User Manual

Attention
Please handle this product with care and inspect it regularly to ensure it is in good working order. If the product, power supply cord, or plug shows any signs of damage: stop use, unplug, and contact Kogan.com support.Read these instructions carefully before using your microwave oven. If you follow these instructions, your oven will provide you with many years of good service.
Specifications
| Model | KAMWO28CSSA |
| Rated Voltage | 230-240V ~ 50Hz |
| Rated Input Power (Microwave) | 1450W |
| Rated Output Power (Microwave) | 900W |
| Rated Input (Grill) | 1100W |
| Rated Input (Convection) | 2100W |
| Oven Capacity | 28L |
| Turntable Diameter | 315mm |
| External Dimensions (LxWxH) | 520 x 489 x 325.7mm |
| Net Weight | Approx 19.3kg |
Safety Warnings
Precautions to avoid possible exposure to excessive microwave energy
- Do not attempt to operate this oven with the door open, as this can result in harmful exposure to microwave energy. It is important not to tamper with or break the safety interlocks.
- Do not place any object between the oven front face and the door, nor allow soil to cleaner residue to accumulate on the sealing surfaces.
- WARNING: if the door or door seals are damaged, the oven must not be operated. Contact the Kogan customer support team before using the unit again.
- If the microwave is not maintained in a good state of cleanliness, its surface could be degraded and this will affect the lifespan of the apparatus and lead to a dangerous situation.
Basic safety precautions
- Liquids and other foods must NOT be heated in sealed containers as they are liable to explode.
- It is hazardous for anyone other than a Kogan technician to carry out repairs that involve the removal of the cover, which gives protection against microwave energy.
- This appliance can be used by children aged 8 years and above, and persons with reduced physical, sensory or mental capabilities or lack of experience and knowledge only if they have been given supervision or instruction concerning the use of the product in a safe way, and been given an understanding of the dangers involved. Children should not play with the appliance. Cleaning and user maintenance must not be carried out by children unless they are older than 8 years old and supervised.
- Keep the appliance and the power cord out of the reach of children.
- Only use utensils suitable for use in microwave ovens.
- The oven should be cleaned regularly and any food deposits should be removed.
- When heating food in plastic or paper containers, keep an eye on the oven due to the possibility of ignition.
- If smoke is emitted, switch off or unplug the unit and keep the door closed in order to stifle any flames.
- Do not overcook food.
- Do not use the oven cavity for storage purposes. Do not store items such as bread, cookies, etc… inside the oven.
- Remove wire twist-ties and metal handles from paper or plastic containers/bags before placing them in the oven.
- Install this oven in accordance with the installation instructions given.
- Eggs in the shell and whole hard-boiled eggs should not be heated in microwave ovens as they may explode, even after the microwave heating has ended.
- This appliance is intended for use in households or similar situations such as:• staff kitchen areas in shops, offices, or other working environments• by clients in hotels, motels, or other residential type environments• farmhouses• bed and breakfast type environments
- If the supply cord is damaged, it must be replaced by the Kogan customer service team, or if the unit is out of warranty, a fully qualified electrician.
- Do not store or use this appliance outdoors.
- Do not use this oven near water, in a wet basement, or near a swimming pool.
- The temperature of accessible surfaces may be high when the appliance is operating. The surfaces are liable to get hot during use. Keep the cord away from heated surfaces and do not cover any vents on the oven.
- Do not let the cord hang down over the edge of the table or counter.
- Failure to maintain the oven in a state of cleanliness may lead to deterioration of the surface that could adversely affect the life of the appliance and/or possibly result in a hazardous situation.
- The contents of feeding bottles and baby food jars should be stirred or shaken, then the temperature checked before consumption in order to avoid burns.
- The microwave heating of beverages can result in delayed eruptive boiling, therefore care must be taken when handling the container.
- The microwave oven is not designed to be operated by means of an external timer or separate remote control system.
- Accessible parts may become hot during use. Young children should be kept away from the cooking area while in use.
- Steam cleaners must not be used.
Cleaning
• Be sure to unplug the unit from the power supply before cleaning.• The door frame, door seal, and neighboring parts should be cleaned carefully with a damp cloth when dirty.• For easier cleaning, place half a lemon in a bowl, add 300ml of water, and heat on 100% microwave power for 10 minutes. Then wipe the internal walls, floor and roof of the oven using a dry, soft cloth.
Utensils
See the list below of “Materials you can use in a microwave oven” and “Materials to be avoided in a microwave oven”. There may be certain non-metallic utensils that are not safe for microwaves. If in doubt, you can test the utensil in question following the procedure below.
Utensil Test
- Fill a microwave-safe container with 1 cup of cold water (250ml), along with the utensil in question.
- Cook on maximum power for 1 minute.
- Carefully feel the utensil. If the empty utensil is warm, do not use it for microwave cooking.Never exceed 1 minute of cooking time when doing a utensil test.
Materials you can use in a microwave oven
| Utensil |
Comments |
| Aluminum foil | Shielding only. Small smooth pieces can be used to cover thin parts of meat or poultry to prevent overcooking. Arcing may occur if the foil is too close to the oven walls. The foil should be kept at least 2.5cm away from the oven walls. |
| Browning dish | Follow the manufacturer’s instructions. The bottom of the browning dish must be at least 5mm above the turntable. Incorrect use may cause the turntable to break. |
| Dinnerware | Check that the dinnerware is microwave-safe only. Do not use cracked or chipped dinnerware dishes. |
| Glass jars | Always remove the lid. Use only to heat food until it is just warm. Most glass jars are not heat resistant and they may break. |
| Glassware | Heat-resistant oven glassware only. Make sure there is no metallic trim. Do not use cracked or chipped dishes. |
| Oven cooking bags | Follow manufacturer’s instructions. Do not close with a metal tie. Make slits to allow steam to escape. |
| Paper plates and cups | Use for short-term cooking and warming only. Do not leave the oven unattended while cooking. |
| Paper towels | Use to cover food for reheating and absorbing fat. Do not leave the oven unattended while cooking. |
| Parchment paper | Use as a cover to prevent splattering or a wrap for steaming. |
| Plastic | Microwave-safe only. Ensure the utensil is marked “microwave safe”. Some plastic containers may soften as the food gets hot. |
| Plastic wrap | Microwave-safe only. Use to cover food during cooking to retain moisture. Do not allow plastic wrap to touch food when possible. |
| Thermometers | Microwave-safe only. (Meat and candy thermometers) |
| Wax paper | Use as a cover to prevent splattering and to retain moisture. |
Materials to be avoided in a microwave oven
|
Utensils |
Comments |
| Aluminium tray | May cause arcing. Transfer food into a microwave-safe dish. |
| Food carton with metal handle | May cause arcing. Transfer food into a microwave-safe dish. |
| Metal or metal-trimmed utensils | Metal shields the food from microwave energy. The metal trim may also cause arcing. |
| Metal twist ties | May cause arcing and cause a fire in the oven. |
| Paper bags | May cause a fire in the oven. |
| Plastic foam | The plastic foam may melt or contaminate the liquid inside when exposed to high temperatures. |
| Wood | Wood will dry out when used in a microwave oven and may split or crack. |
Setting up the oven
Remove the oven and all materials from the carton and oven cavity. Ensure the oven comes with the following accessories:• Glass tray x 1• Turntable ring assembly x 1• Quick start guide x 1
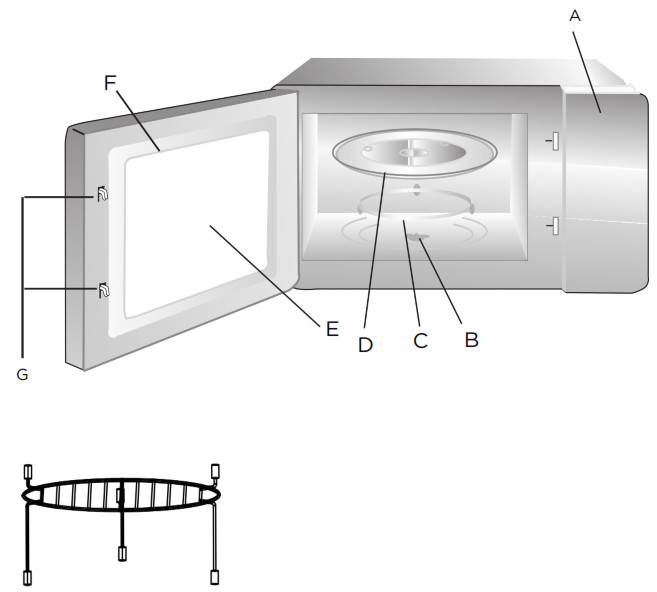
Grill rack(Only to be used in grill/convection function, and be placed on the glass tray).
A – Control panelB – Turntable shaftC – Turntable ring assemblyD – Glass trayE – Observation windowF – Door assemblyG – Safety interlock system
Turntable installation

- Never place the glass tray upside down. The glass tray should never be restricted.
- Both glass tray and turntable ring assembly must be used during cooking.
- All food and containers of food should be placed on the glass tray for cooking.
- If the glass tray or turntable ring assembly cracks or breaks, contact the Kogan customer support team.
Countertop InstallationRemove all packing material and accessories. Examine the oven for any damage such as dents or a broken door. Do not install the oven if it appears to be damaged. Remove any protective film found on the microwave oven surface.Note: Do NOT remove the light brown Mica cover that is attached to the oven cavity to protect the magnetron.Installation
- Select a level surface that provides enough open space for the intake and/or outlet vents.(1) The minimum installation height is 85cm.(2)The rear surface of the microwave oven should be placed close to a wall. Leave a minimum clearance of 30cm above the oven. A minimum clearance of 20cm is required to either side between the oven and any adjacent walls.(3)Do not remove the legs from the bottom of the oven.(4)Blocking the intake and/or outlet openings can damage the oven.(5)Place the oven as far away from radios and TVs as possible. The operation of the microwave can cause interference to your radio or television reception.
- Plug the microwave oven into a standard household electrical outlet.
- Do not install over a range cooktop or other heat-producing appliance.
Operation Instructions
Clock SettingWhen the microwave oven is supplied with electricity, the oven will display “0:00” and a tone will sound once. The input time should be between 0:00 – 23:59 (24 hour); 1:00 – 12:59 (12 hour).Example: to set 12:121. Press “CLOCK/PRE-SET” once to select 24 hour time system or twice to select 12-hour time system, whereupon either 24H or 12H will display.2. Press the number buttons “1”, “2”, “1”, “2” in that order.3. Press “CLOCK/PRE-SET” to finish the clock setting. “:” will flash and the time will light up.Note: if the clock is not set, it will not function when powered.During the process of clock setting, if you press “STOP/CLEAR”, the oven will go back to the previous status automatically.
Microwave CookingSelect the different microwave cooking power and set the cooking time as you wish. There are five power levels available to choose from. Keep pressing“MICROWAVE” to select the power.For example: if you want to use 80% power to cook for 10 minutes, you can operate the oven using the following steps.1. Press “MICROWAVE” once. The oven will display “P100” and the![]() indicator will light up.2. Press “MICROWAVE” once more to choose 80% power. The oven will display “P80”.3. Press the number buttons “1”, “0”, “0”, “0” in that order. The oven will display “10:00”.4. Press “START/+30SEC./CONFIRM” to start cooking.“
indicator will light up.2. Press “MICROWAVE” once more to choose 80% power. The oven will display “P80”.3. Press the number buttons “1”, “0”, “0”, “0” in that order. The oven will display “10:00”.4. Press “START/+30SEC./CONFIRM” to start cooking.“![]() ”will light and the indicator will flash.
”will light and the indicator will flash.
| Presses/Instructions | Display | Microwave Power |
| 1 | P100 | 100% |
| 2 | P80 | 80% |
| 3 | P50 | 50% |
| 4 | P30 | 30% |
| 5 | P10 | 10% |
Grill CookingExample: if you want to use 100% to cook for 35 minutes, you can operate the oven using the following steps.1. Press the “GRILL” key. The oven will display “G-1” and at the same time, the![]() indicator will light up.2. Press the number buttons “3”, “5”, “0”, “0” in that order and the oven will display “35:00”.3. Press the “START/+30SEC./CONFIRM” to start cooking. The
indicator will light up.2. Press the number buttons “3”, “5”, “0”, “0” in that order and the oven will display “35:00”.3. Press the “START/+30SEC./CONFIRM” to start cooking. The![]() indicator will flash and the “:” will light up.Note: Once half of the grill time passes, the oven should sound two tones and this is normal. In order to get a better result from grilling food, you should turn the food over, close the door, and press “START/+30SEC./CONFIRM” to continue cooking. If you do not open the door to turn the food, the oven will beep once and continue working.
indicator will flash and the “:” will light up.Note: Once half of the grill time passes, the oven should sound two tones and this is normal. In order to get a better result from grilling food, you should turn the food over, close the door, and press “START/+30SEC./CONFIRM” to continue cooking. If you do not open the door to turn the food, the oven will beep once and continue working.
Convection Cooking (with preheating function)The convection cooking can let you cook the food as if using a traditional oven. In this mode, the microwave is not used. It is recommended that you should preheat the oven to the appropriate temperature before placing the food in the oven.1. Press the “CONVEC” key once and the oven will display “140”. At the same time, the “°C” and![]() symbols will light up. (Press the “CONVATEC” key several times to select the temperature.)2. Press the “START/+30SEC./CONFIRM” to start the oven heating. The temperature figure will flash once the selected temperature has been reached, and a tone will sound twice to signal that you should put your food in the oven.3. Press the number buttons to enter the cooking time.4. Press the “START/+30SEC./CONFIRM” key to start cooking.Note: The cooking time cannot be input until the temperature has reached the preset level. Once the temperature has been reached, the door must be opened before you can input the cooking time.If there has been no time entered within 5 minutes of the temperature being reached, the oven will stop preheating. The tone will sound five times, then the oven will turn off and go into standby.
symbols will light up. (Press the “CONVATEC” key several times to select the temperature.)2. Press the “START/+30SEC./CONFIRM” to start the oven heating. The temperature figure will flash once the selected temperature has been reached, and a tone will sound twice to signal that you should put your food in the oven.3. Press the number buttons to enter the cooking time.4. Press the “START/+30SEC./CONFIRM” key to start cooking.Note: The cooking time cannot be input until the temperature has reached the preset level. Once the temperature has been reached, the door must be opened before you can input the cooking time.If there has been no time entered within 5 minutes of the temperature being reached, the oven will stop preheating. The tone will sound five times, then the oven will turn off and go into standby.
Convection Cooking (without preheating function)1. Press the “CONVEC” key once and the oven will display “140”. At the same time, the “°C” and ![]() symbols will light up. (Press the “CONVEC” key several times to select the temperature.)2. Press the number buttons to select the cooking time.3. Press the “START/+30SEC./CONFIRM” key to start cooking. The
symbols will light up. (Press the “CONVEC” key several times to select the temperature.)2. Press the number buttons to select the cooking time.3. Press the “START/+30SEC./CONFIRM” key to start cooking. The ![]() symbol will flash and the “:” will light up.
symbol will flash and the “:” will light up.
| Presses/Instructions | Display | Convection |
| 1 | 140°C | • |
| 2 | 150°C | • |
| 3 | 160°C | • |
| 4 | 170°C | • |
| 5 | 180°C | • |
| 6 | 190°C | • |
| 7 | 200°C | • |
| 8 | 210°C | • |
| 9 | 220°C | • |
| 10 | 230°C | • |
Combination CookingExample: if you want to use the combination to cook (C-1) for 40 minutes, you can operate the oven as per the following steps.1. Press the “COMBINE” key once. The oven will display “C-1”. The![]() and
and![]() symbols will also light up.2. Press the number buttons “4”, “0”, “0”, “0” in order and the oven will display “40:00”.3. Press the “START/+30SEC./CONFIRM” key to start cooking. The
symbols will also light up.2. Press the number buttons “4”, “0”, “0”, “0” in order and the oven will display “40:00”.3. Press the “START/+30SEC./CONFIRM” key to start cooking. The![]() and
and![]() symbols will flash and “:” will light up.
symbols will flash and “:” will light up.
| Presses/Instructions | Display | Microwave | Grill | Convection |
| 1 | C-1 | • | • | |
| 2 | C-2 | • | • | |
| 3 | C-3 | • | • | |
| 4 | C-4 | • | • | • |
Delay StartExample: To start cooking at 12:12.1. First, set the clock, then set the cooking program you want. At most 3 sections can be set. You cannot use the defrost setting in this mode.Example: if you want to use 80% microwave power to cook for 10 minutes.a) Press “MICROWAVE” twice. The oven will display “P80”.b) Press the number buttons “1”, “0”, “0”, “0” in order. The oven will display “10:00”c) Be careful not to push “START/+30SEC./CONFIRM” to start the cooking.2. Press “CLOCK/PRESET” to display 0:00.3. Press “1”, “2”, “1”, “2” in order.4. Press “START/+30SEC./CONFIRM” to confirm the setting. The unit will turn back to the clock state.5. When the time arrives, cooking will start. “:” will light up.
Reheat1. Press the “REHEAT” key. “H-1” will display on the oven and flash. ![]() and “AUTO” indicators will light up. (Press the “REHEAT” key several times to select the cooking program you want.)2. Press “START/+30SEC./CONFIRM” to confirm. “H-1” will display.3. Press “REHEAT” again and the oven will display “150”. The “AUTO”, “g” and
and “AUTO” indicators will light up. (Press the “REHEAT” key several times to select the cooking program you want.)2. Press “START/+30SEC./CONFIRM” to confirm. “H-1” will display.3. Press “REHEAT” again and the oven will display “150”. The “AUTO”, “g” and ![]() indicators will light up. (Press the “REHEAT” key several times to select the weight of the food cooking.)4. Press “START/+30SEC./CONFIRM” to start cooking.
indicators will light up. (Press the “REHEAT” key several times to select the weight of the food cooking.)4. Press “START/+30SEC./CONFIRM” to start cooking.
Reheat Chart
| Menu | Weight (g) | Display |
|
h-1 (Auto Reheat) |
150 | 150 |
| 250 | 250 | |
| 350 | 350 | |
| 450 | 450 | |
| 600 | 600 | |
|
h-2(Dinner Plate) |
250 | 250 |
| 350 | 350 | |
| 450 | 450 | |
|
h-3(coffee) |
1 (approximately 240g) | 1 |
| 2 (approximately 480g) | 2 | |
| 3 (approximately 720g) | 3 | |
|
h-4(roll) |
1 (approximately 70g) | 1 |
| 2 (approximately 140g) | 2 | |
| 3 (approximately 210g) | 3 |
Defrost by Time1. Press “DEFROST” once. The oven will display “d-1”.2. Input the desired time cooking. The ![]() and ** indicators will light up. (Maximum cooking time is 99 minutes and 99 seconds).3. Press “START/+30SEC./CONFIRM” to start defrosting. The
and ** indicators will light up. (Maximum cooking time is 99 minutes and 99 seconds).3. Press “START/+30SEC./CONFIRM” to start defrosting. The![]() and ** indicators will start to flash.
and ** indicators will start to flash.
Defrost by Weight1. Press “DEFROST” twice. The oven will display “d-2”.2. Input the weight of the food. (The weight should be between 100 ~2000g).3. Press “START/+30SEC./CONFIRM” to start defrosting. The![]() and ** indicators will flash, and the “g” indicator will go out.
and ** indicators will flash, and the “g” indicator will go out.
Defrost Ground Meat1. Press “DEFROST” three times. The oven will display “d-3”.2. Input the weight of the ground meat. (The weight should be between 100 ~ 2000g)3. Press “START/+30SEC./CONFIRM” to start defrosting. The![]() and ** indicators will flash.
and ** indicators will flash.
Defrost Seafood1. Press “DEFROST” three times. The oven will display “d-3”.2. Input the weight of the ground meat. (The weight should be between 100 ~ 2000g)3. Press “START/+30SEC./CONFIRM” to start defrosting. The ![]() and ** indicators will flash.
and ** indicators will flash.
Auto Menu CookingThe number keys 0-9 all match with ten different subjects respectively.
| # | Cook | # | Cook | # | Cook | # | Cook | # | Cook |
| 1 | Vegetables | 3 | Meat | 5 | Potato | 7 | Roast Chicken | 9 | Cake |
| 2 | Fish | 4 | Pasta | 6 | Soup | 8 | Bread | 10 | Pizza |
Example: Cooking 350g of vegetables.
- Press the “VEGETABLE” key. “AUTO” and
 will light up.
 - Press the “VEGETABLE” key again to choose the weight. The oven will display “350”, “g”, “AUTO” and
- Press “START/+30SEC./CONFIRM” to start cooking. “g” will go out, the time will count down and “AUTO” and will flash.
Auto Menu Chart
| Menu | Weight (g) | Press Times |
Display |
| Vegetables | 150 | 1 | 150 |
| 350 | 2 | 350 | |
| 500 | 3 | 500 | |
| Fish | 150 | 1 | 150 |
| 250 | 2 | 250 | |
| 350 | 3 | 350 | |
| 450 | 4 | 450 | |
| 650 | 5 | 650 | |
| Meat | 150 | 1 | 150 |
| 300 | 2 | 300 | |
| 450 | 3 | 450 | |
| 600 | 4 | 600 | |
| Pasta | 50 (with cold water 450g) | 1 | 50 |
| 100 (with cold water 800g) | 2 | 100 | |
| 150 (with cold water 1200g) | 3 | 150 | |
| Potato | 1 (approximately 230g) | 1 | 1 |
| 2 (approximately 460g) | 2 | 2 | |
| 3 (approximately 690g) | 3 | 3 |
| Menu | Weight (g) | Press Times | Display |
| Soup | 200m1 | 1 | 200 |
| 400m1 | 2 | 400 | |
| 600m1 | 3 | 600 | |
| Roast Chicken | 500 | 1 | 500 |
| 750 | 2 | 750 | |
| 1000 | 3 | 1000 | |
| 1200 | 4 | 1200 | |
| Bread | SOg | 1 | 50 |
| 100g | 2 | 100 | |
| 1509 | 3 | 150 | |
| Cake | 475g | 1 | 475 |
| Pizza | 200g | 1 | 200 |
| 300g | 2 | 300 | |
| 400g |
3 |
400 |
Note: the Cake menu is under convection cooking with 160°C warm-up functions, and you should preheat first following the auto menu operation. When the oven reaches the optimal temperature, it will stop working and sound a tone to remind you to open the door to put the cake in. then press “START/ +30SEC./CONFIRM” to start cooking.
Memory
- Press the “MEMORY” button several times to set memories, from “memory 1” through to “memory 3”. which the oven will display as 1 through to 3.
- Set the one or two stages you want to save.
Example: a) press “MICROWAVE” once to set to 100% microwave power. b) Press the number keys “1”. “0”, “0”, “0” to set the time.
- Press “MEMORY” to save the memory program set, or press “START/ +30SEC./CONFIRM” to start the cooking and save the program
- Next time you want to cook with the memory program that you have set. you only need to press “MEMORY” to choose the saved program you then press “START/+30SEC/CONFIRM” to start cooking.
Multi-Stage Cooking
Up to three stages of cooking can be set. If one of the stages is defrosting, it should be put in the first stage, and auto-cooking should not be set here. The tone will sound once after each stage, then the next stage will begin.
Example: if you want to cook food with 100% microwave power for 10 minutes. then 80% power for 15 minutes. then set as follows:
- Press “MICROWAVE” once to set 100% microwave
- Press number keys “1”, “0”, “0”, “0” to set the first cooking time.
- Press “MICROWAVE” twice to set 80% microwave
- Press number keys “1”, “5”, “0”, “0” to set the second cooking time.
- Press “START/+30SEC./CONFIRM” to start cooking.
Speed CookingWhen the oven is in standby state, press “START/+30SEC./CONFIRM” to start cooking immediately at full 100% power for 30 seconds, (the maximum time youcan set is 99 minutes and 99 seconds).When the oven is in microwave, grill and combination cooking states, press “START/+30SEC./CONFIRM” to add 30 seconds cooking time to the current timer. (In defrosting, multi-stage cooking or Auto cooking, this option is invalid.)
Inquiry Function
- While cooking, press “COMBINE”, “MICROWAVE” or “CONVEC” for the current power setting to be displayed for 2-3 seconds.
- While cooking, press “CLOCK/PRE-SET” for the current cooking time to be displayed for 2-3 seconds.
- While in the pre-set state, press “CLOCK/PRE-SET” for the current pre-set waiting time to be displayed for 2-3 seconds.
Child LockLock: While in standby, hold the “STOP/CLEAR” button for 3 seconds, and there will be a long tone sounding and a ![]() icon will display. This shows that the oven is locked.Unlock: While locked, hold the “STOP/CLEAR” button for 3 seconds, and there will be a long tone sound, and the
icon will display. This shows that the oven is locked.Unlock: While locked, hold the “STOP/CLEAR” button for 3 seconds, and there will be a long tone sound, and the ![]() icon will disappear. This shows that the lock has been released.
icon will disappear. This shows that the lock has been released.
Display Specifications
- In standby mode, the oven will display the clock with “:” flashing.
- In function setting states, the oven will display the related settings.
- During operations or suspended states, the oven will display the residual cooking times.
Maintenance and Troubleshooting
|
Normal |
|
| Microwave oven interfering with TV reception. | Radio and TV reception can be affected by microwave operations. It is similar to the interference small electrical appliances such as hair driers and vacuum cleaners can cause and is normal. |
| Dim oven light | In low-power microwave cooking, the oven light may become dim. This is normal. |
| Steam accumulating on door, hot air coming out of vents. | In cooking, steam may come out of the food. Most will come out of the exhaust vents, but some may accumulate in cool places like the oven door and is completely normal. |
| The oven started accidentally with no food in it. | Running a microwave with no food inside it is extremely dangerous. We suggest you either employ the child lock function or leave a glass of water inside the microwave when it is not in use. |
|
Trouble |
Possible Cause |
Solution |
| Oven cannot be started | Power cord not plugged in | Unplug, then plugin again after 10 seconds. |
| Fuse has blown or circuit breaker tripped | Replace fuse or check the circuit breakers. | |
| Problem with the outlet | Test the outlet with another appliance. | |
| Oven does not heat | Door not closed properly | Close the door firmly. |
| Glass turntable is making a noise while turning | Dirty rollers or dirty floor of oven | Clean rollers and floor of oven to remove residual food. |
If you have any issues, questions or problems with your oven, please contact the Kogan customer support team.
 Do not dispose of the microwave oven with your regular household waste. Please arrange for it to be collected, or take it to your local waste disposal and recycling plant to ensure that the components do not contaminate the environment.
[xyz-ips snippet=”download-snippet”]