
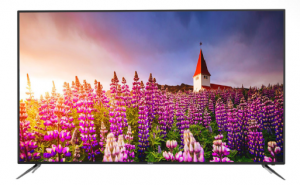
kogan 4K LED TV User Manual
Attention
Please handle this product with care and inspect it regularly to ensure it is in good working order.If the product, power supply cord or plug shows any signs of damage: stop use, unplug and contact Kogan.com support.
Safety Instructions
General Safety Instructions
Risk of electric shock. DO NOT OPEN! Do not attempt to service the television yourself, as opening or removing the covers may expose you to dangerous voltage or other hazards. Refer all servicing tothe Kogan customer support team.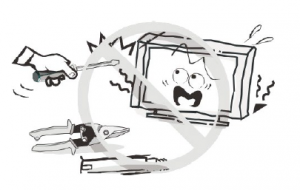
To reduce the risk of fire or electric shock, do not expose this product to rain or moisture. The television should not be exposed to dripping or or splashing, and no liquid filled objectssuch as vases should be placed on the case.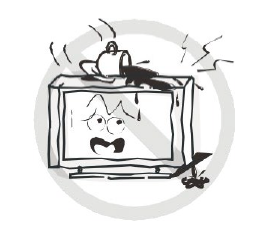
In the event of smoke, strange noises or a strange smell from the unit, you should follow these steps:
- Turn off the unit immediately.
- Disconnect the power plug from the power outlet.
- Contact the Kogan customer support team. Never attempt to make repairs yourself.
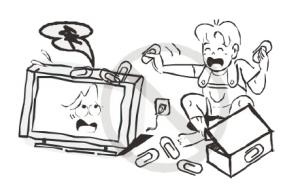
Never push objects of any kind into the set through the cabinet slots as they may touch dangerous voltage points or short-circuit parts that could result in a fire orelectric shock. Never spill any liquids onto the set. Usespecial caution in households where children are present. The television is not suitable for children under 4 years old to operate.
Power supply cords should be routed safely to prevent dangers due to damaged cords.The mains plug is the main disconnect method, so it should be easily accessible and not be obstructed during use.
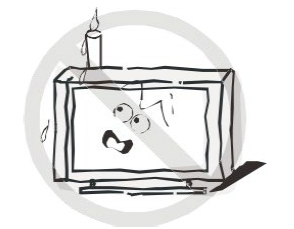
To avoid fires, no naked flame sources such as lit candles or burning incense should be placed onto the casing of the television.
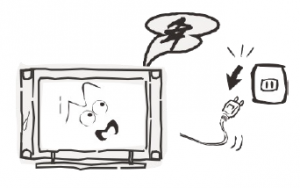
Do not pull the plug out of a power outlet by pulling on the power cable. Always grasp the plug and pull. Never touch the plug with wet hands.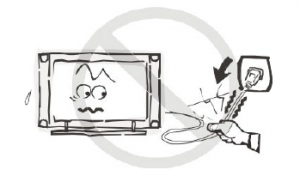
An outside antenna system should not be located in the vicinity of overhead power lines or other electric light or power circuits.When installing an outside antenna system, extreme care should be taken to keep from touching such power lines or circuits, as contact with them may be fatal.
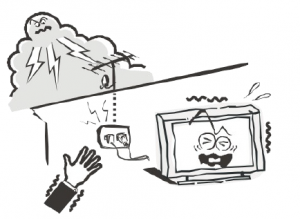
Always turn the set off when it is not being used. Unplug the television from the power outlet when it will not be used for a long time or when there is an electrical storm. Never touch the antenna cable during a lightning storm.

Excessive volume from earphones and headphones can cause permanent hearing loss. Always monitor the volume of noisefrom these devices, especially when children are using them.
Installation
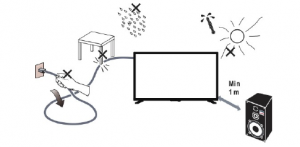
Ventilation should not be impeded or limited by covering the ventilation slots with items such as newspapers, tablecloths, curtains etc .. At least 10cm of space should be left around theapparatus for sufficient ventilation.

The television should be situated away from heat sources such as radiators, heaters, stoves or other products that product heat. & Place the television in a position where the screen is not exposed to direct sunlight. It is best to have soft indirect lighting while watching, and you should avoid a completely dark viewing environment and reflections to avoid eye fatigue. Keep the product away from high magnetic fields(such as near an amplifier speaker) to avoid affecting the tint.

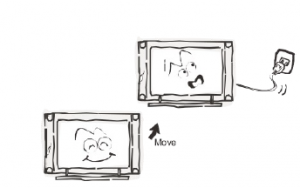
Do not place the television on an unstable table, stand ~ or shelf. The set may fall, causing serious injury as well:C ~- as damage to the television itself. ~ ‘:_ If moving the television on a cart, move the unit with d care as sudden stops and starts may cause the television to overturn.
Do not place this television near water, for example near a bathtub, wash bowl, kitchen sink, laundry tub, swimming pool or in a damp basement etc ..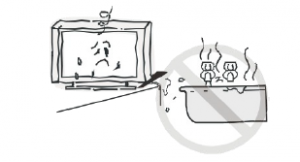
When moving the television to a warm location froma cold location, allow some time for any dew or condensation inside the television to evaporate fully Cleaning before you turn the unit on.
To prevent injury, the television must be securely attached to the floor/wall in accordance to the supplied installation instructions.
Cleaning
Unplug the television from the power supply before cleaning. Do not use any liquid cleaners or harsh chemicals. Use a soft, damp cloth.
General Description
- Zero X radiation complies to green environment protection requirements
- 16:9 widescreen
- Auto tuning and fine tuning.
- Component compatible (480i, 480P, 576i, 576P, 720P, 1080i, 1080P)
- Programmable sleep timer
- No signal automatic power off
Specifications & Accessories
Specifications
| Model | KALED55KU8000UC |
| Display Screen Size | 55″ Diagonal |
| Maximum Resolution | 3840 X 2160 |
| Power Supply | -110-240V, 50/60Hz |
| TV Receive System | PAL/SECAM: BG, DK, I DVB-T |
| Frequency Range | DTV: 5-12, 21-69 |
| Video In | PAL/NTSC/SECAM |
| Antenna Input Impedance | 75ohm unbalanced |
| Speaker Output Power | 2x9W |
| Remote Power Input | DC 3V (Two AAA batteries) |
| Power Consumption | 130W |
| Standby Consumption | <0.5W |
| Operating Temperatures | 0°c – 40°c |
Accessories
Remote Control
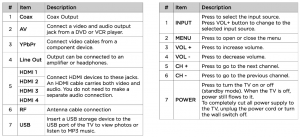
Input termlnals
1 x Antenna jack 4 x HDMI inputs1 x PC-RGB input 1 x USB input1 x COMPONENT input 1 x Headphone output1 x AV input 1 x SPDIF output
Product Preparation
If you need to remove or assemble the stand, please read the following:
- Before attaching/detaching the stand, be sure to turn the TV off.
- Before performing any work, spread cushioning out over the base area to lay the TV on. This will prevent it from being damaged.Do not apply any pressure to the screen display area, which may compromise the integrity of the display. The Kogan warranty does not cover user abuse or other damage caused by improper installations.
Stand Assembly
1. Place the TV unit face down on a soft, flat surface (blanket, foam, cloth etc .. ) to prevent any damage to the screen.2. Attach the stand to the bottom of the TV using the four MB4 x 22mm screws.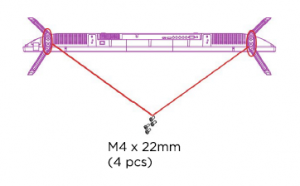
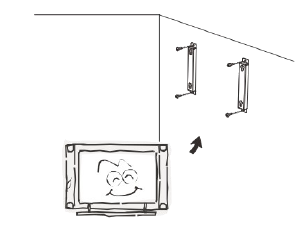
Wall Mounting Instructions
We suggest that the TV is mounted with at least 6cm gap to the wall to prevent cable interference. Before mounting the TV to the wall, the stand must be removed (if it is in place).To attach the wall mount to the TV: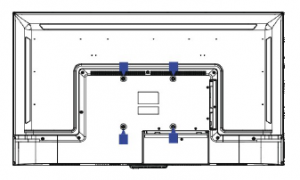
- Remove the TV stand screws.
- Remove the stand from the TV.
- Secure the wall mount bracket to the back of the TV using four large screws. Follow the installation instructions of the TV mount itself
NOTES
- The wall mount bracket is not included with the TV.
- Please confirm that your wall has the strength to withstand the weight of the TV.
- Be careful not to scratch the panel and TV cabinet when you fasten the screws to the TV.
Turning the TV On
- Install the stand and place the TV on a solid surface.0 Ensure that the TV is place in a position which allows free flow of air. Do not cover any ventilation openings on the back cover.0 To prevent unsafe situations, no flame sources such as lit candles should be place on or near the TV.0 Avoid heat, direct sunlight and exposure to rain or water.
- Connect the antenna cable to the ANT IN aerial socket on the back of the TV set.
- Remove the battery compartment cover on the remote control and insert two AA batteries, taking note of the polarity markings.
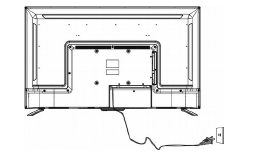
- Plug the TV power cord into a wall power outlet.
- Turn the TV on by pressing C> on the remote control or the POWER button on the side control panel of the TV.
 0 Ensure that the TV is place in a position which allows free flow of air. Do not cover any ventilation openings on the back cover.0 To prevent unsafe situations, no flame sources such as lit candles should be place on or near the TV.0 Avoid heat, direct sunlight and exposure to rain or water.
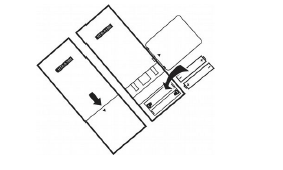
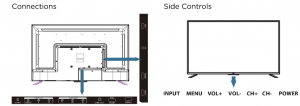
External Connections and Controls
Connecting to an antenna wall jack
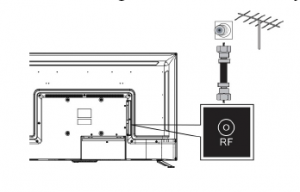
Connecting to an external audio/video device

Note: HDMI cables carry both audio and video. You do not need to use a separate audio cable.Note: Cables are often colour coded so you can match the colour-coded jacks.
Connecting Optical Out

Note: turn the TV and external devices OFF before making connections.
Playlng from External devices
- Turn on the TV and the connected device.
- Press INPUT to open the input source list, then press “1../T to highlight theinput to which the device has been connected, then press OK to select.0 Select TV to watch live TV from the RF input.0 Select HDMll, HDMl2, HDMl3 or HDMl4 to play from a device connected to the HDMll, HDMl2, HDMl3 or HDMl4 inputs.0 Select Composite to play from a device connected to the COMPOSITE input.0 Select Component to play from a device connected to the COMPONENT input.
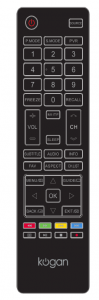
Remote Control
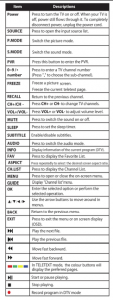
Getting Started
Important: make sure all relevent equipment is connected properly before connecting the unit to a wall power socket and turning on the power.
Powering the TV
To turn the power ON or OFF:
- Plug the power cord into a suitable power point, then turn the power on at the outlet.
- Press the POWER/STANDBY button on the right lower side of the back panel (or on the remote control, making sure to aim it at the sensor at the front of the TV); the indicatorwill glow green. Press it again to power off (standby mode), and the indicator will glow red.
First Use
When you switch on the TV for the first time, the First Time Setup menu will be displayed on the screen, as illustrated below.
- Language: use the/ buttons to select your OSD (on screen display) language, then use the T button to go to the next item.
- Country: use the ◄/ ► buttons to select the country you are living in, then use the T button to go to the next item.
- Time Zone: use the ◄/► buttons to select the time zone you are living in, then use the T button to go to the next item.
- Tune Type: use the ◄/► buttons to select the type of scan, then use the T button to go to the next item.
- Press the OK button to begin scanning for stations.
- To exit channel tuning, press the MENU or the EXIT button, then use the ◄/► buttons to select YES. Select NO to continue tuning.
- When auto-searching is complete, your TV will display the first channel located.
The TV set contains different settings menus where you can program your preferred settings. Once you have programmed any settings, the unit will then retain them in memory until youchange them again, even when switching the unit to standby mode. This means you can always operate the system under the same conditions.
- Press MENU on the back panel or remote control to display the main menu.
- Press ◄/ ► to select different submenus.
- Press OK to enter the submenu page.
- Press Ji../”f to select your preferred option.
- Press ◄/ ► to adjust the values.
- Press MENU to return to the previous menu page.
- Press EXIT to exit the menu page.
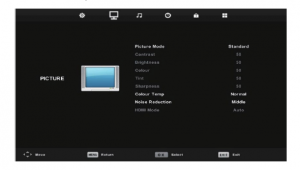
- Picture Mode: available options: Standard, Mild, Personal, Dynamic.
- Contrast/Brightness/Saturation/Sharpness/Tint: these values can only be adjusted when the picture mode is in personal mode. Press the/ buttons to decrease or increase the values. Press the Ji../”f buttons to switch between the settings.NOTE: Tint can only be adjusted when in NTSC mode. Australia’s video standard is PAL.
- Colour Temp: use this to adjust the optimum colour temperature suitable for viewing. Available options are: Cool, Normal, Warm.
- Noise Reduction: Available options: Off, Low, Middle, High, Default.
- Aspect Ratio: Available options: Auto, 16:9, 4:3, Zoom1, Zoom2
- HDMI Mode: Auto, Video, PC
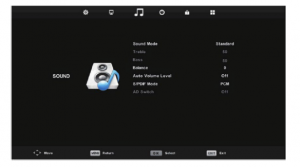
- Sound mode: Available options: standard, music, movie, sports, personal
- Treble/Bass: use these items to adjust the levels of higher pitched sounds (treble) and lower-pitched sounds (bass) from O to 100.Note: these values can only be adjusted when the sound mode is set to personal.
- Balance: use this to adjust the audio output from the left and right speakers from -50 to 50.
- Auto Volume Level: use this to turn auto volume control on and off.
- AD (Audio Description): press OK to enter, then you can switch AD ON or OFF. When AD is set to ON, you can adjust the volume level.Note: Audio descriptions for visual representation works only with programs that contain the related narration information.
- S/PDIF Mode: use this to select the S/PDIF audio output type: Off, Auto, PCM.
- Audio Delay: adjust this setting to synchronize the audio and video.
Time Settings
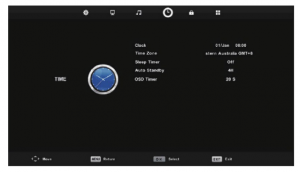
- Press the OK button to enter.
- Press the Jt./’ff buttons to select the desired item.
- Press the ◄/ ► / buttons to adjust the values.
Clock: not user adjustable. TV receives time values from the broadcast signal. Time Zone: used to select the desired time zone. Sleep Timer: used to adjust the sleep timer. Available options: OFF, 15/30/45/60/90/120/240 minutes. No Action Auto Sleep: Used to adjust the timer that will turn the TV off after a period of inactivity. Available options; ON, OFF.Auto Standby: Used to select the auto-standby duration. Available options: OFF,3H,4H,5H. OSD Time: Use to select the desired OSD (on-screen display) menu duration. Available options: 10/15/20/30 seconds.
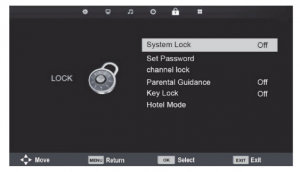
System Lock
- Press OK or ► to enter.
- Input the factory default password “0000” using the numbers on the remote control.NOTE: if you forget your password, the master password is “4711”.
- Press the ◄/► buttons to turn the lock settings ON or OFF.
Set Password
- Press OK or ► to enter.
- Follow the on-screen instructions and input the old password, then the new password.
Channel Lock
- Press the OK or to enter.
- Press the Ji../”f” buttons to select the channel you want to lock.
- Press the GREEN button repeatedly to lock/unlock the highlighted channel.
Parental Lock
- Use this item to select the desired program rating. Available options: No Block, Block All, Block G and above, Block PG and above, Block M and above, Block MA and above, BlockAV and above, Block R and above.
Key Lock
- Use this to the turn the keypad on the TV on or off.
OSD Language
Use this to select the desired on-screen display language.
TT Language
Use this to select the desired language for teletext display. (Please note that teletext is not available in Australia anymore)
Audio Language
Press OK or ► to enter. Then you can select the desired primary and secondary audio language(only adjustable if there is a signal).
Subtitle Language
Press OK or ► to enter. Then you can select the desired primary and secondary subtitle languages and turn on/off the hearing impaired function when this mode is on (only adjustable ifthere is a signal).
Hearing Impaired
This item is used to set Hearing Impaired function ON or OFF. For hearing impaired users, this function can assist them to know a certain scene or action through the caption instead ofhearing it.Note: hearing impaired function works only when you are viewing programs that contain suitable captions.
PVR FIie System
Press ◄/ ► buttons to select the USB drive. Check PVR File System: press OK to check the health of the USB drive file system. Format: press OK to select the file system type, then click OK again to format the USB drive. Time Shift Size: press OK, then press ◄/► buttons to select the time shift buffer size. Free Record Limit: press ◄/► buttons to select the free record time limit.
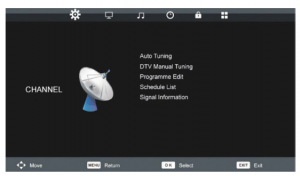
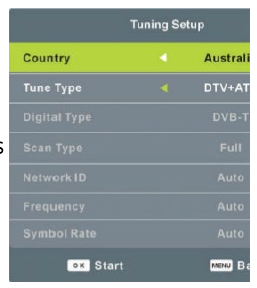
Auto ScanPress OK or ► to enter. Enter you password (the factory default password is “0000”), then select ‘Auto Tuning” and press OK or to start scanning.
DTV Manual ScanPress OK or ► to enter. Enter your password (the factory default password is “0000”).Press buttons to select the channel, then press OK to search.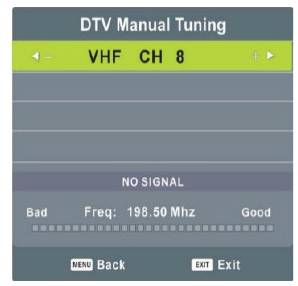
DTV Manual ScanPress OK or ► to enter. Enter your password (the factory default password is “0000”).Press buttons to select the channel, then press OK to search.
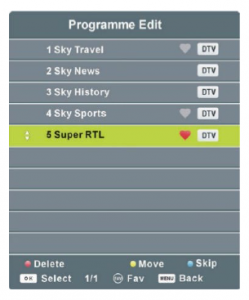
Program Edit
Press OK or to enter. Enter your password (the factory default password is “0000”).
- Press J;,,./’1//f buttons to highlight the desired channel.
- Press the RED button on the remote to delete the highlighted channel.
- Press the BLUE button on the remote to skip the highlighted channel.
- Select the channel you wish to move, then press the YELLOW button to enter move mode. Use the J;,,./’1//f buttons to select the preferred position, then press the YELLOW button again to move the channel.
- Press the FAV button to add the channel to the favourites list.
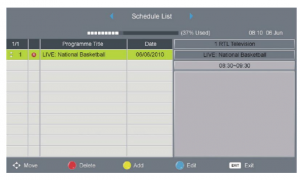
Schedule List
Press Ji../T to select this option, then press OK to enter. If any programs are scheduled through the Add menu (pressing YELLOW on the remote control) then the below menu will appear.Press ◄/► buttons to switch between Schedule List and Recorded List.
- Press the RED button to delete the highlighted option.
- Press the YELLOW button to enter the add menu page.
- Press the BLUE button to enter the edit menu page.
Signal InformationThis is used to display signal details, such as channel number, frequency, quality and strength.
Media Playback
- Insert a USB memory device into the USB port.
- Press the SOURCE button on the back panel or on the remote control to switch the unitto USB mode. (Alternatively, press the MEDIA button on the remote control to enter USBmode directly).
- Press Ji. /T / ◄/► buttons to move the cursor.
- Press the EXIT button to return to the previous menu.
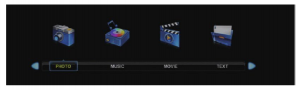
Photos
- Press ◄/ ► buttons to select Photo in the main menu, then press OK to enter.
- Select the USB drive and press OK. Only photo files can be played in this menu category.
- Use Ji. /T / ◄/ ► buttons to select the desired folder or file, then press OK to open them. Press PLAY to start playing the files.
Press the RED button on the remote control to access the sub menu functions such as Delete. When playing photo files:
- Press the DISPLAY button on the remote control to display the on-screen tool bar. Press T button to hide the tool bar.
- Use ◄/► buttons then press OK to select a function such as Previous, Next, Repeat, Rotate, Zoom In/Out etc .. from the on-screen toolbar.
- Note: you can only rotate a photo when the slideshow is paused.
Music
- Press ◄/► buttons to select Music in the main menu, then press OK to enter music mode. Select the USB drive, then press OK. Music files can only be played in this menu category.
- Use.&. /T / ◄/► buttons to select the desired folder or file, then press OK to open the folder or file. Press PLAY to start playing the files.
- Press the RED button on the remote control to access sub menu functions such as delete.
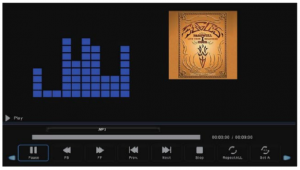
When playing music files:
- Press the DISPLAY button on the remote control to display the on-screen toolbar or T button to hide the toolbar.
- Use ◄/► buttons, then press OK to select a function such as Fast Rewind, Previous, Next, Mute, Repeat etc .. from the on-screen toolbar.
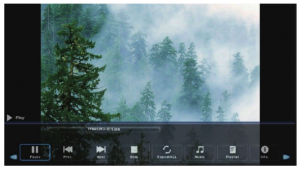
Videos
- Press ◄/► buttons to select Movie in the main menu, then press OK to enter movie mode. Select the USB drive, then press OK. Movie files can only be played in this menu category.
- Use .&. /T / ◄/► buttons to select the desired folder or file, then press OK to open the folder or file. Press PLAY to start playing the file.
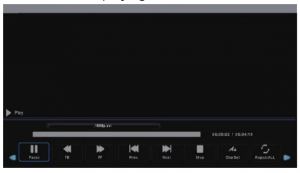
When playing movie files:
- Press the DISPLAY button on the remote control to display the on-screen toolbar or T button to hide the toolbar.
- Use ◄/► buttons to select your option, then press OK to confirm.
Text
- Press ◄/► buttons to select Text in the main menu, then press OK to enter text mode. Select the USB drive, then press OK. Text files can only be viewed in this menu category.
- Use..&. /’ffff I ◄ / ► buttons to select the desired folder or file, then press OK to open the folder or file. Press PLAY to display the file.
When playing text files:
- Press the ◄ ◄/► ► buttons to display the previous/next page.
- Press the DISPLAY button on the remote control to display the on-screen toolbar. Press T button to hide the toolbar.
- Press ◄/► buttons to select the preferred option, then press the OK button to confirm
Troubleshooting
If you have any problems with your television, please check the suggested solutions below, as these issues may be caused by improper adjustment/setup rather than a malfunction with theunit. If the problem persists, please contact the Kogan customer support team.

Read More About This Manual & Download PDF:
[xyz-ips snippet=”download-snippet”]