
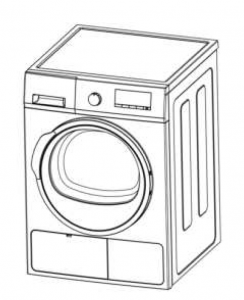
Kogan 8kg Series 8 Heat Pump Dryer User Manual
Safety & Warnings
Warning
- Children shall not play with the appliance. Cleaning and user maintenance shall not be made by children without
- supervision.
- Children, less than 3 years should be kept away unless continuously supervised.
- The rear surface of the appliance shall be placed against a wall.
- Do not over-dry laundry. Over-drying can cause creasing and wastes energy.
- Clean the filters regularly to avoid excessive drying times and high electricity consumption.
- Ventilate the room well
Risk of electric shock
- Do not attempt to repair this product yourself. If the product or its power supply experience any malfunction or damage, stop using it immediately and contact Kogan.com to arrange a repair.
- The household electrical supply system (the current, the voltage and the cable) such as a fuse with suitable specifications should be provided and should meet requirements of the dryer under normal load and safety devices. The power plug must be connected to a three-core socket with an earth wire and must be grounded properly and reliably.
- If the supply cord is damaged, it must be replaced by the manufacturer, its service agent or similarly qualified persons in order to avoid a hazard.
- Do not disconnect the power plug by pulling the supply cord. Hold the power plug with your hand. Ensure the power plug is clean and dry and do not touch it with wet hands.
- Do not over-bend the supply cord or put it under heavyw
Risk of explosion

- Do not put combustible liquid such as gasoline, petrol and alcohol in or near to the appliance. Do not put clothes that have come into contact with these liquids into the appliance.
- Do not connect/disconnect the power plug when leakage of gas or other combustible materials occurs.
Risk of fire /Short circuit or electric leakage
- Do not install the appliance close to fire sources or heat sources.
- Do not place any burning candles or cigarettes on the appliance.
- Do not install the appliance in areas prone to damp or water ingress as water on the electrical components can damage the appliance and/or pose a hazard.
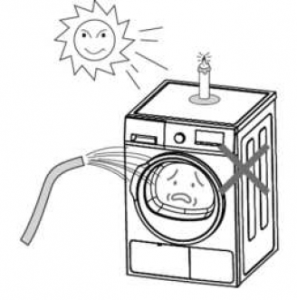
- Do not install the dryer in places under direct sunshine or the plastic components and rubber components may become aged.
- Do not use pressurised water on the appliance when cleaning it.
- Do not use the appliance to dry cushions, quilts and the like, as these items accumulate heat and can pose a fire hazard.
- When using stain remover on your laundry, ensure you run an extra rinse cycle prior to loading the tumble dryer.
- Ensure all pockets are empty prior to loading laundry into the tumble dryer.
- Items that have been soiled with substances such as cooking oil, acetone, alcohol, petrol, kerosene, spot removers, turpentine, waxes and wax removers should be washed in hot water with an extra amount of detergent before being dried in the tumble dryer.
- Ensure the openings in the base are not obstructed by carpets.
Warning
- Keep ventilation openings clear of obstruction.
- Do not damage the refrigerant circuit.
- Never stop a tumble dry before the end of the drying cycle unless all items are quickly removed and spread out so that the heat is dissipated.
- The appliance must not be connected through an external switching device, such as a timer, or to a circuit that is regularly switched on and off by a utility.
Risk of personal injury

- This machine is not intended for use by persons, including children with reduced physical, sensory or mental capabilities or lack of experience and knowledge unless they have been given supervision or instruction concerning use of the appliance by a person responsible for their safety.
- Children shall not play with the appliance. Cleaning and user maintenance shall not be made by children without supervision.
- To avoid danger to children, ensure all packaging is disposed of safely.
- Ensure children under 3 years of age are supervised at all times when they are near the appliance.
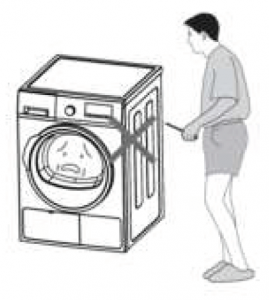
- Wait until the drum has stopped completely prior to removing laundry from the dryer.
- Children and pets should be kept away when the dryer is working to ensure they do not become trapped. Always check the drum carefully before closing the door.
Other instructions
- This appliance is designed for domestic use. It must not be used for purposes other than those for which it was designed.
- Only wash fabrics which are designed to be machine dried. Follow the instruction on each garment label.
- Any electrical work required to install this appliance should be carried out by a qualified electrician.
- If the machine is situated on a carpeted floor, adjust the feet in order to allow air to circulate freely under the appliance.
- Do not climb onto the dryer or rest heavy objects/heating devices or items with water or liquid leakage on the dryer.
- Objects such as coins, safety pins, nails, screws, stones or any other hard, sharp materials can cause extensive damage and must not be placed into the machine.
- After installing the appliance, check that it is not pressing or standing on its electrical supply cable or vent hose.
- Items such as foam rubber (latex foam), shower caps, waterproof textiles, rubber backed articles and clothes and pillows fitted with foam rubber pads should not be dried in the tumble dryer.
- Always unplug the appliance after use, cleaning and maintenance.
- Do not overload the appliance.
- Clothes which are dripping wet should not be placed in the dryer.
- The tumble dryer is not be used if industrial chemicals have been used for cleaning.
- Clean lint frequently.
- Do not dry unwashed items in the tumble dryer.
- The final part of a tumble dryer cycle occurs without heat (cool down cycle) to ensure that the items are left at a temperature that ensures that the items will not be damaged.
- The appliance must be installed on a firm, level surface in a clean place where there is no water, ice or combustible materials.
- If the tumble dryer is not completely levelled, you need to adjust the front feet up to lower the dryer by turning anticlockwise and to ascend it by turning clockwise till the appliance will not shake.
- Adequate ventilation has to be provided to avoid the backflow of gases into the room from appliances burning other fuels, including open fires.
- Oxidation creates heat. If the heat cannot escape, the items can become hot enough to catch fire. Piling, stacking or storing oil-affected items can prevent heat from escaping and so create a fire hazard.
![]() It is dangerous to alter the specifications or modify this product in any way.
It is dangerous to alter the specifications or modify this product in any way.![]() Should the appliance be moved, it must be transported vertically.
Should the appliance be moved, it must be transported vertically.
Overview
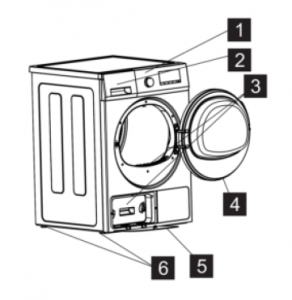
| 1 | Control panel |
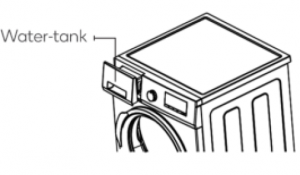
| 2 | Water tank |
| 3 | Lint filter |
| 4 | Door |
| 5 | Condenser cover |
| 6 | Adjustment leg |
Control panel

| 1 | Programme selection knob | 4 | Dry level | 7 | Delay start |
| 2 | Time | 5 | Anti-crease | 8 | Start/Pause |
| 3 | Child lock | 6 | Buzzer | 9 | Indicator lights:
|
OperationInstallation
Important:
The hot air emitted by the tumble dryer can reach temperatures of up to 60°C. Therefore, the appliance must not be installed on floors which are not resistant to high temperatures. The machine must be stable: when pressing on any corner, it should not wobble. The feet can be readjusted by means of the screws on the bottom: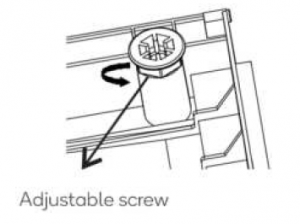
This Appliance Must Be Earthed
- Before switching on, make sure the electricity supply voltage is the same as that indicated on the appliance’s rating plate.
- Should the plug need to be replaced for any reason, it will need to completed by a Kogan technician or qualified service agent. The wires in the mains lead are coloured in accordance with the following code:
- Green and yellow – Earth
- Blue – Neutral
- Brown – Live
In the case of a permanent connection, it is necessary to install a double pole switch. The switch must not break the yellow and green earth cable at any point.The wire coloured green and yellow must be connected to the terminal marked with the letter or by the earth symbol or coloured green and yellow.Any such maintenance should only be carried out by a qualified electrician and you should always contact Kogan.com if your dryer is experiencing any malfunction with your product.
Before First Use
- Ensure that the electrical connections comply with the installation instructions.
- Remove the polystyrene block and any material from the drum:
- Open the loading door.
- Pull off adhesive strips from inside of the machine to top of the drum.
- Remove the two-packaging foam from the machine
- Before using your tumble dryer for the first time, it is recommended to place a few damp cloths inside the appliance and tumble dry for 30 minutes as there may be dust inside a brand-new tumble dryer.

Regular Operation
- Connect the appliance
- Open the door
- Place the laundry in the drum, one item at a time, shaking them out as much as possible.
- Close the door. Ensure the laundry does not get caught between the doors and filter
To cancel a programme which is running, turn the programme selector dial to “off”. At the end of drying, turn the selector dial to “off” to switch the machine off before removing the laundry.
Programme Selection
- Turn the programme selector dial to the desired programme: the Start/Pause light will flash. The programme will beswitched off if there is no input for 10 minutes.

Note:
- “ ” is the standard programme. The programme is suitable to dry normal wet cotton laundry and it is the most energy-efficient programme.
- Some thick clothes such as jeans and large towels take longer to dry due to the characteristics of the material. If you find that they are not completely dry at the end of the programme, it is recommended to use the “Time” programme to dry again.
Automatic Drying
- The device comes with the sensor to sense the moisture in order to automatically adjust the drying time for optimal drying.
- This automatic control system is suitable for most programmes except Warm air, Refresh and Time.
Time
- Turn the knob to the Time option and press the Time button to add to the drying time.
Programme Options
- Depending on the programme, different functions can be combined. These must be selected after choosing the desired programme and before depressing the Start/Pause button. When these buttons are pressed, the corresponding indicator lights will illuminate to show it. When they are pressed again, the lights go out.
Select Buzzer

- The buzzer can be selected during normal use. Press the “Buzzer” button to turn the buzzer and corresponding light on/off. A confirmation tone will sound.
- Press and hold for 5 seconds to activate Anti Crease and Delay Start.
Select Dry Level
- Before you start the machine, you can choose the dry level. The dry level is divided into three grades:
- (Heavy)
- (Strong)
- (Normal)
- This option is only applicable to the following programmes:
- Daily
- Cotton
- Synthetic
- Bulky item
- Towel
Select Anti Crease
Anti Crease is a default setting at the end of each programme. A longer Anti Crease function can be selected while the programme is in standby or running.
Select Delay Start
selected after setting the programme and before pressing Start/Pause to commence drying. When Start/Pause is pressed, the corresponding indicator lights will flash. Other indicator lights will be off except for Delay Start pilot light.
Display
Along with the programme time countdown, the following items are displayed:
Delayed start
- If you have set a delay timer, the remaining time will be displayed in hours. Press the Delay Start button again to show the duration of the set programme.
Start/Pause
Use the Start/Pause button or open the door to pause during operation. Only Start/Pause, Anti Crease and Buzzer controls will work. To re-start the programme, press the Start/Pause button once again with the door shut.
Indicator lights
 |
Drying light: Indicates that the appliance is in the drying phase. |
 |
Cooling light: Indicates that the appliance is in the cooling phase. |
 |
Kogan 8kg Series 8 Heat Pump Dryer User Manual |
 |
End of programme light: Indicates the cooling phase is complete. |
 |
Anti-creasing light: Indicates the anti-creasing programme is selected. |
 |
Filter light: Comes on during every cycle to remind you that the filter must be cleaned at theend of the programme. |
 |
Child lock light: Indicates that the appliance is locked. |
 |
Buzzer light: Indicates that the buzzer programme is selected. |
 |
Delay start light: Indicates that the delay start programme is selected. |
 |
Drying type light: The light for the appropriate set drying intensity will be on |
 |
Tank full light Comes on after each programme and also when the water tank is full,reminding you to empty the water container. |
Programme End
All drying programmes will end with a 10-minute cooling phase. If the laundry is not removed at the end of the cycle, the dryer will run an anti-crease phase – the default duration is 30 minutes and it can be set up to 120 minutes. If the laundry is not removed at the end of the Anti-Crease phase, the display will show “End” and the buzzer will sounds for 15 seconds if enabled. To finish, turn the programme selector dial to off.
Child Lock Function
Press and hold “Time” and “Dry Level” together to toggle the child lock function on or off. With the child lock active, onlythe “Off” button will function.
The function will be cancelled if the door is opened during operation, the filter drawer is removed during operation or if the water tank becomes full.
After Use
If the drying programme has to be stopped before it reaches the end, it is recommended to run the cooling phase before removing the laundry so excess heat can dissipate.Turn the dial to “Off” and then to “Refresh” before pressing the “Start” button.
Modifying the Programme
To change a programme which is running, first cancel it by turning the programme selector dial to “Off”, then select the new programme and press the “Start” button.
Before Loading Laundry
Never tumble dry particularly delicate items such as net curtains, woollen, silk and fabrics with metal trim, nylon tights, bulky materials such as anoraks, blankets, eiderdowns, sleeping bags, feather quilts and other items containing rubber foam or materials similar to rubber foam.
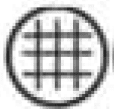
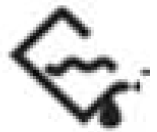
- Always follow the instructions on garment labels:
Can be tumble dried Delicate drying (low temperature) Normal drying (high temperature) Do not tumble dry - Close pillowcases and covers with fasteners to prevent small laundry items getting tangled inside them.
- Close press studs, zips, hooks, tie belts and apron strings. Sort laundry according to type and degree of drying required.
- Avoid drying dark garments with light-coloured items such as towels as they could attract lint.
- The laundry must be thoroughly spun before tumble drying.
- Knitted wool may shrink a little: take care to not over-dry items of this type.
- Starched items can be placed in your dryer: the programme “Iron dry” should be run. To remove starch residue,
- wipe out the internal drum after drying with a moist cloth and then rub it dry.
- To avoid a static charge when drying is completed, use either a fabric softener when you washing or a fabric
- conditioner specifically for tumble dryers.


Ensure no metal objects, such as hair clips, pins, etc., are left in the laundry
- For button-up pillowcases, close zip fasteners, hooks and poppers, tie any belt or long tape to avoid the laundrybecoming tangled.
- For zips, button up duvet covers, tie loose ties or ribbons (e.g. of aprons).
- Turn items with double-layered fabrics inside out. For button-up pillowcases, close zip fasteners, hooks and
- poppers, tie any belt or long tape to avoid the laundry becoming tangled.
- For zips, button up duvet covers, tie loose ties or ribbons (e.g. of aprons).
- Turn items with double-layered fabrics inside out.
Maximum LoadRecommended loads are indicated in the programme chart below. For general reference:
- Cotton, linen: Drum full but not too tightly packed
- Synthetics: Drum not more than half full
- Delicate fabrics and woollens: Drum not more than a quarter full
Try to load the maximum capacity of the machine as small loads are uneconomical.
| Course | Maximum load | Description of the programme |
| Daily | 8kg | A regular load. Different drying strengths can be selected |
| Cotton | 8kg | Cotton products, etc. Different drying strengths can beselected. |
| Synthetic | 4kg | Synthetic fibre products, etc. Different drying strengths canbe selected |
| Bulky item | 8kg | Large items such as bedsheets and quilt covers. Differentdrying strengths can be selected. |
| Towel | 4kg | Towels, etc. Different drying strengths can be selected. |
| Wool | 2kg | Knitted products, etc. |
| Duvet | 3kg | Duvets, down jackets, etc. |
| Babycare | 3kg | Baby clothes, etc. |
| Warm air | 4kg | Delicate materials such as silk. |
| Refresh | 4kg | Allows the laundry to cool and deodorise. |
| Time | 8kg | Drying thick or multi-layered textiles. |
| Underwear | 2kg | Underwear, etc. |
| Denim | 4kg | Denim, etc. |
| Shirts | 2kg | Shirts, etc. |
| Sportswear | 2kg | Sportswear, etc. |
Note: For drying bathrobe and towelling items, the maximum load should not exceed 6kg.
Cleaning & Care
- Disconnect the appliance from the power supply before you carry out any cleaning or maintenance.
- Don’t clean the dryer by directly spraying water onto it. Don’t clean the dryer with benzene, thinner, alcohol or acetone: otherwise, it may cause discolouration, deformation, damage, electric shock or fire.
Emptying the Water Container
The water container collects water from the condenser. It needs to be emptied after every drying cycle. If the water container is full, an active programme stop and the tank full indicator will come on along with a buzzer tone. To continue the programme, the water container must first be emptied.
- Remove the water container.
- Empty wastewater
- Replace the water container into the dryer.
- Press the Start/Pause button.

Water Hose Drainage
The water tank can be filled and emptied, or a hose can be connected to drain automatically
Remove the hose and insert the drainpipe as shown below.
Control Panel
- Clean with a soft, damp cloth. Do not use abrasive substances.
- Don’t spray cleaners directly on the panel.
- The control panel finish may be damaged by some laundry pre-treatment or stain remover products.
- Apply such products away from your dryer and wipe up any spills or overspray immediately
Stainless Steel Tumbler
Door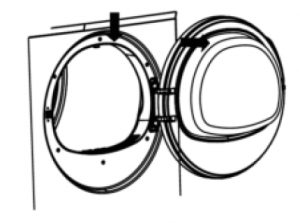
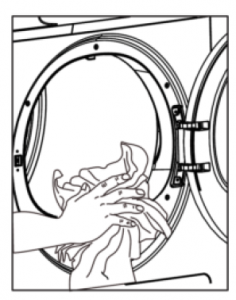
Periodically clean the interior part of the door to remove any lint. Accurate cleaning ensures correct drying.
Dryer Exterior
- The dryer exterior has a high-gloss finish. Clean with a soft, damp cloth. Don’t use abrasive substances.
- Protect the surface from sharp objects as they may scratch or damage the finish.
- Don’t place any heavy or sharp objects or detergent boxes on the dryer. Keep them in a separate storage box.
 Warning: Do not use the appliance without the filter installed
Filter
The lint filter should be cleaned frequently.
- Open the loading door.
- Pull lint filter upwards and out.
- Clean lint, fibre and cotton ravelling by hand or with a soft piece of cloth.
- Close the lint filter and place it back into its housing.
After continued use. a layer can build up on the filter pores and cause the filter to clog. Wash with warm water to removethis layer. Dry the lint filter completely before reinstalling it.

Humidity SensorCalcium oxide builds upon the sensor surface should be cleaned off periodically.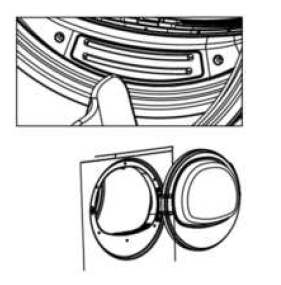
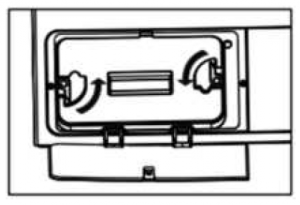
Filter Drawer
Lint and fibre which cannot be captured by the lint filter are caught in the filter drawer behind the cover. This should be cleaned after each drying cycle.There is a two-level filter in the filter drawer: the first level is the filter drawer sponge and the second level is the filter cloth.
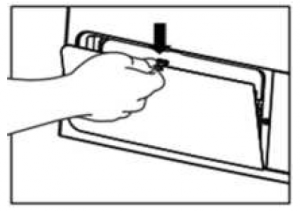
- Press the button to open the cover.
- Open the latch.
- Clean lint, fibre and cotton ravelling on the filter cloth by hand or with a soft cloth.
- If a layer is becoming clogged, clean it by washing it in warm water. Let the filter cloth dry thoroughly before reinstalling it.
- Wash the filter drawer sponge by hand to remove the lint on the surface.
- After washing the sponge, squeeze it by hand and remove the excess water.
- Allow the sponge to dry fully.

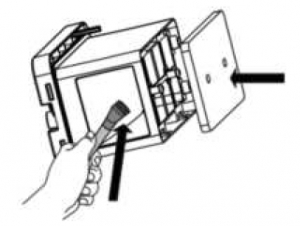
Evaporator
- Clean the lint accumulated on the evaporator fins located behind the filter drawer with a vacuum cleaner or a soft brush.
- It is recommended to clean it at least twice a month.
Warning
Never attempt to clean with bare hands. Evaporator fins can harm your hand.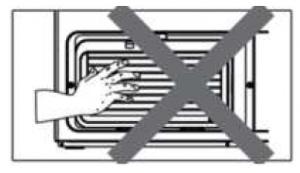
Specification
| Dryer Capacity (kg) | 8.0 |
| (AC V/Hz) | 220-240/50 |
| Rated Power (W) | 650 |
| Weight (kg) | 46 |
| Power (Left-On Mode) (W) | 0.36 |
| Power (Off Mode) (W) | 0.4 |
| Energy Consumption at Full Load (kWh) | 2.9 |
| Programme Time at Full Load (min) | 290 |
| Dimensions (W x D x H) (mm) | 595 x 630 x 850 |
| Ambient Temperature Range (°C) | 5-35 |
Troubleshooting
Issue |
Possible cause |
Solution |
| Dryer not turning on |
|
|
| Drying resultsunsatisfactory |
|
|
| The drying cycle endsshortly after theprogramme starts. “END”light illuminated. |
|
|
| Drying cycle lasts for anunusually long time |
|
|
Recently viewed articles
Kogan 1500W Vitablast Blender – (KAVTBLST15B) – ManualKogan 1000W 8-Piece Rocket Blender Pro Set – (KANMB8PC1WA) – Manual
Shangri-la Paddington Premium Stainless Steel Kitchen Island Trolley – (SLPKITBENWA) – ManualShangri-la Bexley Premium Bamboo Kitchen Island Trolley – (SLBKITBENNA) – Manual
AboutAbout Kogan.comCustomer AccountsManage My OrderCareers at Kogan.com
Useful LinksIndependent Product ReviewsQantas Frequent FlyerRefer a Friend
LegalWarranty Terms and ConditionsPrivacy PolicyTerms & ConditionsSpam Act PolicyChange Of Mind PolicyPrice Drop Guarantee
More from Kogan.comKogan MobileKogan InternetKogan InsuranceKogan HealthKogan Life InsuranceKogan Pet InsuranceKogan For Business
Read More About This Manual & Download PDF:
References
Kogan.com Careers
Kogan Insurance | Better Value Car, Home & Contents & Travel Insurance Starts Here
Kogan Insurance | Better Value Car, Home & Contents & Travel Insurance Starts Here
Kogan Mobile – Kogan Mobile
Better Value Life Insurance Starts Here | Kogan Life Insurance
Kogan Pet Insurance | Only The Best For Your Pet
Kogan 1500W Vitablast Blender – (KAVTBLST15B) – Manual – Kogan.com Help Centre
Kogan Internet | Unlimited NBN Plans With No Lock-In Contacts – Kogan Internet
Kogan 1000W 8-Piece Rocket Blender Pro Set – KANMB8PC1WA – Manuals and Support – Kogan.com Help Centre
[xyz-ips snippet=”download-snippet”]