
kogan 9 in 1 Multifunction Pressure Cooker User Manual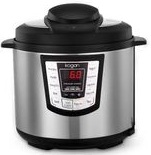
Attention
- Please handle this product with care and inspect it regularly to ensure it is in good working order.
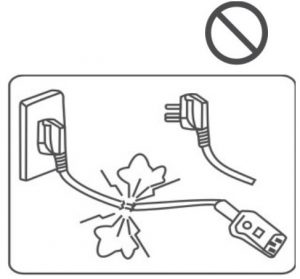
- If the product, power supply cord or plug shows any signs of damage: stop use, unplug and contact Kogan.com support.
Important Safeguards
Read all instructions :
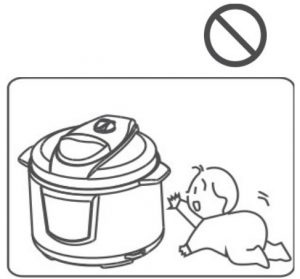
- Do not let children near the pressure cooker when it is in use.
- Do not put the pressure cooker into a heated oven.
- When the pressure cooker is under use, please move the pressure cooker with the utmost care, and only if it is absolutely necessary to move it. Do not touch hot surfaces, and use gloves or similar heat protection.
- Do not use the pressure cooker for any purposes other than the one for which it is intended.
- This appliance cooks food under pressure. Scalds may result from inappropriate use of the pressure cooker. Make sure that the cooker is properly closed before applying heat. See “instructions for use” for more information.
- Never force the pressure cooker open. Do not open before making sure that the internal pressure has completely dropped.
- Never use the pressure cooker without adding water, as this can lead to serious damage.
- Do not fill the cooker beyond 2/3 of it’s capacity. When cooking food products which expand during cooking (such as rice or dehydrated vegetables), do not fill the cooker to more than half of it’s capacity.
- After cooking meat with a skin (such as sausages) which may swell under the effects of pressure, do not prick the meat while the skin is swollen. You may be burned.
- When cooking doughy food, gently shake the cooker before opening the lid to avoid food ejection.
- Before each use, check that the valves are not obstructed.
- Never use the pressure cooker in its pressurized mode for deep or shallow frying of food.
- Do not tamper with any of the safety systems beyond the maintenance instructions specified in the instructions.
- Only use spare parts sourced from Kogan.com. Use of third-party replacement parts including lids or valves can be extremely dangerous.
- Keep a copy of these instructions handy for future reference.
- NEVER ATTEMPT TO OPEN THE LID WHILE THE UNIT IS OPERATING.
- This appliance is intended to be used in household and similar environments such as:
- staff kitchen areas in shops, offices and other working environments;
- farm houses;
- by clients in hotels, motels and other residential type environments;
- bed and breakfast type environments
- This appliance is not intended for use in a commercial environment.
- This appliance is intended to be used in household and similar environments such as:
- This appliance is not intended for use by persons (including children) with reduced physical, sensory or mental capabilities, or lack of experience and knowledge, unless they have been given supervision or instruction concerning use of the appliance by a person responsible for their safety.
- Children should be supervised to ensure that they do not play with the appliance.
- Before using this product, please read the user manual carefully.
- Do not place the unit in an unstable location. It is strictly prohibited to use it on a newspaper, foam or any other object that may easily block the vent hole at the bottom.
- Never use it in a location near fire or water. Do not use it in direct sunshine or where oil may splash.
- Ensure the product, and power cords, are all out of reach of children.
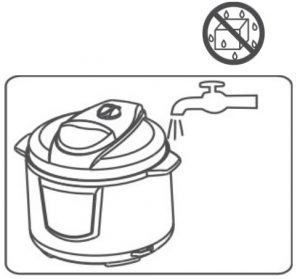
- Never place the product, power cord or plug in water or any other liquids.
- If the unit, power cord or plug are damaged, stop use and contact the Kogan.com customer support team immediately. The unit is not able to be repaired by the customer.
- This appliance is not intended to be operated by means of an external timer or by a separate remote-control system.
- Cooking appliances should be positioned in a stable location with the handles position to avoid the spilling of hot liquids.
- Be mindful that after use, surfaces of the appliance will be subject to residual heat.
Specifications
| Model | PowerSupply | PowerUsage | Volume | Diameter of Pot | Working Presure | Heating Temperature |
| KAPRSCOOKZA | 220-240V 50-60Hz | 840 1000W | 6L | 22cm | 70kPa | 60°C-80°C |
| Ac esories | Rice Paddle
|
Ladle |
Manual |
Measuring Cup
|
Power Cord Components
|


This product should not be disposed of with other household waste. To prevent possible harm to the environment or human health due to uncontrolled waste disposal, recycle it responsibly to promote the sustainable reuse of material resources. Please contact your local municipal waste disposal service for information.
Product Diagram

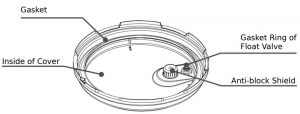
 Diagram of Float Valve
Warming Tip:
- Before each use, inspect the float valve and exhaust valve.
- Before inserting the inner pot into the exterior pot, be sure to remove any debris or water from either pot.
- When moving the unit, please lift the unit by the handles.
- The outer casing can be wiped mclean with a cloth wipe.
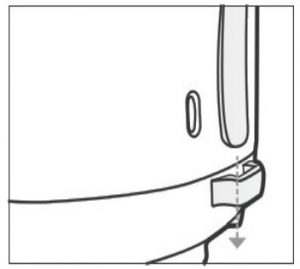
Rice Paddle Attachment Method
Before first use, please take out all accessories from the cooker body and read the User Manual carefully. Special care must be taken to follow directions and heed warnings to avoid damage to property and also to avoid injury or burns.
Usage
Control Panel

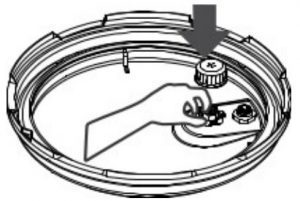
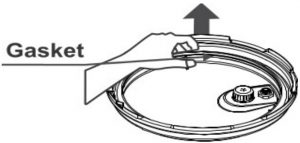
Anti-Block Shield and Gasket Maintenance
| DisasemblyandInstalation ofAnti-BlockShield | Disassembly embly–screw of up wards counterclockwise.
|
Asembly–screw back on down wards clockwise.
|
1. Priortoeachuse,inspect toensurethatthegasket andanti-blockshieldare mounted to the upper cover. 2. After use,remove any foreign objects from the gasketandanti-block shield.Ke ptheseclean toavoidodours. 3. Neverpulthegasketwith force,asdeformationmay afectsealingand presureefects. 4. A damagedgasketshould notbeused.Please contacttheKogan.com customersupportteam forinformation. |
| DisasemblyandInstalation of Gasket | Disasembly–pulup
|
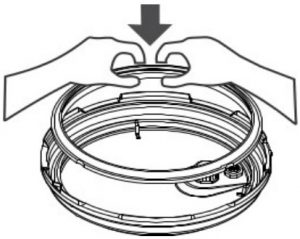
Asembly–pres down
|

Cooking Preparation
- Open the cover correctlyHold the cover handle with one hand, then turn the cover counterclockwise approximately 30 degrees m,until the cover marking is aligned with the outer ▼ case marking OPEN, then lift the cover.

- Check that all parts on the cover are mounted properlyCheck the float valve and exhaust valve for obstruction, and confirm that parts such as gasket and anti-block shield are installed correctly.
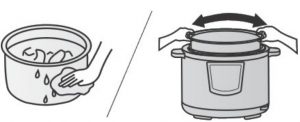
- Remove the Teflon coated aluminium inner pot, then put food and water into the pot.The total amount of food and water should not exceed the MAX level of inner pot height.
- Put the inner pot into the electric pressure cookerBefore reinserting the inner pot, remove any foreign objects and water droplets from the exterior of the inner pot and from the inside of the housing. After putting inner pot in, rotate the inner pot slightly left and right to ensure a good contact between the inner pot and the heating plate.
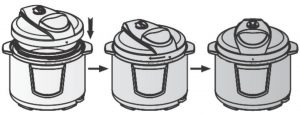
- Close the cover completelyBefore closing, check whether the gasket has been put into the steel rim inside the cover. Hold the cover handle with one hand, then rotate the cover clockwise approximately 30 degrees until the cover marking is aligned with the outer case ▼ marking CLOSE.
- Position the exhaust valve properlyDuring operation, align the small handle of the exhaust valve with the small closed icon, indicating that the pressure cooker is in the airtight condition. When manual venting of pressure is needed, align the small handle on the exhaust valve with the small open icon, indicating that the pressure cooker is in the exhaust mode.


Function Selection
General Functions
- Complete the cooking preparation steps as shown above
- Switch the unit on
- The display with flash and display red horizontal line “—“, indicating that the electric pressure cooker has entered the preparation state.
- Select a required function level
- Once a function key is pressed, the indicator of the corresponding function level will illuminate on the control panel in red;
- The rice porridge and cake functions are only applicable to products matching those descriptions;
- Cooking times vary with each different function level. The bigger the food amount, the longer the cooking time will be. The cooking times listed in the table below are only for reference (e.g food amount + water = 8 scales): Cooking time = heating time + holding time.
FunctionKey Meat/Stew Poultry Beans/Chili Rice Co kingtime(min) Approx5 Approx5 Approx45 Approx35 Soup Yoghurt Saute/Brown Cake/Bake Slow Cook Approx50 Approx360 Approx30 Approx60 120~600
- Press a function key. 10 seconds later the pressure cooker will perform the selected program.Within 10 seconds, you can re-select the Timer and function level, then finally confirmthat the electric pressure cooker will start working 10 seconds after selection.• The red horizontal line “—” on the display screen is bright, indicating that thepressurecooker has entered it’s working state.• Take into account the warm up cycle of 10-15 minutes.• During operation, you can cancel the current working state and return the unit tostandby mode by pressing the “Start/Cancel” key.
- After cooking, unit will go into warming state automatically.After cooking, the corresponding function indicator will go out, and the warmindicator will illuminate in yellow. The display will show “0.0” and will give out a prompting sound (10 beeps). At this time, the electric pressure cooker will go into warming state.• In standby mode, press the “Start/Cancel” key, the warm indicator will illuminate in yellow and a single beep prompt sound will occur, indicating that the pressure cooker has gone into warming state.
Safe Cover Opening
- Disconnect the power or disconnect the plug.
- Exhaust methodA – Quick opening method (for non-fluid food) Slide the exhaust valve to the exhaust position until the float valve falls. Put a wet towel on the cover to quicken the cooling until the float valve falls.• B – General opening method Have the pressure cooker cool naturally until the float valve falls.
- Open the coverHold the cover handle firmly, then turn the cover clockwise to the spacing edge, then lift the cover upwards.
Note :
- Never open the cover until the pressure inside the pot has released adequately.
- Never pull out the exhaust valve while the unit is still venting.
- For fluid/liquid foods, do not slide the exhaust valve to the exhaust position when cooking has finished, as the contents will be ejected from the exhaust valve core, causing a mess and possible serious burns.
- Be sure to disconnect the power supply, then allow the unit to cool naturally.
- To hasten the process, a wet towel can be wrapped around the cover to speed up the cooling process until the valve falls, at which point you can open the cover.
Cooking Examples
Texture Selection
- Finish cooking preparation as explained on page 5.
- Select the corresponding function level.When any function key is pressed after preparation, a corresponding functionindicator illuminates, and the pressure cooker will perform the cooking procedurecorresponding to the function level. Texture default is “standard”.• Once the function level is selected, you can also select another function level within 10seconds, and the pressure cooker will perform the cooking procedure of theultimately selected function level.• If selection of another function is impossible once the pressure cooker has entered it’sworking state, you can cancel the operation by pressing the “Cancel” button.
- Select texture by pressing the “texture” keyOnce “texture” has been pressed, the screen will display “Standard” and “Strong” cyclically. When one texture is selected, the corresponding text will appear on the screen; “Soup”, “Porridge”, “Meat/Chicken”, “Beans/Tendons.
- After cooking, the unit will go into warming state automaticallyAfter cooking, the warming indicator will illuminate and the unit will go into warming state. It is not recommended that you keep food in warming mode for extended periods of time.
Timer Function
- Finish cooking preparation as explained on page 5.
- Select the corresponding function levelWhen any function key is pressed after preparation, the corresponding function indicator will illuminate; you can also select another function within 10 seconds. (To cancel the operation, press the “Cancel” key). No timer function is available with the “Cake” function.
- Press TIMER to set the end time for cookingThe unit is equipped with a 24-hour timer function, which can be operated as follows:• Within 10 seconds after selecting the function, press the TIMER key to set the cooking end time.• Once the key is pressed, the screen will display “Timer End Time 2.0”. The hour portion will flash, and + or – can be used to adjust the hour setting. Once you have the correct hour set, press TIMER and you can then edit the minute section. Press + or – to adjust the minutes.
- After cooking, the unit will go into warming state automaticallyOnce the timer has elapsed, the warm indicator will illuminate and the unit will go into warming state. It is not recommended that you keep food in warming mode for extended periods of time.
Please note: due to the delicate processes and specific temperatures required during the preparation of yoghurt, the timer function cannot be used in this mode.
Slow Cook
The following is an example of usage. Please alter as required.
Ingredients: Beef, onion, carrot, potato, rice wine, salt, olive oil, peanut oil.
Method :
- Wash the vegetables, then cut the beef, onion, carrot and potato into small pieces.
- Put these ingredients into the inner pot. Add the salt, rice wine, olive oil and water.
- Insert the inner pot into the unit. Close the cover completely. Press “Texture” twice to select the “Slow Cook” function, then press “Timer” to select a suitable cooking time from 2 hours to 10 hours, then press “Start/Cancel” to start the unit working.
Once finished, you can open the lid and enjoy the food. Refer to the chapter on Safe Opening.
Saute/Brown
Turn on the power supply with the lid off. Press the “Saute/Brown” button to enable the setting. Make sure that the total cooking time does not exceed 20 minutes (if the cooking time DOES exceed 20 minutes, you will receive a reminder tone to cover with the lid.) If you don’t cover the unit with the lid when this tone is sounding, then the unit will return to standby mode. After finishing, you can cover with the lid, allowing the food to continue cooking.
Cooking Rice
- Measure the rice portion with a measuring cup, then wash itOne serving of rice is about 150g, which will make a portion serving for one person. It is recommended that you don’t wash the rice inside the inner pot.
- Add water to the correct corresponding levelPut all of the clean rice into the inner pot, then fill it with water up until the corresponding water level. The scale line inside the inner pot is a cooking reference water level. For example, to cook 2 cups of rice, fill the inner pot up to the scale line “2”. Water quantities can vary due to different rice varieties and hardness, but please do not exceed the MAX water level inside the inner pot.
- Place the inner pot into the cooker bodyOnce you have inserted the inner pot into the unit, please rotate the pot slightly left and right to ensure full contact between the inner pot and the heating plate.
- Place the lid on the unit, and then switch it on.
- Press the “Rice” keyThe “rice” function indicator will illuminate, and the cooker will begin cooking after 10 seconds.
- Once complete, the unit will go into warming state automaticallyThe cooking time will be approximately 35min, however this time may vary depending on the amount of rice and the quality of rice.
- Open the cover and enjoy!Make sure you follow the Safe Cover Opening instructions. After cooking is complete, it is recommended that you serve the rice up within 1-3 minutes. Keeping the rice in the warming state for longer than this will have an effect on the rice quality.

Keep Warm Function
- After cooking, the electric pressure cooker goes into the Keep Warm state automatically; in this state, the Warm indicator will be lit and “0H” will be shown on the display screen.
- You can also start the Keep Warm function while in standby mode by pressing the “Start/Cancel” key.
- The Keep Warm temperature is 60-80C
- For optimal results, do not use the Keep Warm function for longer than 8 hours.
Care and Maintenance
Regular care and maintenance is essential to ensure that this product is safe for use.
| Problem | Solution |
| Powercordandplugsuferfrom expansion,deformation, cracking,damage etc. | Stop Immediately.Unplug The Unit From the power supplyandcontacttheKogan.com customer support team. |
| Aportionofthepowercordorplugishoterthanusual. | |
| Thepresurecokerisfunctioningabnormalyoremitinga burningsmel. | |
| Whenthepowerison,there’s unexpected soundsorsparking. | |
| Thereisdustordirtonthepowerplug. | Removed With Dry Brush. |
Safety Warnings
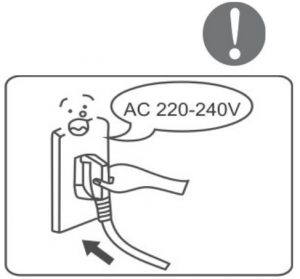
| Please use a 240V 60Hz socket Fire orelectricshockmay
oc urifa 220-240VAC-50 or 60Hz socket is not used. |
Do not share power sockets Do not share power sockets with other devices via adapters or power boards.
|
Do not use non–original covers The use of non-original covers may resultinfire,burnsorother mishaps. |
 |
Do not insert foreign objects Donotinsertforeign Objects Such As pinsorpaperclipsintoventsorcavities. Doing So May Cause Electric Shock Or fire. |
 |
No modifications Iti Sprohibitedtomodifyorrepairthe unityourself.Forrepairspleasecontact theKogan.com customer support team. |
Donotwashorimmerseinwater Thismayleadtoelectric Shock,fire or theunit being short-circuited.
|
| Cover lifting warnings When the electric cooker issafetoopen,there is no presure inside the pot and the valve wil be lowered. When theelectricco keris notsafetoopen,thereis presureinsidethepotandthevalvewilhaverisen.Do not openthecoveruntilthepresureha completely sureha completely sure has completely discharged. | Regular Inspections Caryoutregularinspectionsofthe
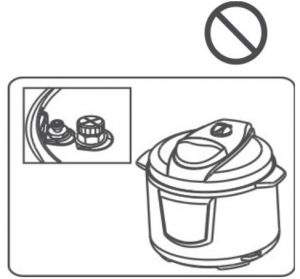
valveandanti-blockshieldtoensure thattheyareunobstructed. Do Not Place Any Heavy Objects On The exhaust valve.
|
| Donottouchtheplugwithwethands Thiscanleadtoelectricshock.
|
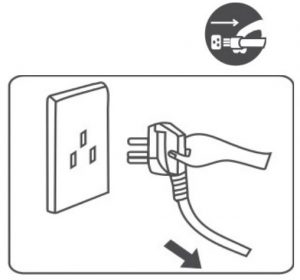
Do not pulon the cord when unplugging When unplugging the cord,be sure to pinch the plug handle.Neverpulonthepowercord,asthis maycausedamagetothecord. |
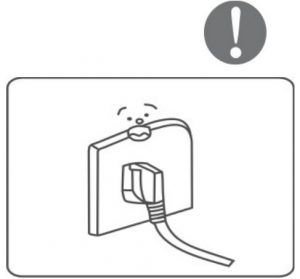
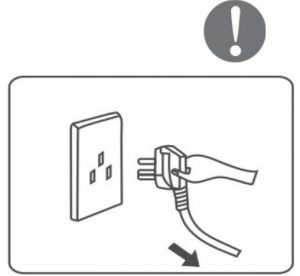
| W hennotinuse,unplugunitfrom socket
This wil stop damage to the unit in the even to fa power surge.
|
Keph and sa way from the exhaust valve W henco king,never putanypartof your body near the exhaust valve to prevent burns.Never cover the valve witharagduringuse.
|
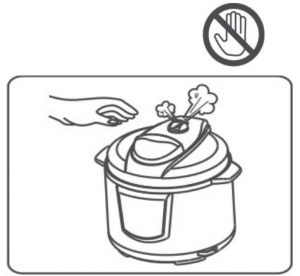
| Never touch the coverd uring operation When th eunitis operating,the cover wilquicklyriseintemperature.Never touchitwithyourhand
Doing so may lead to serious burns.
|
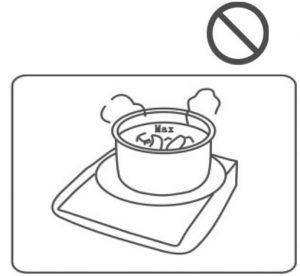
Donotexce dtheMAXlevel Fo dtobeco kedshouldnotexce d theMAXlevel,asthismayresultinthe fodonlybeingpartialyco ked,orthe unitmayoverheatandfail.
|
| Onlyusethesuppliedin erpot Donotsubstitutethein potfora replacement pot of similar dimensions. The Supplied Potisdesignedespecialy forthisproductandmisusemayleadto overheatingorabnormaloperation.
|
Donotheatthein erpotviaothermeans Heatingthein erpotviaanymethod otherthanthepresureco kermay resultinthepotdeformingwhichwil leadtofailurewhenusingitwiththe presureco ker.
|
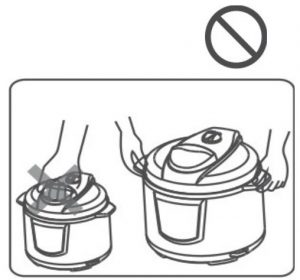
| Whenmovingunit,usethecookerhandles.Whentheunitne dstoberelocated eitherwhilehotorcold,neverliftitvia thecoverhandle,asthismayresultin the overcoming fire and unit dropping to the floor.
|
Neverusetheunitinthe Following Locations:
|


Cleaning
- After each use, it is important to clean the cooker.
- Before cleaning, unplug the unit and carry out the cleaning and maintenance after the unit has cooled down completely.
- Remove the cover and inner pot. Wash them in detergent, then rinse them clean with fresh water. Wipe them down with a soft cloth.
- Using clean water, clean the cover, including the valve, gasket, anti-block shield, exhaust valve core and float valve, then wipe clean with a cloth. After cleaning, install the cover correctly.
- Clean the cooker body with a soft cloth. Do not immerse the unit in water or wash it down with running water.
Warranty
The Kogan.com warranty is valid only when this unit is used for household use. In any of the following situations, the warranty is invalidated:
- Damage by unsuitable operation, storage or maintenance by the consumer
- Damage due to use of a non-specified accessory by any person other than a Kogan.com service technician
- Damage due to undue force being exerted on the cooker
- The pressure cooker is used in a commercial environment.
Troubleshooting
| Problem | Posible Reason | Solution | ||
|
1 |
Dificultyinclosing thecover | Gasketpositionedbadly | Locatethegasket | |
| Pushrodjammedbyvalve | Pushtherodlightlybyhand | |||
|
2 |
Dificultyinopening thecover | Floatvalvefailstofalaftersteam release | Pres thefloatvalvegently with chopsticks | |
| Presureexistsinsideco ker | Openthecoveroncethepresurehaslowered | |||
|
3 |
Leakage From cover |
Nogasket | Placethegasketinpositioncorectly | |
| Fo ddepositsatachedtogasket | Cleanthegasketring | |||
| Gasketworn | Replacethegasketring | |||
| Covernotfirmlyclosed | Closethecovercorectly | |||
|
4 |
Leakage From float valve |
Fo ddepositsatachedtothefloatvalve gasketring | Cleanthefloatvalvegasket | |
| Floatvalvegasketringworn | Replacethefloatvalvegasket | |||
| 5 | Floatvalveunableto rise | Insuficientfo dandwaterinsidethepot | Putmorefo dandwaterintothepot | |
| Smaleakagefrom coverorexhaustvalve | ContacttheKogan.com customer support team | |||
| 6 | Exhaust From valve doesn’t stop | Exhaust Valve Not In The Closed Position | Slide The Exhaust Valve To The Closed Position | |
| Prestrol failure | ContacttheKogan.com customer support team | |||
| 7 | Lamppowerlow | Badpowercontact | Checkthepowercordispluggedinfuly | |
|
8 |
Errorror codes flashing |
C1 |
Sensor Failure |
ContacttheKogan.com customer support team |
| C2 | ||||
|
C5 |
Temperature Too high duetonotenough waterbeinginsidethepot | Attwaters Required | ||
| Temperature Too high duetoinn erpotnot beingpositionedcorectly | Repositionthein erpotcorectly | |||
| C6 | Pres switch failure | ContacttheKogan.com customer support team | ||
|
9 |
Ricehalfco ked/to hard |
Notenoughwaterinthepot | Addmore Water | |
| Cover Closed Prematurely | Oncethetimefinishes,releasethesteam and openthecoverfor5minutes | |||
| 10 | Rice Tooo soft | To much water | Reduce The Water Level |
If you have any further questions or concerns, please contact the Kogan.com customer support team
[xyz-ips snippet=”download-snippet”]