kogan Deep Dish Pie Maker User Manual
 Attention
 Attention
|
Please handle this product with care and inspect it regularly to ensure it is in good working order. If the product, power supply cord or plug shows any signs of damage: stop use, unplug and contact Kogan.com support. |
IMPORTANT SAFEGUARDS
- Please keep a copy of these instructions handy, and if possible the carton with the inner packaging!
- In order to protect children from the dangers of electrical appliances, never leave them unsupervised with the pie maker. Consequently, when selecting the location for your pie maker, do so in such a way that children do not have access to it. Take care to ensure that the cable does not hang down.
- Before using the pie maker, please read the instruction manual carefully.
- Before cleaning and when not in use, unplug from the mains power supply.
- The pie maker is not intended to be operated by means of an external timer or separate remote-control system.
- If the power supply cord is damaged, it must be replaced by a Kogan technician or a qualified electrician in order to avoid a hazard.
- Make sure that the power cord and plug do not come into contact with water.
- Never use the appliance outdoors.
- Place the appliance on a flat, stable heat-resistant and splash-proof surface where it cannot fall.
- Make sure that your hands are dry when you touch the appliance, the power cord or the plug
- The appliance can be used by children aged from 8 years and above and persons with reduced physical, sensory or mental capabilities or lack of experience and knowledge ONLY if they are being given supervision and instructions concerning use of the appliance in a safe way and an understanding of the hazards involved. Children shall not play with the appliance. Cleaning and user maintenance should not be made by children
- Keep the appliance and its cord out of reach of children less than 8 years.
- WARNING: This electrical appliance contains a heating function. Surfaces, including others than the functional surfaces, can develop high temperatures. Since temperatures are differently perceived by different persons, this equipment shall be used with extreme CAUTION. The equipment should only be touched at the intended handles and gripping surfaces. We recommend the use of gloves if you are unsure. Surfaces other than the intended gripping surfaces should be given sufficient time to the cool down before being touched
- When this symbol is used, it means ” Caution: Hot surface”.
SAVE THESE INSTRUCTIONS FOR HOUSEHOLD USE ONLY
ADDITIONAL SAFETY INFORMATION
NOTE This appliance is rated 1200 watts and should be the only appliance operating from that power socket. The plug must be plugged into an outlet which is properly installed.
WARNING A short power-supply cord is provided to reduce the hazards resulting from entanglement or tripping over a longer cord. If it is necessary to use an extension cord, it should be positioned so that it does not drape over the counter or tabletop where it can be pulled on by children or tripped over.
Know Your Smart Pie Maker
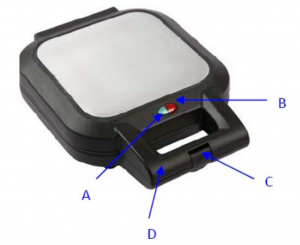
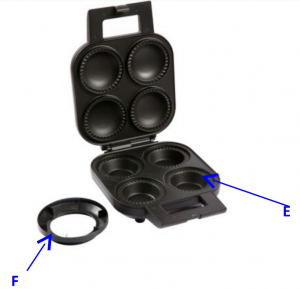
A: Power ON lightB: Ready LightC: Locking LatchD: HandleE: Pie MoldsF: Reversible Pastry CutterYour Pastry cutter is double sided to cut both the top and bottom of your piecrusts. Use the small side for cutting pie tops (puff pastry dough recommended) and the large side for pie bottoms (standard pie crust)
Before Your First Use
- Carefully unpack your Pie Maker. Remove all packaging materials.
- Place the appliance on a flat, level surface close to a 220-240 volt wall outlet. Open the Pie Maker Lid.
- Wipe the Cooking Plates with a damp cloth so that they are clean.
- Wipe the outside of the Housing with a soft damp cloth. NEVER immerse the power cord and plug in water or any other liquid.
- Close the appliance.
- Plug into the wall outlet and pre-heat for 10 minutes.
You may notice some smoking coming from your Pie Maker during this initial phase, this is normal.
Season the cooking plates with vegetable oil and rub off excess with a paper towel. There is no need to season the plates again.
WARNING: Do not immerse the appliance, cord or plug in water. To remove any dust that may have accumulated during packaging, wipe the exterior with a clean, damp cloth. Do not use harsh or abrasive cleansers on any part of the appliance.
Using Your Smart Pie Maker
Place you pie maker on a stable, level surface. Close the cover and plug into a 220-240 volt AC outlet only. The red light will turn on indicating that the appliance is powered on and preheating. In approximately 3- 8 minutes the green light will illuminate when the appliance is preheated and ready for use. The green light will cycle on and off during the cooking process indicting that the correct temperature is being maintained. Always keep the cover closed when preheating or in-between uses.
Cakes & Muffins
- If making cakes and muffins fill the mold directly with approximately 2/3rds full unless the recipe states otherwise. Close the cover and press the Locking Latch in until it clicks
- Set a timer for the specified time as indicated in your recipe. You will notice the green ready light will cycle on and off during the cooking process indicating that the correct temperature is being maintained.
- When the cooking time is complete unplug the pie maker from the wall outlet. Pull the Locking latch up from the bottom and carefully lift the lid. If you need additional browning simply close the lid and set the timer to the desired additional time.
- Carefully remove the cake or muffin from the mold by using a nylon or wooden spatula. Do not use metal utensils to avoid damaging the nonstick surface.
Pies & Tarts
- If making pies and tarts use the Reversible Pie Cutter to make the molds. The larger side is for the pie bottom, and the smaller for the pie top. The slits in the mold bottom allow you to overlap the dough for a better fit in the mold
- . Unless the recipe states otherwise we recommend using Puff Pastry dough for the tops, and standard pie dough for the bottom. If using store brought dough you can find Puff Pastry dough in the freezer section of your supermarket. Pie dough is usually found in the refrigerated section with muffins and cookies.
- Open the Pie Maker and place the large bottom dough over the Pie Mold. Add your fillings according to the recipe instructions. The weight of the fillings will cause the dough to drop down into the mold. You can also use the bottom of a ladle to gently press the dough into the mold, being careful not to tear the dough. WARNING! Surfaces are hot. Never touch the cooking surface directly with your fingers
- If your recipe calls for a top, place the molded dough top over the filled mold and close the cover. Press the locking latch in until you hear a click indicating that it is locked.
- Set a timer for the specified time as indicated in your recipe. You will notice the green ready light will cycle on and off during the cooking process indicating that the correct temperature is being maintained.
- When the cooking time is complete unplug the pie maker from the wall outlet. Pull the Locking latch up from the bottom and carefully lift the lid. If you need additional browning simply close the lid and set the timer to the desired time.
- Carefully remove the pie from the mold by using a nylon or wooden spatula. Do not use metal utensils to avoid damaging the nonstick surface
Care and Cleaning
Other than the cleaning mentioned in this manual, no other servicing or maintenance of this appliance is required. Repairs, if necessary must be performed by technicians at the Kogan customer service center
Caution: Do not immerse the appliance, cord or plug in water.
Before cleaning and when finished using your appliance, unplug power cord from the wall outlet an allow to completely cool. In order to prevent food residue buildup clean your pie maker after each use. Wipe the inside and the wells of your pie maker with a clean, soapy sponge or cloth. Remove soapy residue with a damp cloth and dry thoroughly. To remove stubborn stains use a nylon brush or other utensil safe for nonstick surfaces. Do not use steel wool or scouring pads. Do not use abrasive cleansers. Wipe the exterior with a clean, damp cloth. Clean the pastry cutter in warm soapy water, do not place the pastry cutter in the dishwasher.
Helpful Hints
- Do not use pie dough for pie tops. We recommend using puff pastry dough for pie tops. You can find Puff Pastry sheets in the freezer section of your local supermarket.
- Pre made pie dough can be found in the refrigerated section of your supermarket, usually where the refrigerated cookie dough and biscuits are located.
- For pre-made pie crust unroll onto a piece of parchment paper. Using the large side of the pastry cutter make the bottom as close to the edge of the pie crust as possible. Take the remaining section and reposition the dough to make a second mold. Press the dough down slightly with your fingers to join the pieces. One standard pie mold will yield 1 pie crust bottoms.
- You can store unused molded pie crust in the freezer by simply adding parchment paper in between layers and storing in a plastic freezer bag. Remove excess air from bag before freezing.
- Ensure that your pie mold contains a sufficient amount of filling. If too little filling, the top of the pie will not contact the heating plate and will not brown as well. Too much filling and your pie could overflow during the cooking process and prevent the top and bottom to seal. As a general rule, cakes and batters that do not contain crust should be 2/3rd full, pastry fillings from pies should be 3/4 full.
- Do not use raw fruit fillings or proteins for pies. Since most pies in your Pie Maker are completed within 10 minutes this is not sufficient time to cook fillings. Always precook ingredients before adding to pie mold. You can find premade pie fillings in the canned fruit section of your local supermarket, or see the recipes at the end of this manual to make your own!
| Correct Disposal of this product
This marking indicates that this product should not be disposed with other household wastes throughout the EU. To prevent possible harm to the environment or human health from uncontrolled waste disposal, recycle it responsibly to promote the sustainable reuse of material resources. |
|
| Warranty Information
The manufacturer provides warranty in accordance with the legislation of Australian consumer law, with a minimum of 1 year, starting from the date on which the appliance is delivered to the end user. The warranty only covers defects in material or workmanship. The repairs under warranty may only be carried out by an authorized service centre. When making a claim under the warranty, all contact and correspondence should occur with the Kogan customer service center. The warranty will not apply in cases of:– Normal wear and tear.– Incorrect use, e.g. overloading of the appliance, use of nonapproved accessories.-Use of force, damage caused by external influences.– Damage caused by non-observance of the user manual, e.g. connection to an unsuitable mains supply or non-compliance with the installation instructions.– Partially or completely dismantled appliances. |
Chicken Pot Pies
INGREDIENTS
2 tablespoons unsalted butter2 tablespoons all purpose flour2/ 3 cup whole milkKosher salt and fresh pepper to taste2 teaspoons powdered chicken base1 teaspoon yellow mustard4 tablespoons yellow onions, chopped2 small carrot, diced1/2 cup frozen peas, thawed1 large celery stalk, diced2 cups leftover rotisserie chicken, diced4 circles prepared pie crust, cut with large size cutter4 circles prepared puff pastry dough (thawed), cut with small size cutter
METHOD
- In a small saucepan over medium heat, combine the butter and flour;whisk until the flour is incorporated then stir in the milk.
- Whisk until smooth and bubbly
- Season with salt and pepper; add the chicken base then taste for seasoning.
- Add remaining ingredients, except crusts; cook until bubbly then remove from heat.
- Preheat the pie maker.
- Carefully press the larger pie crusts into the pie molds; press the top edge of each crust into the grooved perimeter.
- Divide the chicken mixture between the pie molds.
- Cover with puff pastry crusts; close and latch the Iid.
- Bake for 7 – 9 minutes or until browned.
- When baking is complete, remove from pie maker and let slightly cool before serving.
Crispy Tuna Casserole Pies
INGREDIENTS
3 cups leftover mashed potatoes1 cup canned French fried onion rings2 cans (5.5 ounces each) tuna fish, drained2 large eggs4 green onions, chopped2 celery stalks, chopped4 tablespoons Parmesan cheeseKosher salt and fresh pepper to taste4 tablespoons breadcrumbs, cracker crumbs or panko
METHOD
- Preheat the pie maker.
- In a bowl, combine all ingredients, except the breadcrumbs; mix well.
- Divide half of the breadcrumbs between the pie molds.
- Divide the tuna mixture between the pie molds and spoon over th breadcrumbs.
- Top the tuna mixture in each pie mold with remaining breadcrumbs.
- Close and latch the lid.
- Bake for 10 minutes or until browned.
- When baking is complete, remove from pie maker and let slightly cool before serving.
TIP: You can substitute the tuna for ham, leftover cooked ground beef, turkey, tofu or more vegetables. This is a great way to use up leftovers.
Easy Homemade Biscuits
INGREDIENTS
11/2 cups all-purpose flour2 teaspoons sugar2 teaspoons baking powder1/2 teaspoon kosher salt1 cup heavy whipping cream
METHOD
- Combine all ingredients in a bowl; stir until a dough ball forms .
- Divide the dough into four equal pieces then place one piece intoeach pie mold of the cold pie maker.
- Close and latch the lid then plug in the pie maker.
- Bake for 14 – 16 minutes or until browned and cooked through
- When baking is complete, remove from pie maker and let slightly cool before serving.
TIP: If the biscuits do not touch the top of the lid and brown well , check to see if your baking powder is still fresh.
Fresh Peach Pies
INGREDIENTS
4 teaspoons unsalted butter4 tablespoons granulated sugar2 Granny Smith apples, peeled and chopped2 pink lady apples, peeled and chopped2 teaspoons fresh lemon juice2 tablespoons all purpose flour1 teaspoon ground cinnamon4 circles prepared pie crust, cut with the large size cutter4 circles prepared puff pastry dough
METHOD
- In a skillet over medium-high heat, combine the butter and sugar.
- Cook until fragrant and the mixture begins to turn amber in color.
- Quickly add the apples; stir until apples release some of their liquid.
- Whisk in the lemon juice, flour and cinnamon; whisk fast to prevent lumps.
- Cook until flour thickens the juices.
- Preheat the pie maker.
- Carefully press the larger pie crusts into the pie molds; press the top edge of each crust into the grooved perimeter.
- Divide the apple filling between the pie molds.
- Cover with puff pastry crusts; close and latch the I id.
- Bake for 7 – 8 minutes or until browned.
- When baking is complete, remove from pie maker and let slightly cool before serving.
TIP: You can make pear pies by substituting fragrant pears for the apples. Bose and Bartlett pears are nice for this
Individual Bacon Quiches
INGREDIENTS
4 large eggs, beaten4 tablespoons heavy cream1/2 cup Parmesan cheese, shredded1/2 cup Swiss cheese, shredded2 teaspoons fresh parsley, choppedKosher salt and fresh pepper to taste2/ 3 cup cooked bacon, crumbled2/ 3 cup cooked potato, diced2 green onions, thinly sliced4 circles prepared pie crust, cut with the large size cutter
METHOD
- Preheat the pie maker.
- In a small bowl, combine all ingredients in the order listed, except for the pie crusts.
- Carefully press the pie crusts into the pie molds; press the top edge of each crust into the grooved perimeter.
- Divide the mixture between the pie molds; close and latch the lid.
- Bake for 8 – 10 minutes or until pastry edges are well browned and filling is set (if mixture is not set in the center, unplug the pie maker and leave quiches in the pie maker for an additional 5 minutes to finish cooking).
- When baking is complete, remove from pie maker and let slightly cool before serving.
Individual Pecan Pies
INGREDIENTS
1/2 cup dark corn syrup1 cup light brown sugar, packed4 tablespoons unsalted butter, melted2 large eggs2 large egg yolks1 teaspoon vanilla extract1 1/3 cups pecans, toasted and chopped4 circles prepared pie crust, cut with the large size cutter
METHOD
- In a bowl, combine all ingredients, except pie crusts; stir well .
- Carefully press the pie crusts into the pie molds of the cold pie maker; press the top edge of each crust into the grooved perimeter.
- Divide the pecan mixture between the pie molds; close and latch the lid.
- Plug in the pie maker and bake for 12 – 15 minutes or until crust is browned and mixture is set.
- When baking is complete, remove from pie maker and let slightly cool before serving.
Pumpkin Muffins
INGREDIENTS
1 tablespoon milk1 can (15 ounce size) pumpkin1/2 cup vegetable oil11/2 cups light brown sugar2 large eggs2 teaspoons baking soda1 teaspoon ground cinnamon1/4 teaspoon ground nutmeg1 teaspoon vanilla extract1 teaspoon apple cider vinegar1 2/ 3 cup unbleached all purpose flour1 cup pecan pieces (optional)
METHOD
- In a bowl, combine all ingredients in order listed; mix well.
- Divide the batter between the pie molds of the cold pie maker; close and latch the lid.
- Plug in the pie maker and bake for 14 minutes or until well browned and batter is set
- Remove carefully and cool for a few minutes before serving .
- When baking is complete, remove from pie maker and let slightly cool before serving.
- Repeat with remaining batter or save for another use.
Spinach & Feta Pies
INGREDIENTS
6 sheets phyllo dough, thawed8 tablespoons unsalted butter, divided2 bags fresh baby spinach1 cup yellow onion, chopped4 garlic cloves, chopped1/2 cup heavy cream1 cup Feta cheese, crumbled4 tablespoons pine nuts, toasted4 teaspoons red wine vinegarKosher salt and fresh pepper to taste
METHOD
- Brush each sheet of phyllo dough with some of the butter and stacon top of each other.
- Use the large size cutter to cut out 4 bases; cover and set aside.
- In a large skillet over medium-high heat, melt remaining butter.
- Add the spinach to the skillet; stir until wilted .
- Add remaining ingredients; cook until bubbly
- Preheat the pie maker.
- Carefully place a circle of layered phyllo into each pie mold (use spatula to press into place if needed).
- Divide the filling between the pie molds; close and latch the lid.
- Bake for 10 minutes or until pastry edges are brown.
- When baking is complete, remove from pie maker and let slightlycool before serving.
Best White Cupcakes
INGREDIENTS
1/ 4 cup unsalted butter, softened1/4 cup shortening11/2 teaspoons baking powder2/ 3 cups granulated sugar1/2 teaspoon kosher salt1 teaspoon vanilla extract1/8 teaspoon almond extract2 large egg whites1 1/3 cups cake flour1/ 2 cup whole milkStore-bought icing
METHOD
- Preheat the pie maker.
- Using a hand mixer, cream the butter, shortening, baking powder, sugar, salt and extracts in a bowl for about 5 minutes or until light and fluffy; scrape the sides of the bowl.
- Add the egg whites and beat well; scrape sides again.
- Add remaining ingredients, except icing; mix until just smooth.
- Pour batter into each well until 2/ 3 full; close and latch the lid
- Bake for 8 minutes then check for doneness by inserting a wooden pick slightly off-center, it should come out with just a few moist crumbs clinging to it (if it has a streak of shiny batter on it, unplug the pie maker, close the lid and let stand for 5 minutes then retest for doneness).
- When baking is complete, remove from pie maker and let cool before icing the tops.
TIP: Extra batter will keep covered in the refrigerator for up to 3 days.
Pumpkin Pie
INGREDIENTS
1/3 cup brown sugar1 tablespoon cornflour2 eggs2/3 cup evaporated milk1 cups cold mashed Kent pumpkin (see note) ¼2 tablespoons maple syrup1 teaspoon mixed spiceIcing sugar and whipped cream to serve
METHOD
- Combine brown sugar and corn flour in a medium bowl.
- Whisk in eggs, evaporated milk, pumpkin, maple syrup and mixed spice until combined.
- Place pastry in base and pour mixture into pie maker.
- Bake for 45 to 50 minutes or until filling has just set.
- Cool.
- Refrigerate for 1 hour or until chilled.
Dust pie with icing sugar. Serve with whipped cream.
Notes
- Pumpkins: You’ll need to cook 500g of pumpkin, peeled seeded and chopped. Cook until soft and drain well before mashing.
- Time saver: The pastry can be made and stored in the fridge for up to 3 days or cover with plastic wrap, then foil and freeze for up to 2 months
- Storage: You can store pumpkin pie in an airtight container in the fridge, for up to 4 days. Top with cream just before serving
.
[xyz-ips snippet=”download-snippet”]