


23L 1700W DIGITAL AIR FRYER OVEN(STAINLESS STEEL)KA23LSSFRYA
SAFETY & WARNINGS
Please handle this product with care and inspect it regularly to ensure it is in good working order.
If the product, power supply cord or plug shows any signs of damage: stop use, unplug, and contact Kogan.com support.
When using an electrical appliance, basic safety precautions should always be followed, including the following:
- Read all of the following instructions before use. Keep this user guide for future reference.
- Unplug from the power outlet when not in use and before cleaning. Allow cooling before cleaning or handling, putting on or taking off parts.
- Do not touch hot surfaces. Use handles or knobs.
- To protect against electrical shock, do not place any part of the appliance in water or other liquids. See instructions in the Cleaning & Care section.
- Be sure to use on a heat-resistant and even surface, such as a heatproof mat. Do not place directly on a benchtop. Keep the appliance at least 20cm away from the wall, furniture, or other flammables.
- This appliance is not intended for use by persons (including children) with reduced physical, sensory or mental capabilities or lack of experience and knowledge, unless they have been given supervision or instruction concerning use of the appliance in a safe way by the person responsible for their safety, and understand the hazards involved.
- Children should be supervised to ensure that they do not play with the appliance. If the supply cord is damaged, it must be replaced by the manufacturer, its service agent, or similarly qualified persons in order to avoid a hazard.
 Caution, hot surface
- Appliances are not intended to be operated by means of an external timer or separate remote-control system.
- This appliance is intended to be used in household and similar applications such as:
- staff kitchen areas in shops, offices and other working environments;
- farm houses;
- by clients in hotels, motels and other residential type environments;
- bed and breakfast type environments.
- Do not operate any appliance with a damaged cord or plug or after the appliance has malfunctioned, or has been dropped or damaged in any way, or is not operating properly. Contact kogan.com for examination, repair, or adjustment.
- The use of accessory attachments not recommended by Kogan.com may cause injury.
- Do not use outdoors.
- Do not let cord hang over the edge of the table or countertop, where it could be pulled on inadvertently by children or pets or touch hot surfaces, which could damage the cord.
- Do not place appliance on or near a hot gas, or electric burner, or in a heated oven.
- Do not use this appliance for anything other than its intended purpose.
- Extreme caution should be exercised when using containers constructed of materials other than metal or glass in the oven.
- To avoid burns, use extreme caution when removing appliance accessories or disposing of hot grease.
- When not in use, always unplug the unit. Do not store any materials other than oven-proof accessories recommended by Kogan.com in this appliance.
- Do not place paper, cardboard, plastic, or similar materials inside the appliance.
- Do not cover the crumb tray or any part of the oven with metal foil. This will cause overheating of the oven.
- Oversize foods, metal foil packages, and utensils must not be inserted into the appliance, as they may present a risk of fire or electric shock.
- A fire may occur if the appliance is covered or touching flammable materials such as curtains, draperies, or walls when in operation. Do not store any items on top of the appliance when in operation. Do not operate the appliance under wall cabinets.
- Do not clean with metal scouring pads. Pieces can break off the pad and touch electrical parts, presenting a risk of electric shock.
- Do not attempt to dislodge food when the appliance is plugged into an electrical outlet.
- Warning: To avoid the possibility of fire, never leave the appliance unattended during use.
- Use the recommended temperature settings for all cooking/baking, roasting, and air frying.
- Do not rest cooking utensils or baking dishes on the glass door.
- Turn the time and temperature dials to the off position to turn off the appliance.
- Do not operate your appliance in a cupboard or under a wall cabinet. When storing in a cupboard, always unplug the unit from the electrical outlet. Not doing so could create a risk of fire, especially if the appliance touches the walls of the cupboard or the door touches the unit as it closes.
- Extreme caution must be used when moving an appliance containing hot oil or other hot liquids.
- To disconnect, press the power button to turn off the appliance and then remove plug from wall outlet.
- Do not force the power cord to bend or stretch. If the power cord is damaged, stop using the appliance immediately and replace the cord before the appliance is used again.
- When unplugging the appliance, please hold the plug and pull it out of the socket. If you unplug it by pulling the cord directly, the cord may be damaged, resulting in leakage or fire. When not in use for an extended period, please unplug the appliance from the wall socket.
- Do not use loose electrical sockets as this may result in fire, electric shock, or injury.
- Do not use an extension cord unless completely necessary with this product. If an extension cord is used please ensure that it has a rating equal to or exceeding the rating of this appliance.
- Do not pull or carry by cord, use cord as a handle, close a door on the cord or pull cord around sharp edges or comers. Keep cord from heated surfaces.
- Do not bend or damage the power cord.
- A fire may occur if the appliance is covered or touching flammable material, including curtains, draperies, walls and the like, when in operation. Do not storeany item on top of the appliance when in operation.
- A short power supply cord is provided to reduce the risks resulting from becoming entangled in or tripping over a longer cord.
- Not intended for commercial use.
OVERVIEW
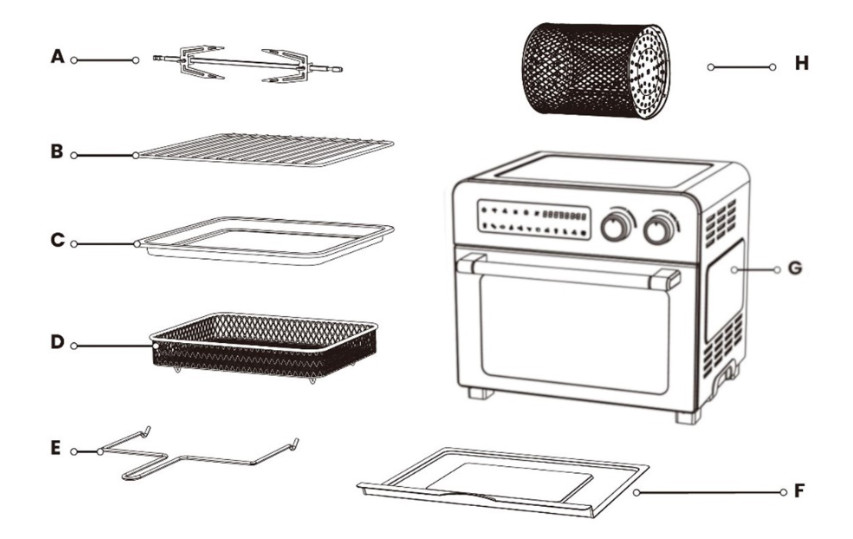
A Rotisserie Spit AssemblyB Wire RackC Baking PanD Air Fryer BasketE Fetch RackF Removable Crumb TrayG Air Fryer OvenH Rolling Cage
Rotisserie Shaft, Forks & Set ScrewsThis is used for roasts and whole chickens.
- Force the shaft lengthwise through the meat so that it is centred on the shaft.
- Slide the forks onto the shaft from either end into the meat, and then lock them in place with the set screws, aligning them with the indentations on the shaft.
- Adjust the screws closer to the middle if needed, but never further outward towards the ends.
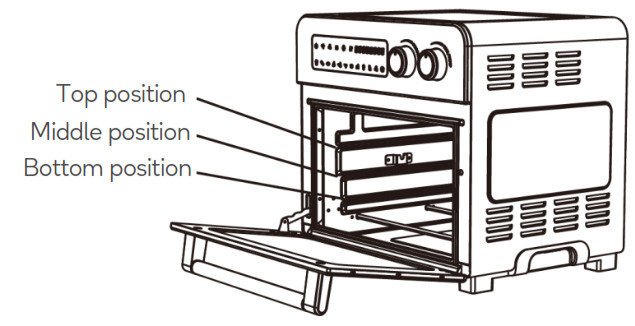
Wire RackThe wire rack can be used in all three rack positions: bottom, middle and top.
Baking PanThe baking pan can be placed in any of the three rack positions and can also be used as a drip tray below other racks.
Air Fryer BasketThe air fryer basket is grated to allow air to pass through the basket for even cooking. The air fryer basket can only be used in conjunction with either the baking pan or on the wire rack. The air fryer basket should be placed in the middle rack position unless a recipe states otherwise.
Fetch RackThe fetch rack is used to take out roasted whole chicken.
Removable Crumb TrayThe crumb tray slides out from the bottom front of the appliance for easy cleaning. Always ensure that the crumb tray is placed underneath the bottom heating elements whenever the oven is being used.
Rolling CageThe rolling cage is used for the preparation of popcorn or fries.
Functions
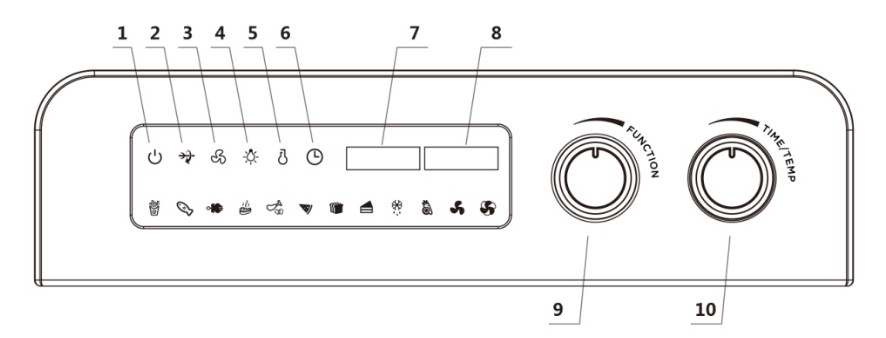
| 1 Power Button | Start or stop the oven after setting a function |
| 2 Rotating Control Button | Control the rotating. |
| 3 Fan Speed Adjusting Button | Adjust desired fan speed.The icon |
| 4 Oven Light | Turn on and turn off the oven light. |
| 5 Temperature Adjust Mode Button | Select temperature function for adjusting. |
| 6 Time Adjust Mode Button | Select time function for adjusting. |
| 7 Temperature Display | Display the working temperature. |
| 8 Time Display | Display the working time. |
| 9 Function Selection Knob | Select different functions. |
| 10 Temperature/Time Adjusting Knob | Adjust desired time and temperature. |
Program Overview
| Function Name | Icon | Temperature (°C) | Time (minutes) | Fan Speed |
| Fries |  |
230 | 15 | |
| Fish |  |
230 | 25 | |
| Rotisseries |  |
170 | 45 | |
| Air broil |  |
230 | 12 | |
| Air roast |  |
230 | 20 | |
| Pizza |  |
230 | 7 | |
| Toast |  |
230 | 5 | |
| Bake |  |
170 | 35 | |
| Defrost |  |
60 | 30 | |
| Dehydrate |  |
60 | 60 |
Oven Rack
OPERATION
Before First Use
- Unpack the appliance and remove all packaging materials. Clean the appliance according to the Cleaning and Care section of this manual.
- Place the appliance, on a flat, stable, level surface. Ensure that the oven is 2 to 4 inches away from the wall or any other objects.
- It is recommended to perform a trial run of your appliance to eliminate any protective substances from the heating elements. Conduct the trial run in a well-ventilated area, as a small amount of smoke and odour may be emitted. This is normal and should be expected.
Note: Under each function mode, the time and temperature can be adjusted as required. Turn the time/temperature dials on the top right of the display window to adjust the desired time/temperature accordingly.
Using OvenBefore using any of the pre-set functions on the unit:
- Place the appliance, on a flat, stable, level surface. Ensure that the oven is 5-10cm away from the wall or any other objects.
- Ensure that the removable crumb tray is placed beneath the bottom heating elements when using your appliance.
- Adjust the time, temperature, and fan speed as desired.
- Always ensure to unplug the appliance after use.
Fries
- The air fryer basket can be placed on top of the wire rack or in the baking pan. Place the tray in the middle or bottom rack position of the oven.
- Connect the oven to the power supply, the oven light is off. Under this condition, turning any knob can activate appliance by entering standby mode.
- Turn the Function knob. Press the Fries icon to select this function. Under this mode, time, temperature, and fan speed display as bellow.
| Function name | Icon | Temperature (°C) | Time (mins) | Fan Speed |
| Fries | |
230 | 15 | High |
4. Press power button to turn on the oven. The Fries icon will flash, and all other icons will dim. When the set time has expired, the display screen will turn off.
Fish
- Place food on the wire rack; then place wire rack in middle rack position.
- Connect the oven to the power supply, the oven light is off. Under this condition, turning any knob can activate appliance by entering standby mode.
- Turn the Function knob. Press the Fish icon to select this function. Under this mode, time, temperature, and fan speed display as bellow.
| Function name | Icon | Temperature (°C) | Time (mins) | Fan Speed |
| Fish | |
230 | 25 | Low |
4. Press power button to turn on the oven. The Fish icon will flash, and all other icons will dim. When the set time has expired, the display screen will turn off.
Bake
- Place the wire rack on the baking pan when using the Bake function. You can also use bakeware or any oven-safe glassware if the dimensions do not exceed30x30cm. Use the Bake function only in the middle or bottom rack position of the oven.
- Connect the oven to the power supply, the oven light is off. Under this condition, turning any knob can activate appliance by entering standby mode.
- Turn the Function knob. Press the Bake icon to select this function. Under this mode, time, temperature, and fan speed display as bellow.
| Function name | Icon | Temperature (°C) | Time (mins) | Fan Speed |
| Bake | |
170 | 35 | Low |
5. Press power button to turn on the oven. The Bake icon will flash, and all other icons will dim. When the set time has expired, the display screen will turn off.
Air Roast
- Place the baking pan in the middle position of the oven
- Connect the oven to the power supply, the oven light is off. Under this condition, turning any knob can activate appliance by entering standby mode.
- Turn the Function knob. Press the Air roast icon to select this function. Under this mode, time, temperature, and fan speed display as bellow.
| Function name | Icon | Temperature (°C) | Time (mins) | Fan Speed |
| Air roast | |
230 | 20 | High |
4. Press power button to turn on the oven. The Air roast icon will flash, and all other icons will dim. When the set time has expired, the display screen will turn off.
Toast
- Place bread on the wire rack; then place the wire rack in the middle rack position.
- Connect the oven to the power supply, the oven light is off. Under this condition, turning any knob can activate appliance by entering standby mode.
- Turn the Function knob. Press the Toast icon to select this function. Under this mode, time, temperature, and fan speed display as bellow.
| Function name | Icon | Temperature (°C) | Time (mins) | Fan Speed |
| Toast | |
230 | 5 | Low |
4. Press power button to turn on the oven. The Toast icon will flash, and all other icons will dim. When the set time has expired, the display screen will turn off.
Pizza
- Place pizza on the wire rack; then place the wire rack in the middle rack position.
- Connect the oven to the power supply, the oven light is off. Under this condition, turning any knob can activate appliance by entering standby mode.
- Turn the Function knob. Press the Pizza icon to select this function. Under this mode, time, temperature, and fan speed display as bellow.
| Function name | Icon | Temperature (°C) | Time (mins) | Fan Speed |
| Pizza | |
230 | 7 | Low |
4. Press power button to turn on the oven. The Pizza icon will flash, and all other icons will dim. When the set time has expired, the display screen will turn off.
Air broil
- Place the baking pan in the middle position of the oven.
- Connect the oven to the power supply, the oven light is off. Under this condition, turning any knob can activate appliance by entering standby mode.
- Turn the Function knob. Press the Air broil icon to select this function. Under this mode, time, temperature, and fan speed display as bellow.
| Function name | Icon | Temperature (°C) | Time (mins) | Fan Speed |
| Air broil | |
230 | 12 | Low |
4. Press power button to turn on the oven. The Air broil icon will flash, and all other icons will dim. When the set time has expired, the display screen will turn off.
Defrost
- Place the baking pan in the middle position of the oven
- Connect the oven to the power supply, the oven light is off. Under this condition, turning any knob can activate appliance by entering standby mode.
- Turn the Function knob. Press the Defrost icon to select this function. Under this mode, time, temperature, and fan speed display as bellow.
| Function name | Icon | Temperature (°C) | Time (mins) | Fan Speed |
| Defrost | |
60 | 30 | Low |
4. Press power button to turn on the oven. The Defrost icon will flash, and all other icons will dim. When the set time has expired, the display screen will turn off.
Dehydrate
- Place the air fry basket in the middle position of the oven. Arrange food evenly on the air fry basket. For best results, place food in a single layer and leave space between pieces.
- Connect the oven to the power supply, the oven light is off. Under this condition, turning any knob can activate appliance by entering standby mode.
- Turn the Function knob. Press the Dehydrate icon to select this function. Under this mode, time, temperature, and fan speed display as bellow.
| Function name | Icon | Temperature (°C) | Time (mins) | Fan Speed |
| Dehydrate | |
60 | 60 | Low |
4. Press power button to turn on the oven. The Dehydrate icon will flash, and all other icons will dim. When the set time has expired, the display screen will turn off.
Rotisseries
- Place one rotisserie fork on the end of the rotisserie spit, with the fork facing the centre, and tighten the rotisserie screw.
- Slide the solid end of the rotisserie shaft through the centre of the food to be cooked.
- Place the other fork on the other end of the spit with the fork facing the food to be cooked.
- Adjust the food so that it is centred on the spit. Make sure the forks secure the food in place, then tighten the screws.
- When cooking poultry, it is necessary to secure the legs and wings to the body with string to make the roast as compact as possible for smooth movement of the spit. See the Trussing Poultry section for instructions.
- Season or baste the roast as desired.
- Put the solid end (right side – see Figure 1) of the spit in the drive socket on right interior wall of the oven.
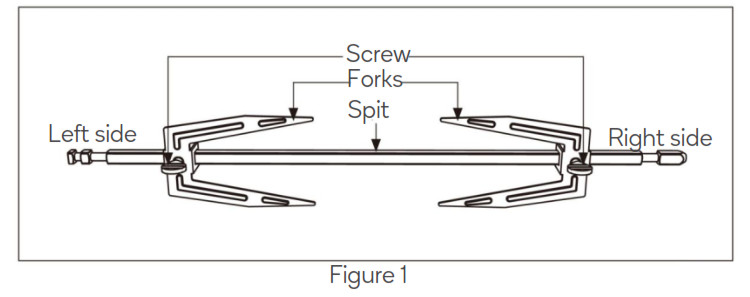
8. Place the grooved end (left side – see Figure 1) of the rotisserie spit on the left interior wall of the oven.9. Connect the oven to the power supply, the oven light is off. Under this condition, turning any knob can activate appliance by entering standby mode.10. Turn the Function knob. Press the Rotisseries icon to select this function. Under this mode, time, temperature, and fan speed display as bellow.
| Function name | Icon | Temperature (°C) | Time (mins) | Fan Speed |
| Rotisseries | |
170 | 45 | Low |
11. Press power button to turn on the oven. The Rotisseries icon will flash, and all other icons will dim. When the set time has expired, the display screen will turn off.12. Unplug the appliance from the wall outlet.13. Remove the roast from the oven using the spit removal tool by placing the tool underneath the grooved edges of the spit. Lift the left side up and towards you at an angle and slide the right side of the spit out of the drive socket.14. Place the roast on a cutting board or platter and allow to stand for 10-15 minutes.15. Using a potholder, loosen the rotisserie screws on the forks and remove the spit from the roast. Carefully remove the forks and carve the roast.
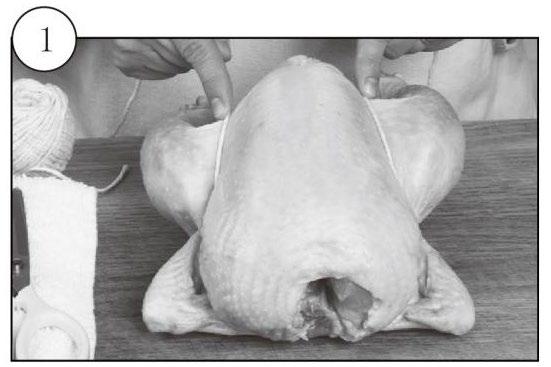
Trussing Poultry
1. Place the poultry on the cutting board breast up. Place twine under the wings then pull the twine evenly between legs and breast.
2. Cross the twine.
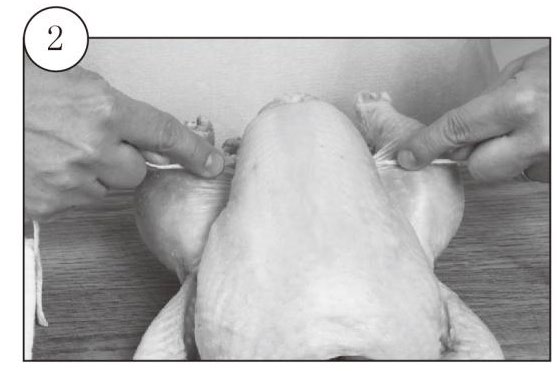
3. Run the twine under the end of the legs.
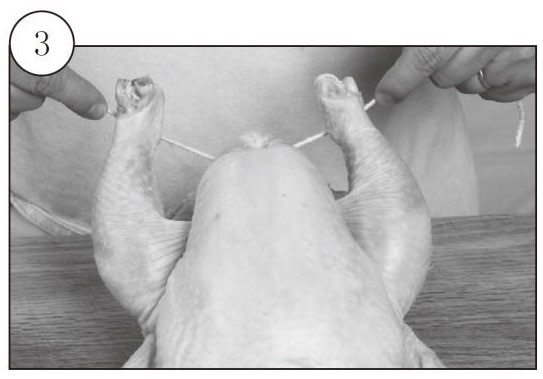
4. Wrap the twine up and around legs, bring them together then tie the twine into a knot and a bow to secure.

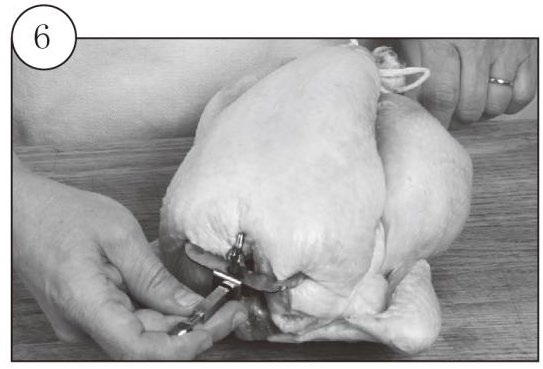
5. Run rotisserie rod through the cavity of the poultry. Secure the rotisserie fork between legs and into to back of the poultry then tighten down the screw on the rotisserie fork.

6. Place the other rotisserie on the rotisserie rod already inserted. Slide down and secure the rotisserie fork into both sides of the breast. Tighten down the screw on the rotisserie rod. Load into the oven.
CLEANING & CARE
- Unplug your appliance and allow it to completely cool before cleaning. Do not use abrasive cleaners, as they will damage the finish. Simply wipe the exterior with a clean, damp cloth and dry thoroughly. Apply the cleaning agent to a cloth, not directly onto the appliance. Do not use excess pressure when cleaning the area of the control panel as it could cause the text to be removed over time.
- To clean the interior walls and bottom of the oven (remove the Removable Crumb Tray first) use a damp soapy cloth or sponge. Never use harsh abrasives or corrosive products including oven cleaner sprays. These could damage the oven surface. Never use steel wool pads on the appliance or accessories.
- The wire rack, baking pan, air fryer basket and crumb tray should be hand-washed in hot, sudsy water using a nylon scouring pad or nylon brush. These parts are not dishwasher safe.
- Always clean the crumb tray after each use. Excess food particles could cause smoking and will be hard to remove from the tray. To remove baked-on grease or burnt food particles, soak the crumb tray in hot, sudsy water or use nonabrasive cleaners. Never operate the oven without the crumb tray in place.
- The rotisserie shaft, forks, screws, and removal tool can be cleaned with a cloth or sponge in hot, sudsy water. For stubborn stains soak them in hot sudsy water before cleaning.
- The top interior of the appliance should be cleaned to remove excess grease that may accumulate after cooking greasy foods or after using the rotisserie function. Doing so will prevent smoking in the oven during subsequent uses.
WARNING: Do not use normal paper as it can lead to fire hazard. Use aluminium foil.
NOTES
Need more information?We hope that this user guide has given you the assistance needed for a simple set-up. For the most up-to-date guide for your product, as well as any additional assistance you may require, head online to help.kogan.com
[xyz-ips snippet=”download-snippet”]