

Extreme Evaporative CoolerKAEXTEVACLA
 WARNING:
 WARNING:
CHOKING HAZARD – Small parts and batteries, Not for children.Use with adult supervision only
Safety Warnings
Please read all instructions and keep a copy of this manual handy for future reference.
- Please consider the load capacity of your home electricity when you use this unit.
- The water in the tank must never exceed the MAX marking, nor be below the MIN marking when the cooling function is in use.
- Don’t lean or knock the unit when it is filled with water, as the water may spill.
- When there is no water, or a low amount of water in the tank, attempting to start the COOL function will result in the unit sounding a tone and the water pump not starting up.
- Please unplug the unit when it is not being used.
- Wipe the surface of the unit down with a damp cloth. Do not clean the surface with any chemicals or solvents, and do not apply water directly to the unit surface.
- Do not let children play around the unit unsupervised while it is in operation.
- Do not run the unit in direct sunshine.
- Please ensure that nothing is blocking the air inlets or outlets.
- Place the unit on a flat, stable surface during use.
- Do not use the unit in bathrooms, near swimming pools or similar locations.
- Avoid using powerboards or extension cords with this unit.
- Do not use the unit in an area with flammable liquids or gases present.
- Ensure the unit is not placed where it can get wet from rain or other sources of liquid.
- This appliance is not intended for use by people (including children) with reduced physical, sensory or mental capabilities, or lack of experience and knowledge, unless they receive supervision or instruction concerning the use of the appliance by a person who is responsible for their safety and supervision.
- If you notice that the unit is noisy or the airflow is not optimal, the filters may need cleaning.
- Please unplug the unit from the power before any cleaning or maintenance.
- Do not touch the power cord or plug with wet hands.
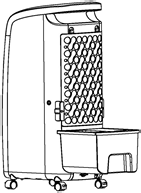
Product Layout
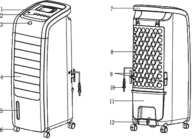
1 – Remote control holder 7 – Handle2 – Operation panel 8 – Air filter3 – Remote control receiver 9 – Power cord reel4 – Air vane assembly 10 – Power cable5 – Water level display window 11 – Water tank6 – Casters 12 – Water tank lock
1
Accessory
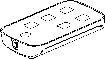
Remote Control
Operational Interfaces
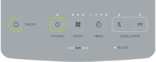
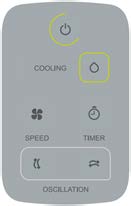
Operation Panel & Display Panel Remote Control Operation Panel
Product Usage
- When the power is connected initially, all of the LED lights will light up for 2 seconds, and a tone will sound to show the product is ready to use. The unit will then enter into standby mode, with all buttons being unresponsive except for the ON/OFF button.
- Press ON/OFF while in standby, and the unit will turn on. It will sound a tone and then start functioning in whichever mode it was last run in.
- Press ON/OFF while the unit is running, and the unit will sound a tone, then turn off and go into standby mode.
- Press the FAN SPEED button to set the wind speed while in COOLING mode. The speed indicator LED lights will indicate low, medium or high air speeds. Note that under HEATING mode, the wind speed is locked to medium speed.
- Press the TIMER button to set the power off function. The time can be set as 1H, 2H, 4H or 8H after pushing the button. Once the timer has been set, the countdown will begin. Once the countdown timer reaches zero, the unit will turn off automatically.
- Press the OSCILLATION buttons (either horizontal or vertical button) to start the air vanes moving automatically, helping to spread the air in the area.
- Press the HUMIDIFICATION button to start using the water pump. Hold the HUMIDIFICATION button for 3 seconds to turn this mode off.
WARNINGSome functions require the unit to undergo a startup process which may take a short time. If upon setting an option, the LED light lights up dimly, allow time for the process to start. Once the process is working, the LED light will shine brightly.
2
Water Filling
If using the COOLING or HUMIDIFICATION functions, please add water to the water tank. Prior to adding the water, please open the water tank lock, remove the water tank from the unit and slowly add water (as shown below). Once the tank is full, please replace the water tank into it’s original location and lock the water tank lock.
Step One Step Two


Water tank locked Water tank unlocked
Step Three Step Four
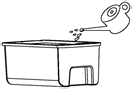
Water tank removed Filling water tank
- Do not fill the water tank to a level exceeding the MAX water mark.
- Be sure to use clean tap water.
- Upon first use, it is normal for the tank to have a slight odour. This will not affect your health.
Using Remote Control
- Open the battery cover of the remote control and insert a 3V CR2032 battery.
- Please point the remote towards the receiver when using the remote.
- If the battery voltage is low, please open the battery cover as shown below and replace with a new CR2032 battery. Please take note of the positive and negative poles when placing the battery. Then replace the battery cover.

3
Safety Warnings and Precautions
To avoid accidents caused by misuse and to ensure convenient, effective performance, several warnings and cautions are given below.
- If the product has any form of failure or malfunction, please unplug it immediately and contact the Kogan.com customer support team. Do not attempt to disassemble or replace the parts yourself. Disassembly or modifications will affect the safety of the product and the warranty. Kogan.com are not liable for products that have been tampered with.
- Do not touch the power plug with wet hands.
- Never insert wooden sticks, metal rods or any other objects into the air inlet and outlet. It may cause damage, electric shock or water leakage.
- Do not spray insecticides or flammable sprays near the unit.
- Avoid placing objects or allowing people to stand close to the outlet.
- Do not pull on the power cord while moving the product.
- Inspect the power cord before use to ensure the covering isn’t cracked or split.
- Do not bend the power cord, or rest heavy objects on it.
- Always disconnect the power plug from the power outlet and empty the water tank if you are not planning on using the unit for an extended period of time.
- Do not let the water level exceed the MAX water mark, or go below the MIN water mark when using the COOLING or HUMIDIFICATION modes.
- Do not tilt or bump the unit while it has water inside it. If the unit is bumped or tilted with water inside it, immediately unplug the unit and allow it to rest for 24 hours to give it time to dry out before plugging the unit in again.
- Never use the unit near a bathtub, shower or swimming pool.
- Do not use the unit directly below the power outlet.
- Do not cover the unit during use.
- During the HUMIDIFICATION mode, do not remove the air filter screen, as this may result in water being sprayed out of the unit.
- Do not pull on the horizontal air vane louvers during use as it may cause damage.
Cleaning and Maintenance
- Turn the power off and unplug the unit before performing any cleaning.
- Do not use any chemicals on the surface of the unit.
- Remove dust by simply wiping the unit with a soft cloth.
- If the surface is particularly dirty, you can clean the unit with a damp cloth, then wipe dry with a soft dry towel.
Air Filter
If there is too much dust and debris on the air filter, performance will be affected. During use, it is recommended that the filter be cleaned at least once a month.
- Remove the filter net first, then the wet curtain assembly can also be removed (as shown to right).
- Use a brush to clean the filter net.
- The wet curtain assembly can be dipped into water to clean. Leave the wet curtain assembly out to dry in the air before replacing it.

4
Water Tank Cleaning
- Unplug the unit from the power, then unlock the water tank lock.
- Remove the water tank from the unit.
- Use a towel to clean any residue from the tank, then flush the tank out with clean water.
Body Cleaning
- Wipe the body of the unit down with a damp cloth. Do not apply water directly to the unit.
- Do not use corrosive cleaners, detergents or solvents.
Installation After Cleaning
- Insert the water tank, wet curtain assembly and air filter net. Check that all parts are correctly in place, and that the water tank is locked securely.
- Plug the unit into a power outlet and ensure the unit is running smoothly.
Maintenance
- If the unit is not being used for an extended period of time, it should be unplugged from the power outlet. Ensure the wet curtain assembly and air filter net are dry, and that the water tank is completely empty.
- Store the unit in a dry, cool location with a plastic bag or sheet covering the outlets to prevent excessive dust build-up.
Product Specifications
Rated Voltage: 220-240 V∼Rated Frequency: 50HzRated Power: 70WNoise (High Speed Mode): <64dBDimensions: 250mm x 330mm x 703.5mmNet Weight: 6.5kgPackaged Weight: 8.5kg
WARNING – KEEP BATTERIES OUT OF REACH OF CHILDREN 
![]()
- Swallowing may lead to serious injury in as little as 2 hours or death, due to chemical burns and potential perforation of the oesophagus.
- If you suspect your child has swallowed or inserted a button battery immediately call the 24-hour Poisons Information Centre on 13 11 26 for fast, expert advice.
- Examine devices and make sure the battery compartment is correctly secured, e.g. that the screw or other mechanical fastener is tightened. Do not use if compartment is not secure.
- Dispose of used button batteries immediately and safely. Flat batteries can still be dangerous.
- Tell others about the risk associated with button batteries and how to keep their children safe.
5
[xyz-ips snippet=”download-snippet”]