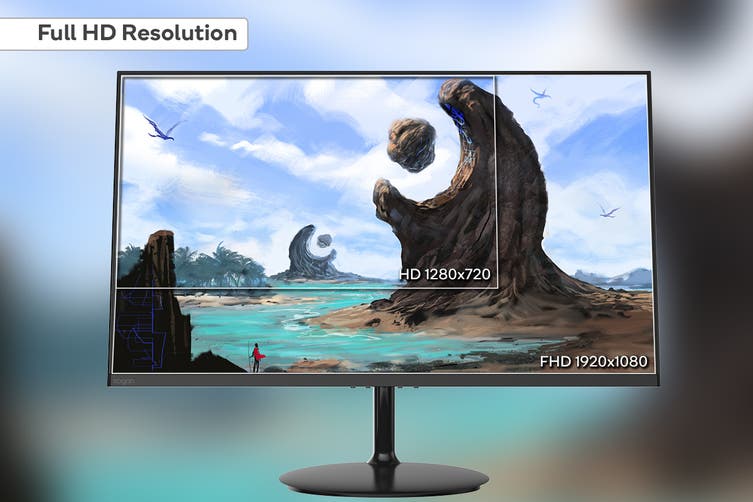
kogan Full HD IPS 75Hz Frameless Monitor
Attention
Please handle this product with care and inspect it regularly to ensure it is in good working order. If the product, power supply cord or plug shows any signs of damage: stop use, unplug and contact Kogan.comsupport.
Safety & Warnings
Handle with care and inspect regularly to ensure product is in good working order. If this product, power supply cord or plug shows any signs of damage: stop use, unplug the product and contact Kogan.comsupport.
- Read all instructions before using the appliance and retain for reference.
- This appliance is not intended for use by persons (including children) with reduced physical, sensory or mental capabilities, or lack of experience and knowledge, unless they have been given supervision or instruction concerning use of the appliance by a person responsible for their safety.
- Do not clean with liquid detergent or spray detergent. Use a clean cloth dampened with water or special LCD cleaner.
- Do not use with an extension cord unless necessary, and if so, ensure it is suitably rated and it is handled safely as is the product’s own power cord:
- Do not allow the power cord to be exposed to water, heat, direct sunlight or overhang where it can be pulled or otherwise be damaged or pose a hazard.
- Unplug the power cord when cleaning the monitor. Never clean it with liquid detergent or spray detergent, but wipe it with wet soft cloth. If it is still not clean, use a special LCD screen detergent.
- DO NOT used accessories not authorised by Kogan.com, otherwise they may incur danger.
- Keep the display away from water sources such as bathtubs, sink or washing machine. DO NOT place the display on wet floor or near a swimming pool or press the LCD surface with fingers or hard objects.
- The grooves and openings on the back and bottom of the shell are for ventilation purpose and also for guaranteeing the reliability of the elements and preventing them from overheating: do not allow them to be blocked or covered.
- This device contains no user-serviceable parts and its internal parts contain high voltage which pose a risk of injury. Do not attempt to repair the device.
Overview
In the Box

Power Indicator
Indicator Mode No light Green light flashingGreen light Normal working conditions Green light flashing Powered with no input signal
Controls
Key Function
- Menu Show OSD menu/select function
- Down Move icon down/decrease value
- Up Move icon up/increase value
- Exit Back to last menu/auto adjust
- Power Turn monitor ON/OFF
Connections
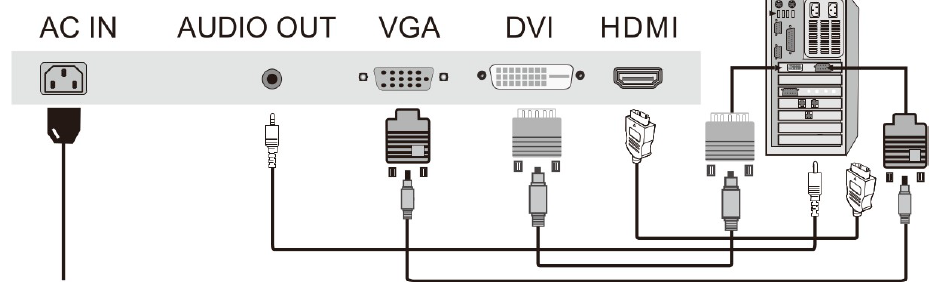
- Connect the power cord from the power point to the AC IN port on the back of the monitor.
- Connect a suitable display connection from your computer to the corresponding input on the monitor.
On-Screen Display (OSD)
Main Menu
- Brightness
- Image
- Colour Temperature
- OSD Settings
- Reset
- Misc.
Brightness

- Brightness: Use the up and down buttons to increase or decrease brightness setting.
- Contrast: Use the up and down buttons to increase or decrease amount of difference between white values and black values.
- Black equalizer: Use the up and down buttons to increase or decrease black equalizer setting.
- Low blue: Use the ON/OFF option to adjust the low blue function. ECO adjustment This option sets STAN DARD/GAME/MOVIE/TEXT/FPS/RT S mode.
- DCR: Set DCR function on or off.
Image 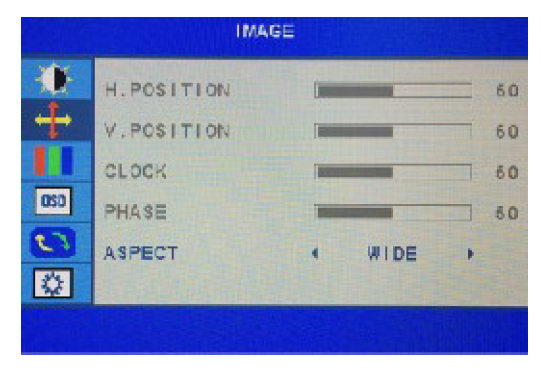
- H. Position/ V. Position: Use up and down/ left and right buttons to adjust horizontal/ vertical position of the video on your display. Only available in VGA mode.
- Clock: Press up or down to adjust.
- Phase: Press up or down to adjust.
- Aspect adjustment: Wide (16:9), 4:3 or Auto.
Colour Temperature
 Change red, green, and values in the image.
- Warm mode is more red give more red, cool mode is more blue and user mode allow you to set individual levels directly.
 Change red, green, and values in the image.
OSD Settings 
- Language adjustment: Select OSD display language.
- OSD H. Pos. / V. Pos.: Use up and down/ left and right buttons to adjust horizontal/ vertical position of the on-screen display menu.
- OSD Timer: Adjust duraction of OSD menu timeout.
- Transparency: Adjust OSD menu transparency.
Reset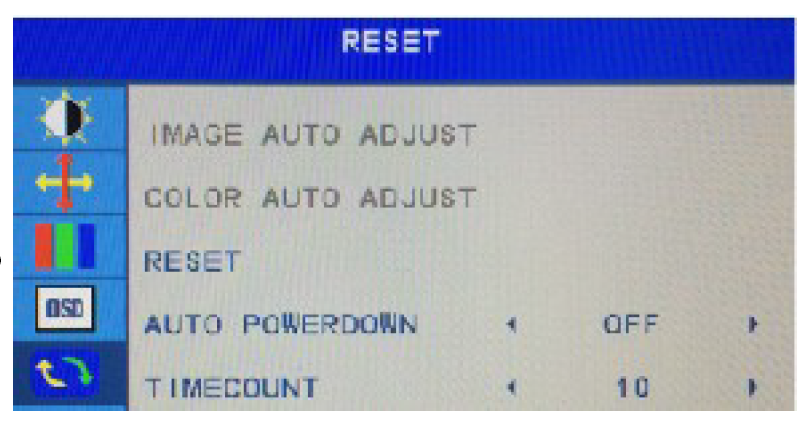
- Image Auto Adjust: Automatically set image to preset high-quality settings. Only available in VGA mode.
- Image Auto Adjust: Automatically set colour to preset high-quality settings. Only available in VGA mode.
- Reset: Restore factory defaults.
- Auto Power Down: With this function enabled, the display will go on standby after 60 seconds of no input.
- Time Count: Set timer to count down from lOmin, 20min, 30min, 40min, 50min, 60min or 90min.
Misc.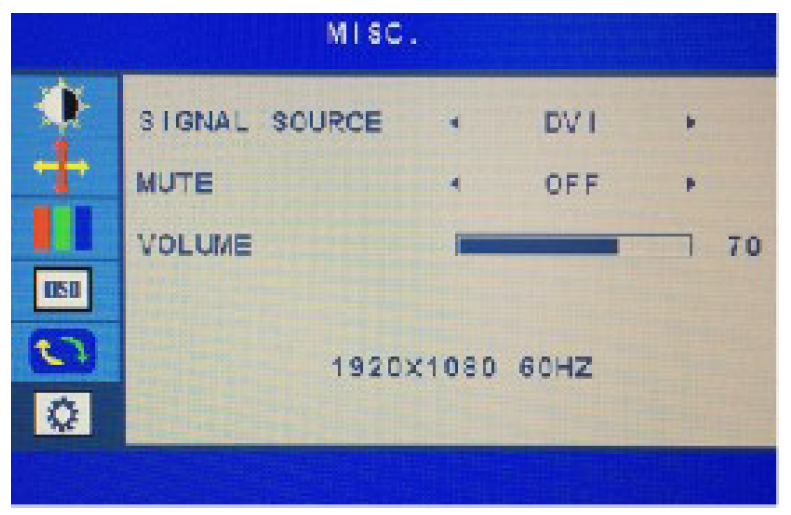
- Signal source adjustment:
- Press UP or DOWN to select VGA, DVI, HDMI source.
- Mute adjustment
- This selection will all allow you to open or close mute.
- Volume adjustment
- Press UP and DOWN to adjust the volume.
Specifications
| Standard | Resolution | H-Frequency (KHz) | y.frequency (Hz) | Remark |
| 720 X400 | 31.47 | 70.0 | ||
| VGA | 640 X 480
640 X 480 |
31.47
37.50 |
60.0
75.0 |
|
| 640 X 480 | 37.861 | 72. 8 | ||
|
SVGA |
800 X 600
800 X 600 800 X 600 |
37.879
48. 077 46. 875 |
60.0
72. 2 75. 0 |
|
|
XVGA |
1024 X 768
1024 X 768 1024 X 768 |
48.363
56.476 60.02 |
60.0
70.0 75.0 |
|
|
SXVGA |
1280 X 1024
•1280 X1024 |
63. 981
79.976 |
60. 0
75. 0 |
17/19 4: 3 |
| WXGA | * 1360X768 | 60. 0 | 15.6/18. 5 16:9 | |
| WXGA+ | * 1440X900 | 55.469 | 60. 0 | 17/19 16: 10 |
| WXGA+ | * 1600X900 | 55. 906 | 60. 0 | 17.3/20 16: 9 |
| WSXGA+ | * 1680X1050 | 64.7 | 60. 0 | 22 16: 10 |
| WUXGA | • 1920X1080 | 67· 2 | 60. 0 | 21.5/23 16:9
23.6/24 |
Product Specifications
|
VGA Input |
Input interface Input signal | D-SUB 15pin
Analog 0.7pp anode signal/75amp |
|
DVI Input |
Input interface Input signal | DVI-D 18 pin
10bit digital signal |
|
HDMI Input |
Input interface Input signal | 19pin 18Gbps |
| Audio in | 2x2W | |
| H-Frequency | 30 – 80 Khz | |
| V-Frequency | 60 – 75 Hz | |
|
Temp. |
Storage Temp -20° C to 60° C
Operation Temp 0 c to 40° C 0 |
|
| Humidity | Operation 10% to 85% |
Troubleshooting
| Issue | Steps to Resolve |
| l. No display/ power indicator light off | Check display and power connections Turn on with power button |
| 2. Image blurring, zoomed in/out, etc. | Use Image Auto Adjust |
| 3. Image appears dark | Adjust the brightness and contrast of the display. |
| 4. Display overheats | Leave at least 5cm of distance of ventilation around the display and do not place objects on the display. |
| 5. Dark/ light spots when powering on | This is a normal phenomenon: backlight illumintation will be uneven at start due to temperature differences. This effect will disappaer after a short amount of time (allow up to 20 minutes). |
| 6. Image distortion, blinking, shaking | Check computer setting, select the correct resolution and re-adjust the refresh frequency. |
| 7. Noise while powering off | This is a normal phenomenon caused by display discharging in the process of powering off. |
User manual is subject to change without notice. For the latest version of your user manual, please visit https://www.kogan.com/usermanuals/![]()
[xyz-ips snippet=”download-snippet”]