
![]()
2 in 1 Ice Cube Maker & Water DispenserKA2ICDISPSA, KA2ICDISPSBQuick Start Guide
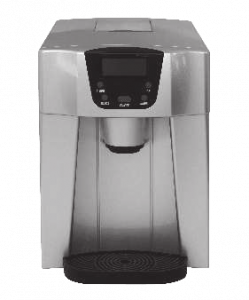
Table of Contents
Safety & Warnings ………….. 2Overview ………………….. 3Installation ………………. 5Operation …………………. 5Cleaning & Care ……………. 9Specifications …………….. 9Troubleshooting ……………. 9
1
Safety & Warnings
This is the safety alert symbol:
![]()
All safety messages will follow the safety alert symbol and the word “DANGER” or “WARNING”.
These words mean:You can be killed or seriously injured if you don’t immediately follow the instructions.
All safety messages will tell you what the potential hazard is, how to reduce the chance of injury and what can happen if the instructions are not followed.
Preparing Your Ice Cube Maker for UseWhen using the electrical appliance, basic safety precautions should be followed to reduce the risk of fire, electric shock and injury to persons or property.
- This appliance can be used by children aged 8 years and above and persons with reduced physical, sensory or mental capabilities or lack of experience and knowledge if they have been given supervision or instruction concerning use of the appliance in a safe way and understand the hazards involved. Children should not play with the appliance. Cleaning and user maintenance should not be performed by children without supervision.
- Do not operate this unit with a damaged power cord. If the supply cord is damaged, it must be replaced by the manufacturer, its service agent or a similarly qualified person in order to avoid a hazard.
- This ice cube maker must be positioned in such a way so that the plug is accessible.
- Connect to properly grounded outlets only. No other appliance should be plugged into the same outlet. Be sure that the plug is fully inserted into the receptacle.
- Do not run the power cord over carpeting or other heat insulators. Do not cover the cord. Keep cord away from traffic areas and do not submerge in water.
- Use of an extension cord is not recommended, as it may overheat and present a risk of fire. If you want to use an extension cord, use a cord of 0.75 mm minimum size and rated not less than -16A/250V with a plug.
- Unplug the ice cube maker before cleaning, making any repairs or servicing.
- Exercise caution and use reasonable supervision when appliance is used near children.
- Do not use your ice cube maker outdoors. Place the ice cube maker away from direct sunlight and make sure that there is at least 15 centimetres of space between the back of your unit and wall. Keep a minimum distance of 15 centimetres on each side of your unit free. Make sure that there is enough air circulation around your unit.
- Do not use liquids other than water to make ice cubes.
- Do not clean your ice cube maker with flammable liquids. The fumes can create a fire hazard or explosion.
- Do not tip over the unit.
- If the ice cube maker is brought in from outside during winter, give it a few hours to warm up to room temperature before plugging it in.
- Children should be supervised to ensure that they do not play with the appliance.
- Do not store explosive substances such as aerosol cans with a flammable propellant in this appliance.
2
- This appliance is intended to be used in households and similar areas such as:a) Staff kitchen areas in shops, offices and other working environments.b) Farmhouses, and clients in hotels, motels and other residential type environments.c) Bed and breakfast type environments.d) Catering and similar non-retail applications.
 Warning: Risk of fire/flammable materials used. Please use the appliance according to local regulations regarding disposal of the appliance as it has flammable blowing gas.
- Keep ventilation openings in the appliance enclosure or in the built-in structure, clear of obstruction.
- Do not damage the refrigerant circuit.
- Do not use mechanical devices or other means to accelerate the defrosting process or ice harvesting process.
- Do not use electrical appliances inside the ice cube maker.
This appliance must be earthed.
Important:
The wires are coloured in accordance with the following code:
Green and yellow GroundingBlue NeutralBrown Live
To avoid a hazard due to instability of the appliance, it must be placed on flat, level surface.
Overview
3
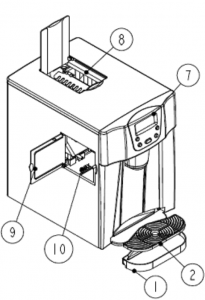
- Water drip tray.
- Water drip tray cover: Also used as the support of the ice-cube container.
- Water drain plug: For draining water from water reservoir.
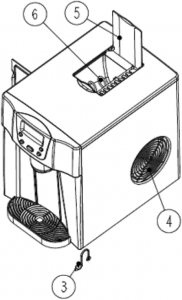
- Hot Air outlet.
- Top window.
- Ice cube pushing spring.
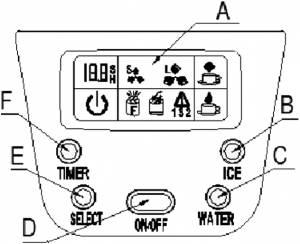
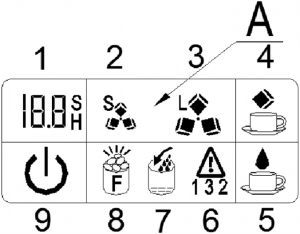
- Control Panel: Easy to use, visible functions touch display setting.A: LCD display window.1) Timer setting delay time.2) Ice-cube size display: Small size.3) Ice-cube size display: Large size.4) Ice-cube obtaining symbol: Ice-cube will be pushed out.5) Water dispensing symbol: Water is flowing out now.6) Error code.7) Low water symbol: Unit will stop running, need to fill water.8) Ice-full symbol: Meaning, the ice storage area is full of ice cubes.9) ON/OFF symbol: If the unit is turned off, this symbol will flash and if the unit is turned on, this symbol will glow constantly.B: Ice cube obtaining button.C: Water dispenser button.D: ON/OFF Button: To turn on/off the unit.E: SELECT Button: To select the size of the ice cube and the number code for all kinds of delay time.F: TIMER Button: To set the timer on or timer off.
- Evaporator.
- Side door: For filling water and to clean the water reservoir.
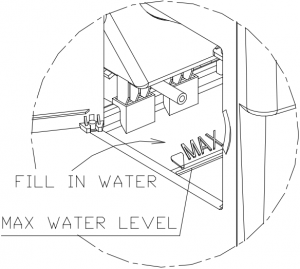
- Water reservoir and the maximum level mark of water.
4
Installation
Improper use of the grounded plug can result in electrical shock. If the power cord is damaged, please contact Kogan.com Support.
- This unit should be grounded properly for your safety. The power cord of this appliance is equipped with a grounding plug which mates with standard grounding wall outlets to minimise the possibility of electric shock.
- Plug your appliance into an exclusive, properly installed, grounding wall outlet. Do not damage the grounding means of the plug under any circumstances. Any questions concerning power and/or grounding should be directed towards a certified electrician.
- This appliance requires a standard 220-240V, 50Hz, grounded electrical outlet.
Operation
Unpacking Your Ice Cube Maker
- Remove the exterior and interior packaging and then check whether all the accessories are included. If any parts are missing, please contact Kogan.com Support.
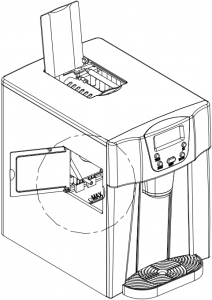
- Remove all the protective tape on the unit. Open the transparent window and take out the accessory parts inside.
- Clean the interior (such as water reservoir, ice cube pushing spring etc.) with lukewarm water and a soft cloth.
- Locate your ice cube maker on a flat counter table far from direct sunlight and other sources of heat (i.e. stove, furnace and radiator). Make sure that there is at least 15 centimetres between the back and sides of your ice cube maker and the wall.
- Allow the refrigerant fluid to settle down for one hour before plugging your ice cube maker into power.
- The power plug must be directly accessible.Warning: Fill with potable water only.
How to Start the Unit
1. Open the left side door, pour potable water into reservoir. Keep water level below the “maximum” water level mark.
5
2. Plug your ice cube maker into the main power outlet, then the “![]() ” symbol will flash on theLCD display window.
” symbol will flash on theLCD display window.
3. Press the “ON/OFF” button on the control panel to begin the ice making cycle. After this, the “![]() ” symbol will turn on in LCD display window and the “
” symbol will turn on in LCD display window and the “![]() ” symbol will flash in the meantime.The default size of ice-cube is Large. If you want to select the size of the ice cube, just press the “SELECT” button to switch between Large
” symbol will flash in the meantime.The default size of ice-cube is Large. If you want to select the size of the ice cube, just press the “SELECT” button to switch between Large ![]() and Small
and Small ![]() . If you still think the ice cube size is not fit for you, you can add to each ice-making cycle time by pressing the “SELECT” button.
. If you still think the ice cube size is not fit for you, you can add to each ice-making cycle time by pressing the “SELECT” button.
When the unit is running, always press the “ON/OFF” button for more than 5 seconds, then the digit “0” will appear on the display, the standard time of the ice-making process, continue to press the “SELECT” button and the digit will change from 0 to 1, 2, then return to 0. After 5 seconds, the settings will be saved, and the digit will disappear.
With digit 1 settings, it will add 1 minute to the standard duration of each ice-making cycle and for digit 2 settings, the added time will be longer. If the unit is unplugged again, it will return to the digit 0 settings with standard time.
4. The ice making cycle lasts 6 to 12 minutes, depending on the size of the ice cube selection and the ambient temperature.
5. While the ice cube maker is on, verify the water level periodically. If water pump can’t pump out water, the ice cube maker will stop automatically and the “![]() ” symbol turn on, indicating that more water is required in the reservoir.
” symbol turn on, indicating that more water is required in the reservoir.
It is recommended to use the “ON/OFF” button to turn off the unit first, then fill water up to the Maximum level mark before pressing the “ON/OFF” button again to restart the unit.
Allow the refrigerant liquid inside the compressor to settle for at least 3 minutes before restarting the unit.
When the Ice Full Indicator is On6. The ice cube maker automatically stops working when there is no room for more ice in the unit and the “![]() ” ice full symbol will be shown on the display.
” ice full symbol will be shown on the display.
Harvesting Ice Cubes7. Put your ice cube container on the drip tray, press the “ICE” button one time on the control panel (Button B). The “![]() ” symbol will show on the display, then the ice cube pushing spring will start to rotate pushing ice cubes out of the unit.Press the “ICE” button again, to stop this.
” symbol will show on the display, then the ice cube pushing spring will start to rotate pushing ice cubes out of the unit.Press the “ICE” button again, to stop this.
6
Dispensing WaterDefault time of water flow: 10s.
8. Put your water cup on drip tray and press the “WATER” button once on control panel (Button C). The water will flow out from middle water tap, the “![]() ” symbol will display and “10s” will display in the TIMER delay section. After 10 seconds, the “
” symbol will display and “10s” will display in the TIMER delay section. After 10 seconds, the “![]() ” symbol disappears, and water dispensing will finish. If the water flowing time is too short or too long, you can manually change this.
” symbol disappears, and water dispensing will finish. If the water flowing time is too short or too long, you can manually change this.
To change the dispensing time, press the “WATER” button for more than 5 seconds. “10s” will appear in the display. Press the “SELECT” button to select the suitable time range from 7 seconds to 25 seconds. After 5 seconds of not pressing anything, the setting will save, and the new digit will disappear and be remembered. Next time you dispense water, it will pour for the new set time.
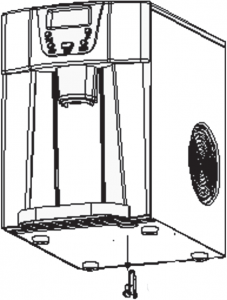
Draining Water9. When you clean the unit’s internal parts or change the drinkable water, you need to drain out the remaining water in the water reservoir by unplugging the water drain cap located at the bottom of the unit, near the water drip tray.
The water will flow out from the unit completely. You can connect a soft plastic tube to help guide the draining water.
10. Change water in the water reservoir for every 24 hours to ensure a reasonable hygiene level. If the unit isn’t to be used, drain all water and dry the water reservoir.
7
Timer SettingTimer delay time range: 0.5-19.0 hours.Default delay time: 1 hour.When the unit is running, you can activate the OFF-TIMER to turn off the unit after your timer ends.When the unit is on standby, you can activate the ON-TIMER to turn the unit on after your timer ends.
How to set the timer
Press the TIMER button first, the default delay time is 1.0 hour which is displayed on the LCD display window, then press the SELECT button to select your desired delay time.
Press SELECT button one time, the delay time will increase 0.5 hour, but if you constantly press the SELECT button then the delay time will change very quickly. During the process of delay time adjustment, the letter “H” will flash, then after 5 seconds of flashing without pressing any buttons, the “H” letter will become steady, means the timer program has been completed.
How to cancel the timerWhen a timer has been activated, press the TIMER button, then the delay time digit and “H” letter display will disappear, meaning the timer set has been cancelled.
Timer delay time
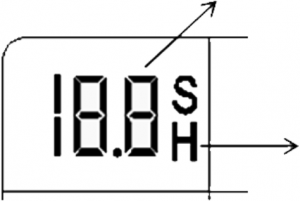 Means Hour, and timer setting duration
Circuit Diagram

8
Cleaning & Care
Before using your ice cube maker, it is strongly recommended to clean it thoroughly.
Unplug the unit before cleaning or performing maintenance.
- Take out the accessory parts under top window.
- Clean the interior with diluted detergent, warm water and a soft cloth. First, pour the warm water with diluted detergent into the internal water reservoir and the space below the transparent window and then use the soft cloth to wipe the surface.
- Use water to rinse the interior parts and drain out the water by unplugging the drain cap on the bottom.
- The exterior should be cleaned regularly with a mild detergent solution and warm water.
- Dry the interior and exterior with a soft cloth.
- When the machine is not in use for a long time, open water drain cap to drain water completely from water reservoir.
Warning: Fill with potable water only.Note: Gas inside the unit is flammable.
Specifications
Protection type IClimate type N /SN/ST/ TPower 220-240V/50HzIce making current 0.8AIce harvest current 1.0ARefrigerant R600a/23gVesicant C5H10Net Weight 9.5kgEnclosure Plastic
Troubleshooting
| Problem | Possible cause | Solution |
| “ |
Water reservoir is low. | Stop the ice cube maker, fill water and press “ON/OFF” button again to restart the unit. |
| “ |
There is too much ice. | Remove some ice from the chamber |
| No ice cube inside. | There may be an obstacle or some dirt affecting the internal sensor. Remove the obstacle and clean the unit. | |
| 1 |
Ambient temperature sensor breakdown | The unit can still work but suggested to contact Kogan.com Support or an electrical technician to replace with a new sensor. |
9
| The ice cube maker doesn’t reset normally. | Contact Kogan.com or a qualified technician to check the problem. | |
| Ice cubes on the evaporator stick together. | The ice making cycle is too long. | Stop the ice cube maker and restart it after the ice blocks melt. Select small sized ice cubes. |
| Water temperature in inner tank is too low. | Change the water in the inner tank. Temperature of water is better if set between 7°C-32°C. | |
| There are ice cubes inside the unit, but it can’t dispense the ice cubes when you push the “ICE” button. | Moving shaft for the ice cubes is blocked. | Release the button for 3 seconds and push the “ICE” button again. |
| Ice making cycle is normal, but no ice is made. | Ambient temperature or water temperature in inner tank is too high. | Please run the ice cube maker below 32°C and pour colder water into tank. |
| Refrigerant liquid leakage. | Verify with a qualified technician or contact Kogan.com. | |
| Pipe in the cooling system is blocked. | Verify with a qualified technician or contact Kogan.com. |
Disposal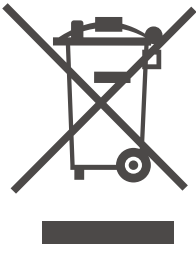 This marking indicates that this appliance should not be disposed with other household wastes. To prevent possible harm to the environment or human health from uncontrolled waste disposal, recycle it responsibly to promote the sustainable reuse of material resources.
User manual is subject to change without notice. For the latest version of your user manual, please visit https://www.kogan.com/usermanuals/
10
[xyz-ips snippet=”download-snippet”]