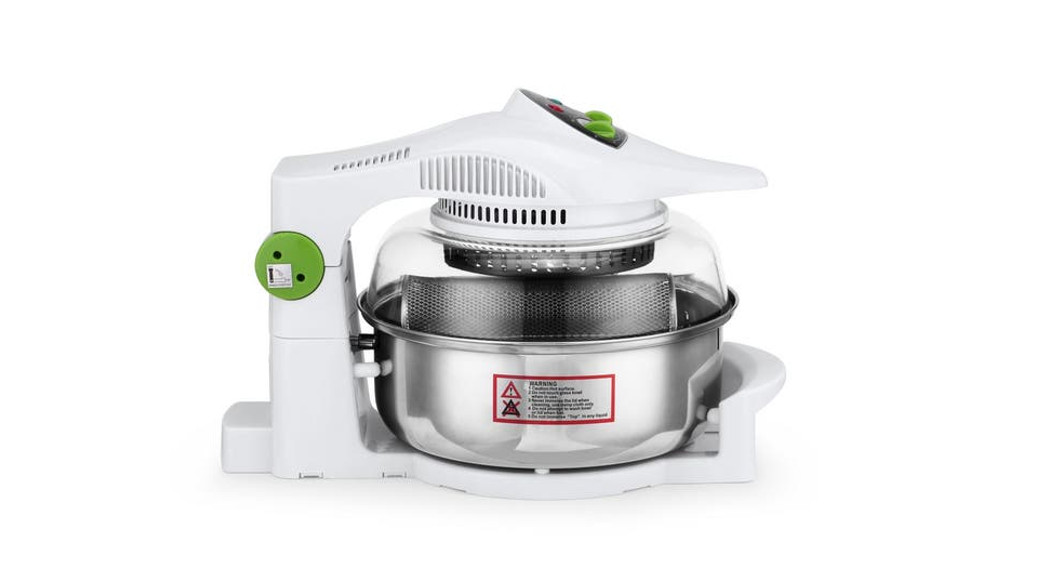
![]() User Guide12L ROTARY AIR FRYERKA12RTAIRFA
User Guide12L ROTARY AIR FRYERKA12RTAIRFA
SAFETY & WARNINGS
Please handle this product with care and inspect it regularly to ensure it is in good working order.If the product, power supply cord, or plug shows any signs of damage: stop use, unplug, and contact Kogan.com support.
- Read all instructions before using the appliance and retain this guide for reference.
- Be sure to use on a heat-resistant and even surface, such as a heatproof mat. Do not place directly on a benchtop. Keep the appliance at least 30cm away from the wall, furniture, or other flammables.
- Never place food directly on the bottom of the bowl, as the bottom of the food will not cook evenly. Always use a rack or pan when cooking. Note: Most pans can be used in this oven if it is a baking pan and fits comfortably inside the bowl.
- Do not touch hot surfaces. The temperature of the outer surface can get very hot while the appliance is in operation. Always use oven gloves when handling hot materials and allow metal parts to cool before cleaning. Allow the appliance to cool thoroughly before removing parts. Always use the handles when moving the appliance.
- Do not use the appliance for other than its intended indoor household use.
- To protect against the risk of electric shock, do not immerse this appliance, cord set or plug in water or any other liquid.
- The appliance is not intended to be operated by means of an external timer or any type of separate remote control system.
- The use of accessories that are not recommended or supplied by Kogan may cause fire, electric shock, or injury.
- Do not use an extension cord unless completely necessary with this product. If an extension cord is used please ensure that it has a rating equal or exceeding the rating of this appliance.
- Do not pull or carry by cord, use cord as a handle, close a door on the cord or pull cord around sharp edges or comers. Keep cord from heated surfaces.
- Do not bend or damage the power cord.
- Always unplug the appliance when not in use. To disconnect from the power supply, grip the plug and pull from the outlet. Never pull by the cord. The plug must be removed from the outlet before cleaning, servicing, maintenance or moving the appliance.
- Never force the plug into an outlet.
- Do not place the appliance near a hot gas or electric burner.
- Do not cover the appliance while in use. If it is covered, there is a risk of fire.
- Improper installation may result in the risk of fire, electric shock, or injury to persons.
- If the power cord or plug is damaged, do not use the appliance.
- The appliance has no user-serviceable parts contained within. Do not attempt to repair, disassemble or modify the appliance.
- Always operate on a dry-level surface. Operating on sinks or uneven surfaces must be avoided.
- Do not clean with metal scouring pads.
- Extreme caution must be used when moving an appliance containing hot oil or other hot liquids.
- Do not move or lift the appliance while the power cord is still connected to a wall outlet
- All metal items inside the bowl, such as the dual rack, can get very hot during cooking.Please be careful when removing these items from the appliance, always use the tongs supplied.
OVERVIEW
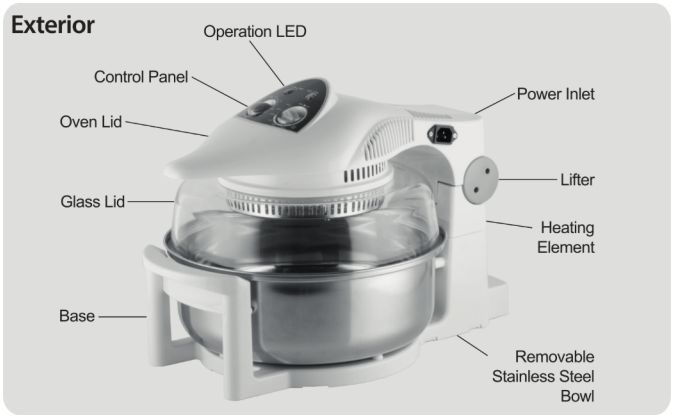
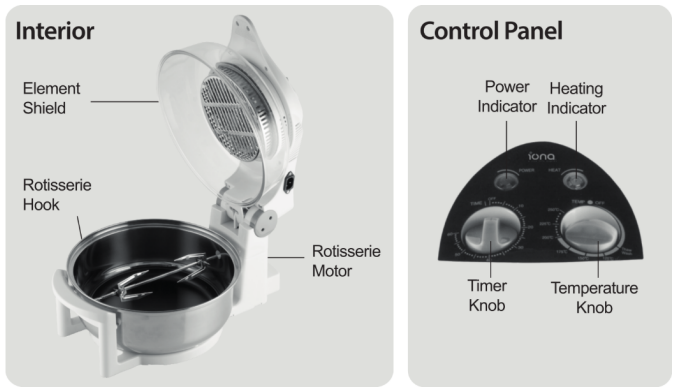
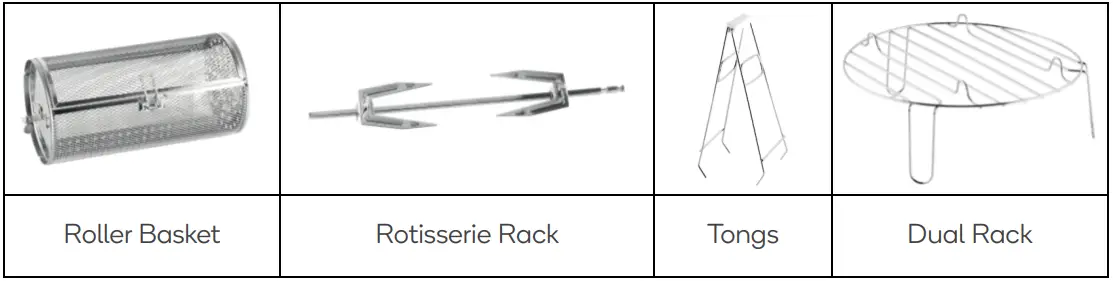
Accessories:
Note:The cooking accessories are securely stored in foam packaging during transit.Please check the packaging thoroughly to locate them, and do not throw out the packaging before the accessories have been removed.
Unpacking and first use:
- Unpack the appliance and all accessories from the packaging box.
- Select a level, heat-resistant surface to operate the Air Fryer on.
- Check all parts of your appliance before discarding any packaging materials.
- Peel off any adhesive label or stickers from your appliance where necessary.
- We recommend you keep the original box for storage and shipping purposes.
- Step 1: Wash the bowl and accessories in warm soapy water or in the dishwasher. Dry thoroughly before use. NEVER submerge the oven lid in water or any other liquid. Only the rack and stainless-steel bowl are dishwasher-safe.
- Step 2: Position the rack on the bottom of the bowl.
- Step 3: Connect the power cord to the wall outlet.
- Step 4: Fold down the oven lid.
- Step 5: Before first use, turn on the empty Air Oven, heating it at maximum temperature for 5 minutes. This will eliminate any odours from within the Air Fryer, and also burn off any excess lubricant that may have been used in the manufacturing process.
- Step 6: Allow the unit to cool to room temperature.
- Step 7: Wipe the inside of the stainless-steel bowl with a damp doth. DO NOT use abrasive cleaners or scouring pads.
- Note: A slight burning odour may be emitted during the first few uses. This is normal because the appliance is burning off the excess lubricants and will not cause any harm to you, your food, or the appliance.
OPERATION
General operation
- Before cooking, it is suggested that you spray a layer of oil on the cooking accessories to prevent sticking.
- Place the stainless-steel cooking bowl securely onto the base, ensuring it is placed centrally and sits securely.
- Position the cooking rack in the 5.5 bowls. The type of rack used will be dependent on the type of food being cooked. The high rack is best for grilling and broiling, crisping or cooking well-done meals. The low rack is best for baking, roasting etc.
- Once the food has been placed onto the rack, lower the top onto the stainless-steel bowl, ensuring the top sits inside the rim of the bowl.
- Plug into the wall socket and power inlet and power on. Adjust your cooking time and temperature by the timer and temperature knobs.

Note:Do not place food directly onto to stainless steel bowl, as this will result in uneven cooking. If the oven cover is open, the power supply will automatically be cut off.
Roller basket
The roller basket is ideal for cooking nuts, coffee beans, potato wedges and French fries etc.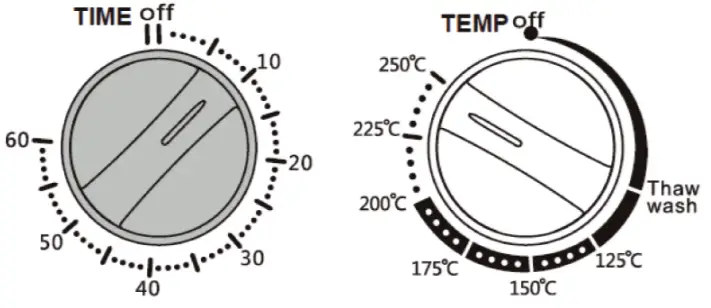
- Pass the rotisserie pin through the basket.
- Tighten the fastening screw to secure the basket.
- Place food into the basket and secure the cover.
- Insert the pointed end of the rotisserie pin through the hole in the pot and into the rotating shaft.
- Place the other end onto the L-ledge on the bowl.

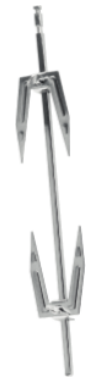
Rotisserie rack
The rotisserie rack is ideal for roasting chicken, turkey, leg of lamb and pork rolls etc.
- Tie up chicken wings and legs before roasting.
- On one end of the rotisserie pin, lightly secure the fastening fork.
- Insert the rotisserie pin through the chicken with the fork holding the chicken in place.
- Secure the other end with another fork.
- Insert the pointed end of the rotisserie pin through the SS pothole and into the rotating shaft.
- Place the other end onto the L-ledge on the bowl.
 Tie up chicken wings and legs before roasting.
Dual rack
The dual rack is a reversible high and low rack and it acts as a cooking stand to support the frying pan and basket. You can also place other bakeware or food on the dual rack.Place directly in a bowl according to food/bakeware height.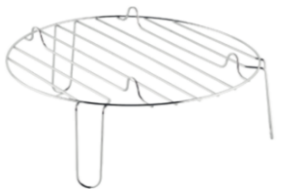
Roasting
Fix the chicken on the rotisserie: the food is cooked more evenly both inside and outside, without burning the surface.It is not necessary to use oil for roasting, but you may do so for foods that tend to become dry in an oven. Roasting time may vary depending on the type of meat or other food, type of cut, amount of fat, thickness and/or weight of the item.However, the cooking time of the air oven is generally 50% faster than a traditional oven.
Baking
Use any ovenproof baking dish, preferably non-stick that will fit comfortably inside the air oven. Place on the low rack. Take special care in baking, as desserts are especially delicate and easy to overcook. Lower the temperature slightly and turn the baking dish if too muchbrowning occurs in one area.
Steaming
You can steam vegetables at the same time you cook your main dish by placing the vegetables in an aluminium foil pouch: add a few drops of water and seal the pouch. You can also add a cup of water in the bottom pot, with savoury herbs and spices to steam fish or vegetables.
Frying
You can get the effect of deep-fried chips without oil, by spraying potato strips with some polyunsaturated cooking oil. The excess oil will drip away while cooking for healthier chips.To make delicious fried chicken, season the chicken pieces firstly with batter and cooking oil.The excess oil will drip away while cooking for healthier fried chicken.
Defrost
You can use the air oven to defrost frozen food more evenly than a microwave oven. Simply set the temperature to defrost and check the food every 5-10 minutes.
Cooking guide
Please note, the time and temperatures listed in the tables below are just for reference and may need to be adjusted for various food sizes or quantities, food manufacturer instructions and/or individual taste.
| Selection | Time (Mins) | Temperature (°C) | Function (Example) |
| Meat | 15 | 230°C | Roast/Grilling |
| Chicken | 18 | 250°C | Roast/Grilling |
| Fish | 15 | 200°C | Fillets / Whole |
| Cake | 10 | 220°C | Cake |
| French Chip | 15 | 250°C | French Chip |
| Pizza | 10 | 200°C | Pizza / Pies |
| Food | Time (Mins) | Temperature (°C) |
| Medium Prawns | 6-8 mins | 150-180°C |
| Sausages | 6-8 mins | 120-150°C |
| Toasted Bread | 5-7 mins | 120-140°C |
| Potato &Vegatables | 8-10 mins | 180-200°C |
| Chicken wings | 10-15 mins | 200-220°C |
| Hot dogs | 5-8 mins | 190-210°C |
| BBQ Spareribs | 8-12 mins | 220-240°C |
| Fried Chicken Pieces | 8-10 mins | 230-250°C |
CLEANING & CARE
Cleaning
- Always allow the appliance to cool completely before cleaning.
- Never immerse the lid into liquid.
- Always unplug the power cord before cleaning.
- It is imperative that the appliance be washed thoroughly after each use.
- Do not use any abrasive materials for cleaning.
Cleaning steps:
- Disconnect the power cord and allow the appliance to cool completely beforecleaning.
- Wipe the lid clean using a damp cloth rinsed in warm soapy water.
- Wash the bowl and any other accessories in warm soapy water.
- You can also clean the appliance with its automatic cleaning process. Add approx.5cm of cold tap water into the bowl with a squirt of dishwashing liquid. Set the temperature to 80°C and the time to 10 min to start the cleaning process to soften any stuck-on deposits. Accessories can be left in the bowl during this process to soften any deposit.
Storage
 report this ad
Ensure all parts are thoroughly cleaned and dried before storage.It is recommended to put the appliance back in the original box and store in a dry and clean area.
![]() Need more information?We hope that this user guide has given youthe assistance needed for a simple setup.For the most up-to-date guide for your product,as well as any additional assistance you may require,head online to help.kogan.com
Need more information?We hope that this user guide has given youthe assistance needed for a simple setup.For the most up-to-date guide for your product,as well as any additional assistance you may require,head online to help.kogan.com
[xyz-ips snippet=”download-snippet”]