
![]() User Guide
User Guide

8.2L DIGITAL LOW FAT 1800W AIR FRYERKA7LDGAFRYA
SAFETY & WARNINGS
Please handle this product with care and inspect it regularly to ensure it is in good working order.
If the product, power supply cord or plug shows any signs of damage: stop use, unplug and contact Kogan.com support.
- Read all instructions before using the appliance and retain this guide for reference.
- Be sure to use it on a heat-resistant and even surface, such as a heatproof mat. Do not place directly on a benchtop. Keep the appliance at least 20cm away from the wall, furniture or other flammables.
- Do not touch hot surfaces. The temperature of the outer surface can get very hot while the appliance is in operation. Always use oven gloves when handling hot materials and allow metal parts to cool before cleaning. Allow the appliance to cool thoroughly before removing parts. Always use the handles when moving the appliance.
- Do not use the appliance for other than its intended indoor household use.
- To protect against the risk of electric shock, do not immerse this appliance, cord set or plug in water or any other liquid.
- The appliance is not intended to be operated by means of an external timer or any type of separate remote control system.
- The use of accessories that are not recommended or supplied by Kogan may cause fire, electric shock or injury.
- Do not use an extension cord unless completely necessary with this product. If an extension cord is used please ensure that it has a rating equal or exceeding the rating of this appliance.
- Do not pull or carry by cord, use cord as a handle, close a door on the cord or pull cord around sharp edges or comers. Keep cord from heated surfaces.
- Do not bend or damage the power cord.
- Always unplug the appliance when not in use. To disconnect from the power supply, grip the plug and pull from wall outlet. Never pull by the cord. The plug must be removed from the wall outlet before cleaning, servicing, maintenance or moving the appliance.
- Never force the plug into an outlet.
- Do not place the appliance near a hot gas or electric burner.
- Do not cover the appliance while in use. If it is covered, there is a risk of fire.
- Improper installation may result in the risk of fire, electric shock, or injury to persons.
- If the power cord or plug is damaged, do not use the appliance.
- The appliance has no user-serviceable parts contained within. Do not attempt to repair, disassemble or modify the appliance.
- Always operate on a dry-level surface. Operating on sinks or uneven surfaces must be avoided.
- Do not clean with metal scouring pads.
- Remove all packaging materials before operating this appliance.
- Extreme caution must be used when moving an appliance containing hot oil or other hot liquids.
- Do not move or lift the appliance while the power cord is still connected to the wall outlet.
- This appliance is not intended for use by persons (including children) with reduced physical, sensory or mental capabilities, or lack of experience and knowledge unless they have been given supervision or instruction concerning the use of the appliance by a person responsible for their safety. Children should be supervised to ensure that they do not play with the appliance.
OVERVIEW
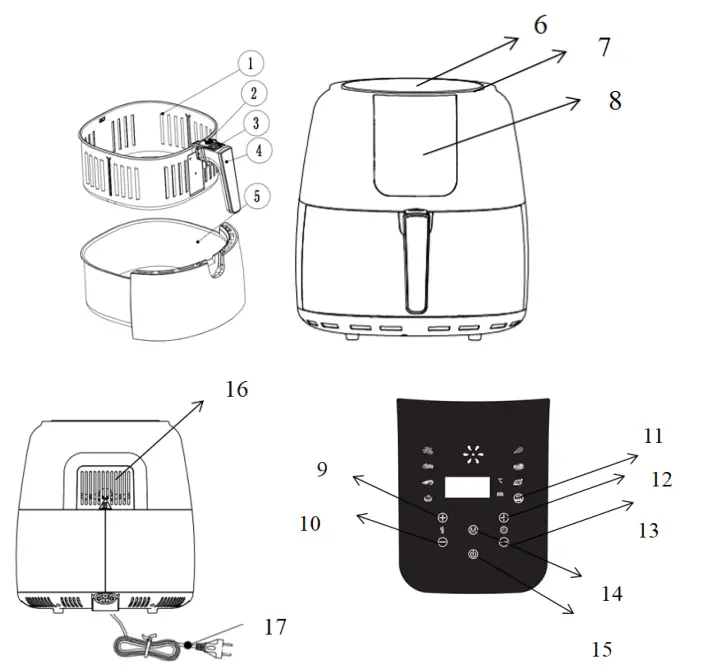
| 1. Fry Basket | 2. Protective Cover |
| 3. Push-Release Button | 4. Handle |
| 5. Fry Pot | 6. Upper Housing |
| 7. Air Inlet | 8. Control Panel |
| 9. Temperature Increase Button | 10. Temperature Decrease Button |
| 11. Menu Button | 12. ON/OFF Button |
| 13. Keep Warm Button (2 Hours) | 14. Time Increase Button |
| 15. Time Decrease Button | 16. Air Outlet |
| 17. Power Cable |
OPERATION
Before the first use
- Remove all packaging material.
- Remove all stickers or labels from the appliance
- Thoroughly clean the basket and the fry pot with hot water, some washing-up liquid, and a non-abrasive sponge.
- Wipe the inside and outside of the appliance with a moist cloth.
- Place the appliance on a stable, horizontal, and level surface. Place the item on a surface that is heat resistant. Place the appliance with good air circulation and away from the hot surfaces and any combustible materials.
- Place the basket in the fry pot properly, you will hear a “tang”. Slide the fry pot back into the appliance.
- This is an appliance that works on hot air. Do not fill the fry pot with oil or frying fat.
- Do not put anything on top of the appliance. This disrupts the airflow and affects the hot air frying result.
Turning on The Fryer
- Put the mains plug in an earthed wall socket and turn the power switch on.
- Click the ON/OFF button. The default display shows 180 degrees Celsius and 15 minutes.
Preheat Mode
- Click temperature increase/decrease button to set the temperature for cooking.
- Click the Time decrease button to set 5 minutes.
- Click the ON/OFF button once more to start cooking.
- When you hear the timer beep, carefully pull the fry pot out of the appliance and put it on a heat-resistant surface. Caution, the fry pot, and the basket are extremely hot. Only hold with the fry basket handle. You do not need to remove the fry basket from the fry pot at this stage.
- Carefully place the ingredients inside the fry basket (Attention: do not exceed the maximum line), slide the fry pot back to the appliance. Until you hear it click into place otherwise it will not turn back on.
- Never use the fry pot without the basket in it.
|
Food Preparation Guide (8 Modes) |
||||||||
| Food | Default | Fries | Ribs | Prawns | Cake | Drumsti cks | Meat | Fish |
| Cooking Time (Mins) | 15mins | 20mins | 15mins | 20mins | 40mins | 25mins | 20mins | 20mins |
| Temp. (°C) | 180°C | 200°C | 180°C | 160°C | 160°C | 180°C | 160°C | 180°C |
- Click the mode selection button to switch between each cooking mode. Otherwise, click the temperature increase/decrease button and the time increase/decrease button to choose the appropriate time and temperature.
- Click the ON/OFF button once more to start cooking.
- When you hear the timer beep, the cooking time has elapsed. Pull the fry pot out of the appliance and place it on a heat-resistant surface.
- Check if the ingredients are ready. If the ingredients are not ready yet, simply slide the fry pot back into the appliance and set the temperature and timer to a few extra minutes.
- If the ingredients are ready, carefully pull out the fry pot and press the basket release button and lift the basket out of the fry pot to remove the food.
- Do not turn the basket upside down with the fry pot still attached to it, as any excess oil that has collected on the bottom of the fry pot will leak onto the food.
- Empty the basket into a bowl or onto a plate. When a batch of ingredients is ready, the appliance is instantly ready for preparing another batch.
Tips:
- Add some oil to the dish for a crispier result.
- Shaking ingredients halfway during the cooking time will optimize the end result and can help prevent unevenly fried ingredients. To shake the ingredients, pull the fry pot out of the appliance by the handle and shake it. Be careful to avoid splashing hot oil or food. Then slide the fry pot back into the appliance. Do not press the basket release button during shaking.
CLEANING & CARE
- Before cleaning, turn the timer to 0, unplug the appliance and wait for the appliance to cool down. Don’t touch the surface before cooling.
- Never immerse the device in water or any other liquid. The device is not dishwasher-proof.
- Clean the surface of the fryer pot and basket with hot water, some washing-up liquid, and a non-abrasive sponge. If dirt is stuck to the basket or the bottom of the fry pot, fill the fry pot with hot water with some washing-up liquid. Put the basket in the fry pot and let the fry pot and basket soak for about 10 minutes.
- Used damp cloth to wipe the surface of the fryer. Never use harsh and abrasive cleaners, scouring pad, or steel wool, which damages the device.
- If you do not use the appliance for a long time, please clean it and store it in a cool and dry place.
TROUBLESHOOTING
| Problem | Possible Cause |
Solution |
| Does not work | The power cord has not been inserted into the power socket | Firmly insert the power cord into the grounded power socket |
| Did not set the cook mode | Click the mode selection button to select the appropriate cook mode, then click the ON/OFF button | |
| Didn’t click the ON/OFF button after selecting cook mode | Click the ON/OFF button | |
| Food is raw when time out | Too much food in the basket | Fry food in turns |
| The temperature set is too low | Set to an appropriate temperature, re-fry food | |
| Cooking time is short | Set an appropriate cooking time, re-fry food | |
| Did not fry food evenly | Certain foods need to be shaken in the middle of cooking | In the middle of the cooking process, pull the fry pot out and shake it to separate the overlapped food material, then push the fry pot back to continue |
| Fried food is not crisp | Some food materials have to be fried with oil | Plush a thin layer of oil on the surface of the food first, then start to fry them |
|
Cannot smoothly place the fry pot back to the appliance |
The fry pot is too heavy from the food | The food material in the basket must not exceed the maximum line |
| The basket is not correctly placed in the fry pot | Press the basket into the fry pot | |
| Handlebar stuck | Place the handlebar in a horizontal position | |
|
Smoking |
Frying oily food | Normal phenomenon |
| Fryer contain oil from last use | Please clean the fry pot and basket after use |
SPECIFICATIONS
| Rated voltage | 240V |
| Rated frequency | 50Hz |
| Rated power | 1800W |
| Fry basket capacity | 7.2L |
| Full pot capacity | 8.2 |
| Net weight | 6.0kgs |
| Product size | 337 x 493 x 369mm |
 report this ad
Disposal
 |
This marking indicates that this appliance should not be disposed of with other household wastes. To prevent possible harm to the environment or human health from uncontrolled waste disposal, recycle it responsibly to promote the sustainable reuse of material resources. |
NOTES
![]() Need more information?We hope that this user guide has given youthe assistance needed for a simple setup.For the most up-to-date guide for your product,as well as any additional assistance you may require, head online tohelp.kogan.com
Need more information?We hope that this user guide has given youthe assistance needed for a simple setup.For the most up-to-date guide for your product,as well as any additional assistance you may require, head online tohelp.kogan.com
[xyz-ips snippet=”download-snippet”]