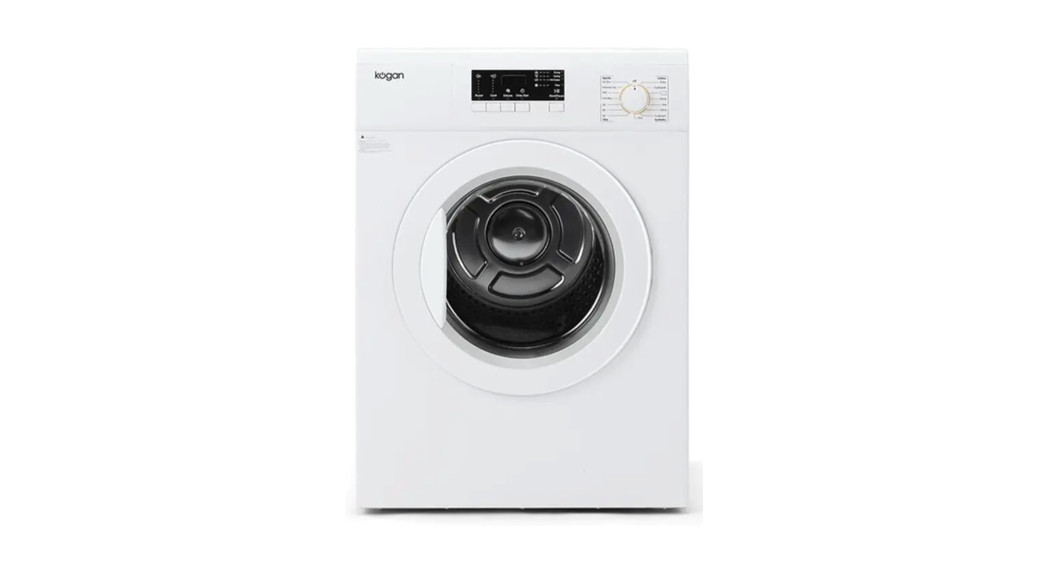
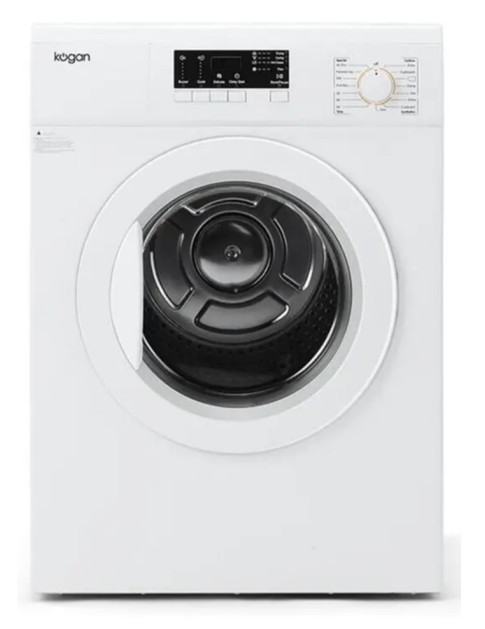
![]() 7KG VENTED DRYERKAGVNTDRY7AUser Guide
7KG VENTED DRYERKAGVNTDRY7AUser Guide
SAFETY & WARNINGS
Read this manual thoroughly before first use, the safety precautions enclosed herein reduce the risk of fire, electric shock, and injury when correctly adhered to. Retain this user guide for future reference. If applicable, pass these instructions on to the next owner.
- Do not attempt to repair this product yourself. If the product or its power supply experiences any malfunction or damage, cease use immediately and contact Kogan.com for support.
- This appliance is not intended for use by persons (including children) with reduced physical, sensory or mental capabilities or lack of experience and knowledge unless they have been given supervision or instruction concerning use of the appliance by a person responsible for their safety.
- Ensure children are supervised so that they do not play with the appliance.
- Ensure the lint filter is cleaned after every cycle and whenever prompted by the dryer.
- The lint filter and air intake filter should be washed frequently.
- WARNING: The appliance must not be supplied through an external switching device, such as a timer or connected to a circuit that is regularly switched on and off by a utility.
- Do not place naked flame sources, such as candles, on the appliance.
- Do not block any of the ventilation openings or allow them to be blocked by newspapers, tablecloths, curtains, etc. Do not install inside a narrow cabinet.
- Ensure there is adequate ventilation to avoid the backflow of gases into the room from appliances burning other fuels, including open fires.
- Do not dry unwashed items in the tumble dryer.
- Do not attempt to dry clothes that have been soiled with flammable liquids inside the dryer without washing them thoroughly by hand beforehand. Do not allow flammable or combustible materials such as gas, petrol, alcohol or lacquer in the appliance.
- If clothes that are dirtied in this way need to be dried, the hazard can be mitigated but not eliminated by washing first in hot water with extra detergent.
- Do not overload the dryer.
- Keep the drum clear of foreign objects and always remove items from clothing.
- The door window may become hot after a long drying cycle: keep children away.
- Install on a stable, solid surface.
- The final phase of the tumble dry cycle does not use heat (cool down cycle): this is to ensure items are not left at a high temperature and able to be damaged due to this.
- Wait at least 2 minutes after turning off the power supply before turning it on again.
- Ensure all packaging is removed from the dryer before first use.
- Follow instructions for use provided with any fabric softener.
- Do not dry items such as foam rubber (latex foam), shower caps, waterproof textiles, rubber-backed clothes, or pillows fitted with foam rubber pads.
- Do not use if industrial chemicals have been used for cleaning.
- Do not allow lint to build up around the tumble dryer.
- The power cord should only be replaced by a service agent authorized by Kogan.com in order to avoid a hazard.
- Should the appliance need to be moved, it must be transported vertically.
Electrical safety and cord handlingAlways follow basic safety precautions and accident prevention measures when using an electrical appliance, including the following:
- Voltage: Ensure your outlet voltage and circuit frequency correspond to the voltage indicated on the appliance’s rating label and your outlet socket is properly earthed. If this is not the case, do not use the dryer.
- Separate circuit: We strongly recommend you connect the appliance to a separate circuit serving only this appliance. This provides the best performance and prevents overloading the house wiring circuits that could cause a fire hazard from overheating.
- Electrical hazard: Do not insert any objects into the appliance.
- No extension cord: Do not use this appliance with a power adaptor or extension cord.WARNING: If such a device must be used, the cord or outlet must be positioned so that it is not subject to splashing or liquid ingress.
- Protect the power cord. Do not kink or damage the power cord. Position the cord out of the way so no one steps on or places anything on the cord or against it. Do not run the cord under floor coverings. Position the cord away from high traffic areas where it will not become a tripping hazard.
- Disconnect: Unplug the clothes dryer from the power supply after use, before cleaning, servicing or moving the appliance. To disconnect, turn the appliance off, switch off the power outlet and remove the plug from the power outlet. Grip the plug when disconnecting; do not pull on the cord. After disconnection, wait at least 2 minutes before turning the appliance back on again.
- RCD: Unless your home is already fitted with a residual current device (safety switch), we recommend installing an RCD with a rated residual operating current not exceeding 30mA to provide additional safety protection when using electrical appliances. Consultant an electrician for professional advice.
Usage conditions and restrictionsThis appliance is intended for indoor household use only. It is not intended for industrial, commercial or trade use. Do not use it outdoors. Do not use it for anything other than its intended purpose (drying domestic quantities of washing) and only use it as described in this manual.
Installation requirements:
- Do not install the appliance in a tight-fitting cabinet.
- Do not install it near heat sources such as radiators, heaters, air ducts or direct sunlight. If the clothes dryer is not wall-mounted, place it on a flat, firm, dry and stable floor in a well-ventilated area. Use the adjustable legs to assist in leveling the dryer if required. Do not place it on any soft material such as foam or plastic.
- Ventilation: Do not block any ventilation openings. Ensure that vents are not covered by newspapers, tablecloths, curtains, etc.
- Before use: Make sure to remove transport packaging from the rear of the dryer.
- Suitability for tumble drying: Only load suitable items into the clothes dryer.Always follow the instructions on garment labels.
- Preparation: Make sure all pockets having been emptied. Hard, sharp objects such as coins, safety pins, bra wires, nails, screws, lighters or matches must be removed as they can cause extensive damage to the dryer.
- No dripping water: All clothes must be thoroughly spin-dried before placing them in the dryer. Dripping water may cause an electrical hazard.
- No open flames: Do not place open flame sources such as candles on the dryer.
- Hot surface: The door window may be hot after a long drying cycle. Always ensure children are kept away from the machine.
- Repair: Except for the filters that require regular cleaning, this appliance contains no user-serviceable parts inside. Do not attempt to open, disassemble or repair it yourself; only have it serviced by qualified personnel.
- Liability: Improper use or installation may result in the risk of fire, electric shock, and/or injury. We assume no liability for any damages caused by improper use or handling or by any other non-compliance with the instructions in this user guide.
WARNING: Before loading the dryer, always ensure children or pets have not climbed into it. Do not overload the clothes dryer.WARNING: Any damage or malfunction resulting from foreign objects is not covered by your warranty and may lead to expensive repairs.WARNING: Never stop a tumble dryer before the end of the drying cycle unless all items are safely removed and spread out to allow the heat to dissipated.
Unsuitable Items:The items listed below are unsuitable for tumble drying. They can cause fire in the clothes dryer or extensive damage. Do not place the following items into the clothes dryer.
- Items containing foam rubber (also known as latex foam) or similarly textured rubber-like materials – when heated, these materials can spontaneously combust and cause a fire.
- Items that have been spotted or soaked with cooking oil or with highly flammable substances – these substances constitute a fire hazard. Highly flammable substances used in domestic environments include acetone, alcohol, petrol, kerosene, some stain removers, dry-cleaning solvents, turpentine, waxes, wax removers, and some hair care products. (This also includes items that have previously been cleaned or spotted with dry-cleaning solvents or other flammable or explosive substances.)
- Washing these items thoroughly beforehand in hot water with an extra amount of detergent will reduce, but not necessarily eliminate the hazard. The ‘cool down’ cycle of a clothes dryer should be used to reduce the temperature of the items.They should not be removed from the clothes dryer or piled or stacked while hot.
- Undergarments that contain metal reinforcements (such as underwire bras) – these parts can come loose during drying and damage the clothes dryer.
- Plastic articles such as shower caps or waterproof baby bibs.
- Rubber-backed articles, clothes fitted with foam rubber pads, pillows, galoshes, and rubber-coated tennis shoes.
- Fabric softeners or similar products, unless they are specifically recommended by the product manufacturer for use in a clothes dryer to eliminate the effects of static electricity.
Caution: Hot surface! Do not touch the air intake during a drying cycle: it will be hot.
 Adequate ventilation has to be provided to avoid the backflow of gases into the room from appliances burning other fuels, including open fires.
This appliance contains no user-serviceable parts. If it suffers any failure or damage, cease immediately and contact Kogan.com for support after consulting the Troubleshooting section of this user guide.
OVERVIEW
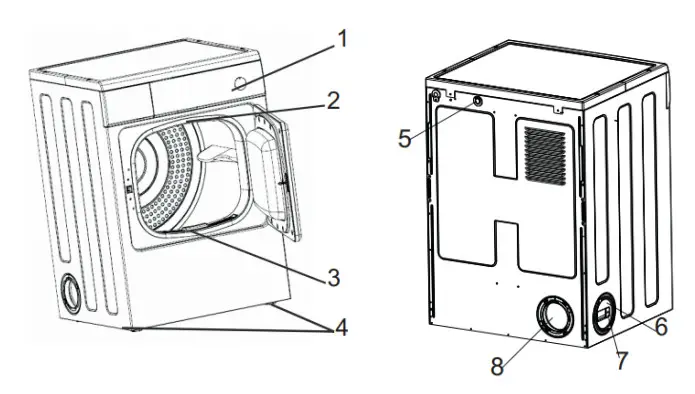
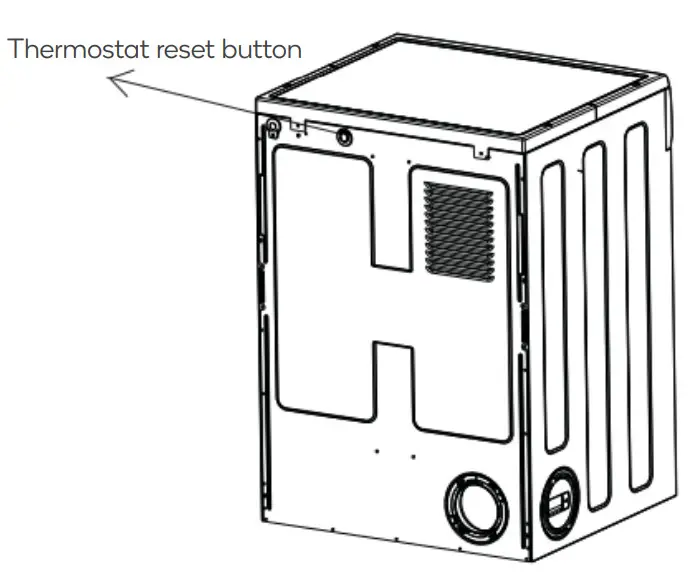
| 1. Control panel2. Drum light3. Filter4. Adjustable feet | 5. Thermostat reset button6. Side vent outlet7. Vent pipe cover8. Rear vent outlet |
Control Panel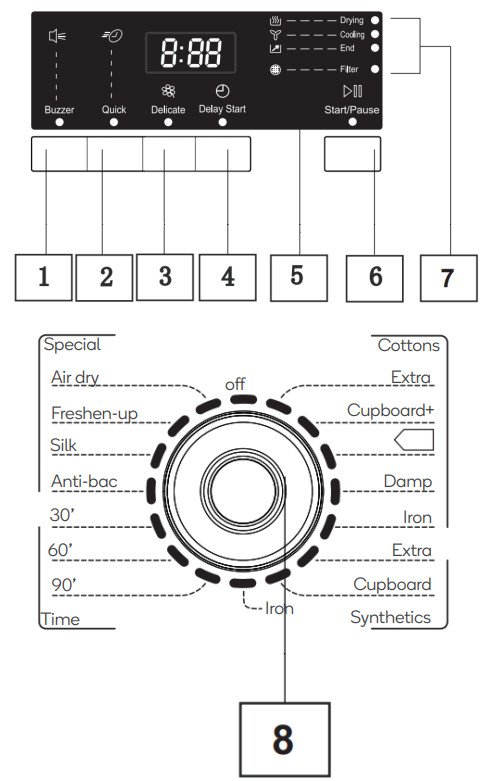
| 1. Buzzer2. Quick3. Delicate4. Delay Start5. Display6. Start/Pause | 7. Indicator lights• Drying• Cooling• End• Filter8. Program selector dial |
INSTALLATION
Location
- It is recommended that, for your convenience, the machine is positioned close to your washing machine.
- During operation, the tumble dryer will expel a certain amount of warm, moist air that should be removed from the room as quickly as possible to prevent condensation. In an extremely well-ventilated room, this may occur naturally. However, in general, it is recommended to vent the dryer’s exhaust outside via the supplied vent hose.
- The vent should be installed ending either temporarily at an open window or permanently at a fixed ventilation grille, fitted to an exterior wall or window.
- The tumble dryer must be installed in a clean place, where dirt does not build up.Ensure there are no obstructing items or material (paper, rags etc.) near the air intake louvers.
- To keep vibration and noise to a minimum when the dryer is in use,it should be placed on a firm, level surface placed on a firm, level surface.
Important: The hot air emitted by the tumble dryer can reach temperatures of up to 60°C.The appliance must there not be installed in floors that are not resistant to high temperatures.Note: If the floor is uneven, adjust the adjustable feet. Do not place any wooden pieces or other objects under the feet to try level the dryer.Level adjustmentWhen pushing down on the edges of the dryer’s top plate, the machine should not move at all. If the machine rocks, adjust the feet.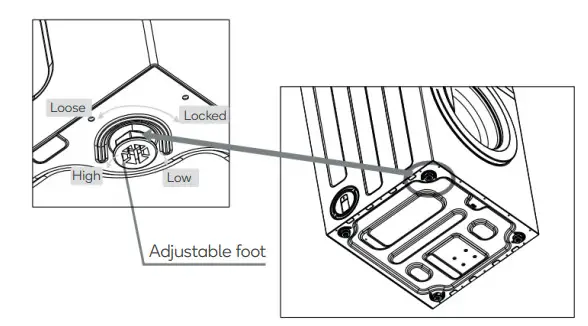
- Loosen the locknuts.
- Rotate the adjustable feet clockwise to lower the dyer.
- Rotate the feet counter-clockwise to raise the dryer.
- Tighten the locknuts after ensuring the dryer is level.
Note: The locknuts must be tightened after adjustment. Any looseness can cause vibration and noise.The feet must never be removed. Do not place the dryer on deep pile carpets, strips of wood, or similar. This might cause heat build-up and interfere with the operation of the appliance.
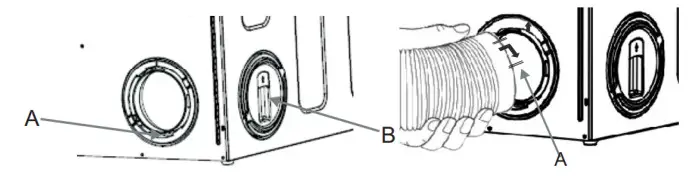
Installing the vent hoseTo accommodate for different dryer, installations, the supplied vent hose can be installed into one of two different vent outlets. One is located on the rear of the dryer, the other is on the left-hand side.
- Connect the vent hose to the outlet by removing the ring nut (A).
- Align the arrows on the hose and outlet and secure the hose in place by rotating in a clockwise direction while pushing in firmly.
- The unused vent will need to be sealed using the supplied snap cover (B).
Tips:If the hose is long and the room temperature is low, the moisture might condense inside the hose. This is an unavoidable natural phenomenon. To prevent this water from collecting in the hose or flowing back into the tumble dryer, it is advisable to drill a 3mm hole in the lowest point of the hose (B) and placing a small container below it.

- Once connected to the dryer, run the vent hose to the desired outlet point, ensuring it contains no more than two bends. If the hose is to be permanently attached to a wall/window grille, please consult your local hardware store to obtain the necessary fittings and installation advice.
- Never attach the vent hose to a range hood or a chimney designed to carry the exhaust from a fuel-burning appliance.
- In order to prevent the appliance from overheating, it is important that the steam exhaust is unobstructed.
- Ensure that the vent hose is not squashed. If the hose is partially squashed, drying efficiency will be reduced, resulting in longer drying times and higher energy consumption.
- If the hose is completely squashed, the safety cut-outs on the dryer may cause the dryer to turn off.
OPERATION
Before First Use
- Ensure that the electrical connection complies with the specifications found on the dryer’s rating plate.
- Remove the polystyrene block and any other packaging material from the drum.
- Before using your tumble dryer for the first time, we recommend that you place a few damp cloths inside the appliance and dry for 30 minutes. There may be dust inside a brand-new tumble dryer.
Daily Use
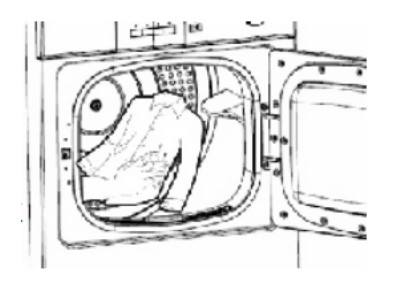
- Open the door.
- Place the laundry in the drum, one item at a time, shaking them out as much as possible.
- Close the door ensuring that nothing is caught between the door and filter.
Selecting a ProgramTurn the program selector dial to the required program. The corresponding light starts to flash. The program will automatically be switched off if there is no user input for 10 minutes. The program selector dial is divided into four sections: cotton, synthetics, time, and special.
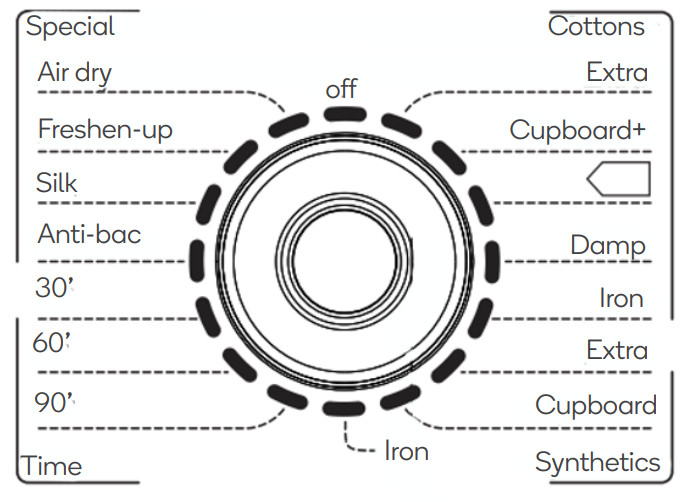
Note: “ ![]() ” is for the “standard cotton program”. The program is suitable to dry normal wet cotton laundry and it is the most efficient program in terms of energy consumption for drying wet cotton laundry.
” is for the “standard cotton program”. The program is suitable to dry normal wet cotton laundry and it is the most efficient program in terms of energy consumption for drying wet cotton laundry.
Automatic Controlled Drying The appliance detects the moisture in the load and automatically adjusts the drying time for optimal drying. Just select the program according to fabrics. This drying system will be active when selecting one of the following: cotton and synthetics sections, Anti-Bacterial and silk program.
Time Controlled Drying These programs can be used to add additional drying time when necessary. Select the 90 or 60-minute program for cotton or the 30 programs for synthetics. To cancel a program that is running, turn the program selector dial to “off”.At the end of drying, turn the selector dial to “off” to switch the machine off before removing the laundry.
Program Option ButtonsDepending on the program, different functions can be combined. These must be selected after choosing the desired program and before pressing the Start/Pause button. When these buttons are pressed, the corresponding indicator lights come on. Pressing the button again will cancel the option.Buzzer: Pressing the “Buzzer” button will enable or disable the dryer’s buzzer feature. By default, the buzzer is turned off. When the buzzer is on, the dryer will play a tone in the following situations:
- When pressing a button.
- At the end of a program.
Quick:The option can be selected in the following program: “Extra”, “Cupboard+”, “ ”. Selecting this option, the drying time will be reduced by 3-5 minutes.This option cannot be selected together with the “Delicate” option. Delicate:This option can be selected in the following sections: “Cotton”, “Synthetics”. Pressing this button allows drying to be performed at a lower temperature.This function cannot be used in combination with the quick-drying option.  Delay start: This button allows you to delay the starting of the program by 12 hours max. This option must be selected after having selected the program and before pressing the Start/Pause button. Every time the button is pressed, the time will increase in 1-hour increments.
Incorrect option selection:If you select an option that is not compatible with the program you have selected, the display shows ErS (error). This code will also be displayed during operation if you press one of the option buttons or the program selector.
Start/Pause:Press this button to start the dryer after having selected the program and the options. If the door of the appliance is opened while the program is running, this button must be pressed again after closing the door in order to restart the program from the point at which it was interrupted. In this case, the lights flash to remind you that the start button needs to be pressed again.
Indicators:These lights indicate the following functions:
| Drying | This indicates that the appliance is in the drying phase. |
| Cooling | This indicates that the appliance is in the cooling phase. At the end of drying, there is a 5 or 10-minute cooling phase to cool the laundry. |
| End of program | This indicator will turn on at the end of the cooling phase, during the anti-creasing phase. |
| Filter | Comes on after every cycle to remind you that the filter must be cleaned. |
Thermostat ResetIf during operation, the heating element isn’t working, the manual thermostat may need to be reset. To perform a thermostat reset follow the below procedure:
- Turn the program selector dial to the “Air Dry” position and press the start button
- Wait approximately 20 minutes and then press the thermostat reset button.
After Running a ProgramAll drying programs will end with a 5 or 10-minute cooling phase. If the laundry is not removed at the end of the cycle, the dryer will enter an anti-creasing phase (30 minutes maximum). If you do not remove the laundry, the dryer will stop automatically at the end of the anti-creasing phase. The display shows “End” and the buzzer sounds for 15 seconds if it has been enabled. Turn the program selector dial to the “off” position.Note: Ensure the lint filter is cleaned after every cycle and whenever prompted by the dryer.
Important!If the drying program has to be stopped before it reaches the end, we recommend that you turn the program selector dial to position “Air Dry” and wait until the end of this cooling phase before removing the laundry. This will avoid a build-up of heat inside the appliance. To do this first turn the dial to “off’ and then to “Air Dry” and press the “Start” button.
Modifying the ProgramTo change the program which is running, first cancel it by turning the program selector dial to “off”. Select the new program and press the “Start” button.
Suitable ItemsNever tumble dry the following particular items: net curtains, woolen items, silk fabrics with metal trim, nylon tights, bulky materials such as anoraks, blankets, sleeping bags,feather quilts and any items containing rubber foam or materials similar to rubber foam. Always follow the instructions on garment labels:
 |
Maybe tumble dried |
 |
Delicate drying (low temperature) |
 |
Normal drying (high temperature) |
 |
Do not tumble dry |
- Close pillowcases and covers with fasteners to prevent small laundry items from getting tangled inside them.
- Close press studs, zips and hooks and tie belts and apron strings. Sort laundry according to type and degree of drying required.
- Do not over-dry laundry.
- Avoid drying dark clothes with light-colored fluffy items such as towels as they could attract the fluff.
- The laundry must be thoroughly spun before tumble drying.
- Easy-care items should be briefly pre-spun before drying.
- Knitted textiles (knitted underwear) may shrink a little during drying. Do not over-dry items of this type.
- You can also place starched items into your However, to achieve the desired starched effect, choose the program “Iron dry”. To remove any starch residue, wipe out the internal drum after drying with a moist cloth and then rub it dry.
- To avoid a static charge when drying is completed, use either a fabric softener when you are washing the laundry or a fabric conditioner specifically for tumble
- Remove the laundry when the dryer has finished drying.
- If individual items are still damp after drying, set a brief post-drying time, at least 30 minutes, this will be necessary particularly for multilayered items.
- Ensure that no metal objects are left in the laundry (hair clips, safety pins, pins etc.)
Maximum LoadsTr y t o always load the maximum capacity of the machine as small loads are uneconomical. Use the below as a guide to help determine the correct load capacity for the type of items you are drying:• Cotton, linen: drum full but not too tightly packed.• Synthetics: drum no more than half full.• Delicate fabrics: drum no more than quarter full.
Common item weights:The following can be used as a guide to help determine your load capacity:
| Item | Weight | Item | Weight |
| Bathrobe | 1200g | Nightdress | 200g |
| Quilt cover | 700g | Underpants | 100g |
| Sheet | 500g | Button up shirt | 600g |
| Pillowcase | 200g | T-shirt | 200g |
| Tablecloth | 250g | Pajamas | 500g |
| Towe l | 200g | Tea towel | 100g |
Drying Program
| Section | Course | Max load | Description of program | |
| 6 kg | 7 kg | |||
| Cotton | Extra | 6 kg | 7 kg | Drying bathrobe, toweling towel, Jeans, work clothes. |
| Cupboard-f- | 6 kg | 7 kg | Dying bathrobe, toweling towel, Jeans, work clothes. | |
| 6 kg | 7 kg | Drying shirt, T-shirt, cotton trousers | ||
| Damp | 6 kg | 7 kg | Drying knitted items, cotton shirt. | |
| Iron | 6 kg | 7 kg | Drying sheet, bed linen, table linen, starched laundry | |
| Synthetics | Extra | 3 kg | 3 kg | For sheet, tablecloth, synthetics items. |
| Cupboard | 3 kg | 3 kg | For synthetics items | |
| Iron | 3 kg | 3 kg | For knitted items, shirt | |
| Time | 30′,60′,90′ | 6 kg | 7 kg | Drying thick or multi-layered textiles, e.g., terry toweling items. For drying individual items of laundry or for small volumes. |
| Specials | Anti-Bac | 4 kg | 4 kg | Underpants, winter clothing |
| Silk | 1.5 kg | 1.5 kg | For silk items | |
| Freshen-up | 3 kg | 3 kg | Underpants, a t-shirt. | |
| Air Dry | 6 kg | 7 kg | For refreshing or gently cleaning textiles. |
If the weight of the laundry is less than 1 kg, it is more efficient to use the “Time controlled Drying” program.
CLEANING & CARE
Disconnect the appliance from the power outlet before you perform any cleaning or maintenance.
Cleaning Interior & Exterior of Dryer
- Do not clean the dryer by directly spraying water onto it.
- Do not clean using benzene, thinner, alcohol or acetone as this may cause discoloration, deformation, damage, electric shock or fire.
- Clean the external surfaces of the dryer using a soft cloth with a solution of soap and water and then dry thoroughly.
- Do not use any type of spray cleaner when cleaning the interior. The drum can be cleaned with a damp cloth.
- Thoroughly dry and remove any residue before next operation
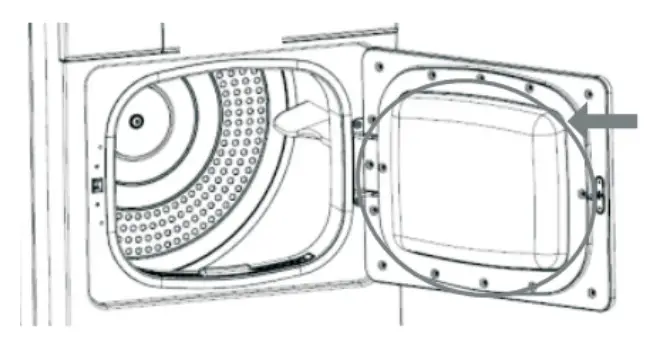
Cleaning the DoorThe door will need to be periodically cleaned to ensure the dryer is operating efficiently.Remove any lint build-up and wipe down the door glass using a soft cloth.
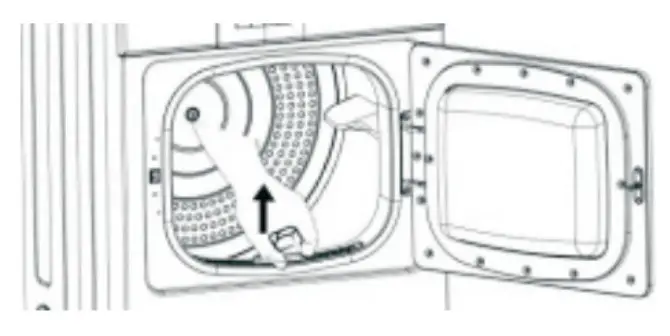
Cleaning the filter
- Open the loading door.
- Remove the lint filter by pulling upwards and out.
- Clean lint, fiber and cotton raveling by hand or with a soft piece of cloth.
- Close the lint filter and place it back into its housing.
Note:Ensure the lint filter is cleaned after every cycle and whenever prompted by the dryer.After continued use, a layer can build up on the filter pores and cause the filter to clog. Wash with warm water to remove this layer. Ensure the lint filter is completely dry before reinstalling it.
WARNING: Never use the appliance without the filter installed.
SPECIFICATIONS
| Dryer Capacity | 7kg |
| Power (standby mode) | 0.42W |
| Energy consumption at full load | 5.75kWh |
| Program time at full load | 217min |
| Dimensions (WxDxH) | 595x555x850mm |
| Depth (with loading door open) | 1030mm |
TROUBLESHOOTING
Some issues are caused due to lack of simple maintenance or oversights, which can be solved easily. Before contacting help.Kogan.com for support, please carry out the checks listed below.If the dryer encounters a problem during operation, the Start/Pause indicator light will flash. Once the problem has been eliminated, press the Start/Pause button to restart the program, if after all checks, the problem persists, contact help.Kogan.com for support.
| Issue | Possible cause | Solution |
| Dryer not turning on | •Mains plug is not plugged in.•Loading door is open.•Have you pressed the |
•Plug in at socket.•Close loading door.•Press the |
| Drying results unsatisfactory | •Wrong program selected.•Filter clogged.•Incorrect volume of laundry. | •Select a different program the next time you dry.•Clean lint filter.•Observerecommended loading volumes. |
| Drum light does not work | Light bulb is defective. | Replace light bulb. |
| Drying cycle ends shortly after the program starts. “End” light illuminated. | Not enough washing loaded or washing loaded is too dry for the selected program. | Select higher drying level (e.g., Heavy instead of Strong). |
| Drying cycle lasts an unusually long time. | Load volume is too big. | Reduce load volume. |
 report this ad
![]()
Need more information?We hope that this user guide has given you the assistance needed for a simple setup.For the most up-to-date guide for your product, as well as any additional assistance you may require,head online to help.kogan.com.
[xyz-ips snippet=”download-snippet”]