![]()
USER GUIDEkogan.com
GPS CAR HEAD-UP DISPLAYKAHUDQ7GPSB
OVERVIEW
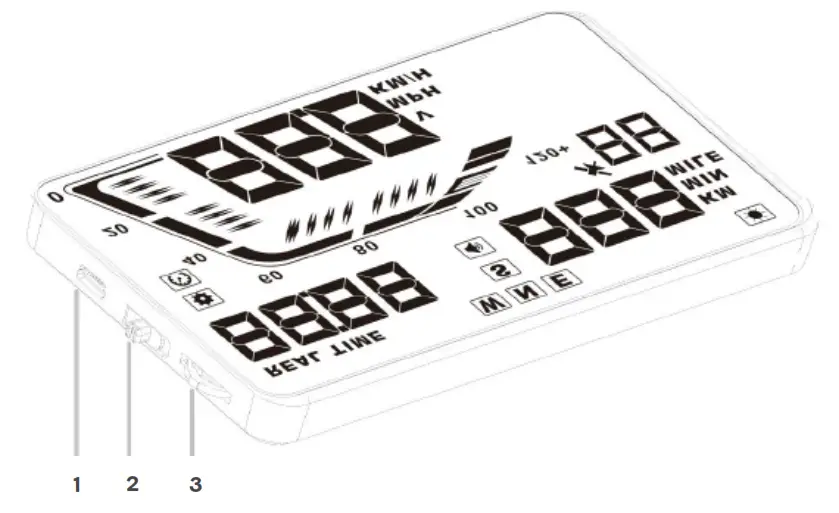
- USB charging port
- Power switch
- Input button
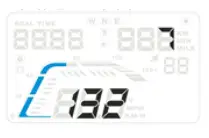
Display: (as viewed on windscreen)
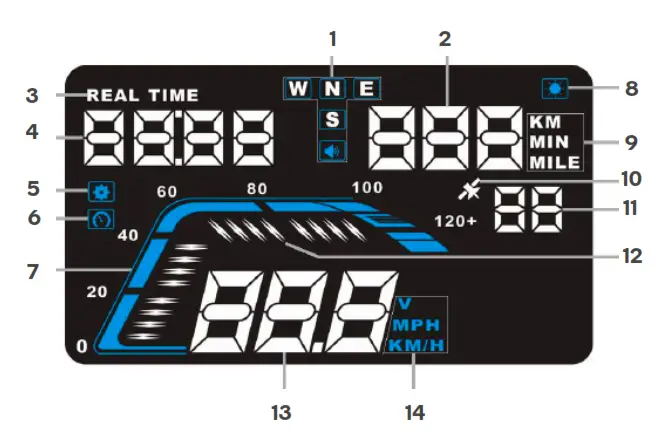
| 1 | Compass & buzzer indicator | 8 | Light sensor |
| 2 | Driving distance (KM/MILE) or driving time (MIN) | 9 | Unit of driving distance/time |
| 3 | Real-time indicator | 10 | Satellite indicator |
| 4 | Current time | 11 | Number of connected satellites |
| 5 | Settings indicator | 12 | Speed indicator |
| 6 | Speed alarm | 13 | Speed or voltage |
| 7 | Current speed | 14 | Unit of speed or voltage |
INSTALLATION
Before First Use
- Place the non-slip mat on the driver’s side corner of the dashboard and then place the head-up display (HUD) on it.
- Connect the charger to the USB charging port and plug it into your car’s 12V power socket (cigarette lighter).
- Place the power switch in the on position.Note: Once the HUD’s switch has been placed in the on position, it is designed to automatically power on and off with the vehicle’s accessory power.
- Start the engine and the HUD will power on and the satellite indicator will begin flashing.
- Once the HUD has located a satellite, the indicator will stop flashing and turn solid, the HUD is ready for use.
Reflective FilmThe HUD projects information up onto the windscreen. Due to the construction of your windscreen, the HUD may create a double reflection on the windscreen, which will make it difficult to read. If this occurs, install the reflective film.
- Spray some water onto the inside of your windscreen above where the HUD is installed. Clean the area with a dry cloth.
- Remove the backside (marked 1) of the film and apply to the windscreen.
- Ensure the film is installed in the correct location and adjust if necessary.
- Use a flat plastic object (credit card) to squeeze out any water or bubbles from behind the reflective film.
- Remove the protective film (marked 2).
- If the reflective film isn’t positioned to display all the vehicle information, adjust the position of the HUD and non-slip mat until it is correctly aligned.
OPERATION
HUD Buttons
- Power switch Power ON and OFF. ON is towards the USB input, OFF is towards the Input button.
- Input button The Input button is a three-way button used to navigate the HUD’s menu and adjust the settings.• Up: pull the button towards the driver• Ok: press the button inwards• Down: push the button towards the windscreen
Using the input buttonPress and hold the input button for 5 seconds to enter the menu. When finished adjusting the settings, press and hold the input button for 5 seconds to save changes and exit.
- Up: increases setting value
- Down: decrease the setting value
- Down and hold: turn alarm tone on or off
- OK: short press to change menu selection
- OK (when out of settings): toggle between KM, Time or Miles traveled.
MenuThe HUD receives data from satellites, GPS data such as speed or distance traveled may be slightly different to your car dashboard data. You can adjust the speed display on the HUD to get results closer to your dash information. To do this, you should drive at a stable speed such as 60km/h and note the difference between the speedometer on the HUD and in the car. Kogan.com recommends you have something to assist you with this so that you can pay full attention to the road.
For example, if you find that the HUD is 5km/h slower than your car’s speedometer, then you should change the value of the speed setting menu 0, as shown below, to 105.Note: This adjustment may need to be changed over time as your tires wear, or if you change components of your car such as tires, wheels or other drivetrain parts.
WARNING: Do not adjust the HUD settings yourself while driving. Have someone assist you or ensure vehicle is parked before making any adjustments.
|
Menu |
Parameter | Range | Explanation | Default |
Display |
| 0 | Speed | 50-150 | This setting allows you to adjust the reading on the HUD to match your speedometer. | 100 |  |
| 1 | Over-speed alarm |
30-250 |
Sets the speed at which your HUD will beep to alert you to your speed. |
112 |
 |
| 2 | Brightness | 0-2 | 0 = automatic
1 = darkest 2 = brightest |
0 | 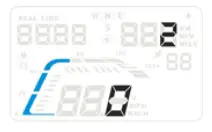 |
| 3 | Speed unit or battery voltage | 0-2 | 0 = km/h
1 = mph 2 = voltage |
0 | 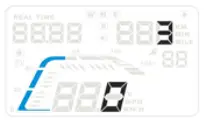 |
| 4 | Distance or driving time | 0-2 | 0= km travelled
1= driving time 2= miles travelled |
0 | 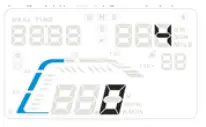 |
| 5 | Driving time or altitude | 0-1 | 0 = driving time 1 = altitude | 0 |  |
| 6 | Time zone | -12 – 12 | Time zone (from GMT -12 to GMT 12) | 10 | 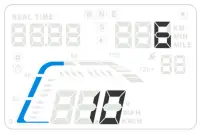 |
| 7 | HUD starting voltage | 0-150 | Sets the voltage that the unit will auto power on and off at. By default, the HUD will power on at 13.2V or higher, and power off when lower than 13.2V. |
132 (13.2V) |
 |
| 8 | Restore to factory setting | 0-1 | Set to 1, press and hold wheel for 5 seconds and returns to display interface | 0 |  |
TROUBLESHOOTING
HUD screen has no display/powerCheck that the power cable is plugged in securely to the HUD and to the cigarette lighter socket. Check that the HUD switch is in the ON position. If there is still no display, please try the unit in another car to test whether the vehicle’s 12V socket is supplying power. If your car is not supplying power, please consult with your car user manual or a qualified mechanic.
No speed, HUD powers off after 20 seconds or HUD will not automatically power on or off When the starting voltage is less than 13.2V, the HUD will not power on. If your engine is running and the HUD is still not working, please toggle the power switch on the side to turn it on, then hold the input button in for 5 seconds to enter into the settings menu. Once in the settings, navigate through to settings menu 7. Push or pull the button to adjust the voltage from 132 to 128 or lower. Try turning on your car again to see if the HUD now automatically turns on.
HUD will not automatically power off after the car is turned off The HUD is designed for a default voltage value of 13.2V. When the voltage is above 13.2V, it will automatically power on, then when it is lower than 13.2V is will automatically power off. If the HUD does not power off automatically, hold the input button in for 5 seconds to enter into the settings menu, then navigate through to settings menu 7. Adjust the voltage level to 135 or higher, then press and hold the input button for 5 seconds to save. Please note that the value shouldn’t be set too high, as the HUD will not automatically power on due to not receiving sufficiently high voltage.
Inaccurate speedWhen the HUD is powered on, press and hold the input button for 5 seconds to enter into settings. The menu 0 will show the parameter of 100 push r pull the input button up or down to increase or decrease the value according to the difference to your speedometer. For example, if your HUD reads 5km/h lower than your speedometer, change this to 105. If your HUD is 4km/h higher than your speedometer, change this value to 96. After making the adjustment, press and hold the input button for 5 seconds to save.
Overspeed alarmThe default value for the Overspeed alarm is 112km/h. Users can choose to increase/decrease this value. When the HUD is powered on, press and hold the input button for 5 seconds to enter into the settings menu, then navigate to menu 1. The parameter will display 112, which represents the speed at which the HUD will give an alarm once the car reaches that speed. Push or pull the input button up or down to set the desired speed, thenPress and hold the button in for 5 seconds to save.
Cannot see the HUD clearly in sunlightCheck whether the HUD protective film is torn and that the reflection film is positioned correctly. If this does not help you, press and hold the input button for 5 seconds to enter into the settings menu, then navigate to menu 1. The parameter will display 0, automatic adjustment. Change this to 2 for the highest brightness level, then press and hold the input button for 5 seconds to save.
Unit keeps crashing or showing bizarre or incorrect dataPlease do a factory reset on the unit.
SPECIFICATIONS
| Voltage | DC8 18-24V |
| Compass accuracy | ±1° |
| Working current | 40mA |
| Standby current | 15mA |
| 12V charger | 1000mA |
| Speed range | 0 – 400km/h |
| Dimensions | 130 x 78 x 15mm |
| Weight | 115g |
NOTES
Need more information?We hope that this user guide has given you the assistance needed for a simple setup.For the most up-to-date guide for your product, as well as any additional assistance you may require,head online to help.kogan.com
[xyz-ips snippet=”download-snippet”]